[Plugin] Hatchfaces (v1.8 beta) UPDATED 15-Dec-2012
-
-
About added features:
To put hatches in a layers(newly created OR selected) is possible, at least create a new layer. I was thinking of adding that anyway.
@unknownuser said:
If you do two hatches of the same face, is it possible to get both hatches in the same group.
It is a good idea, looking at how the plugin works right now. But it's risky business adding geometry inside groups, and you probably have to select the created hatchgroup before running. Wich in turn will not add that much improvement in workflow?
But if you really, REALLY want that feature... It won't hurt testing..My personal view is that I should rather investigate the possibilitie to improve the plugin with a "pattern library" instead. No promises can be made in that regard though. It seams difficult.
@unknownuser said:
TIG, kyyu, please do not leave jolran alone

TIG's been helping me a LOT! Through PM's and more, otherwise this plugin would not exist. KYuu fixed the spacing and that was mucho importante.
-
The layer part is easy. Add some code to make/refer to the layer
hatch_layer=model.layers.add("HATCH")
If it doesn't exist it's made...
Then after the group is made use...
group.layer=hatch_layer
Done
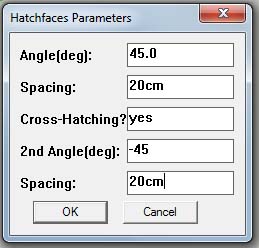
You could add a 'crosshatch' option to the main dialog, because most of the time that's what's wanted anyway - "Crosshatch? " >> "Yes|No" [you'd need to insert a 3rd ['','',["Yes|No"]] in inputbox moving the title over to 4th place] - default would be 'No'. If results[3]=='Yes' you'd repeat the line drawing steps within the same group entities, but at +/-90 degrees, so there would be twice as many edges overlaid etc...

How are the 'holes' going...

-
He he! As easy as that, huh?
 Well there you have it guys!
I will work on those things. And put an option of angle on second hatching. That would give you as much flexibility as
needed for linehatching I presume?The "holes"... Hmm difficult. I have been searching posts about that subject(Don't just want to add anything unless I actually understand what is going on). If I understood it right, holes are somewhat problematic in Sketchup. One have to
use both face.outer_loops AND face_loops to get to the face hole geometry? Where face_loops is innerloop? Or include.all loops? That is a big difference.In API it says: Face outer_loops retrieves a "face loop object" But what does that mean?
Edges, vertices? Both? Is it an array?For a newbie like me to interprate the API is quite difficult.
The posts in here are very helpful, but it takes time to search specific posts. There are currently around 146 pages * 25 * (number replies) in just the developper section.
So with that said, I am very greatful for your help TIG.
-
all_loops=face.loopsi.e. its is an array of all loops including the outer one
outer_loop = face.outer_loop inner_loops = all_loops - [outer_loop]
Although some of this is of academic interest as we only need all_loops...As I said before [in a PM]... you simply iterate through all loops and add a face for each loop using its vertices.
all_loops.each{|loop|gents.add_face(loop.vertices)}
You have the main face drawn... but with its holes filled in with other faces.
We can erase these by testing to see if each face in gents has an edge with only one face [i.e. it's NOT in a hole], if not then we'll erase it...faces2go=[] gents.each{|face| next if face.class!=Sketchup;;Face face.edges.each{|e| if not e.faces[1] break end faces2go << face } } gents.erase_entities(faces2go)[this code is untested and might have typos !]
Now you should have a perfect clone of the face inside the group with any holes reproduced too.
Do your intersecting of the hatch lines etc just as before and then when you erase 'faceless edges' the ones now crossing these 'holes' will be erased too
-
Great info! Will work on that.
Do you mean {|loop|gents.add_face
or {|loop|ents.add_face ?
Thank you TIG. Got me some homework

-
The 'gents' refers to the group.entities where we are replicating the face ?
-
Yes that make sence. I had already put a similar code from your pm in my editor where I had used ents.
That was wrong then from my part. Makes thing clearer. Thanks!

-
Strange. Should work, but no innerface is created.
Hatch gets created over whole face. I tried different combinations with
these new lines added, but get errors then..gp=ents.add_group() gp.name=name gents=gp.entities face=gents.add_face(face.outer_loop.vertices) # adds a faceclone from outer vertices loop faces2go=[] # was faces2gp? Typo? array for innerloups faces face.loops.each{|loop|gents.add_face(loop.vertices)} # creates inner loop gents.each{|face| next if face.class!=Sketchup;;Face face.edges.each{|e| if not e.faces[1] break end faces2go << face } } gents.erase_entities(faces2go) #erase the faces in the holes -
Try first adding the faces for the 'inner_loops' - each using loop.vertices in turn [i.e. face.loops-[face.outer_loop]], then add the face from face.outer_loop.vertices...
This might work... To see what you are getting stop the code temporarily before the inner faces are erased and before any hatching is done - add a line 'return nil' in the code so that it stops... You should get the faces reproduced in the group. Then try with the inner face erase bit to see if they go [sans hatching...]
-
Perhaps the thickness of the hatch lines should not be equal to the thickness of the edges? Like dimension lines.
-
Not noow Kato!!


I don't understand Sergey. Do you want line weight? That is only possible
through styles in Sketchup. But it's a global feature. I am afraid I can't do anything about that. Maybe if thin rectangles are grouped with materials
like TIG,s dashed lines. But that is further on in developement.Look at my last minitut for an example how you can use differnt styles, with edge profiles for ex.
Thanks for input Sergey! MUST CODE ON!!

And yes TIG. I'm trying!

-
This code gives me a face with holes. If I stop after this code.
But cannot Hatch faces with holes in full script.
Get an error
Normal (square faces) works fine in full script with the changed code, strange enough.gp.layer=hatch_layer # group to Hatching layer gp.name=name gents=gp.entities faces2go=[] face.loops.each{|loop|gents.add_face(loop.vertices)} gents.each{|face| next if face.class!=Sketchup;;Face face.edges.each{|e| if not e.faces[1] break end faces2go << face } } gents.erase_entities(faces2go) #erase the faces in the holes -
Why not?
How are you hatching?
Stop at each stage with a temporary 'return nil' and see what you get or error messages etc...
-
Tig this is brilliant, wanted this for so long.
-
Whether not too much I want?


-
jolran, a few suggests for you to consider.
-
Seperate out the code that draws the line pattern, into it's own method. That will make your main program simpler to understand. It will look more like an outline. Check out my later example code snippet. I just premade the line pattern, by hand, which would represent simply calling a method to make it. Also, you can reuse the draw_lines method, say if you want to draw a 2nd set in the criss cross direction.
-
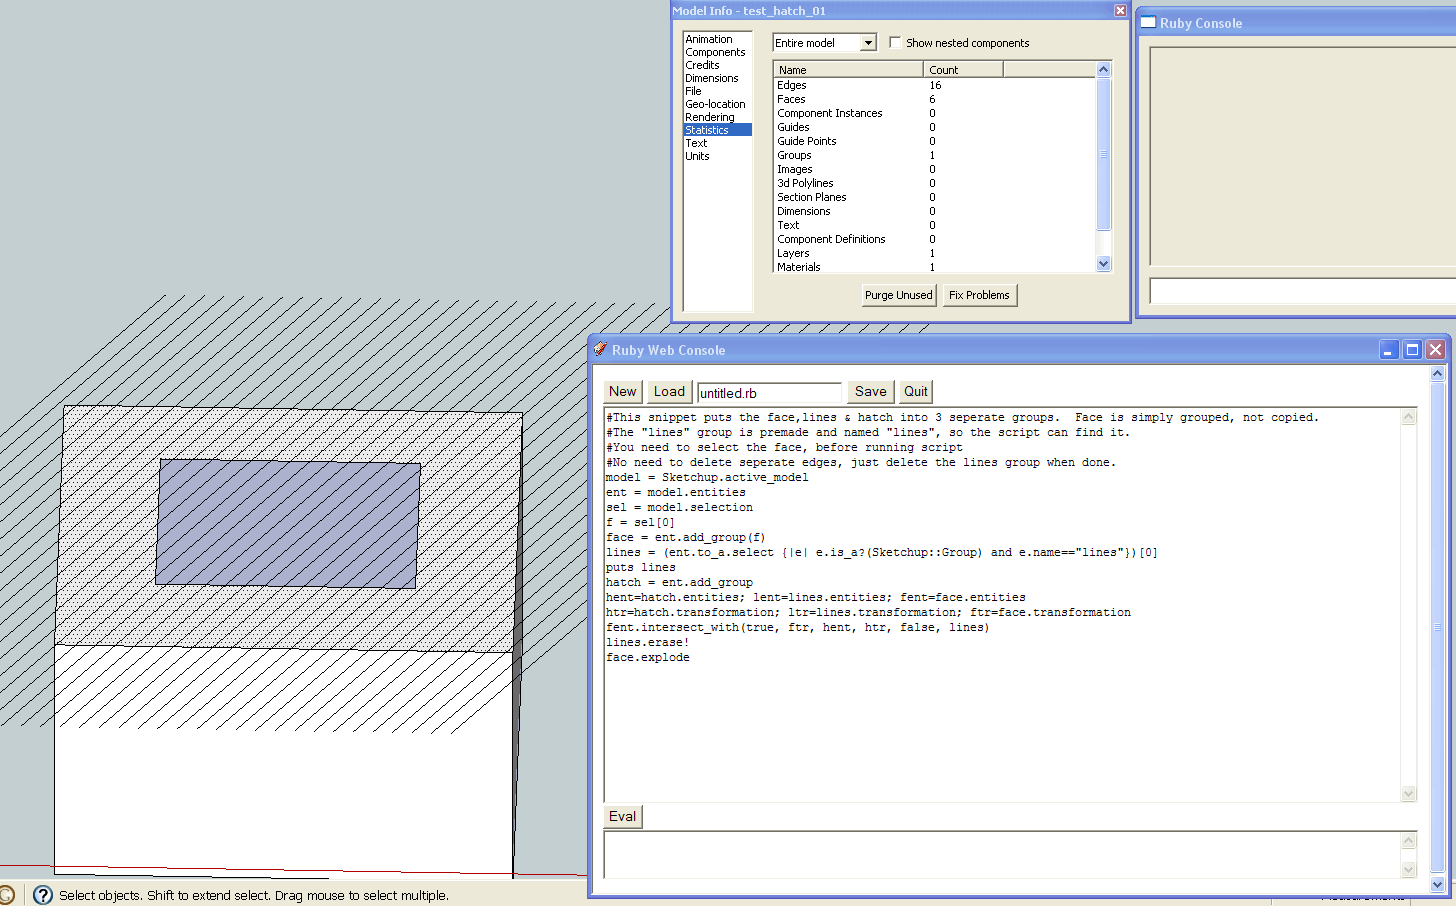
Might want to consider a rethink. The program will become more complicated, if you just keep adding stuff on top of exsiting. Here's a possible new way, shown below. And the way I test stuff quickly, is to use the "Ruby Web Console" plugin by Jim Foltz. I often check parts of my program, like this, as snippets of code; before adding it to the plugin. You simply undo <ctrl+z>, change the line(s) of code and execute the code again, by hitting the "eval button".
#This snippet puts the face,lines & hatch into 3 seperate groups.  Face is simply grouped, not copied.
#The "lines" group is premade and named "lines", so the script can find it.
#You need to select the face, before running script
#No need to delete seperate edges, just delete the lines group when done.
model = Sketchup.active_model
ent = model.entities
sel = model.selection
f = sel[0]
face = ent.add_group(f)
lines = (ent.to_a.select {|e| e.is_a?(Sketchup;;Group) and e.name=="lines"})[0]
puts lines
hatch = ent.add_group
hent=hatch.entities; lent=lines.entities; fent=face.entities
htr=hatch.transformation; ltr=lines.transformation; ftr=face.transformation
fent.intersect_with(true, ftr, hent, htr, false, lines)
lines.erase!
face.explode

test_hatch_RubyWebConsole.skp -
-
This is very useful, jolran. Thanks for making it happen.
-
wonderful!! This kind of plugin (hopefully someday with some extra hatch options) is really what I was missing in SU.
Many thanks to those involved!
-
Sergey, thanks for your suggestions
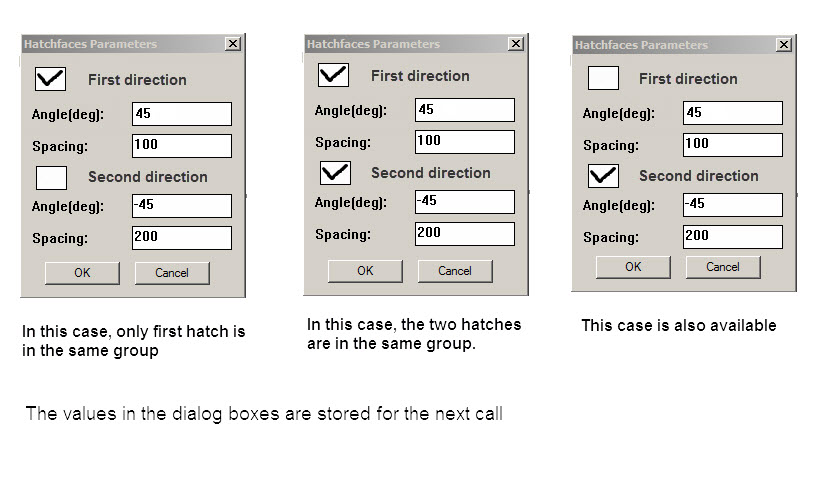
 I will probably go for something like the picture, first time around.
Unless I'm wrong you have to use webdialog for checkboxes, and I'll put that on hold for now.
More important issues to deal with first.Hi Kyyu. Many thanks for your input and experimenting. Really appreciate it

I got a strong impression from reading this forum, that making groupes from selection is a bad choice?
Thats why I neglected my original idea and went for TIG's "face.clone iterating stuff". Don't you get splats doing it like that? Have you tried this inside a group? I got constant splats doing almost exactly as you did.However grouping the edges before doing an intersect_with might be a good idea. That might actually be an easier method than iteration the edges for erasing? Depends on how "splat-prone" the method is.
About separating to 3 groups. Don't know if that is necessary? Doesent it suffice to add the hatches to a new layer? (Which is already implemented in my current code). This grouping In my opinion does no good for the workflow. Need more feedback about that, please

@unknownuser said:
Seperate out the code that draws the line pattern, into it's own method
Yeah, I know code's a bit messy, but doing a second hatching that is probably a must anyway.
I'm using AS ruby code editor. It's the same as Jim's no?Thank you Jim and Kaas! And TIG's been helping me a LOT, that goes without saying.

Advertisement
 ]
] 


