[Plugin] Hole Punching Tool
-
Cool tool -- thanks for creating and posting it, TIG! The more I experiment with it, the more impressed I become.
As a SketchUp newbie and a Mac user, I request that TIG please add the description of the correct Mac plugin folder location to the install instructions in the main post. I initially put my install in the wrong place. The menu items still showed, though I couldn't get them to work. (That may be because of my inexperience, rather than a limitation of the plugin.)
It took a bit of experimentation before I achieved components that punched through. I'm sure TIG's instructions are clear to people who know SketchUp better than I do. For the benefit of other newbies, here's how creating a punchable component seems to work in its simplest form:
- Use any drawing tool(s) to create a surface (circle, rectangle, doodle...). You can do this on the object you wish to punch, or elsewhere.
- Select the surface and delete it. This will leave you with a set of bounding lines.
- Select the bounding lines. (On a Mac, use the Select tool and double-click one of the lines. Unless you deleted a line and created a gap, this will select them all.)
- Select Make Component.
- In the dialog box, change the "Glue to:" selection from None to another option.
- Check the "Cut opening" checkbox.
- Make sure "Replace selection with component" is checked.
- Optional: give your component a descriptive name.
- Click "Create."
- If necessary, position your component using the Move tool.
- Select the component and right-click (Windows) or Option-click (Mac) to pop up a contextual menu.
- In the contextual menu, select Hole Punching... > Punch
If the bounding lines of your surface would be hard to select separately from the object you are punching (for instance, if you created a rectangle that shares an edge with the object you want to punch), make a component from your surface and its bounding lines by skipping Step 2 above. After creating your component, edit it by double-clicking it with the Select tool. Click the surface to select it, delete it, then close your component. You are now ready to punch a hole.
If you don't remove the surface from your component, the plugin WILL punch the hole... but you won't see it because the surface will hide it. Orbit to the other side of the object to see your hole.
Did I get that right, TIG?
-
Yes, but of course remember that you don't need to 'create' your cutting-components at all if you don't have to... there are many such components already available from Google and the 3dwarehouse [doors, windows, rooflights etc]. But sometimes making your own is necessary - especially for very simple or very complex things, as you are unlikely to get one of those 'off the shelf'...
Provided that a component has 'gluing/cutting' properties you can 'HolePunch' it... The component itself is not changed - any 'punched' instance is given special attributes and linked reveal geometry so they select and move together etc. Non-punched instances are exactly the same as they are is 'native' Sketchup. After punching you have choices to unlink - so the hole is no longer 'joined' to the component, unpunch - so the component no longer punches a hole, re-punch - necessary if you have swapped the instance for another component of a different size or shape and the punched reveals no longer match it, re-glue - useful if you have remade a face and its cutting components no longer cut it - select them, run re-glue and they cut the face again - then punch as desired; you can also change the punch depth - by default it's set at 500mm/20", which means it punches the hole in any walls/roofs thinner than this or in walls/roofs thicker it stops at the limit - this is really a safety-net, so that if you try to punch a single-skin wall the reveals don't extend over to the wall on the other side of the room as that'd be the first logical face it encountered! If you find you have walls thicker than the default then adjust the setting as desired, but be aware that large sizes run the risk if not all of your walls/roofs are 'twin-skinned'...On a PC or MAC if you can type/copy&paste this line of code into the Menu > Window > Ruby Console command line:
Sketchup.find_support_file("Plugins")
it will return the path to your own Plugins folder, where you should put your .rb scripts.
Note: for some scripts there are more complex files that come inside a zip-file, as well as .rb file[s] there are usually some more files inside a subfolder - extract them keeping their relative relationships and put the .rb file[s] etc and the intact subfolder into Plugins - never move files out of these subfolders, they must remain in there, you will break things otherwise!I note that you say the items were on the context menu but 'grayed'. The option to 'Set Depth' should always be active, but most of them are deactivated [grayed] and only become available if you have an appropriate selection - so Punch is activated if you have one or more cutting components selected [that have not already been punched!], Unlink/Unpunch/Repunch require the selection to be already components that are already punched, Reglue require cutting-component[s] to be selected...
There is also another cause for 'grayed' items in the context-menu. As more and more plugins were developed over the last few years it was realized that there is a finite limit to the number of 'commands' that can be added before some of them 'fail' and show gray when they should be active [you can often still run them from the equivalent list at the end of the Edit menu]. Some scripts were making multiple commands which exacerbated the issue. Authors have now fixed their scripts as far as I know, but there is still a limit, so if you have dozens of scripts loading at some point the context-menu will breakdown. If you find that you have items that are 'gray' when you are sure they ought to be 'active', and you have loads of scripts loading, then it's probably this issue... so you need to make a list of tools that appear in the menu, but are rarely used and disable them: if it's an Extension try and deactivating it; or rename its file in Plugins - so a script named xxx.rb >>> xxx.rb.TXT [only .rb/.rbs files will auto-load from Plugins] - so then when you restart Sketchup that item should have gone from the menu. If you find you do need that tool regularly then rename it back so it auto-loads once more; if you find you need it occasionally you can type this in the Ruby Console to load it just for that session -load "xxx.rb.TXT"where of course you use the scripts name in place of 'xxx'... Remember that you need to restart Sketchup to see the affects of these changes...
See http://forums.sketchucation.com/viewtopic.php?p=252413#p252413 for a context-menu-optimizer that might help too, but it won't solve the issue completely...

-
VERY helpful, TIG -- thank you!
Two more questions:
-
How does file size of a punched hole differ, if at all, from file size of a manually pushed hole? (As you know from Best practice for drilling multiple holes?, so you know I'm making components with zillions of holes in them, where small size differences add up.)
-
The default punched hole shows segments. How do I get it to show a smooth hole like SketchUp creates when I Push/Pull a circle?
Thanks so much -- Hole Punching Tool is a wonderful plugin, and the more I use it, the better I like it!
Joy
-
-
I think there should be no substantial difference in size.
The instance and reveal's geometry will have some attributes making that slightly bigger but the use of components as the instance will be smaller once you have more than a few of them...
At the moment the HolePunch alwats makes faceted holes - even if the cutting component has 'curves' as it's edge - BUT you can smooth the unwanted reveal edges by using the Erase+Ctrl and simply wipe over those edges so they disappear [unless you have View > Hidden-Geometry ON! when they will look 'dotted'].
It might not be too difficult to get the 'smoothness' to be replicated in the reveals - something I'd not thought of or had been asked about before watch this space...
 -
Hi TIG, I have never tried this plugin before, because I use other tools for windows in my models (that don't require sketchup). Having said that I am going to give this a spin, and if you could show me which file to change for an Italian localization i will be happy to make it for you

Nice job!!
-
To make [or edit] a locale file look in the
../Plugins/TIGtools/subfolder.
There are several #HolePunchTool...lingvo files.
Copy the base file #HolePunchToolEN-US.lingvo as #HolePunchToolIT.lingvo
for ITalian.
To find your exact locale 'code' type/copy&paste this in the Ruby Console
Sketchup.get_locale.upcase
This 'code' then goes on the end of the file's name, before.lingvoin place of 'EN-US'.
Edit the new file and you'll see lines of code like this:
Exiting.<==>Exiting.
The text to the left of the<==>is the hard-coded English version and to the right the translation - obviously in the English lingvo file it's the same words!
Change the right-hand side to your locale translation, keeping punctuation and spaces etc if any, so for an IT version you might have.
Exiting.<==>Verrà chiuso.
Complete your translations and then save the file.
When you restart Sketchup the tool should display in the locale language as it'll automatically find the new file.
If you find some text that's wrongly translated, then check the lingvo file and edit it.
If you find that some text has not translated, then check the lingvo file and fix it - if the text is not actually in the file then let me know as sometimes bits of hard-coded text and the lingvo text mismatch - although I think that this one is pretty solid. -
Here's v2.1 http://forums.sketchucation.com/viewtopic.php?p=271170#p271170
The input box code improved.
If cutting the defn has curved edges then the extruded reveals are now 'smoothed' to match. -
The file is empty.
-
No, it's not?
-
Excuseme is an error in my browser.
-
excellent plugin, thank you very much.
A consultation is possible that the contextual menu only is activated, when you right click the mouse on a component.? -
@jorge2011 said:
excellent plugin, thank you very much.
A consultation is possible that the contextual menu only is activated, when you right click the mouse on a component.?Most submenu items are only active [i.e. not gray] when there is an appropriate selection [e.g. cutting-component[s] that are not punched or ones that are punched activate different options - because you can't punch with one that's already punched and you can't unpunch one that's not been punched!].
See this post http://forums.sketchucation.com/viewtopic.php?p=350006#p350006 - as well as the notes on the main download page... -
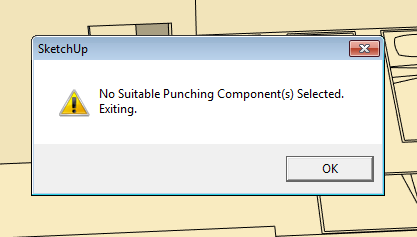
So Tig. . .I keep getting this. . .what constitutes a "suitable" component?
Not properly attired? No shoes? no shirt? no service?

-
A 'suitable' component has to be made to glue to a face and cut a hole in that face [z/blue axis out of the face] - that's a standard Sketchup thing. Of course it also has to have been glued onto a face! You can easily make a component with those behaviors, or by editing one later etc - imported hole-cutting window and door components are premade to have this gluing/cutting behavior.
The Hole-PUNCHING tool can then extend the component instance's hole-cutting behavior so that it continues its hole in the wall's outer face through to the inner face of the wall, with reveals etc...
Select one or more glued/cutting component-instances and run the tool and they will punch right through the wall.
If a wall is thicker than the maximum default of 20"/500mm you can reset it in a dialog, however all walls thinner that the limit will punch correctly, so adjusting this is rarely needed... -
Great. . .As a duly authorized green-badged Sketchucator deputy-- it shames me to say I have always sucked at hole-cutting components. I gotta get batter at that sort of thing.

Thks for the reply.
-
Got if fixed.
Thx,
D
-
thank you for the tool, sir.
-
hi,
i have a problem with this model with a component i made.
planned to use Hole Punching Tool on the component.
but i couldn't make it work well.
is there something that i missed here?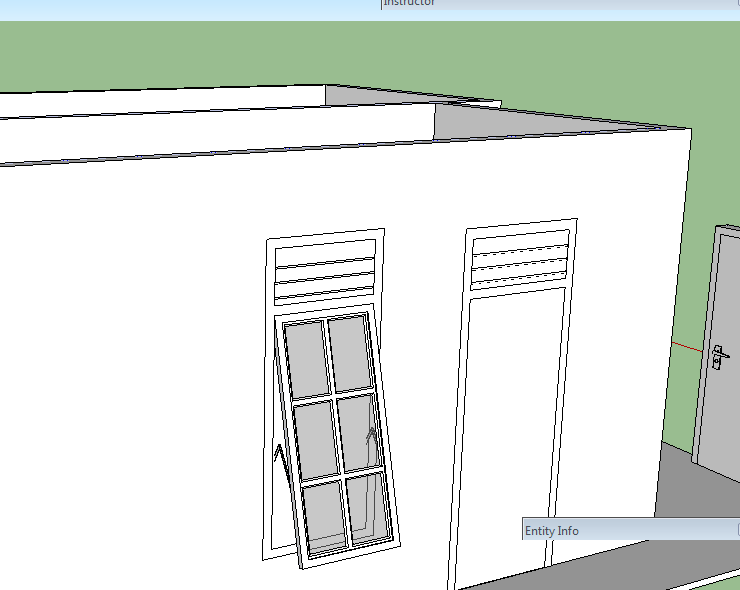
-
Irwan
For any component to be able to 'cut' a hole it needs a looped outline that is on the plane of the face onto to which it is 'glued'.
Examining your component#1 I see that it is an assembly of subcomponents - which in itself is not a bad thing... BUT as a result of that there is no continuous loop of edges on the face-plane; so although it 'glues' to a face, it doesn't 'cut' it, and because it doesn't cut it then it doesn't 'punch' through to any inner face either.
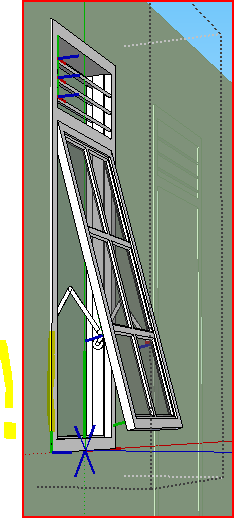
BUT don't despair - it's easy to fix this.You can edit the component whilst it is on the wall, select-all and move everything back a few mm so that the front-face of the window-frame are on the wall-face with the axes.
Now it will cut its hole in the face it is glued onto, and then it can also punch through to the inner leaf...Alternatively, IF you really want your window-frame to project slightly in front of the wall-face like you have made it currently, then you must add an extra set of lines around the outside of the frame so that there is then a rectangle on the wall's face that will be recognized as the 'cutting-loop' [and also form any 'punching-loop' too]. If you draw such a rectangle inside the component as raw geometry you will find it will make a face, which you don't want - select that face only and delete it, but leave the four edges in place to define the 'cutting-loop'...
-
@tig said:
Irwan
You can edit the component whilst it is on the wall, select-all and move everything back a few mm so that the front-face of the window-frame are on the wall-face with the axes.
Now it will cut its hole in the face it is glued onto, and then it can also punch through to the inner leaf...does that mean i don't have to explode the window so the window frame become able to provide looped outline?
actually, i've changed that to be a bit further off surface. after reading other post about HPT. if i'm not mistaken there are posts with "1 mm shift above surface"?
so, i don't have to shift the window above the surface about 1 mm?
here is the actual component i made. without that shift above the surface.
Jendela 6 Kaca Vent.skp
i'll see if i could understand the instruction, sir. i'll play with the model again.
Hello! It looks like you're interested in this conversation, but you don't have an account yet.
Getting fed up of having to scroll through the same posts each visit? When you register for an account, you'll always come back to exactly where you were before, and choose to be notified of new replies (either via email, or push notification). You'll also be able to save bookmarks and upvote posts to show your appreciation to other community members.
With your input, this post could be even better 💗
Register Login


Advertisement