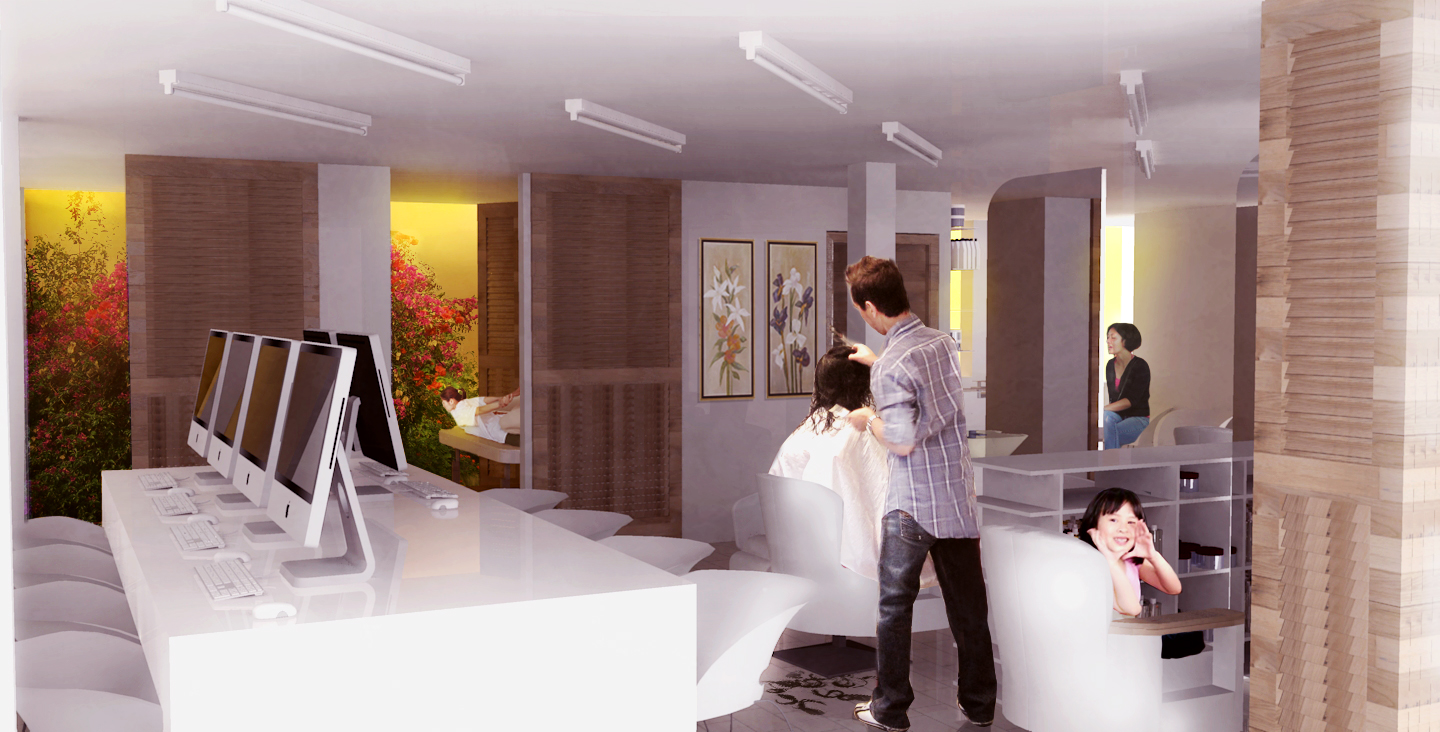
sketchucation logo sketchucation
    • Login
    1. Home
    2. swedishnitro
    3. Posts
    ℹ️ Licensed Extensions | FredoBatch, ElevationProfile, FredoSketch, LayOps, MatSim and Pic2Shape will require license from Sept 1st More Info
    S
    Offline
    • Profile
    • Following 0
    • Followers 0
    • Topics 10
    • Posts 44
    • Groups 1

    Posts

    Recent Best Controversial
    • RE: A new home for SketchUp

      Turns out I have been living under a rock and this one totally missed me by until yesterday evening.

      Whilst I share the cautious optimism shared by the far more experienced users on the forum, I cannot understate the psychological impact of the move for many casual and professional users across many industries.

      • The Trimble website, is horrible and reminds me of lots of proprietary software pages that don't have the same polish as AutoDesk, or for that matter, the relatively friendly Google Sketchup website.
      • Trimble's corporate video is uninspiring and sends out the wrong message to the millions of users who already use SU.

      I won't comment on feature development or further 3rd party integration, but the simple fact of the matter is, that SU's user base exploded because of Google's rather straight forward front end and friendliness and is integral to it's appeal.

      I hope someone from Trimble is listening, because they won't have many opportunities to make a good first impression to the vast majority of SU users, myself included, who have never even heard of them.

      posted in SketchUp Discussions
      S
      swedishnitro
    • RE: Realistic Ice Effect in Kerkythea

      @tridem - probably something like this: http://upload.wikimedia.org/wikipedia/commons/d/d4/Upsala_Glacier_3.jpg
      and this http://my-blackberry.net/wallpapers/42/m/Ice_Cave%2C_Spencer_Glacier%2C_Alaska.jpg.

      I want to get across the sheer monolithic monumentality of the wall itself (700 feet high 300 miles long!), which is why I'll be refining the block work so it's slightly smaller but obviously much larger than a person would be able to lift.

      Thanks Charly, I'll look into that particular preset; I can do a bunch more post-processing in Photoshop when I get a half decent render out...

      posted in Extensions & Applications Discussions
      S
      swedishnitro
    • Realistic Ice Effect in Kerkythea

      Hi all,

      I'm currently working on a piece from the HBO/Popular book series Game of Thrones as a present for a friend. For those of you who watch the show or read the books, I'm eventually working towards a view of the Wall looking towards the Shadow Tower. So far I've been experimenting with Protude.rb and Greeble 2 to create a huge monolithic wall several hundred feet high made of ice. I'll be refining the process over time, as well as adding more details.

      My question is; has anyone done any realistic looking ice (more like glacier solid ice rather than translucent ice) in Kerkythea? I'd be particularly interested in materials settings.

      Thanks!


      SU Test model of the Wall

      posted in Extensions & Applications Discussions extensions
      S
      swedishnitro
    • Drzach & Suchy's 3D Printing Installations

      http://www.fastcodesign.com/1665695/watch-this-3-d-portrait-of-einstein-magically-morph-into-marilyn-monroe#8

      Modelled in SU, before being 3D Printed. Enjoy and Merry Xmas all!

      posted in Gallery
      S
      swedishnitro
    • RE: Chainklink Fence Help

      @irwanwr said:

      have you tried to ask in the Kerkythea's forum?
      i use Kerkythea too, but obviously not as long and as well as you do.
      if you don't mind i'd like to ask about those people on the image.
      are they 2D or 3D components?

      I tried Kerkythea's forums and got a half decent tutorial, but it led to my machine crashing. The image you see above was about half way through my post processing in Photoshop, so the figures are actually shopped in rather than components. You can see the finished image at http://forums.sketchucation.com/viewtopic.php?f=81&t=41658.

      In the end, I warped the chainlink in place, but would still like to resolve the issue properly.

      posted in Extensions & Applications Discussions
      S
      swedishnitro
    • RE: Chainklink Fence Help

      @tomsdesk said:

      I took that png, created a void mask, made the mask 1 pixel wider, then erased the chainlink thinner...and it looks better, to me, in SU and rendered.

      Hi tomsdesk,

      Do you have any screenshots?

      Cheers!

      • J
      posted in Extensions & Applications Discussions
      S
      swedishnitro
    • RE: SketchUp 8 M2 is out!

      @gaieus said:

      @swedishnitro said:

      And to think I actually got laughed at architecture school for using SU.

      Just tell them to produce anything comparable in the same time. Sit down side by side to two computers with the same task. The idiot having laughed previously will have the grin frozen on his face.

      (Ah well, I did this with a client once when he had a phone call and left for about 20 minutes. I built his design during that time - and the "competitor" had previously worked on it for two weeks)

      Well I produced this: https://lh3.googleusercontent.com/-0QJyr1PBXN8/R3OMq2wYXpI/AAAAAAAAAg4/blNEiDJO9A0/s800/Alex_Explode.jpg

      'How did you do that? Rhino?'
      'SketchUp!'

      I personally believe architecture schools across the world should be teaching SU to students by week 2.

      posted in SketchUp Discussions
      S
      swedishnitro
    • RE: SketchUp 8 M2 is out!

      Just watched the video for Advanced Camera tools. Totally blown away. And to think I actually got laughed at architecture school for using SU.

      posted in SketchUp Discussions
      S
      swedishnitro
    • RE: The Art of SketchUp - part 1: Fantasy

      Awesome, I didn't realise a lot of RIFT was developed in Sketchup! A conversation I keep having with people (particularly architects) is that they feel SU is a children's programme, which it's anything but. Seeing amazing stuff like this just gives me more answers to take on the naysayers. Keep up the great work.

      posted in Gallery
      S
      swedishnitro
    • Lot 351 (Night Shot)

      Well, this is my first night time render. I've tried doing them just in Photoshop in the past, but the lighting is never right. I spent some time trying to figure out the best way to light the image in Kerkythea and finally figured it out after watching a tutorial on Youtube http://www.youtube.com/watch?v=ex1qhpX3NWU.

      Everything else is Photoshop. I've sourced various family members and generic Filipino guys as the project is located in the Philippines.

      Dimanu_Gym.jpg

      About the project:

      A corner lot in a working class area of Manila in the Philippines is designed to increase social and economic intensity by placing 3 separate businesses in an incredibly tight floor footprint with private residential above. Filipino building laws have been exploited to maximise use of floor space by blurring the inside and outside together. To allow maximum ventilation and light, a chainlink facade wraps around the entire building profile, allowing fabric banner advertising to substantially increase economic revenue whilst acting a a sunscreen. The chainklink has the added advantage of acting as a buffer to flying debris in the Philippines' annual cyclone season.

      Screen Shot 2011-11-30 at 22.37.43.png
      Gym_Night_Non_Aliased.jpg

      Cheers!

      • J
      posted in Gallery
      S
      swedishnitro
    • Chainklink Fence Help

      Hi all,

      I'm having trouble with Kerkythea and trying to render out a chainlink fence. I've looked through the forums and saw the chainlink fence post with the provided PNG, but I can't seem to get it to render correctly. I've attached both the Sketchup model and the WIP image based on a Kerkythea render.

      Dimanu_Gym.jpg

      SU File = http://ge.tt/9qO9PaA

      I opened up the file in Kerkythea and added a clip mapping texture in the edit material dialogue box. Then I selected the bitmap in Texture Editor and turned on alpha channels. Everytime I change the scale, the whole thing crashes. What am I doing wrong?

      Cheers!

      posted in Extensions & Applications Discussions extensions
      S
      swedishnitro
    • RE: Improving Wood Texture

      @gaieus said:

      Those are good materials. Have you installed and are you applying them in Kerkythea?

      Pete: don't tease him! 😄

      Yeah, I installed the .map.zip and installed the library, then applied the texture. I guess it's just the settings from more experienced modellers I'd like to know.

      And Pete: Funnily enough, you are actually dead on! The project is a very small corner lot in Manila, where the client wanted to have two floors of economic programme, then two floors of residential occupation. The total floor area available is very small, compromised further by Filipino building regulations that stipulate a 2 metre setback on the ground floor, and a 1 metre setbak on the first floor. Due to the compromised size, rather than trying to figure out how to separate the two programmes (a gym is now located on the ground floor) - it was much more interesting to literally put the hair dressing/massage/beauty programme alongside the 'internet cafe' as a result of the design process.

      The building is geared towards economic and social intensity. The facade is wrapped in a chainlink fence, which acts as a safety barrier, allows maximum views and sunlight, and fulfils the client's request for prominent advertising on the corner lot. Fabric adverts are simply wrapped around the facade and cable tied back (I'm a sucker for simple details!). The fence allows plants to grow up it, turning the corner into a sort of green fuzzy screen, punched out by advertising. The barrier also acts as a crucial safety feature, putting a barrier between flying debris in typhoons and residents, an annual occurance.

      Cheers!

      posted in Extensions & Applications Discussions
      S
      swedishnitro
    • RE: Improving Wood Texture

      @gaieus said:

      Can you share the wood material you are using?

      I downloaded http://www.kerkythea.net/joomla/index.php?option=com_remository&Itemid=42&func=fileinfo&id=54

      The particular texture used was 'Oak Planks'. I made sure that all the faces were reversed correctly, but I don't really know how to make the setting for the materials look more realistic. Also, other woods give off a speckly effect, which I thought was resolved by reversing the faces correctly, unless it just comes out speckled in the test render.

      Cheers!

      posted in Extensions & Applications Discussions
      S
      swedishnitro
    • RE: Improving Wood Texture

      @gaieus said:

      Do you use any bump and specular maps with your wood? Do you give any shininess to it at all?

      Not at all. I think I added a slight shine to it, but that's all. What do you recommend for bump and specular maps?

      Cheers!

      posted in Extensions & Applications Discussions
      S
      swedishnitro
    • RE: Improving Wood Texture

      Post processing in Photoshop. Still unhappy with the wood.


      Massage-Room-Day.jpg

      posted in Extensions & Applications Discussions
      S
      swedishnitro
    • Improving Wood Texture

      Hi guys,

      So I started playing around with Kerkythea for the first time properly this morning to try and light an interior view of a project I'm working on. I was hoping the more advanced users could give me some pointers in how to improve the realism of the scene, particularly with the wood which I'm currently unhappy with. Are there any global settings I should be aware of?

      Massage Room Day.jpg

      I'm fine with post processing in Photoshop, but anything at all to make the walls and atmosphere more realistic would be most helpful. I'll be posting up a night version as well now I've figured out how to create light sources.

      Cheers!

      • J
      posted in Extensions & Applications Discussions extensions
      S
      swedishnitro
    • RE: Gothic Church(Interior fragment)

      Stunning. You've set the benchmark for what you can do with this programme.

      posted in Gallery
      S
      swedishnitro
    • RE: AT-AT attacking Time Square

      @solo said:

      :thumb:

      Looking at the SU model wondering if you even needed it, you could have just sourced an image of the walker online.

      For sure, but the tutorial was intended to be a demonstration of how to prepare SU models for processing in Photoshop.

      Cheers!

      posted in Gallery
      S
      swedishnitro
    • RE: AT-AT attacking Time Square

      atatnyc_step_0.jpg
      Step 0
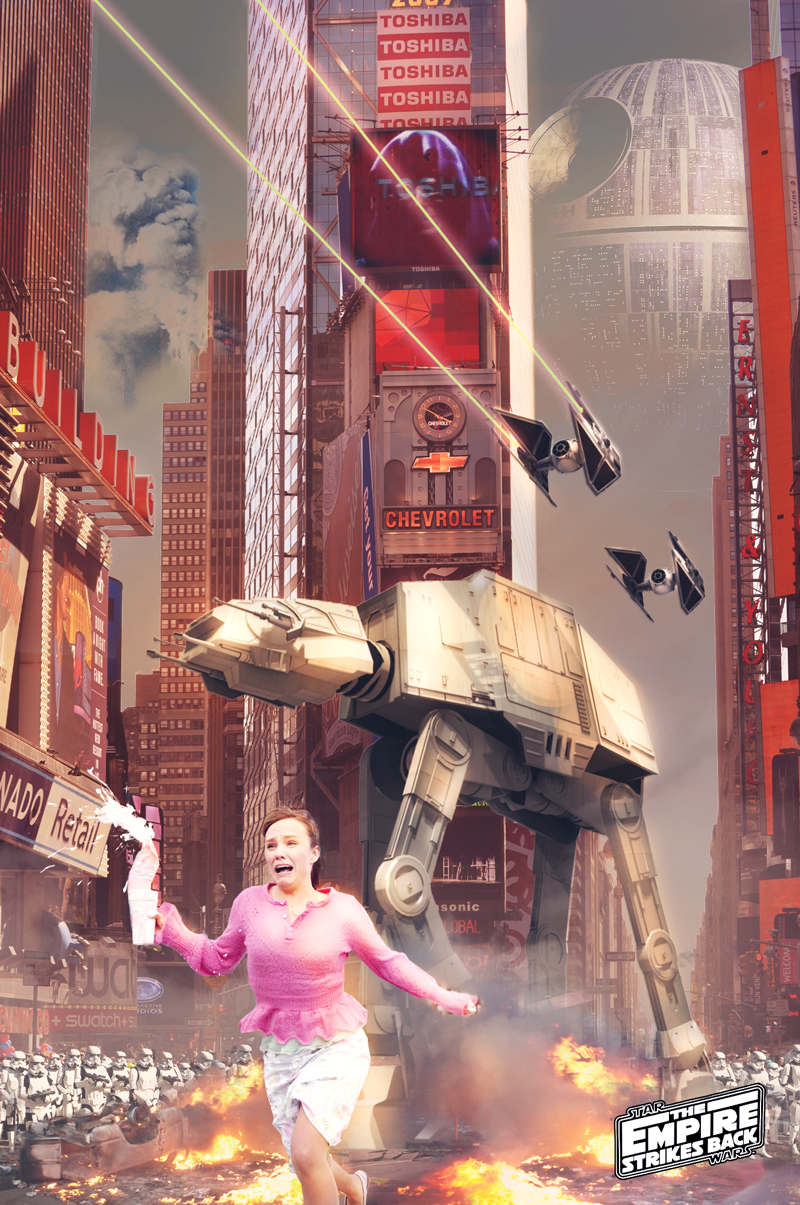
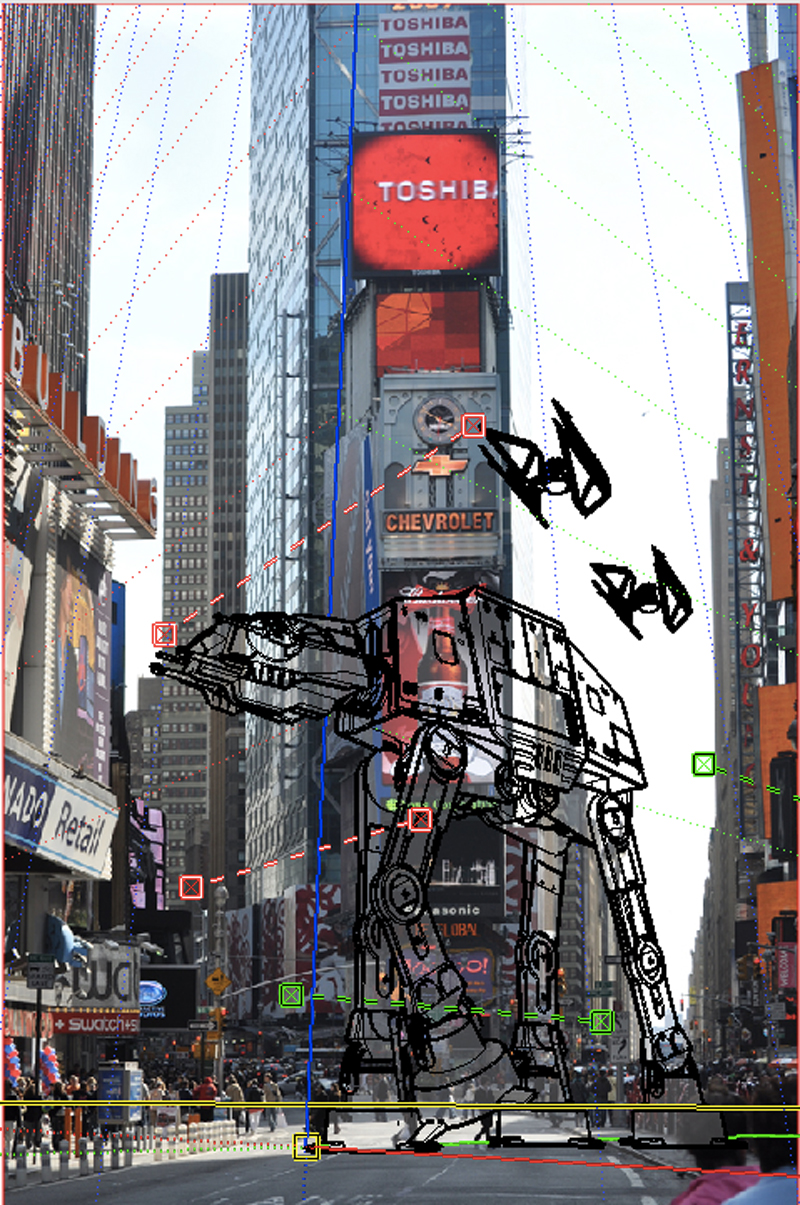
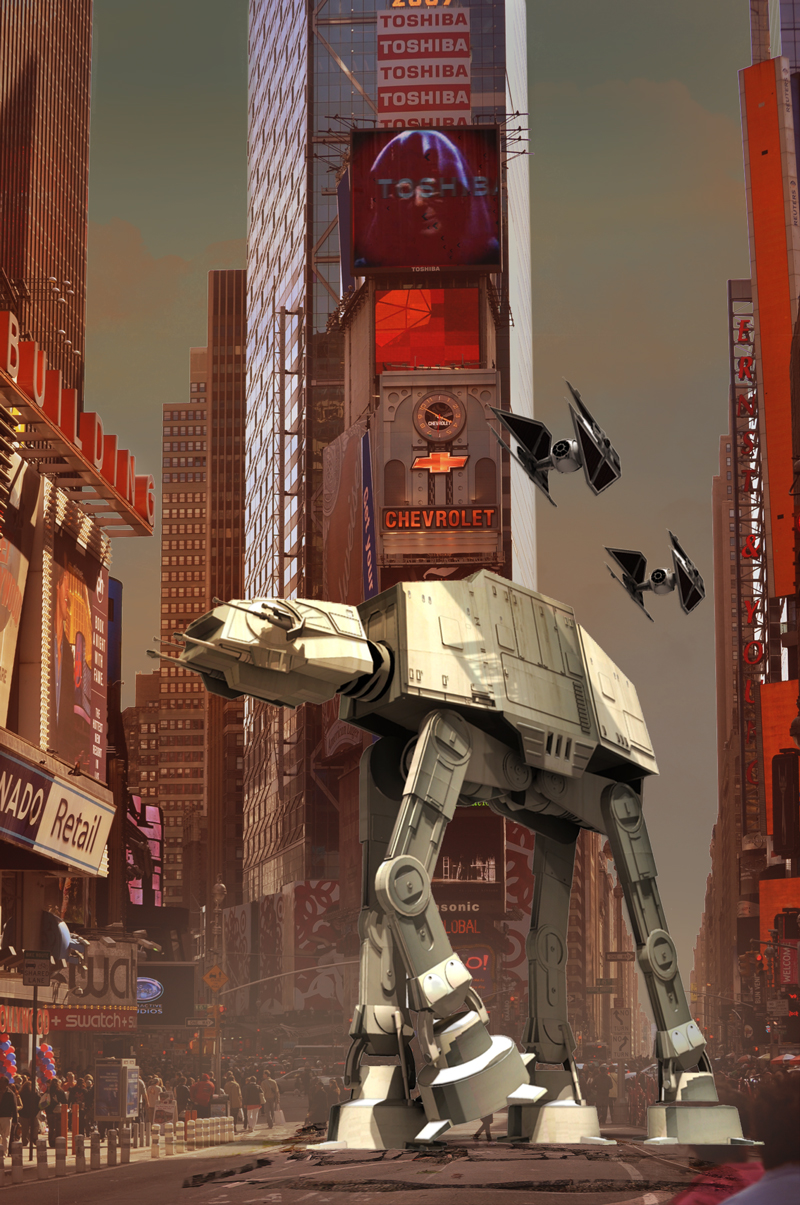
      As this was intended as a fun tutorial to prepare SU models for post processing in Photoshop, I asked students to call out the first things they could think of. In 3D Warehouse I got a request for a Star Wars AT-AT walker, followed swiftly by a picture of Times Square.

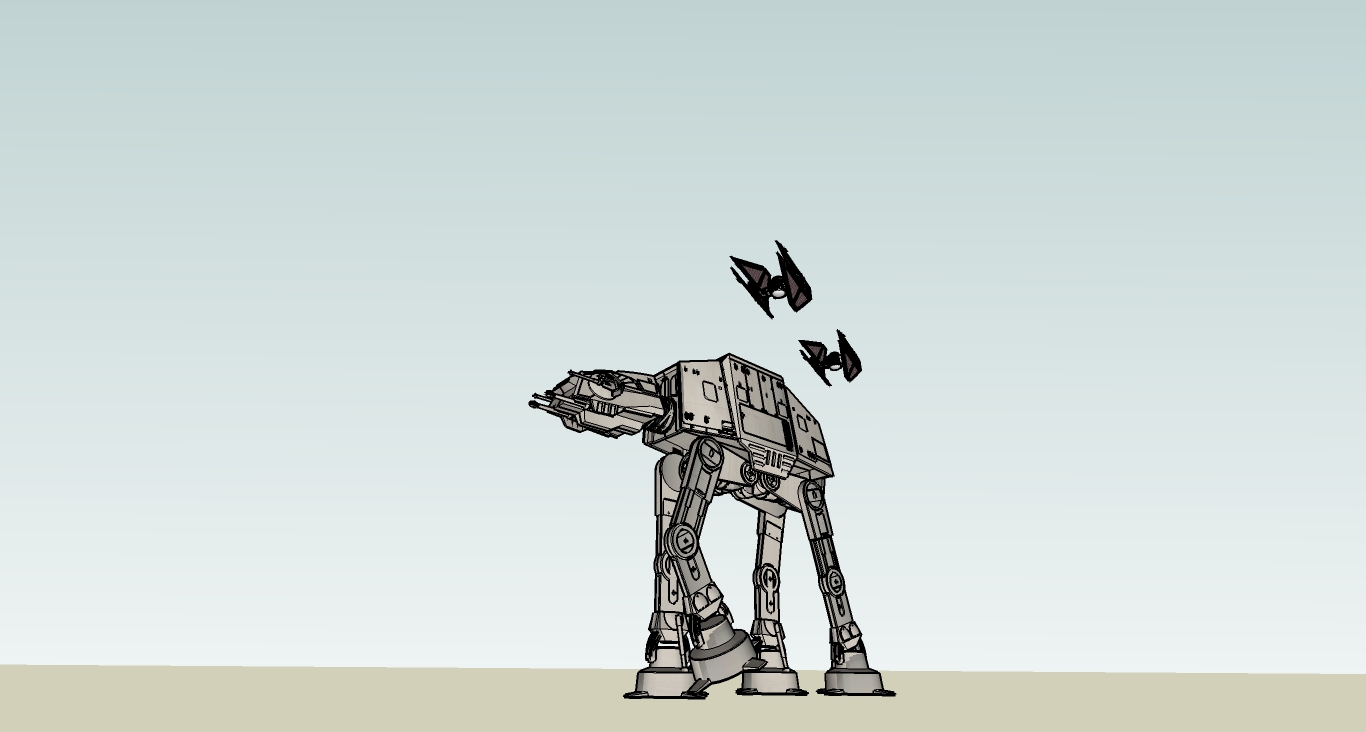
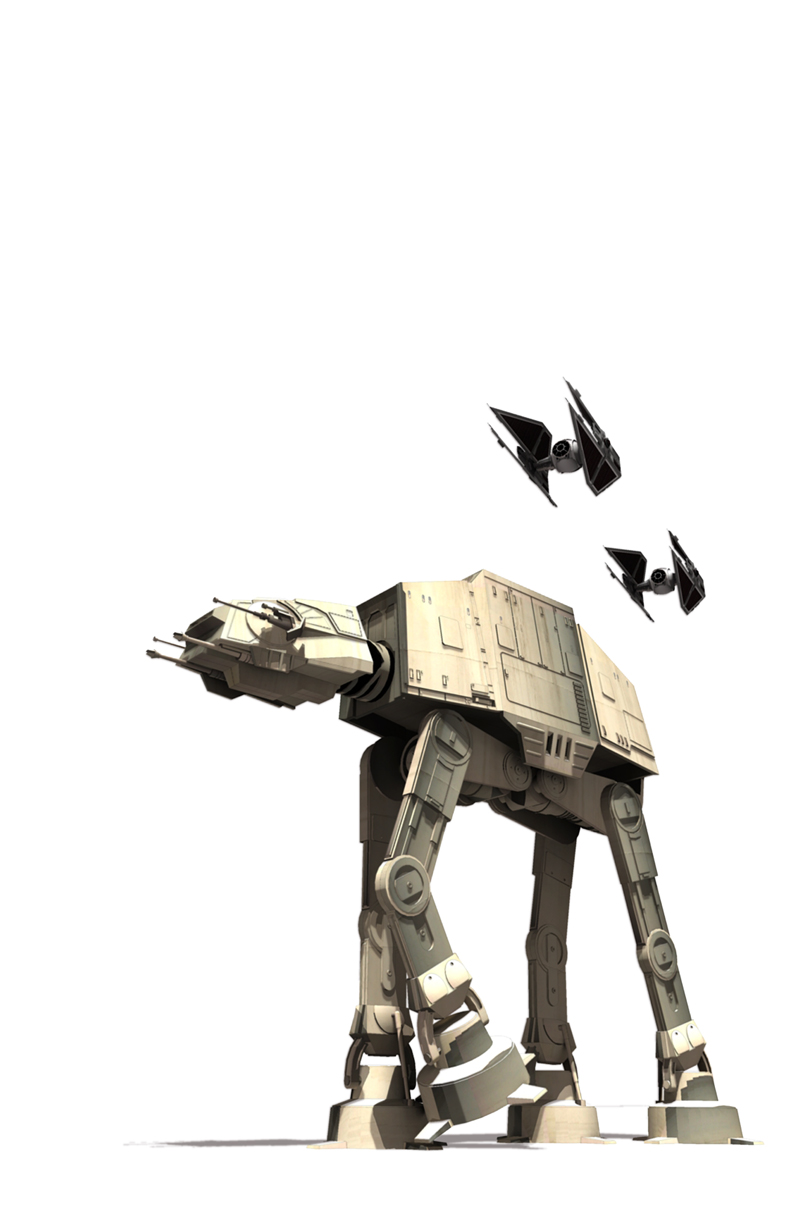
      In Sketchup, I replaced the texture of the AT AT with one off CG textures which I thought looked more realistic. Opening the Match Photo dialogue box, I then quickly matched the model with the image of Times Square. I realise of course, an actual AT-AT is much larger than the one in the image, but I wanted to get the image out in under a couple of hours and it would have taken to long to get the composition right if the AT-AT was at full scale.

      atatnyc_step_1.jpg
      Step 1
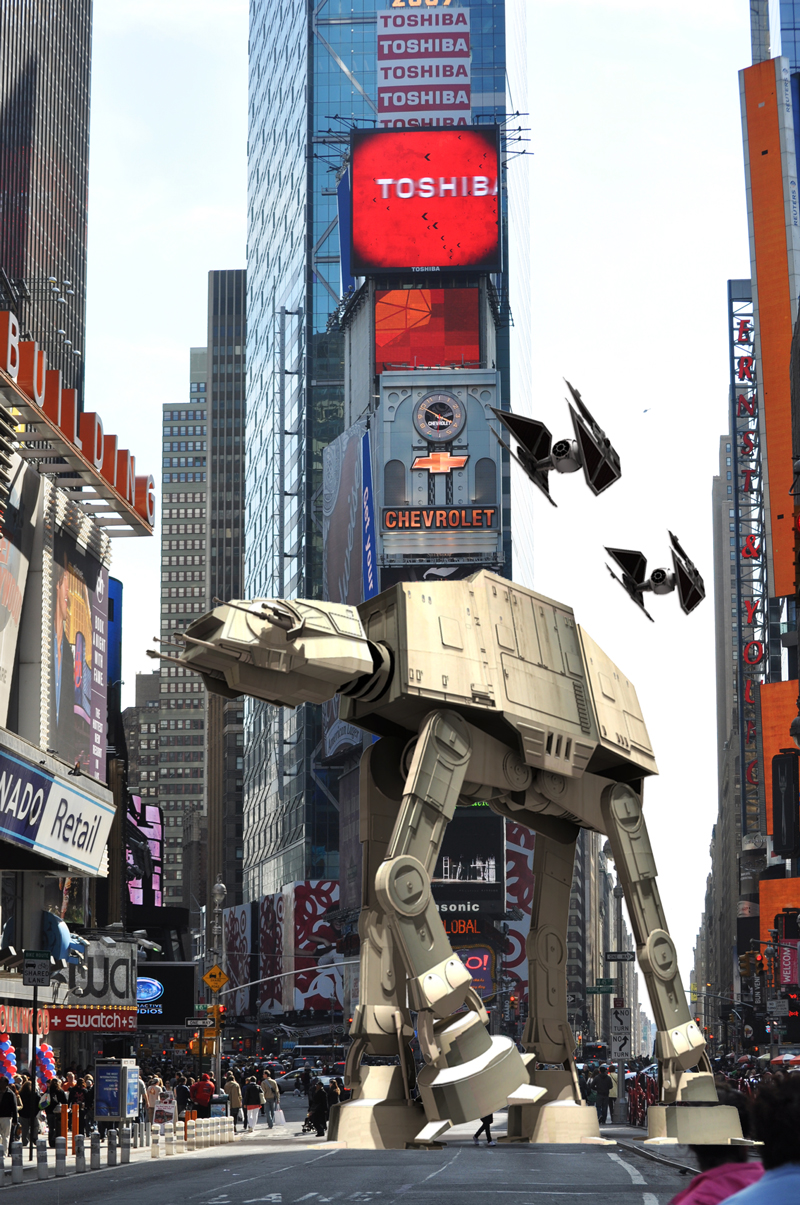
      I decided to take the plunge finally and start using a rendering programme for the first time ever. After spending some time installing Kerkythea, I followed a basic tutorial to achieve the render seen above. I adjusted the exposure and darkness setting ever so slightly in Kerkythea's render window whilst trying out the test renders as I knew this would be a late afternoon scene.

      In addition to the Kerkythea render, I did a shadow pass on it's own of the photo matched model by going to hidden line styles and turning off edges. Opening up Photoshop, the first job was to align the Kerkythea render with the shadow pass. I also added a line render for reference and made a layer group for all three base layers.

      atatnyc_step_2.jpg
      Step 2
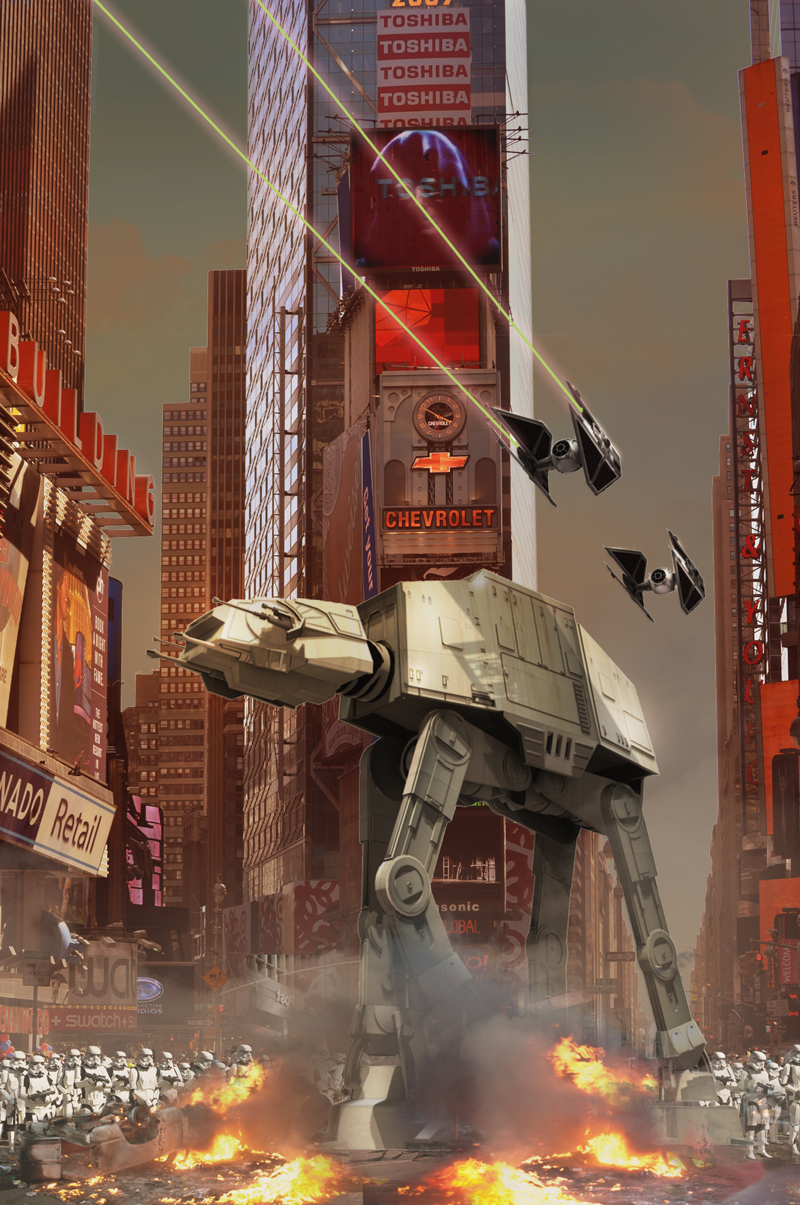
      When doing my images for project-work, I usually always start with the sky, as it helps to define to overall atmosphere and lighting for the rest of the image. I always have an idea of what I'd like to have, but things usually change. The best way to extract the sky in my opinion is to make an Alpha Channel selection, by copying the channel that has the largest contrast. The copy is then adjusted using the levels palette to create a black and white silhouette, by painting in the outstanding areas. The selection is then used to create a layer mask.

      The sky is added as a new layer group beneath the base image. In this case, I used a soft brush, colour sampling the apocalyptic sky from a reference.
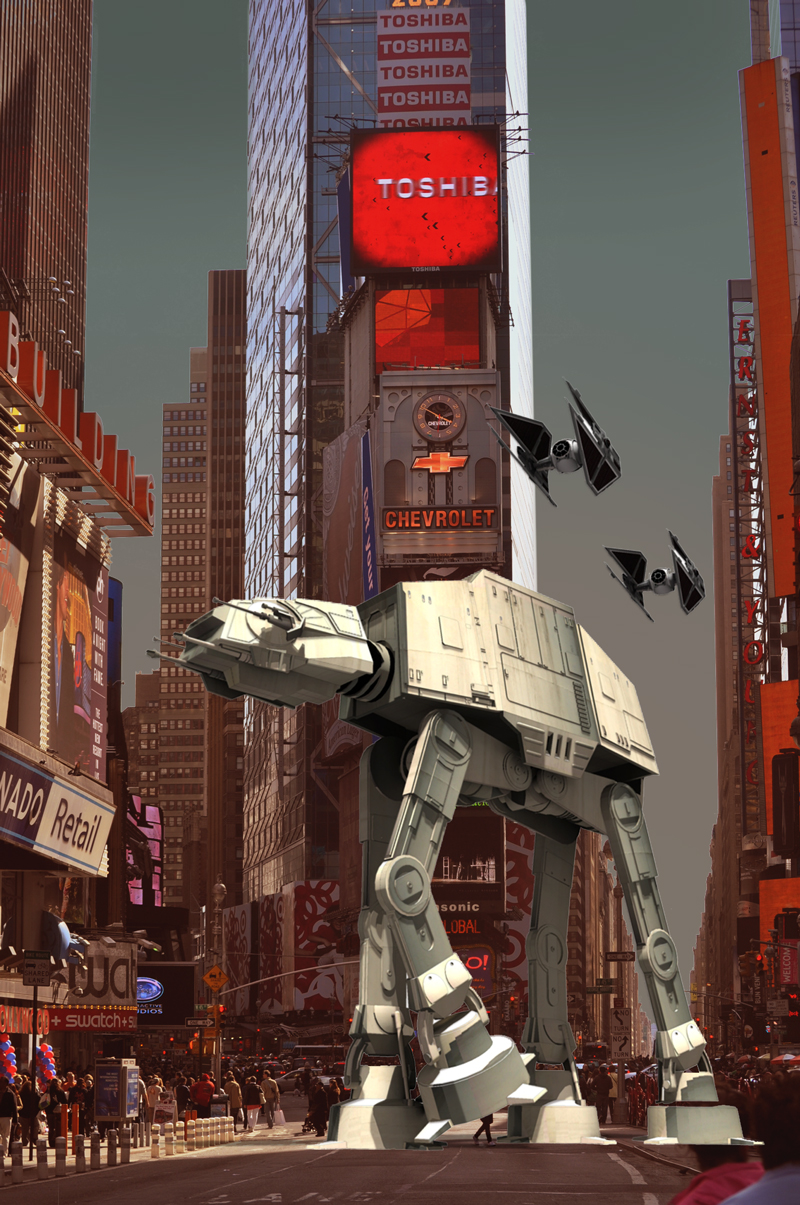
      atatnyc_step_3.jpg
      Step 3
      To add to the war zone atmosphere, chances are there will be a lot of fires. Duplicating the base plate with the layer mask, pressing cmd+B (or cntl+B) brings up the colour balance dialogue, and I shifted the entire tonal range toward a more reddish hue.

      atatnyc_step_4.jpg
      Step 4
      Cracks in the road were added by throwing in some real cracks from a reference and distorting it to match the perspective, before applying a blending mode and rough it into the image. Clouds were added using a cloud brush with a browny/orange tone. Using a similar tone, a soft brush on a separate layer with the opacity turned down creates a realistic looking cloud of dust behind the AT-AT. This helps with the atmosphere build up and will wash out mid ground elements.

      Also added was a new layer set to overlay as a blending mode, and with a soft brush I painted in areas where the light would strike surfaces to give the appearance of a setting sun hitting those edges. This really matches the duplicated colour balanced plate. Furthermore, I added the Emperor Palpatine to give the impression all broadcasting had been compromised by the Galactic Empire. An extra bit of realism was added by having a cast shadow dropping onto the body of the AT-AT itself - copied from the right side of the plate, distorted, levelled to black and multiplied onto the AT-AT, then taking the opacity down to match the other cast shadows. Lastly, a gaussian blur was added to soften the shadow.

      atatnyc_step_5.jpg
      Step 5
      Mid ground elements added. Starting with the laser, this was a soft brush set to green. Holding shift whilst drawing two points keeps a straight line. The layers were rotated into position then duplicated. A solarize filter was added and set to overlay to create the corona from the lasers.

      I found a picture of a burnt out car online and gave it a layer mask, and simply flipped around. No need to find another photo as I knew there would be a foreground element. The layer mask was simply brushed to blend into the existing dust layer.

      levels.jpg

      The same process was used to add the Imperial Stormtroopers (taken from a Spanish parade). As they sat behind the car fires and debris strung into the road, the only real adjustment after eliminating the background was to use blend them more convincingly. A lot of images look wrong to me as elements in the mid to background often have too much contrast. The colour delta range should only be sharp and broad as you move towards the foreground. To adjust this, go to Image > Adjustments > Levels. Usually no one pays attention to the bottom two sliders, the Output Levels, which will increase the overall lightness or darkness of the layer. Sliding towards the middle decreases the relative contrast.

      atatnyc_step_6.jpg
      Step 6
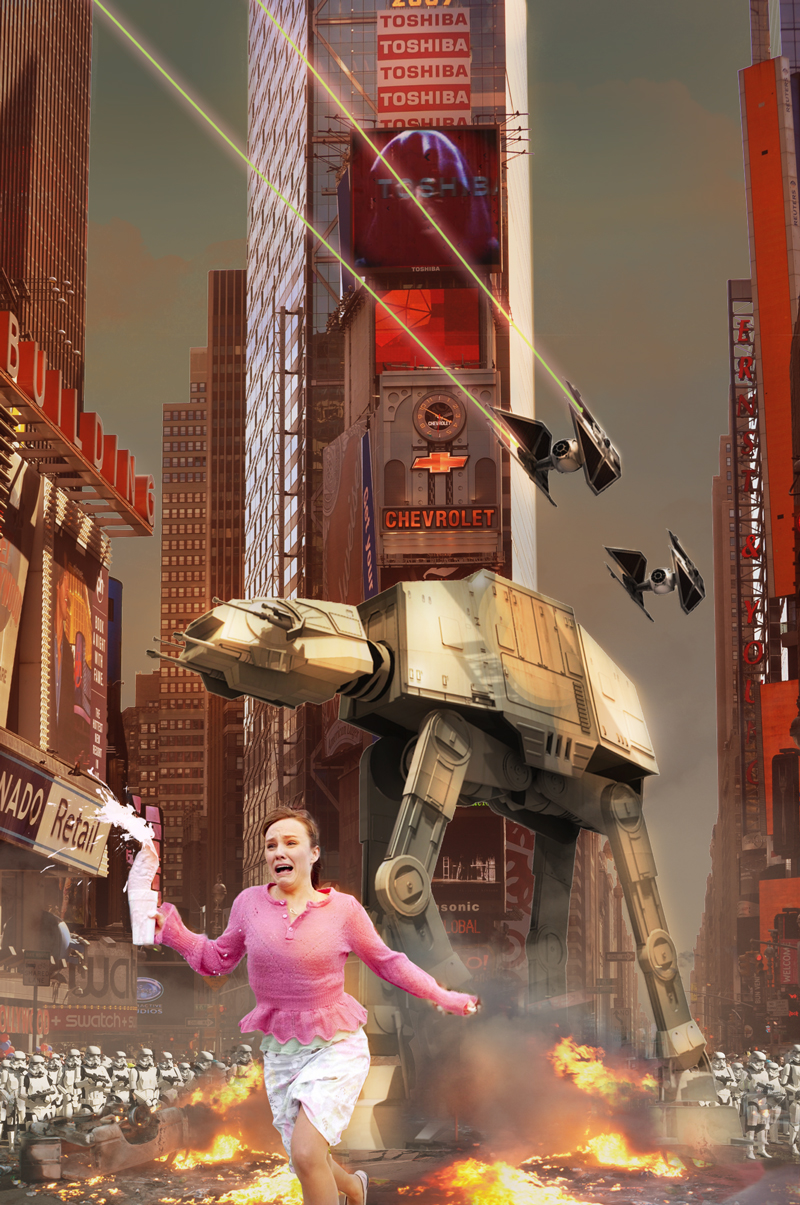
      The milk shake woman was too good to pass up, in the original she's running away from a zombie. I used the pen tool to create the layer mask, then simply blended her into the photo. Another layer was added with the blending mode set to overlay, and a soft brush with an orange tone was added to light hit surfaces, particularly to the right side of the woman. You could also use the dodge and burn tool to create a similar effect.

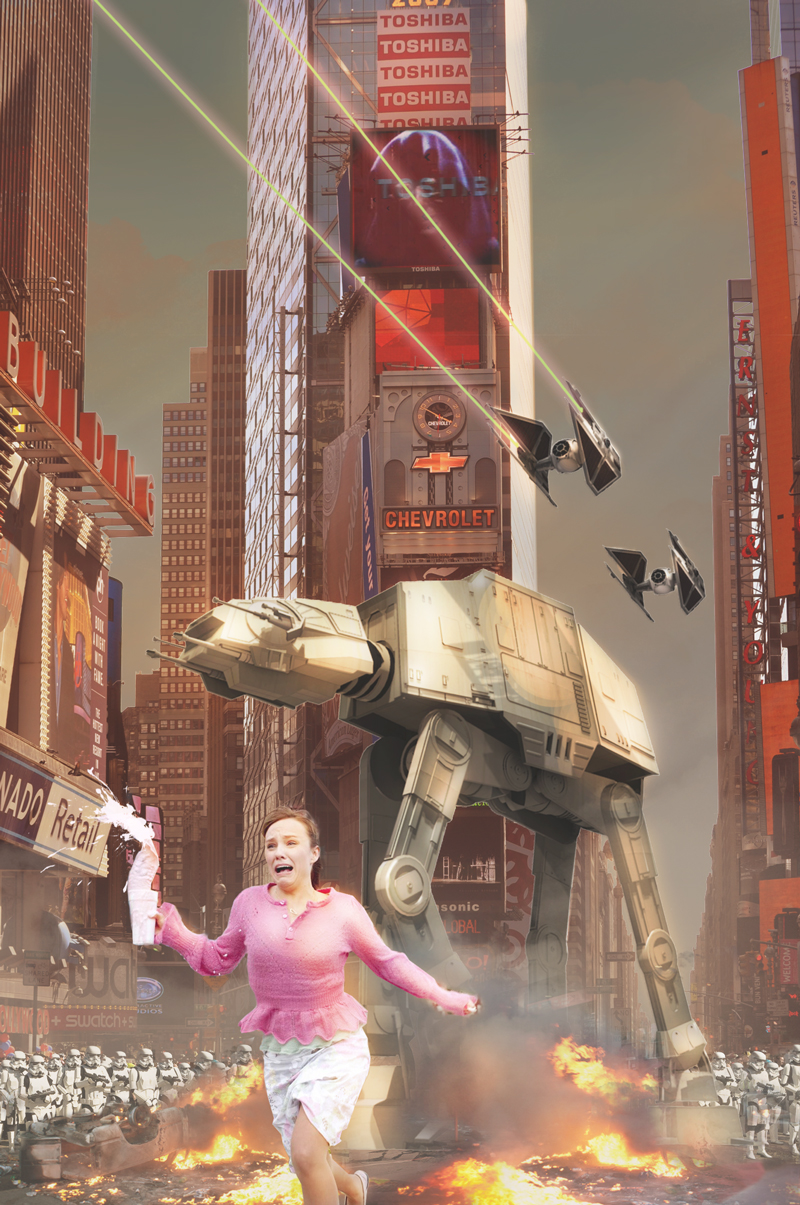
      Usually by this point I'm pretty sure I've got the composition nailed, so the last thing to do is add some lighting effects.

      atatnyc_step_7.jpg
      Step 7
      One particular trick I have is simply doing a plain white layer, and turning the opacity down to 10%. Like a noise layer, it works a treat of levelling out all of the separate elements.

      atatnyc_step_8.jpg
      Step 8
      Another overlay layer is applied right at the top, with a soft white brush just picking out highlights. I also added a subtle 'god light', a soft brush streaked across diagonally, set to overlay and opacity at around 10%.

      The final adjustments involved a curves adjustment layer to bring out the shadows and contrast, and a final subtle colour balance, and a photo filter to give it some warmth. Logo added too. Voila.

      Total time: 2 hours.

      You can download the original model and Photoshop file here: http://ge.tt/9vapLOA?c

      Cheers!

      • J
      posted in Gallery
      S
      swedishnitro
    • AT-AT attacking Time Square

      So I was teaching some architecture students basic output from Sketchup for processing in Photoshop. I was quite bored of the usual 'insert your project into your site photo' so we did something a little different: The first two words to be shouted out by the group were 'Star Wars AT-AT' and 'Times Square'. I had some fun doing this and it was a great way to get to grips with Kerkythea, as I've never used a rendering package before.

      I'm happy to post up a tutorial if anyone is interested.

      • J

      ATAT_NYC.jpg


      atat_model_SU.jpg

      posted in Gallery
      S
      swedishnitro
    • 1 / 1