sketchucation logo sketchucation
    • Login
    1. Home
    2. RootlessAgrarian
    3. Posts
    ℹ️ Licensed Extensions | FredoBatch, ElevationProfile, FredoSketch, LayOps, MatSim and Pic2Shape will require license from Sept 1st More Info
    R
    Offline
    • Profile
    • Following 0
    • Followers 0
    • Topics 7
    • Posts 25
    • Groups 1

    Posts

    Recent Best Controversial
    • RE: [Plugin] 2D Tools

      Resolved πŸ˜„

      The macbook pro is new to me -- my old laptop was stolen in December 2010. I'm still discovering the differences.

      Turns out the new trackpad, aside from being jittery and twitchy (grrr) emulates mouse button 3 -- not 2 for some reason, there is dissatisfied chitchat about this here and there on Apple user groups -- but 3 is emulated with 2 fingers (I will refrain from some obvious jesting).

      I can right-click with this builtin mapping, and presto I can now draw coloured and dashed and weighted lines, which is really cool... and it appears I can retroactively style lines drawn with other SU tools such as Arc -- very nice!

      My difficulty with 2dtools is now resolved -- and was not a difficulty with 2dtools at all, but with my shallow knowledge of SU.

      posted in Plugins
      R
      RootlessAgrarian
    • RE: [Plugin] 2D Tools

      Don't worry TIG my install is not as BU as you fear. Tool palette is now visible and working.

      The revelation I needed was the View->Tool Palettes feature in the main menubar... And yes, I do feel stupid for not noticing it before. So many of my plugins activate their tool palettes by default, that I thought there must be some problem with those that don't -- and if they were not absolutely necessary I just ignored 'em and got on with my drawing πŸ˜„

      My bad -- as you can tell I'm not a deep Sketchup user, I use it only when I have to get something done; so I don't spend a lot of time exploring all the features (though it's on my list of fun things to do when I someday have the time). Kind of like vi -- most people only know the minimum number of commands necessary to do basic text editing, and never explore the huge toolkit lurking within.

      So thx for the pointer to the "obvious" menu item! and yes I do generally understand the packaging of plugins, but it's been 6 mo or so since I fooled with them so it's all a bit rusty. I was grasping at any straw to explain what I thought was broken behaviour.

      I fear that the remaining mystery may come down to OSX and mouse buttons (or lack of same).

      I still can't get the dashed-line tool to do anything. I can select a line (it becomes bolded); the hint at bottom of screen suggests I then right-click in empty space to get a dialogue box. I am sitting at a macbook pro, with cmd-click mapped to right-click (seems to work in x11 apps anyway, xev confirms). I begin to fear that this mapping may be at the X11 level, though I think in previous releases of OSX it was at the System Preferences level. [a little rootling around...]

      Damn. No click modifier mapping for 3btn emu in Leopard System Preferences, at least not obviously visible -- maybe with some googling I can find a way to do it. If not, looks like I will have to buy a trackball or 3btn mouse if I want 2dtools to work.

      Sorry for the dimness of the original query. My brain is much more engaged with the stuff I'm building (1100 sf of new sails plus spars to match) than with the s'ware I'm using to draw it. Different headspace πŸ˜„

      ps Actually I don't use dragndrop much unless the app is chained to the OSX GUI; being an old linux geek I prefer mv, cp, tar, etc. πŸ˜„ very old-fashioned I know πŸ˜„

      posted in Plugins
      R
      RootlessAgrarian
    • RE: [Plugin] 2D Tools

      I hope this is an appropriate thread for my question.

      I have never got 2Dtools to pop up a control panel. It correctly modifies the Draw menu, but doesn't offer a toolbar or panel like most other plugins. (I have also not yet figured out how to make any of it work -- have tried to draw dashed lines, for example, but gave up in the end. "Click on empty space" is supposed to do something, according to the prompt at the bottom of the Sketchup window, but I never could get it to do anything.)

      How do I go about figuring out why the control panel never pops up at startup? I see a directory full of icons, and I see code that looks like it should build a control panel, so I assume that's what's supposed to happen? I have installed 2Dtools50 with Sketchup 8, and immediately noticed that in 2D#.rb (startup script) there was a case mismatch between the path to 2D#loader.rb:

      load '2Dtools/2D#loader.rb'

      and the directory 2DTools_50 (cap T, even when the _50 is removed).

      I fixed this by renaming the directory 2Dtools to match the startup script. I was hoping that the latest version, with the latest Sketchup, would work (i.e. display a control panel). However it seems about like the old version with Sketchup 7: the Draw menu is modified but there is nary an icon in sight πŸ˜„

      So I am looking for Sketchup's startup log, where presumably I might find an error message from the attempt to load 2Dtools. It's been quite a while since I fooled around with ruby scripts and Sketchup plugins and so on, and I'm trying to refresh my failing memory πŸ˜„

      posted in Plugins
      R
      RootlessAgrarian
    • RE: [Plugin] Toggle Units

      @cadfather said:

      sorry.. 😳 i meant plugins folder of course..

      if the path is right the icons should show up

      as I say I do not speak Ruby, but I used to be extremely literate in Tcl/Tk and the syntax is not completely alien. I have tried various things, even using the full pathname. other .rb scripts are correctly finding their icons w/rel pathname starting at 'plugins', but this one for some reason is not. mysterious! I've looked for some initialisation that might set the default path, etc -- no luck so far. must be a very silly coding error that I can't see because I'm so unfamiliar with Ruby apps.

      checked the obvious like protection bits on subdir and images, checked that they really are .pngs, checked that they are not empty files, etc. baffled.

      oh well. something to fool with when I've nothing more urgent to do πŸ˜„

      posted in Plugins
      R
      RootlessAgrarian
    • RE: [Plugin] Toggle Units

      @cadfather said:

      the lines make sense if you have the corresponding folder (toggle_units_icons) in the plugins menu..

      plugins menu? or plugins directory (folder)?

      that subdir does exist in the plugins directory (as do other subdirs of small images used successfully by other Ruby extensions). can't figure out why the images are not getting associated with the buttons. but hey, the unit switching function works and that's what I needed. I can fool around with the icons later.

      posted in Plugins
      R
      RootlessAgrarian
    • RE: [Plugin] Toggle Units

      @rootlessagrarian said:

      @matt666 said:

      Here is the script.
      Toolbar to change drawing units quickly.

      Hi -- I may not be understanding what this tool does, or how units work in Sketchup; I am frustrated because I can't do what seems to me a simple thing.

      I read backwards in this thread and found that others have had some trouble with Leopard (OSX) and this plugin. I grabbed a more recent version edited by Jim Foltz Oct 2009 and installed that.

      The Foltz version works except that the icons do not display: this I thought was because the icon paths were all set to CD_ICONS/TWEAK, but I substituted the correct path "toggle_units_icons" and I still get no icons in the toolbar. So I have to memorise the button sequence or wait for the balloon help to pop up πŸ˜„ but the tool now does exactly what I was hoping for: my ruler can be toggled to work in inches or meters, hooray.

      If anyone can tell me why these lines of code

      cmd.small_icon = "toggle_units_icons/tudec16.png"
      cmd.large_icon = "toggle_units_icons/tudec24.png"
      

      do not correctly association the png files with the button, I'd like to know (I don't speak Ruby obviously). meanwhile I'll happily use the version with anonymous blank buttons -- project no longer stalled!

      posted in Plugins
      R
      RootlessAgrarian
    • RE: [Plugin] Toggle Units

      @matt666 said:

      Here is the script.
      Toolbar to change drawing units quickly.

      Hi -- I may not be understanding what this tool does, or how units work in Sketchup; I am frustrated because I can't do what seems to me a simple thing.

      Here is the deal. I am working on a model in non-metric units (feet and inches). But I have paper sketches from a colleague in Norway who has annotated his drawings in decimal meters. I'd like to reproduce his hand drawing directly into my model by copying it exactly, so I'd like to work on a set of components in meters or mm. To my surprise I could find nothing in Preferences for toggling from metric to inch and back. So I thought that Toggle Units plugin might enable me to switch the whole model from inch to mm or cm.

      I installed it. But it seems to toggle units only between different representations of inches (the first 4 buttons); the other buttons (mm, cm, mt) are grayed out and inactive. I really want to toggle between metric and inch -- is there no way to do this? it seems such an obvious thing to want to do πŸ˜„ argh. would rather not have to use a unit converter and manually convert all the dims on my colleague's drawing!

      btw I am aware that I can draw in any units I like, i.e. enter dimensions in notation like "3.0m". what I cannot do is use the Ruler tool to verify those dimensions after drawing, because the ruler is apparently hard-wired to inch units. if I could just toggle the Ruler between inch and metric that would be great!

      any ideas would be gratefully received as this has got me bogged down right at the start of the project.

      posted in Plugins
      R
      RootlessAgrarian
    • RE: Painted faces going shimmery

      @tig said:

      What you have model so far looks pretty well thought out... except... I suggest you make all of the elements into groups (or components if they might be repeated). [...]
      πŸ€“

      O my, I wish I had started out doing this (making each major new area of the model a layer). Trying to select stuff after the fact, group it, and layer it, is pretty tedious and delicate work. However I have done some of this and it is useful to be able to turn on and off entire design elements like Roof, Walls. Thanks for the thought-provoking tip!

      posted in Newbie Forum
      R
      RootlessAgrarian
    • RE: Painted faces going shimmery

      @unknownuser said:

      that's z-fighting

      you have two faces on top of each other.. you'll have to delete one of the faces if possible. (or get them off of the same plane via some design change)

      [edit].. it would probably help if you upload the skp.. two reasons -- one, people could find the problem more easily and two, they could show you how to fix/prevent it more easily

      aha. I don't know how duplication happened exactly, but it doesn't surprise me all that much. I'm working "in tight spaces" and having difficulty controlling the over-eager inferencing feature πŸ˜„

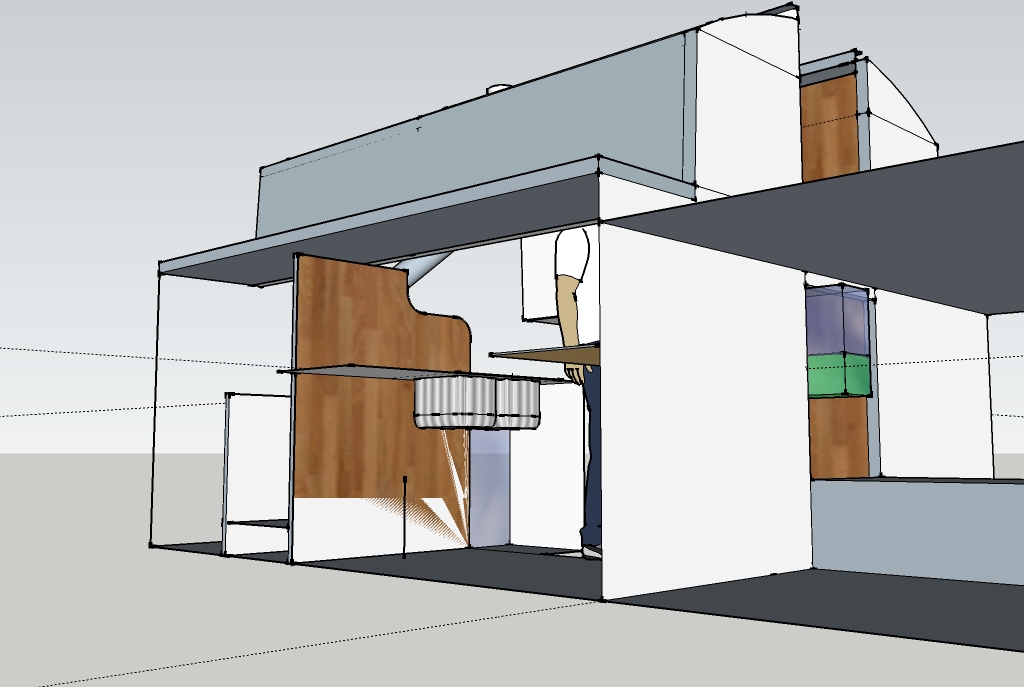
      As a newbie to CAD I'm discovering all kinds of technique issues. My approach -- which may have been stupid -- was as follows: first, draw a handful of necessary components for my interior sketch (such as a wood stove, double sink, and propane cooktop with dimensions taken from real life). Then I worked intuitively from larger to smaller structure, taking the outside dimensions of the cabin followed by the inside dimensions, roughing in bulkheads (walls) and doorways. Then I tried to draw the interior joinery (countertops and so on) and place the prefabricated components. Here's where it started to get tricky, as I was working inside the structure with weird sightlines and too many vectors to which SU kept trying to snap lines. It got harder and harder to see what I was doing as the visual field got crowded.

      I can hide surfaces, of course; but sometimes I need to be able to see some structure for alignment and orientation, yet it's in the way wrt mouse-picking. I had moments of hair-tearing frustration with objects popping around into different perspective lines on the tiniest mouse movements πŸ˜„ or objects refusing to move on the axis I was trying to relocate them on, but arbitrarily (it seemed to me) insisting on a different axis. any tips on "how to work effectively inside a Sketchup architectural space?

      I'll attach the skp file in case anyone wants to comment. I am sure Enlightened Masters like Gaieus will find it hideously amateurish and sloppy πŸ˜„ but in this case it really is a sketch, with approximate dimensions for a reality check. I'm not planning to take a cut-list off it! just to get a feel for what's possible... nevertheless I'd be interested to learn how to do things smarter and easier, and especially how to reduce the mess, orphan surfaces, weird little gaps, etc.

      The most difficult Sketchup activities, imho, are selection and relocation. Constructing shapes is dead easy (brilliant interface and metaphor imho), and measuring is delightfully intuitive with Tape Measure. Construction lines are dandy -- except for the darned x or + signs at each end, which are hard to select and erase (my models usually end up dotted with orphan +'s like fruit flies). The fancy special effects (plugins) are like a big box of candy πŸ˜„ all tasty and so easy to use.

      But the really challenging task is the basic one of properly selecting and repositioning elements; sometimes I feel like I'm fooling with a Rubik's Cube, trying to find just the right POV and order of operations to slide a piece into its correct place. Even with X-ray option and surface hiding, it can be tricky. One of the disconcerting things to this n00b is the way that surfaces and shapes become melded with the larger model as they snap to its edges or surfaces; several times I've wanted to resize a "plane" such as a wall, only to find the whole model distorting because the plane is now glued to the rest of the model along one or more edges. I sometimes wish there were a way to divorce a selected chunk of geometry from the model, fool with it, and then glue it back on.... but there are other ways to accomplish such modifications and I'm learning them slowly πŸ˜„

      (.8 MB file attached)
      Rough sketch of new galley layout

      posted in Newbie Forum
      R
      RootlessAgrarian
    • Painted faces going shimmery

      I can't think of a better way to describe this.

      When a face has been painted with a texture, sometimes (I am not sure when or why) if I draw another line across that face, the texture goes all "shimmering" -- broken up by white streaks which change shape and location as the camera orbits. photo attached... is this an OSX bug, or a SketchUp bug, or a known symptom of something that users should not do?

      here is a snapshot of shimmering texture

      posted in Newbie Forum sketchup
      R
      RootlessAgrarian
    • Hull Design baby steps (skp attached)

      For anyone who is interested...

      here's my first attempt at documenting what I think is the easiest/simplest (though least accurate) approach to building a virtual boat hull (at least to the first stage -- more to come) with SU7. It's fairly similar to other folks' methods that I've found online -- but to my brain, a little clearer.

      I am a rank newbie so am probably doing some things stupidly, feel free to laugh. Just trying to give something back in gratitude for the hospitality w/which I've been met as a n00b. Thanks to everyone.

      I found that it was easier drawing bezier curves on a defined surface, then rotating and warping the whole surface (for better visibility, less parallax error and other confusions). There is some cleanup (extreme zoom needed -- stray line deletion and very fine point position adjustments) to make them into clean connected curves that Soap/Skin will accept. I guess I should list the plugins I used... off top of head, ummm, Shape Bender, Soap/Skin, TextTag. I forget whether Bezier Curves is a plugin or a native feature in v7 πŸ˜„

      My next attempt will be skinning carefully shaped frames along a curve. This seems far more time consuming and tricky, but should yield a more controllable, potentially accurate shape.


      Virtual Boat Yard 1

      posted in Newbie Forum sketchup
      R
      RootlessAgrarian
    • RE: Morph shape to shape?

      @d12dozr said:

      See if this plugin by Krill does what you want...http://forums.sketchucation.com/viewtopic.php?f=180&t=21658&hilit=Krill

      that certainly looks like the ticket!

      many thanks

      posted in Newbie Forum
      R
      RootlessAgrarian
    • Morph shape to shape?

      Newbie here still having fun on the vertical learning curve πŸ˜„ [I'd like to put in another plug for the rather useful series of Sketchup tutorials and notes by Dave Richards which I've been working my way through with great interest. Realworld applications, very helpful.]

      It has occurred to me that so far I have not seen any Sketchup tool for morphing one shape into another smoothly. Maybe this is simple to do with existing SU tools and methods? Say I have a rectangle and a cylinder, which I smash together... is there any SU tool which will morph smoothly over N units of distance from one x-section to the other? (Still working on transitions between sections of complex hull forms).

      My personal SU mystery of the week is why the Explode cmd is hidden waaay down in a context menu πŸ˜„ I've dragged it out to a key binding, since I use it constantly.

      Another random observation: my old (and now rare) Touchstream keyboard is a godsend for SU... navigation is far more intuitive with the TS gesture set. That was a company that shoulda stayed in business 😞 a great loss to the mousing world, imho. Anyone else out there using a TS?

      posted in Newbie Forum sketchup
      R
      RootlessAgrarian
    • FFD baffling to newbie

      What does it mean when the FFD "box" with +-sign handles appears, but all the handles are gray and do not respond to any mouse events?

      I followed what I think is the right recipe: make an object into a Group, select it, right-click to get Context menu, select FFD 3x3.

      I get the cloud of +-signs. But on most occasions, when I double click to activate the FFD feature, the surrounding box frame and +-signs turn gray and are not interactive.

      Is there something about my object that makes it incompatible with FFD?

      I'm getting one other strange FFD mode (same object) where I do get interactive handles, but all they do is resize the wireframe box. The original object is untouched. Moreover, I get messages like this:

      Error: #<NoMethodError: undefined method `[]' for nil:NilClass>

      Have I missed a <Return> or a moment where I should have entered numeric data?

      posted in Newbie Forum sketchup
      R
      RootlessAgrarian
    • RE: Stitching surfaces

      @gaieus said:

      I think you are trying to do this the other way round. In SU (in my opinion) you shouldn't "force" what you are doing in real life - starting from flat planes and bending/stitching them together - but first designing the overall shape and then secting it apart to get the basic shapes you can already work with.

      But of course, I have never built a boat (do you also build wooden boats?)

      Not personally πŸ˜„ I sail, and live on, a boat built by the origami method. I'd like to model boats of this kind, and it seems like it would be way easier to start with the shape of the steel sheets and mimic pulling them together ('cos I can get good drawings of the steel sheets and their cut lines). I've been fooling about with possible methods of modelling the fair curves of a hull, and it seems there are two ways to go about it (though you guys can probably think of more).

      One is the method shown in the "model a boat hull" article: draw a couple of bezier curves and use soap/skin to warp a surface around them. The problem with this -- for me as a newbie CADista -- is that (a) the bezier curves while they "look boaty" do not conform to the actual shape of the hull in question, (b) the interpolated surface is hard to predict, (c) the relation of the two original curves in 3-space is a bit confusing to keep track of (d) the original curves need to be 3d, i.e. the "bend" in the line of the toerail is in two axes not just one. It might be better to make a Simple Generic Hull Shape and then use the FFD plugin to bend it this way and that to get closer to the actual lines, but when I tried this initially I found it difficult to get good (rather than amusing or grotesque) results. I'll try again. Practise, practise, practise πŸ˜„

      The other way to make a hull is to emulate trad wooden boat lofting. This means making a series of frames (vertical slices), lining them up properly, then using "skin" or equivalent to paint a hull around them. I think woodworker Dave Richards talks about using sections + skin to build up nice fair curved components like table legs. A standard wooden (or tradition rib-n-stringer steel) hull would have drawings detailing these sections or frames. But this is not how my boat was made, so I have no drawings for the sections. They could be inferred from careful measurement when hauled out, but...

      I guess one more possibility would be to "carve" a boat hull out of a solid: create a giant brick and then scoop away material along carefully drawn paths (using "follow me"? I have not really played with FM yet. It seems potentially powerful, but I'm not sure of its limitations). Alternatively, carve away a big solid with intersects, but either of these means shaping the "cutting tools" for subtractive modelling, which are just as complex as shaping the positive hull form. .

      I include here several pics of the boat being hauled for maintenance a couple of years back, to show the complexity and compound curvature of the shapes involved.

      note the tumblehome at the transom, i.e. the way the hull sides curve back in towards centreline...

      http://www.svtaz.org/Taz/Haulout.06/IMG_1023.JPG

      note the extreme sheer, i.e. the upward curve of deck line towards bow and stern away from a low point amidships...

      http://www.svtaz.org/Taz/Haulout.06/IMG_1030.JPG

      the deck, btw, is also whalebacked (higher on centreline than at the rails, for obvious reasons). the cabin tops are rounded. there is not a flat surface to be seen, except for one bottom section of the hull (dory hulled, with a flat bottom in the region of the twin keels). you can see the hard chine line just above the keel.

      http://www.svtaz.org/Taz/Haulout.06/IMG_1082.JPG

      the twin keels are vaguely foil shaped and not hard to model (I've already made an approximation of one. the flat dory bottom could be done with an intersect.

      http://www.svtaz.org/Taz/Haulout.06/IMG_1091.JPG

      It's the very compound shape of the hull that vexes me. Probably the worst problem for a newbie to tackle (something like a cabin or house design, mostly rectilinear, would be a far easier target for a novice!)... but I am not remodelling a house, I'm working on boats πŸ˜„ so these nasty, curvy surfaces are what I actually need to deal with. If anyone's got a suggestion for how to model a close approximation of a real boat hull, one with specific measurements and shape, rather than an imaginary boat hull, I am all ears!

      More pics of Taz under sail, for those who like boats. The sails present a whole other modelling problem πŸ˜„

      BTW, do smart modellers start from the smallest components and model "upwards", or start with large vague sketchy containers and then fill in detail "downwards"? My instinct is the latter, but for all I know that's stupid and I'll regret it later. Advice?

      posted in Newbie Forum
      R
      RootlessAgrarian
    • RE: Stitching surfaces

      Hi Pilou... well here are some photos of the principle applied to a boat hull, aka the "origami method" of hull construction. they are not quite as clear as I would like but I imagine you will get the idea.

      http://www.moonflowerofmoab.com/images/PA170079.JPG

      flat sheet of steel with cutout "darts" and shape for future contoured seams

      http://www.moonflowerofmoab.com/images/PA250024.JPG

      one half hull with darted edges stitched up, the other about to be pulled together with comealongs

      http://www.moonflowerofmoab.com/images/PA270001.JPG

      two half hulls tacked together, bow seam still open

      http://www.moonflowerofmoab.com/images/PA300003.JPG

      rounded transom tackwelded on, pulling sides into shape

      http://www.moonflowerofmoab.com/images/PB200045.JPG

      centreline being tacked up, pulling bow into shape

      http://www.moonflowerofmoab.com/images/P3280026.JPG

      completed hull is fair throughout, no ribs

      Similar techniques are used in plywood boat building -- see "Stitch and Glue" -- Sam Devlin wrote a good book about it πŸ˜„ here's a typical cut plan

      http://www.ee.hacettepe.edu.tr/~semih/d4/panels.jpg

      Again the idea is that shaped panels are cut out and their edges married (stitched and glued together), so that the panels deform and under tension produce a monocoque structure, stiff and light. As Devlin's web site says:

      @unknownuser said:

      The differences between conventional plywood-on-frame and β€œStitch and Glue” construction are significant. To better understand the differences between the two, contrast the structural dissimilarities of an early biplane and a modern jet airliner. The biplane was made up of frames and spars over which was stretched a thin skin. The jet airliners structure, on the other hand, is much simpler, with a stressed aluminum skin rigidly attached to bulkheads and spars to create a single monocoque unit. A boat built by attaching plywood planking to lumber frames is most similar to the biplane; a β€œStitch and Glue” more closely resembles the jet airliner, a homogeneous structure in which the skin bears the primary stresses.

      sorry about the huge images... BBCode img tag doesn't seem to permit scaling...

      another example would be the cutting of sails with varying draft: pieces of sail cloth are laid out on the loft floor and cut with curved edges; when the edges are properly married and sewn up, the sail has the right amount of camber, "belly", etc. when filled by wind pressure.

      does this explain sufficiently my probably-foolish speculation?

      posted in Newbie Forum
      R
      RootlessAgrarian
    • RE: What ever became of ... Sandbox?

      @gaieus said:

      (you may need to scroll a bit as there are so many extensions nowadays).

      I need to get outside for a few hours πŸ˜„ staring at this screen too long. yes, if I bother to scroll further down I see it fine. fatigue error. mumble, stare at feet. this also prolly answers my 'face restore' q as I see just such an option in the extensions stash.

      posted in Newbie Forum
      R
      RootlessAgrarian
    • Restoring a lost face

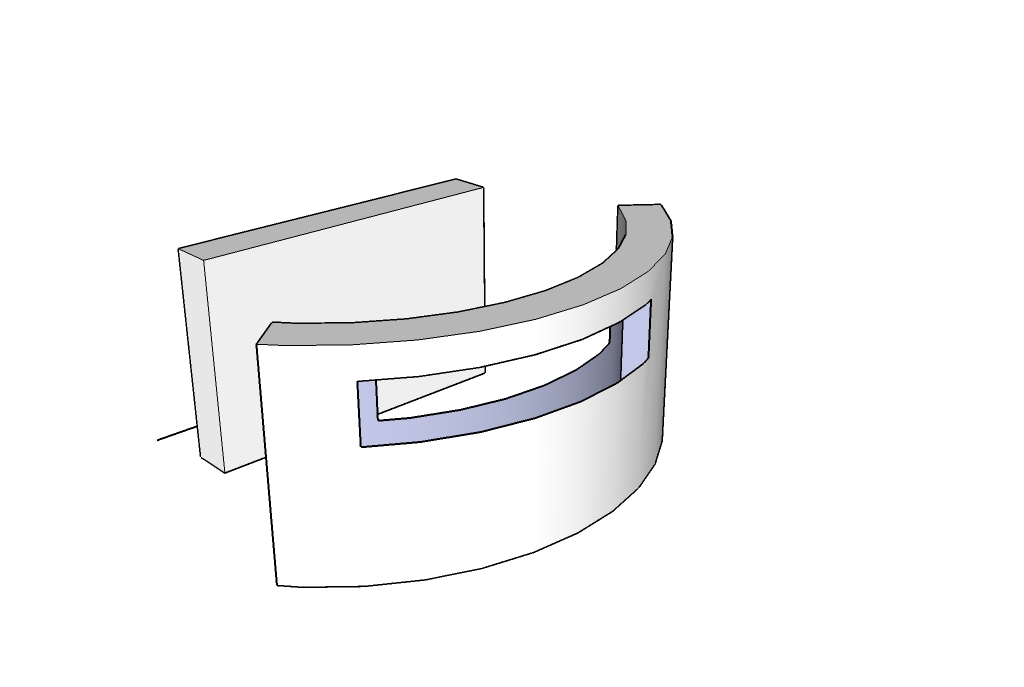
      I've just been bending shapes with clf shape bender (which does rather odd things if I try to use it in the neg quadrant of XY plane, but works dandy in the pos quadrant)... and having made a "curved wall" I tried to put a window through it by means of an intersect. I woulda liked to draw a rectangle on the curved face and then push it out, but that didn't seem possible.

      alas, I lost the inner faces around the window after deleting bits of the intersect.

      what's the best-practise way to restore those missing faces? I googled for "sketchup face restore" and found an old post, marked RETIRED (previous version?)... didn't seem helpful. I've attached a jpg of the messed-up wall.

      I think my next step is to walk through all the Beginner tuts at sketchucation in the hope of broadening my grasp of the basics, otherwise I'll be asking stupid questions here for days to come. sorry abt the noise. I'll go away and try to self-educate for a day or two now.


      curved wall with missing faces

      posted in Newbie Forum sketchup
      R
      RootlessAgrarian
    • What ever became of ... Sandbox?

      In the official Google SU manuals, mention is made of a Sandbox extension (for deforming and texturing large surface, as for landscape/terrain effects). However, when I try to follow the instructions for enabling this extension, I find that it is not listed in the dialogue box for Extensions.

      I Google around a bit looking for a Sandbox extension online, and find Nuffin. Has it been renamed under v7, or incorporated into the core, or...?

      posted in Newbie Forum sketchup
      R
      RootlessAgrarian
    • Stitching surfaces

      More newbie ignorance...

      has anyone written or even attempted a plugin that would "stitch" two shapes together along selected edges, deforming as necessary?

      I ask because this is a common procedure in sheet metal work (not to mention tailoring, a whole unexplored territory for a tool like Sketchup!): you cut out two shapes -- possibly with curved edges, which makes life interesting -- then using tack welds and tensioning you pull them into a 3-d shape. the shape is predetermined by the behaviour of the sheet material under tension.

      a similar effect can be done using soap-bubble, skin, etc., but the difference is that the surface thus created is an interpolation inside (or around) a 3d poly wireframe, and not the actual surface originally drawn, i.e. not the actual sheet of flexible material (in real world terms). the math would be pretty hairy -- we'd have to assume zero stretch, I guess, and even then it makes my brain hurt. but I have seen so many brain-hurting accomplishments in the last couple of days of Discovering Sketchup that I'm beginning to believe these Ruby-speaking geometry hackers can do anything.

      I just wondered if anyone had had a whack at a "reverse unfold" -- something that would create 3d shells out of "peel" segments that started out flat.

      dumb question? probably πŸ˜„

      posted in Newbie Forum sketchup
      R
      RootlessAgrarian
    • 1
    • 2
    • 1 / 2