sketchucation logo sketchucation
    • Login
    1. Home
    2. hellnbak
    3. Posts
    Oops, your profile's looking a bit empty! To help us tailor your experience, please fill in key details like your SketchUp version, skill level, operating system, and more. Update and save your info on your profile page today!
    🔌 Easy Offset | Offset selected faces in SketchUp in positive and negative offsets. Download
    Offline
    • Profile
    • Following 0
    • Followers 1
    • Topics 199
    • Posts 2,103
    • Groups 1

    Posts

    Recent Best Controversial
    • RE: Designing my new mower stand

      @jenujacob said:

      @hellnbak said:

      ...but when I'm having fun with a model I just can't seem to back off. And I did learn a LOT about my mower while researching everything....

      I can totally understand this... glad to know that I am not the only one!
      cool project though! keep us posted here! 👍 👍

      Thanks. It's still in the develpment stage. For example, I've decided to add some slots to let me slip in a plank in case I need to use a scissor jack to let me remove a wheel, or whatever
      2019-09-12_164653 A.jpg

      posted in WIP
      hellnbakH
      hellnbak
    • RE: Designing my new mower stand

      @hornoxx said:

      :shock: 😲 👍 wow! - what an unusual but even more cool and real project this is!! Excelent!

      Much appreciated!

      posted in WIP
      hellnbakH
      hellnbak
    • RE: Designing my new mower stand

      The stand, part 2

      So, a little background on this project. As I had mentioned I had built a stand similar to this probably about 17 years ago, and while it did indeed made working on my mower at the time (can’t remember what model or year it was) much easier, unfortunately I sort of “designed” it as I went. It got the job done and I used it countless times, but it was clunky and took up a lot of room in the barn when disassembled and stored. But worst of all, for whatever reason, I did not use treated lumber. I did apply two coats of a gray paint that was supposed to seal it and protect it from the elements, but after about maybe six or seven years or so it started getting soft in places and it just wasn’t safe to use anymore. (If I was concerned enough about it being out in the weather to go all that trouble why the hell didn’t I just use treated lumber???).
      I did manage to find some photos of it, but they are of poor quality (digital cameras of the time weren’t all that great, mine actually stored the photos on floppy disks).

      MVC-728S.png
      They were taken the day I first got the nerve to drive the mower up on it, before I decided to add the sacrificial wood blocks under it to keep it up off the concrete, and then disassemble and paint it.

      MVC-732S.png
      With ramp and center sections removed (the ramps were foldable). Had a lot of people stop and ask me about this, how the heck I got the mower up there. Should have charged admission.

      2019-04-26_200157 A.jpg
      I used the photos to jog my memory enough to build a model of it (not sure why). I do remember that I had countersunk all of the lag bolts. Dumb decision and completely unnecessary . I ended up having to fill all the holes around the bolt heads with caulking to keep them from filling with water and soaking into the wood. (I didn’t bother countersinking the bolts in the model).

      2019-05-01_103126 A.jpg
      The removable center sections were indeed clunky and over-thought.

      2019-04-29_025146.jpg
      But, back to the new stand. I used simple stand-in tires of correct size and spacing to ensure everything would work with my mower (everything was modeled on a one-to-one scale, full size).

      2019-05-01_022420.jpg
      And then I sorta went a little crazy with it

      2019-05-01_200229.jpg
      2019-03-05_014608.jpg
      2019-04-28_112210 C.jpg
      2019-05-03_153459.png
      2019-04-22_204835.jpg
      Not sure why I bothered with all this, it wasn't necessary for modeling the stand, but when I'm having fun with a model I just can't seem to back off. And I did learn a LOT about my mower while researching everything. Still lots of parts and pieces missing, obviously, probably more than are actually there, and I'm not sure I'll ever finish it. But maybe after I get the stand finished and get it up where I can see and measure everything easier.

      posted in WIP
      hellnbakH
      hellnbak
    • Designing my new mower stand

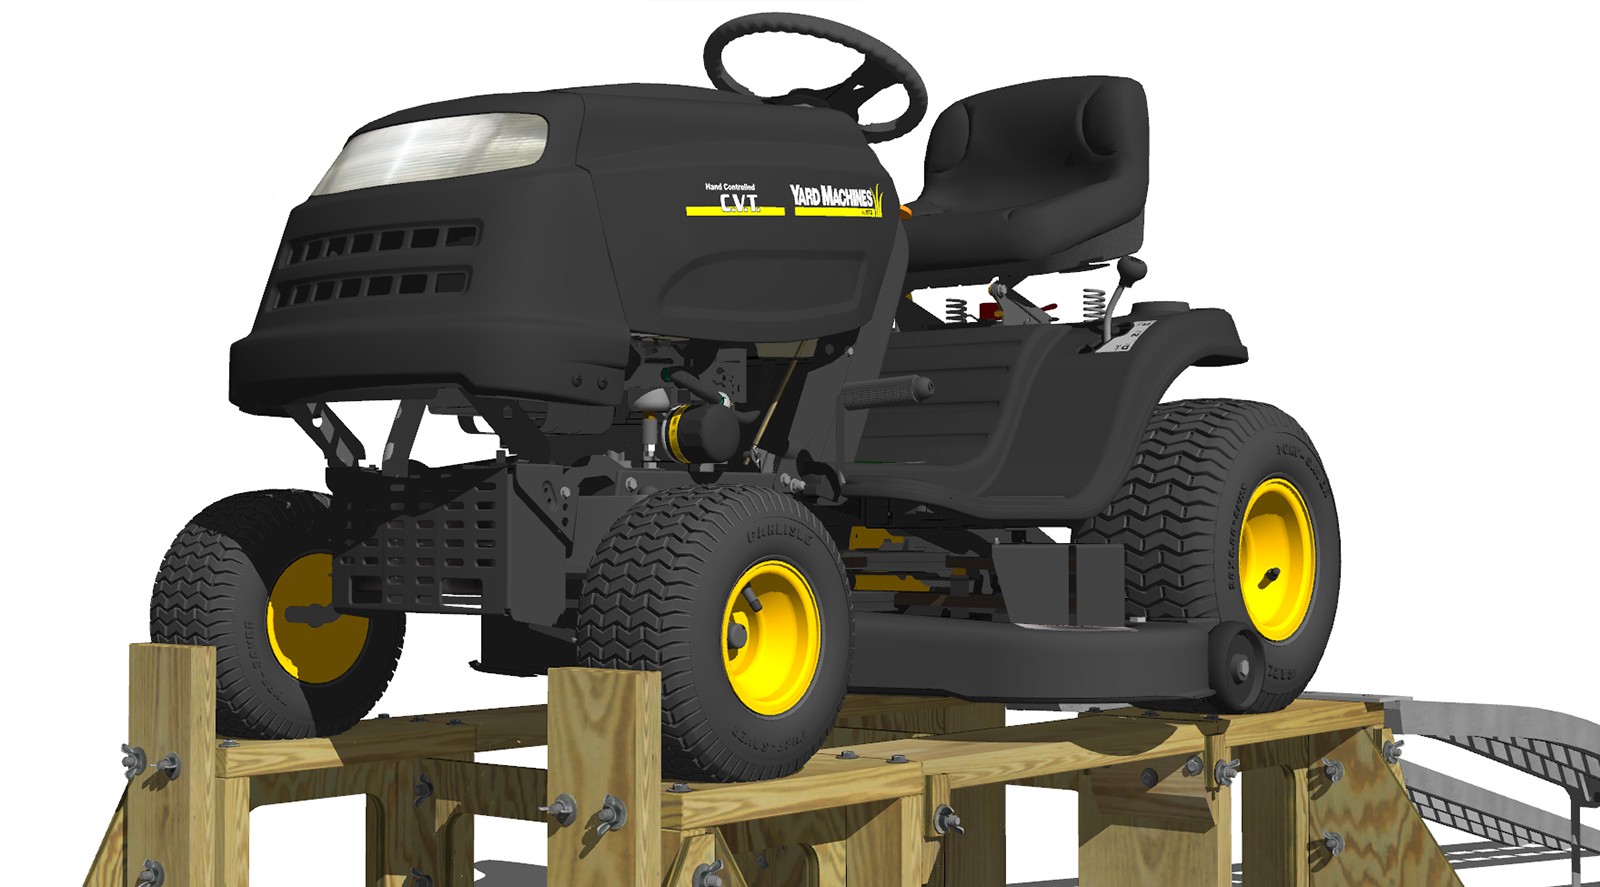
      Been designing a stand to make working on my riding mower easier, and thought I would post it here and see what you think. Comments, criticisms and suggestions are more than welcome.

      DSCF0297.jpg
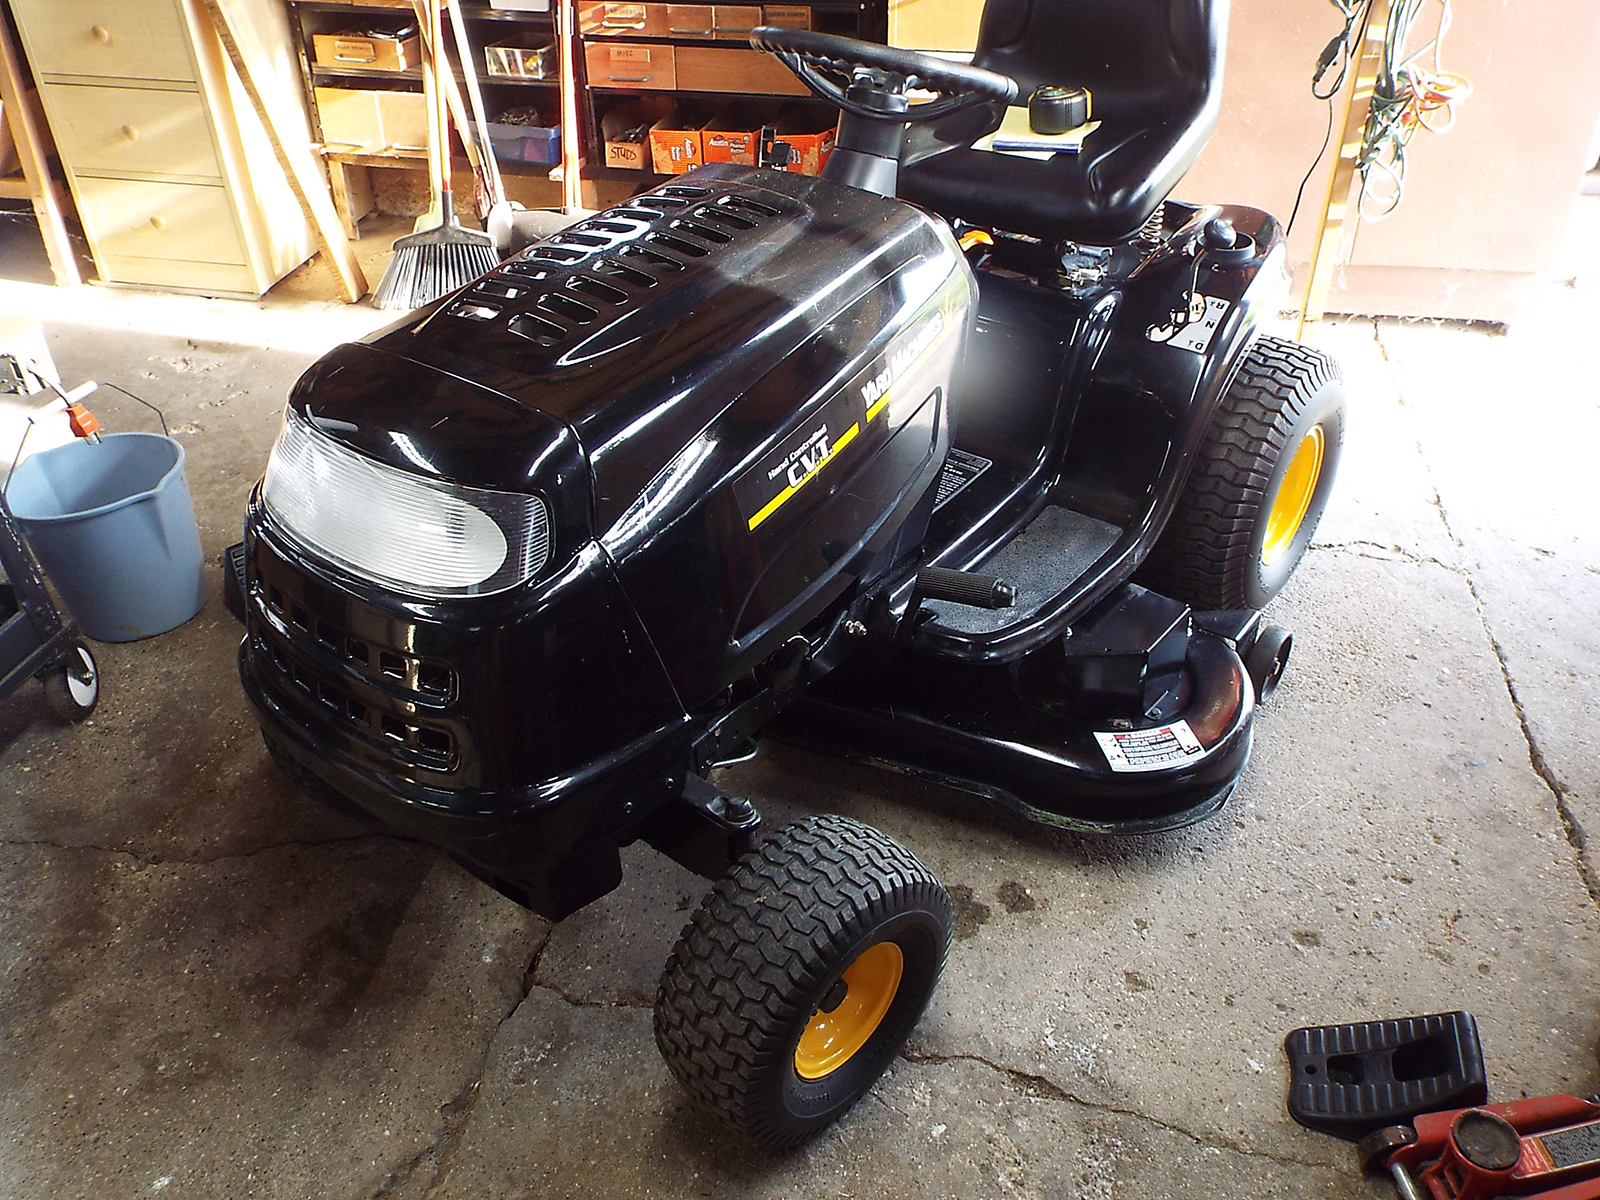
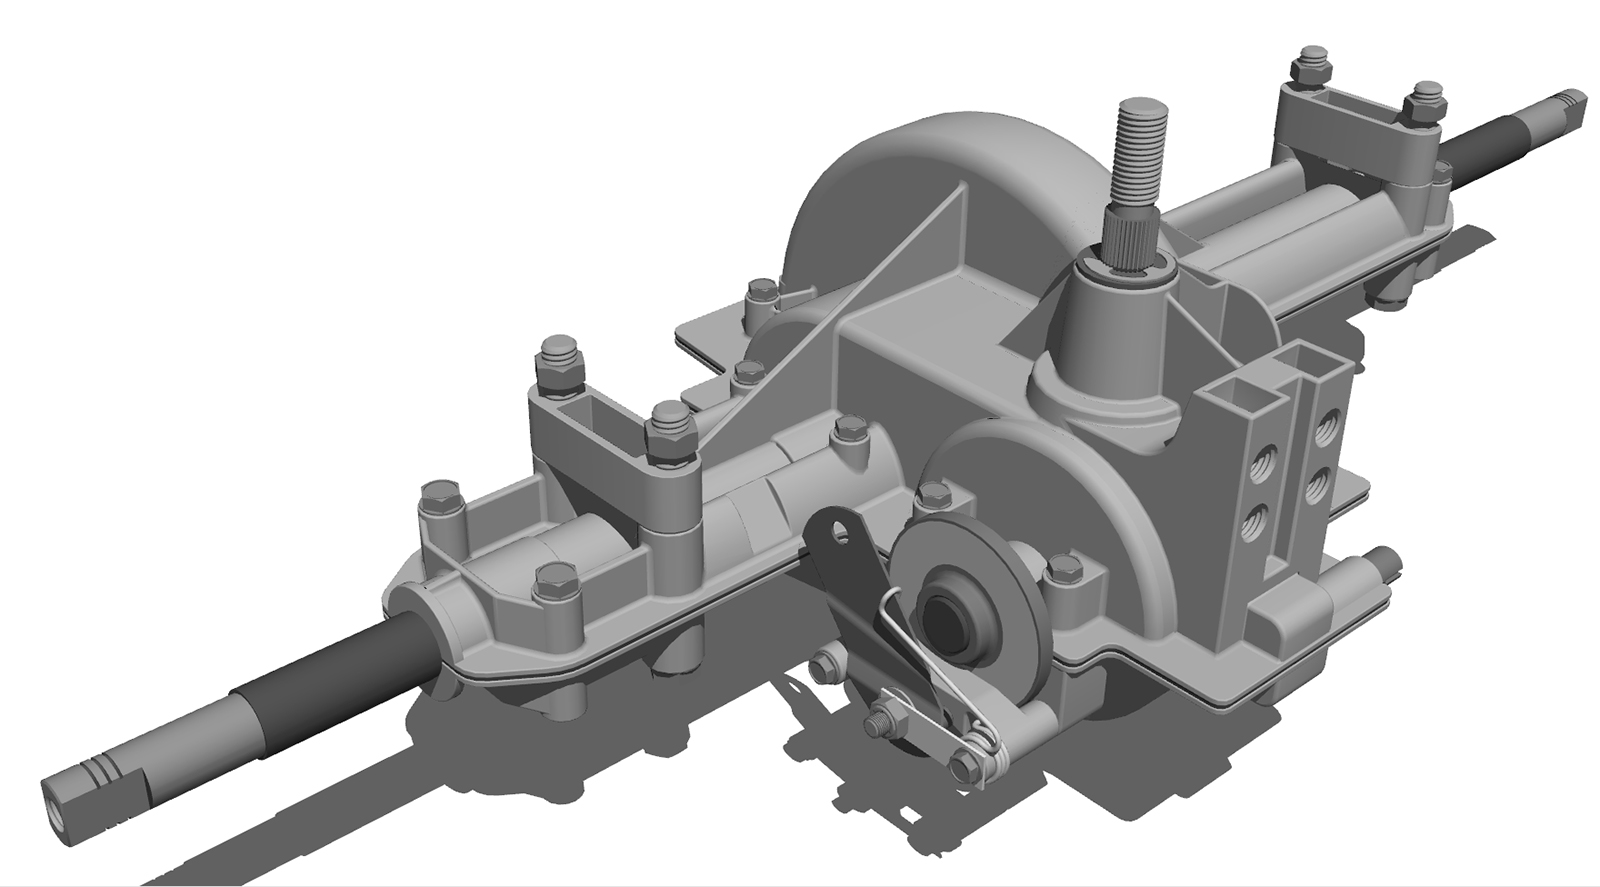
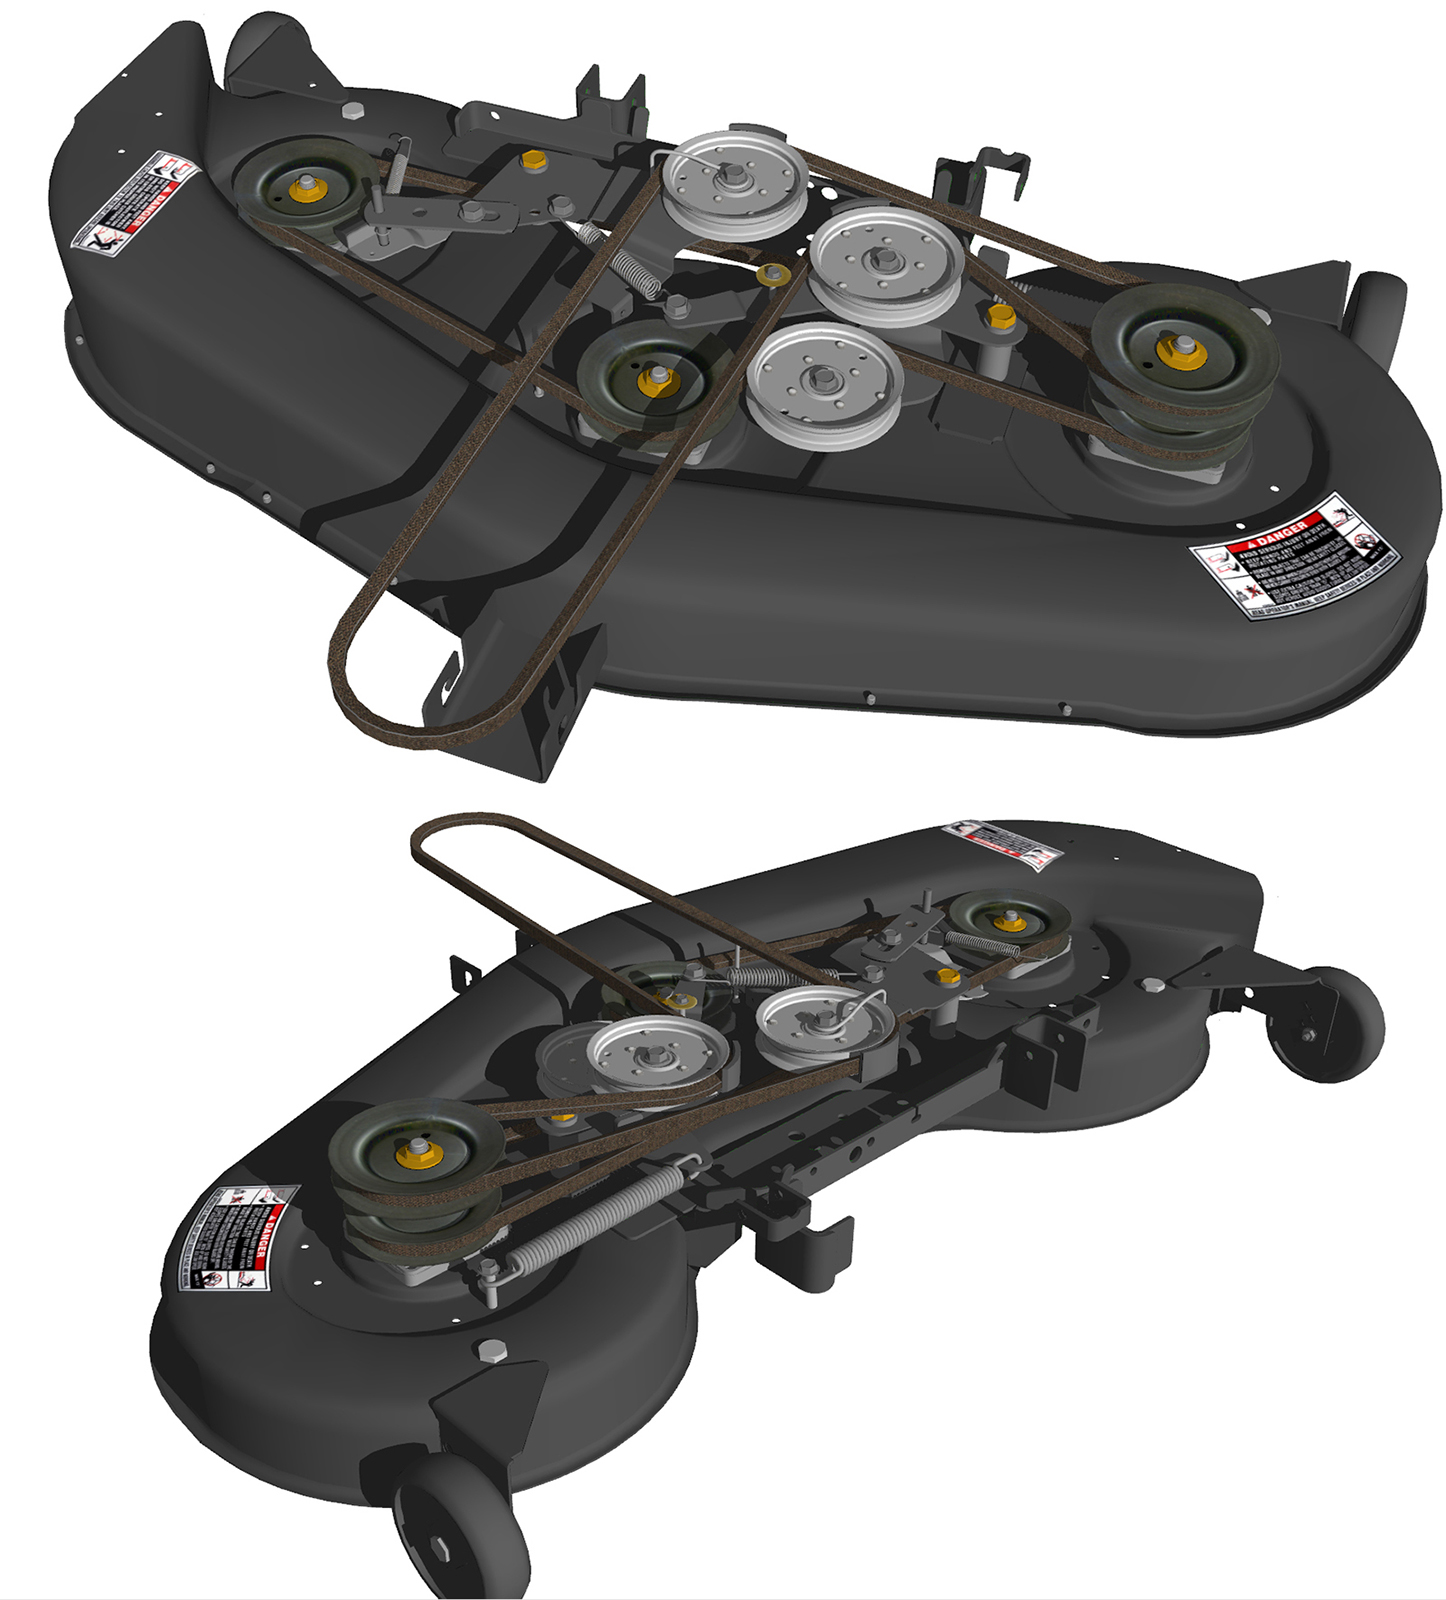
      I have a 2007 MTD 13AN771H729 46 inch, and, while I generally like it a lot, doing maintenance on it can be a real pain. Removing the deck on this thing is anything but straight forward, and I’m a long way from being a spring chicken (whatever that means) and getting down on the ground (and back up) can be very difficult.

      2019-04-24_084912.jpg
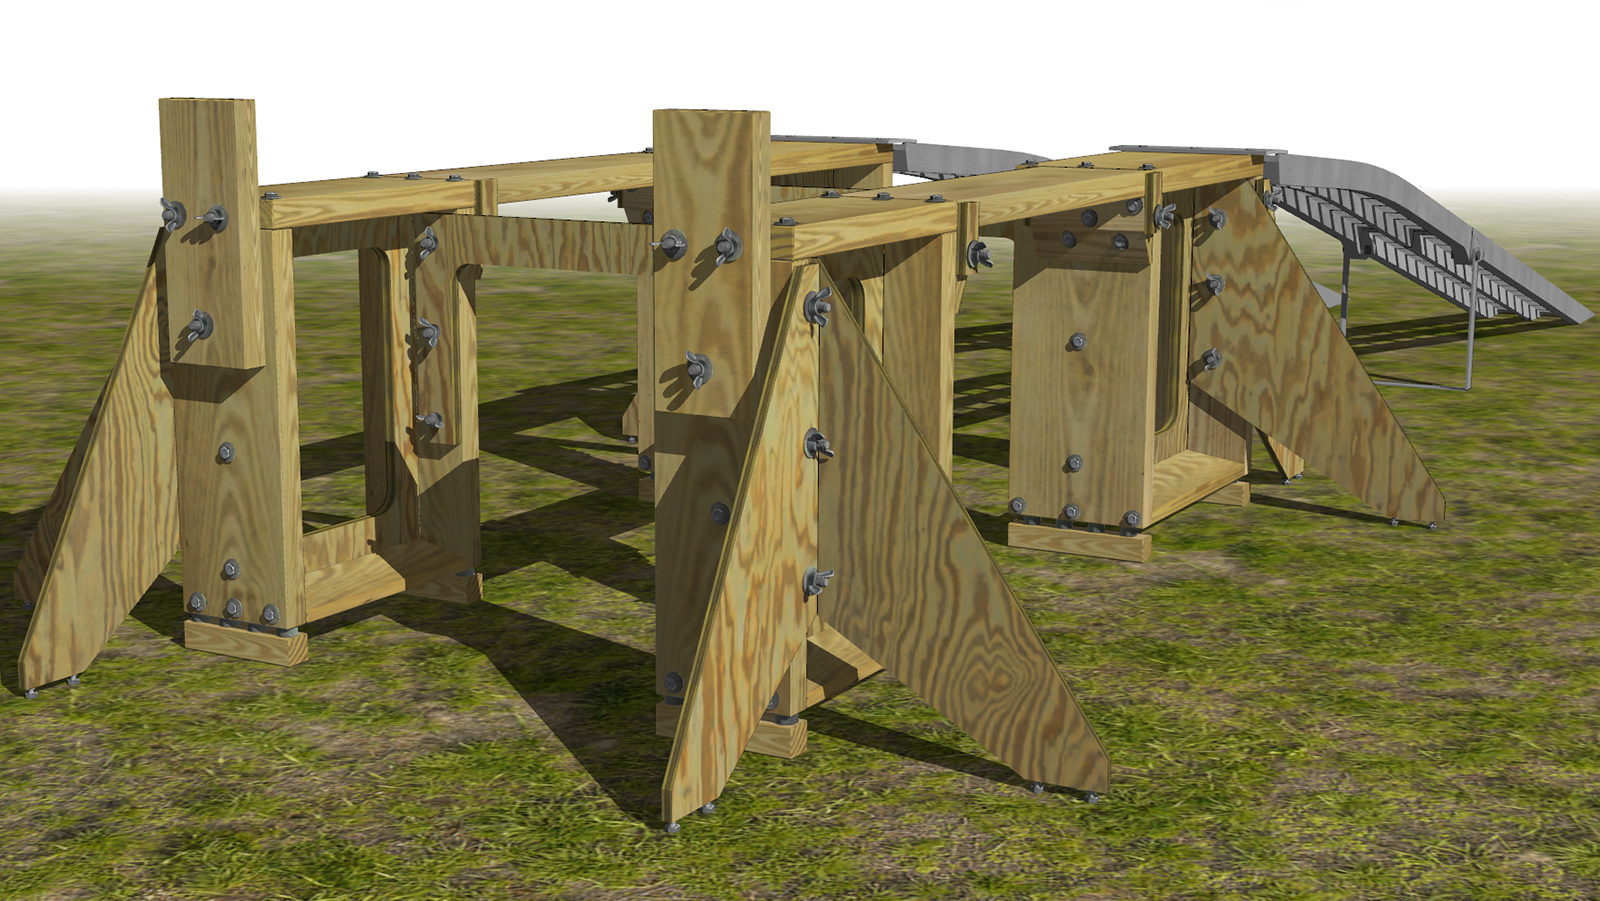
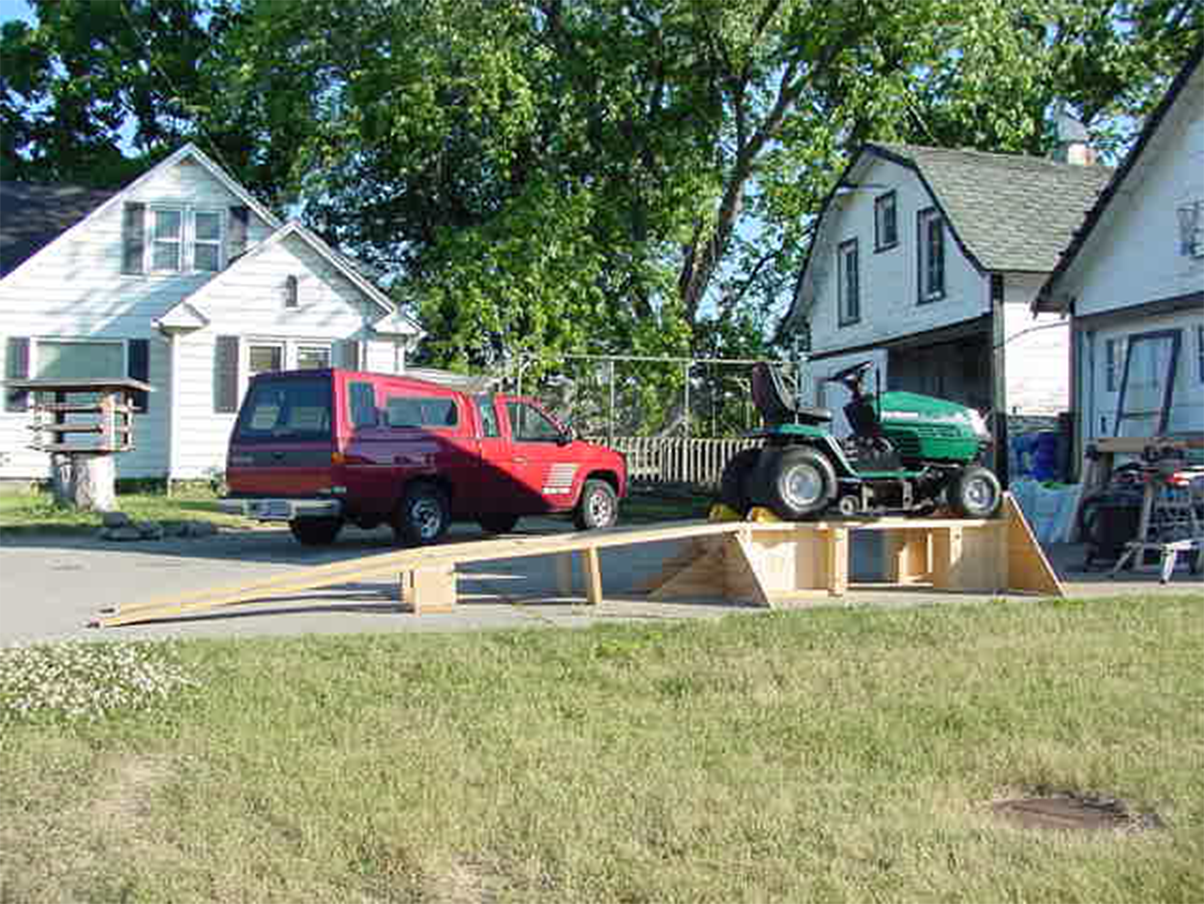
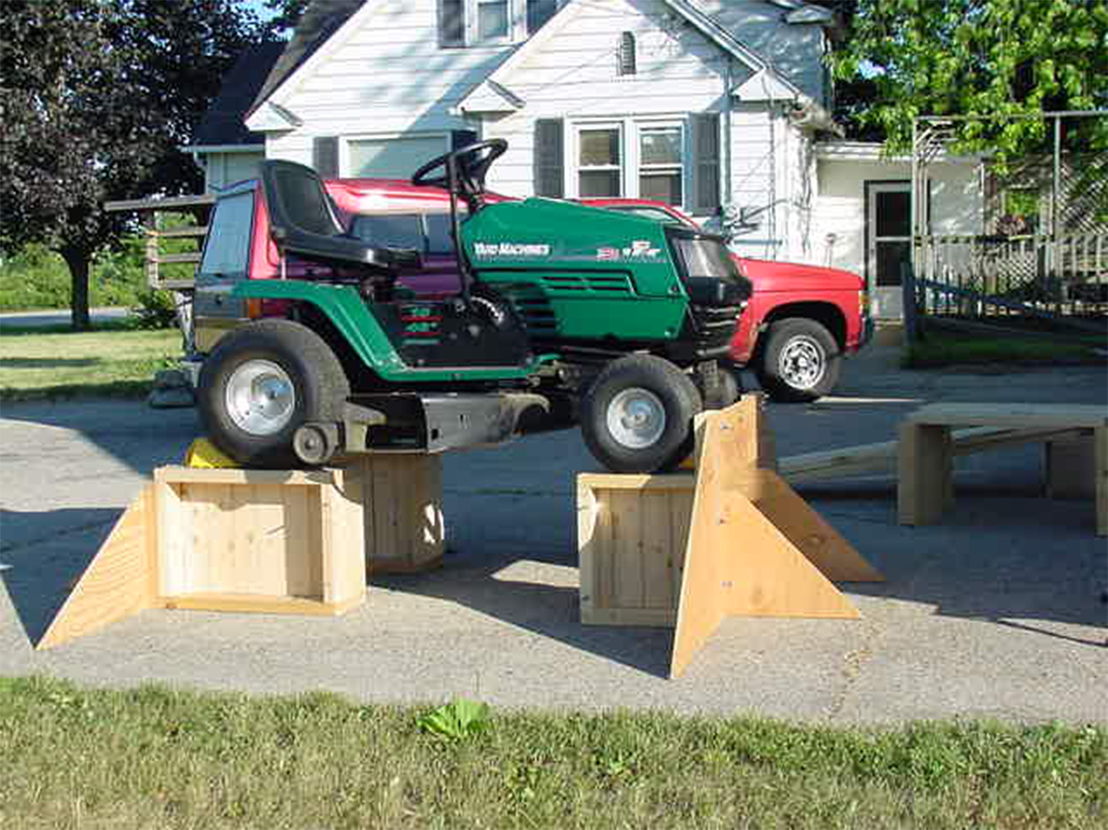
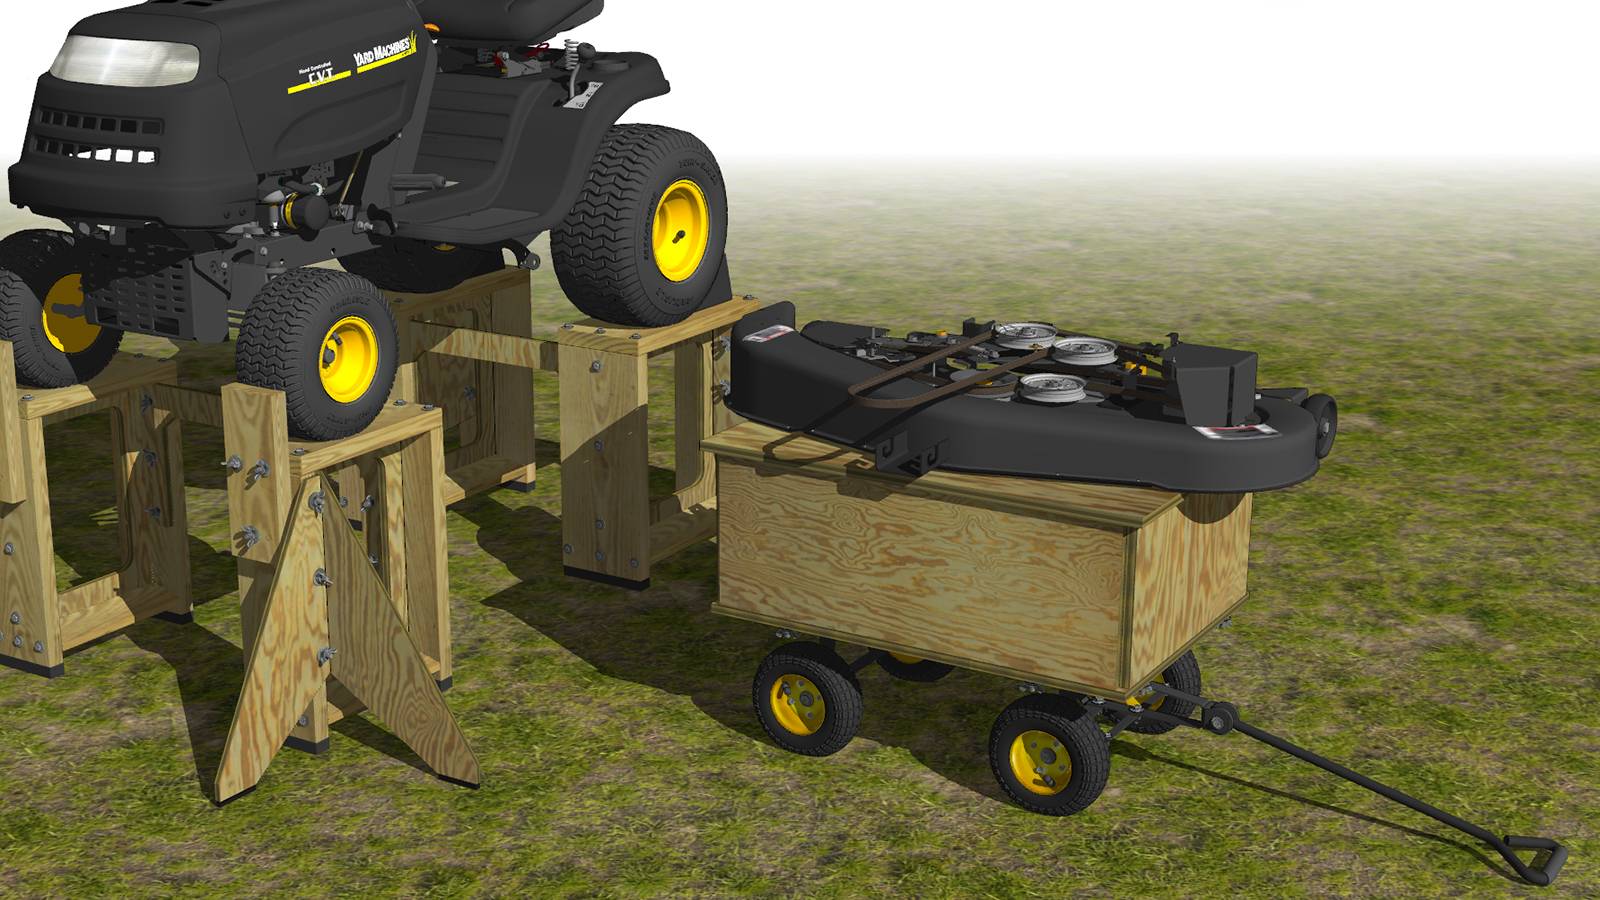
      So I’m going to build this to get the mower up where I can work on it at a comfortable level. I had built a similar stand many years ago, but let’s just say I didn’t really plan that one very well. More on that later. Keep in mind that this is designed for my particular situation. I live in an old farmhouse, and it has a small barn and workshop with a large concrete slab in front of them. While I do use a grass texture in some of the photos, that is just to give it a base (and I’m too lazy to develop a decent concrete texture). It would not be suitable for use on the ground. The slab is large enough that I can leave it up all summer without it being in the way, so I will assemble it in the Spring and disassemble and store it when the mowing season is over. I could maybe/sort of use it in the barn, but it would be tight, to the point that actually working on the mower would be too much of a pain (the barn, like the other buildings, including the house, was designed by children and built by fools).

      2019-04-24_160442.jpg
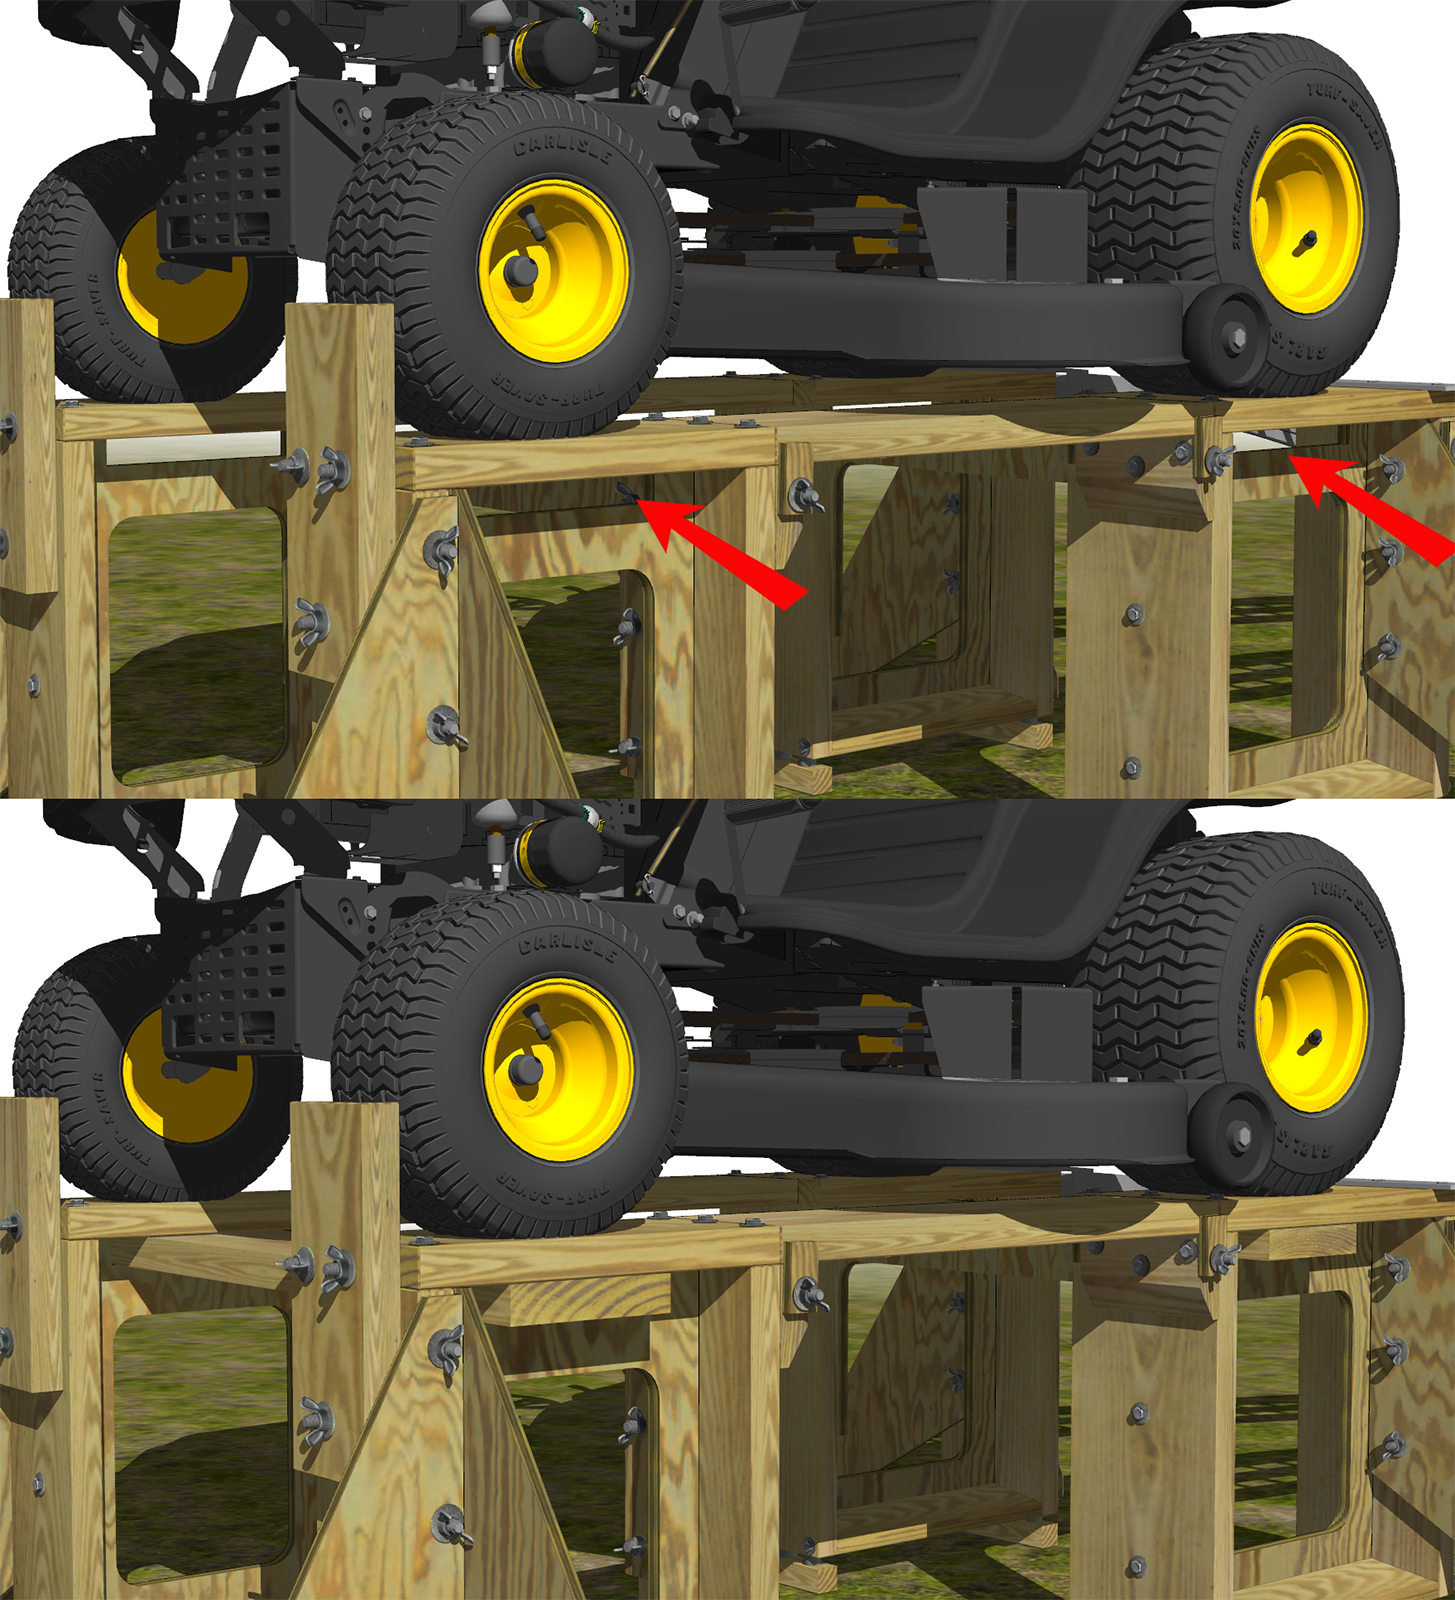
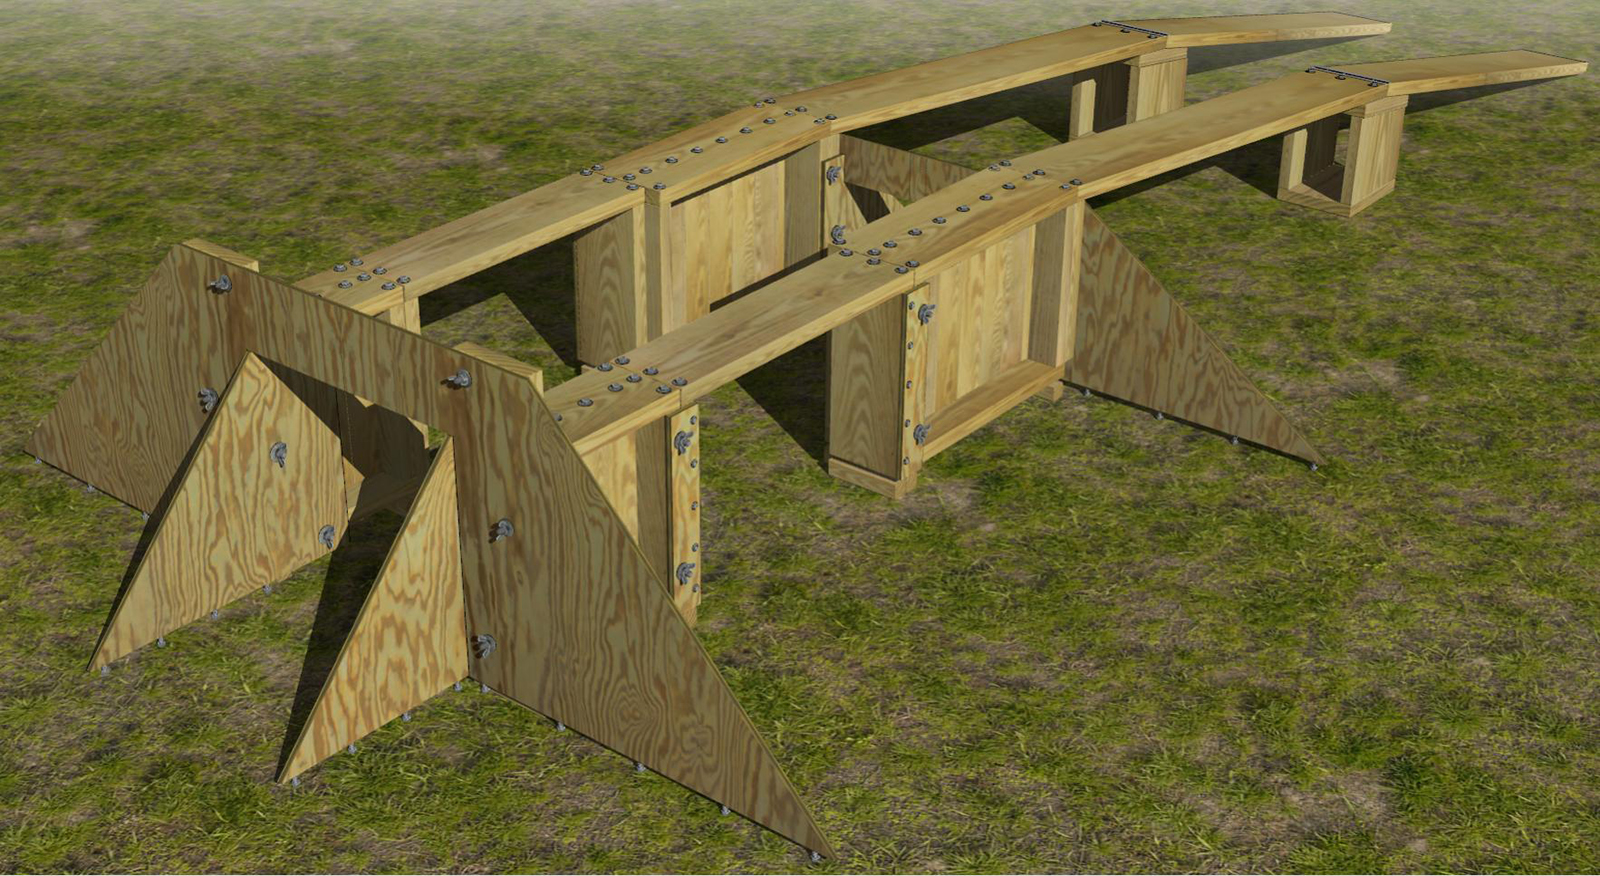
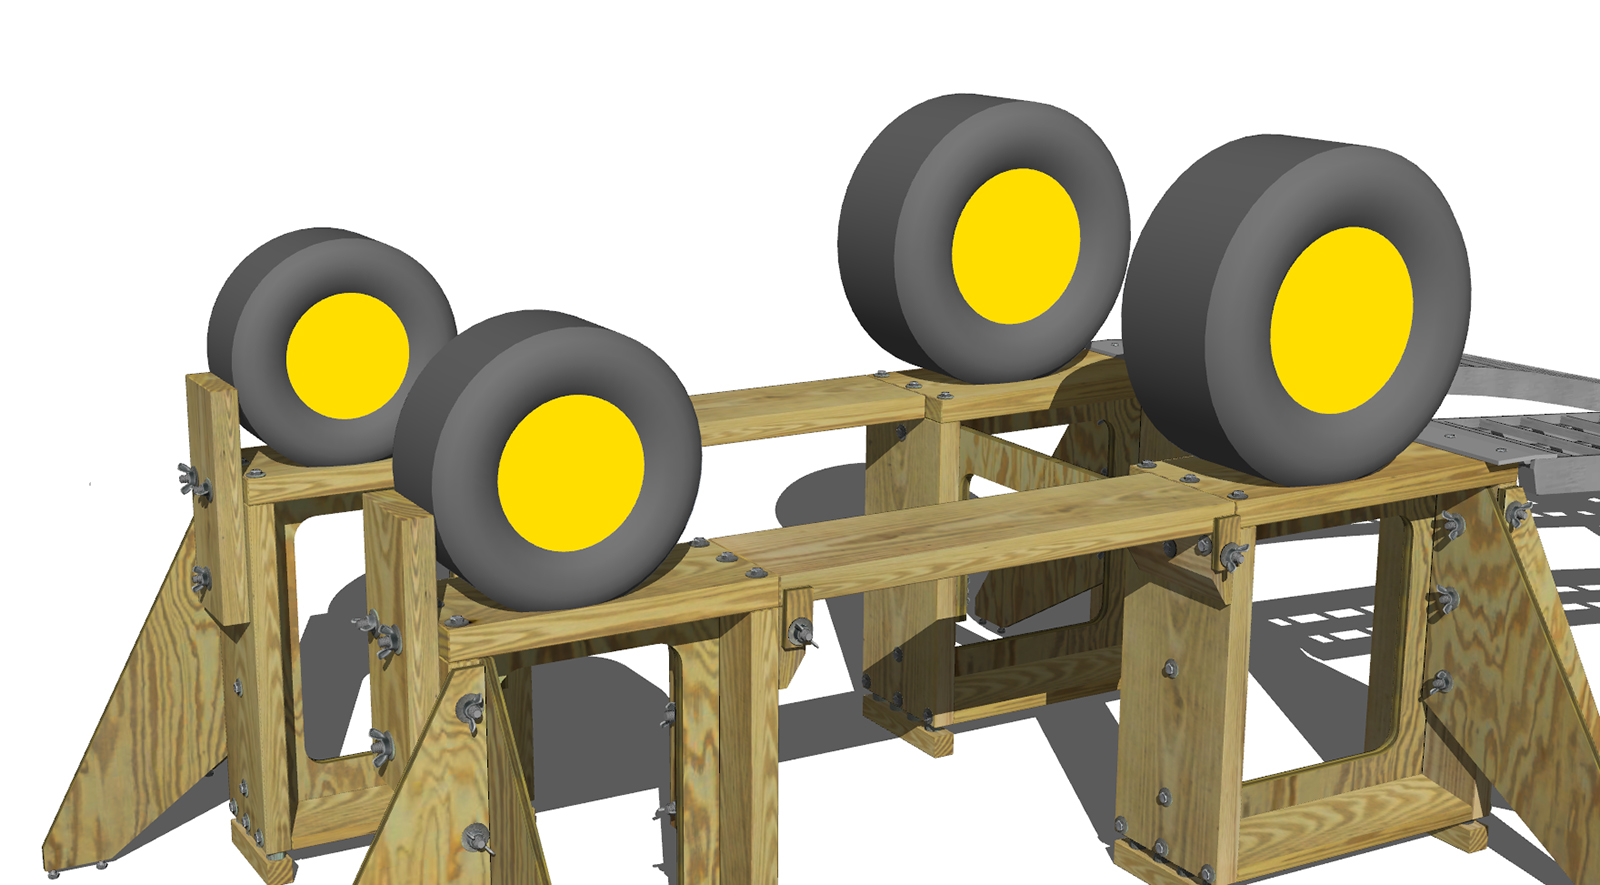
      The center sections can be easily removed to facilitate working underneath the mower, and for removal and installation of the deck. Ramps can also be quickly removed to make working around the mower easier.

      2019-04-26_171549.jpg
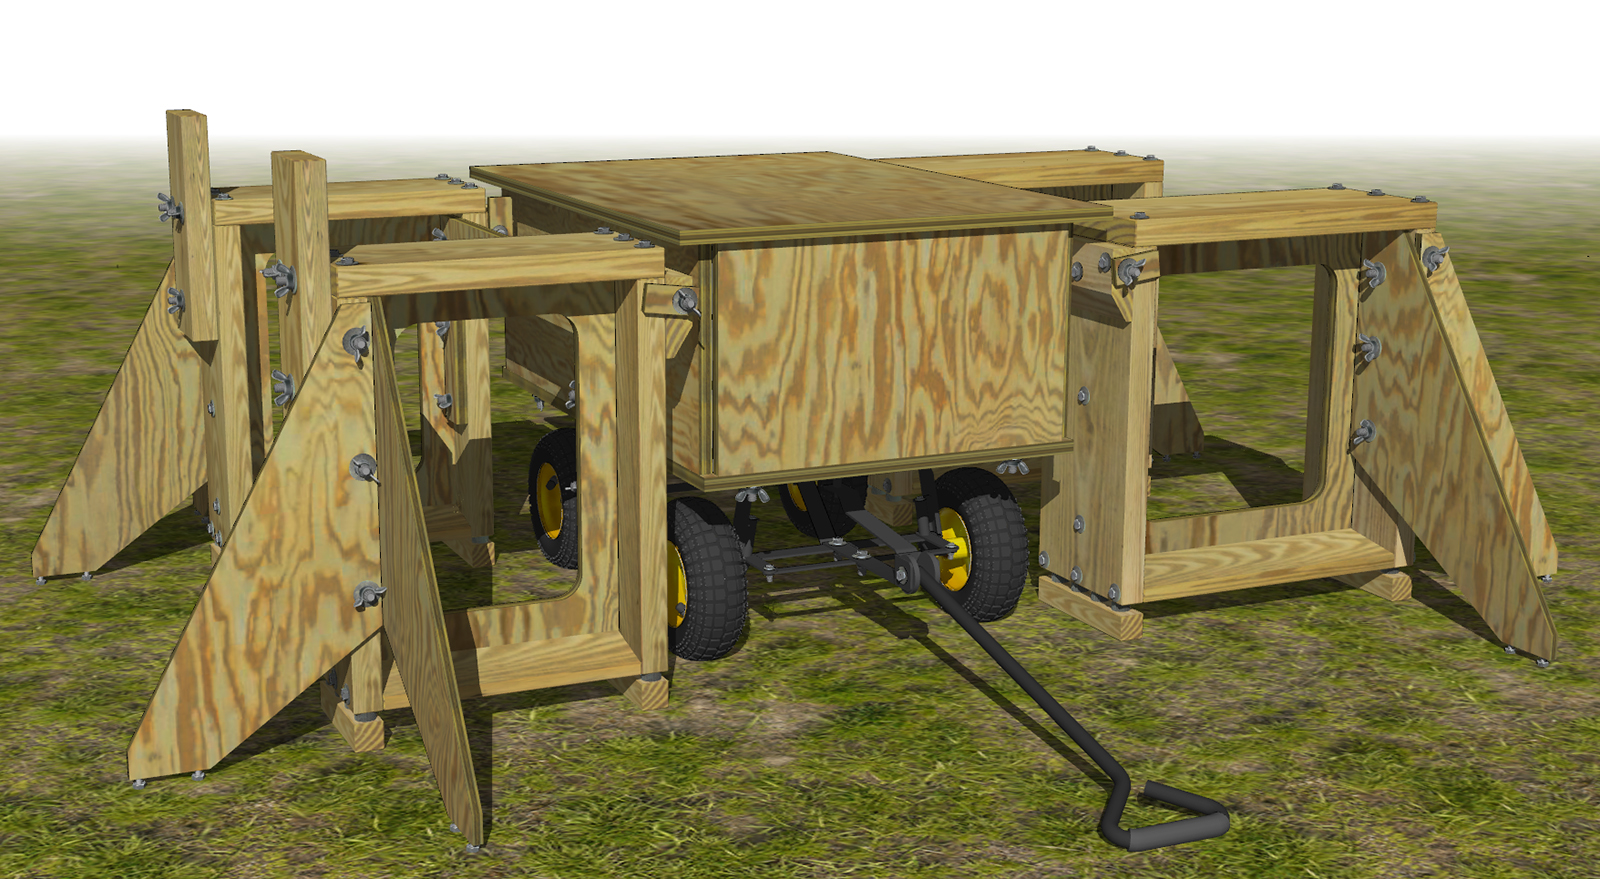
      I have an old garden wagon, from which I have removed everything on top and attached a slab of ¾” plywood. I’ve been using it to haul things around, and I will just attach the “box” (with piano hinges inside to let it fold flat for storage) with wing nuts on lag bolts. The top will have lips to set it on the box.

      2019-04-26_180428.jpg
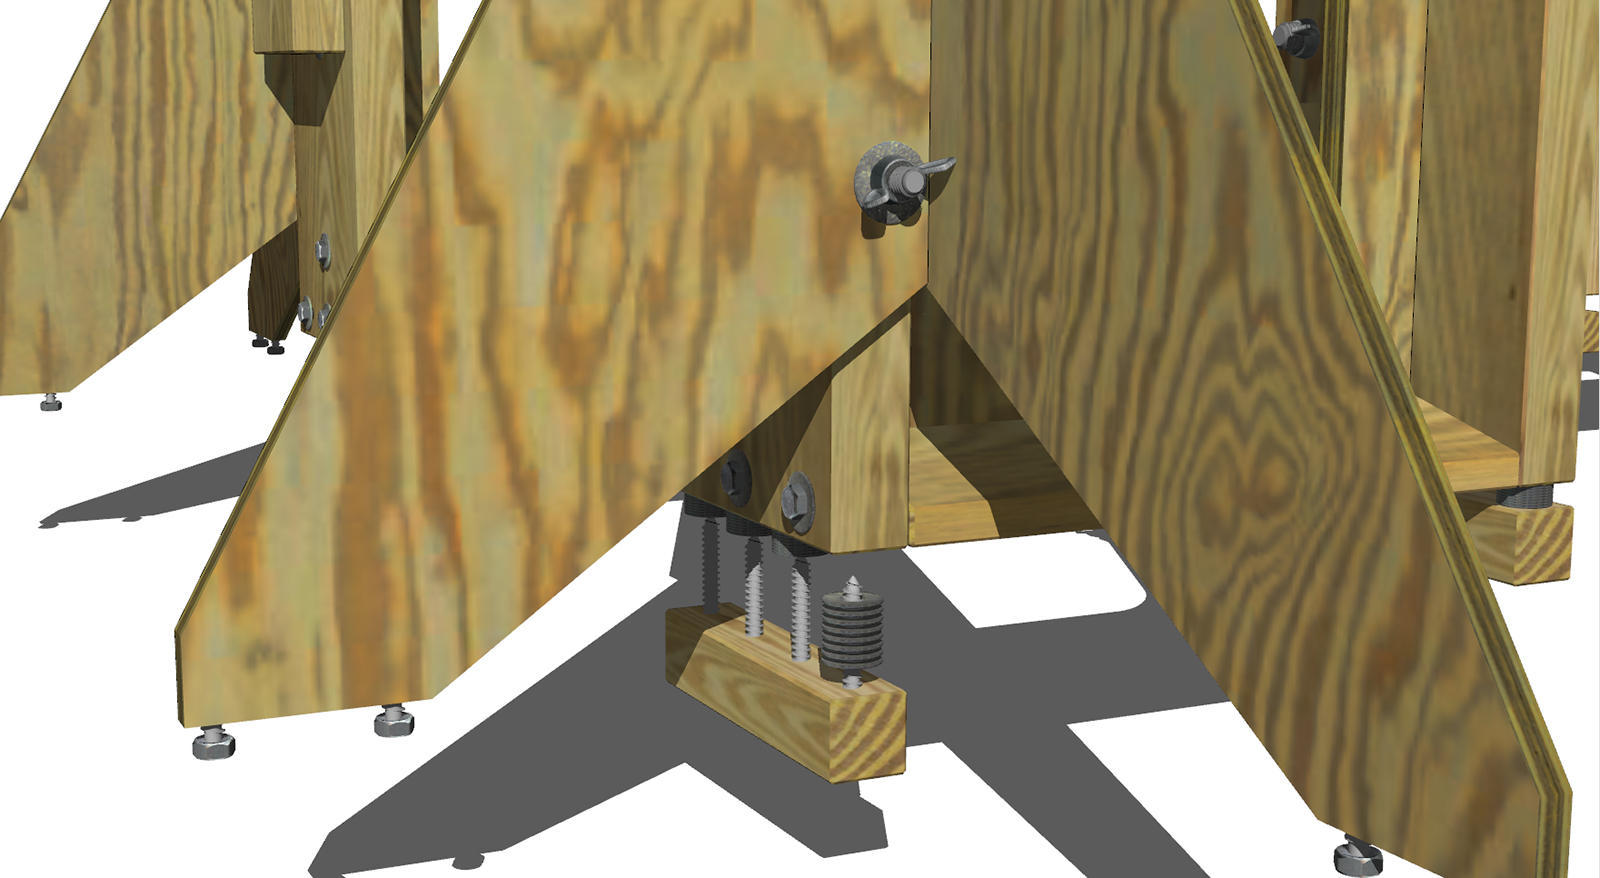
      I don’t want the actual stand to be in constant contact with the concrete so I will use “sacrificial” wooden blocks, separated by a number of washers on the lag bolts. Easy to replace and I will just make an extra set or two when I make them. I will just use lag bolts to lift the “outriggers” away from the concrete. This is the same setup that I used on the original stand and it worked well.

      2019-04-27_093819.jpg
      I am also considering the use of some type of hard rubber blocks, but I’m moving away from that for now due to some concerns about it’s suitability.

      2019-04-27_082441 A.jpg
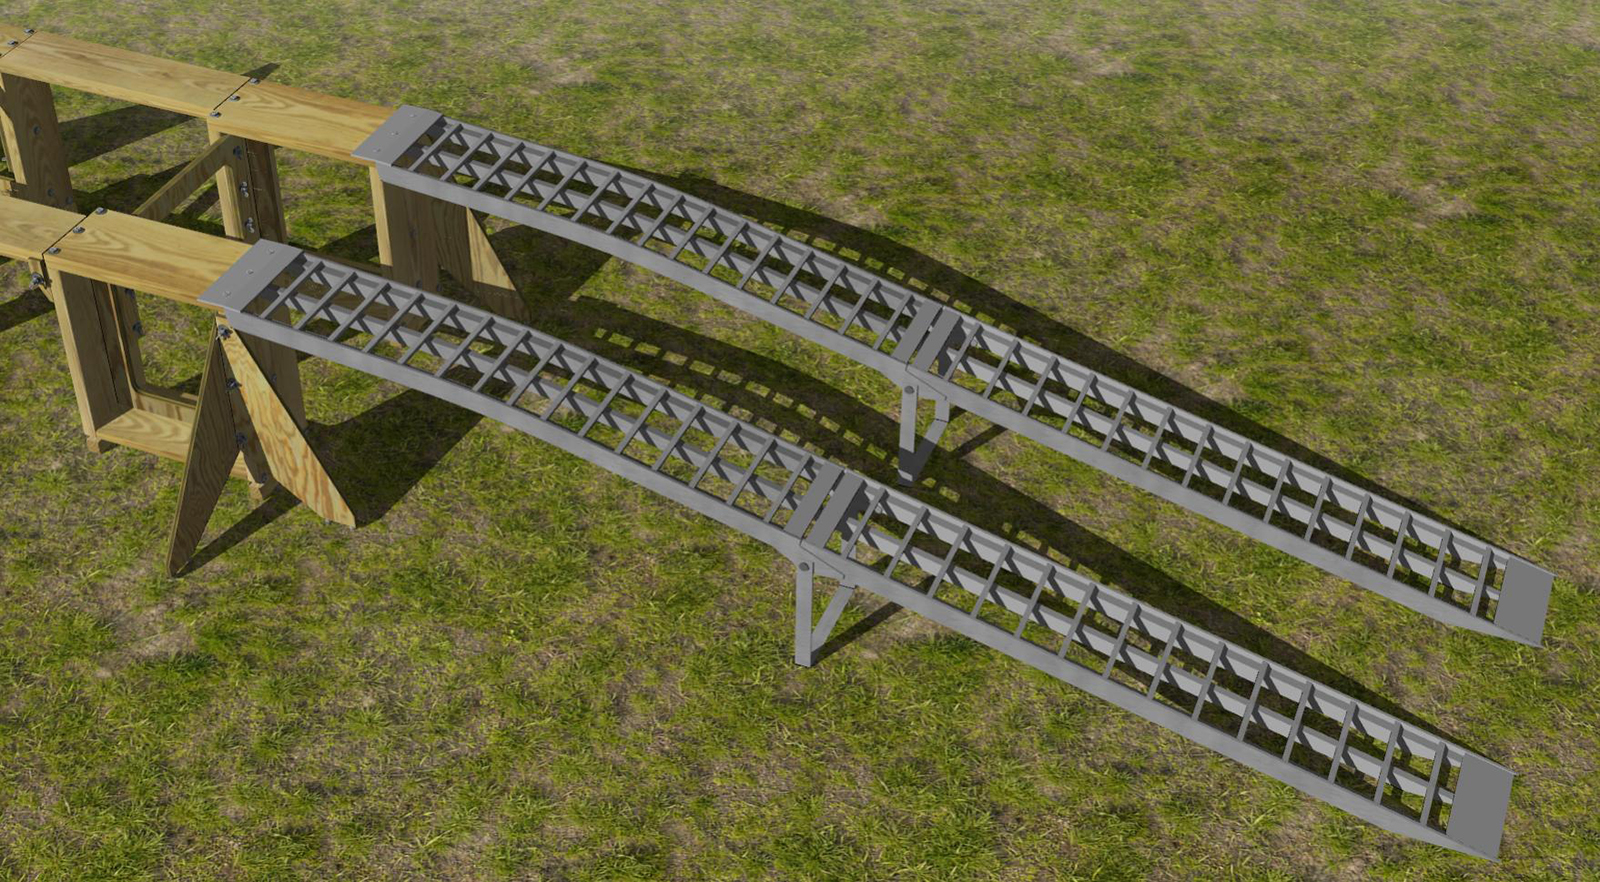
      While the original had wooden ramps, I’ve decided to go with aluminum for this one. There are any number of them available online, but I have narrowed it down to a select few. Reading the reviews it’s not too surprising that the main problem with this type of ramp is the area where the two sections join/fold. That is obviously the weak point, so I plan to add a support of some type (possibly a swing-down support)to take care of that. The design of that support and how the ramps will connect with the stand will have to wait until I have decided which ramps to order.

      2019-04-26_200657.jpg
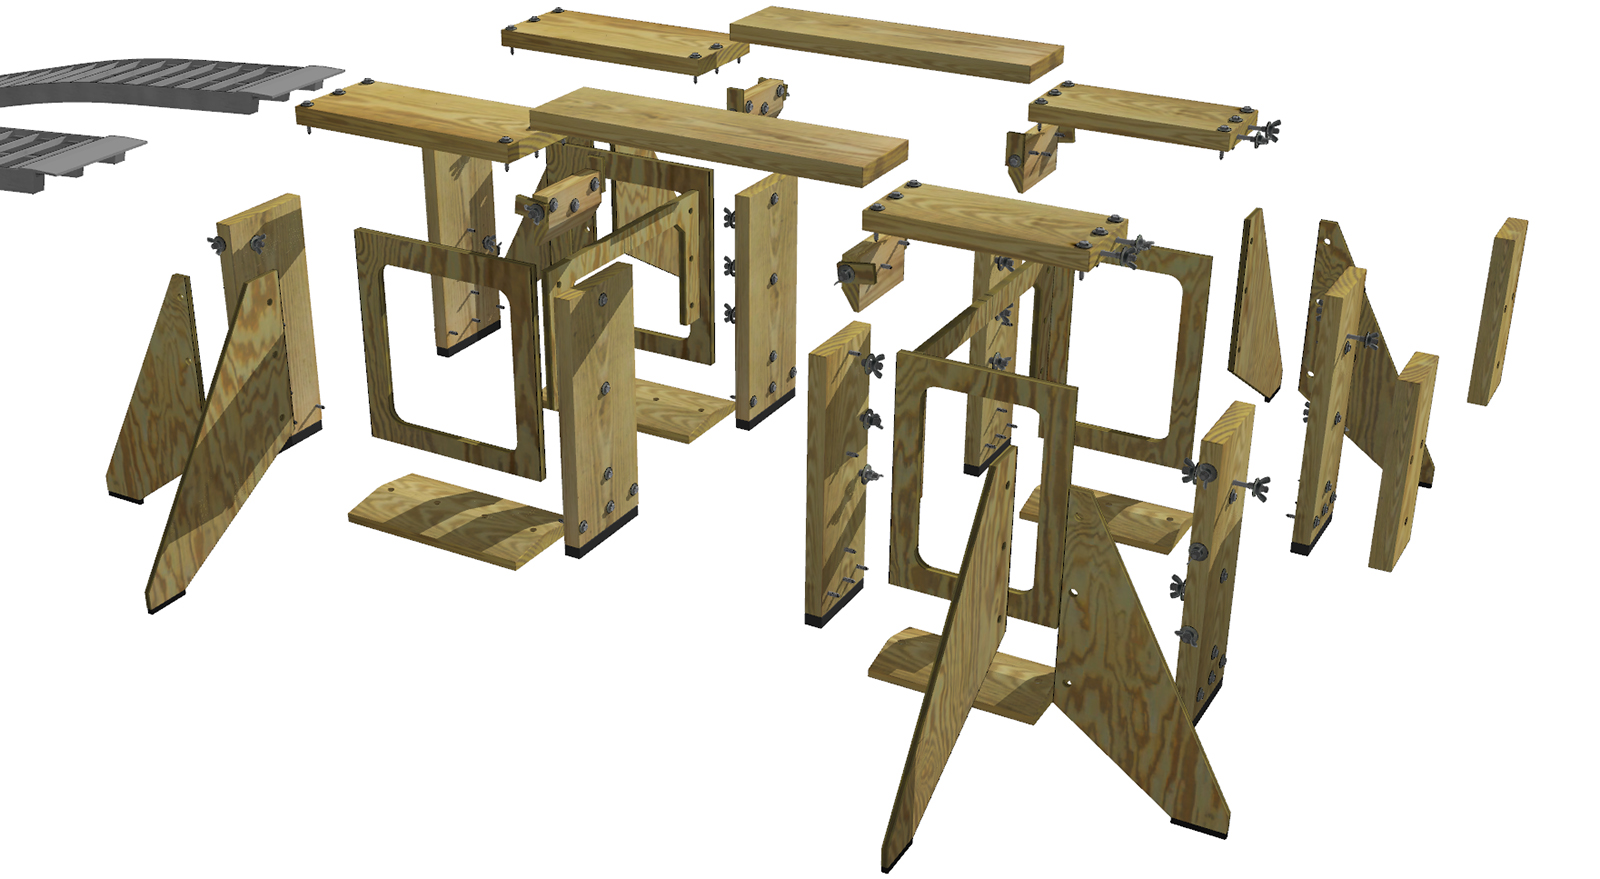
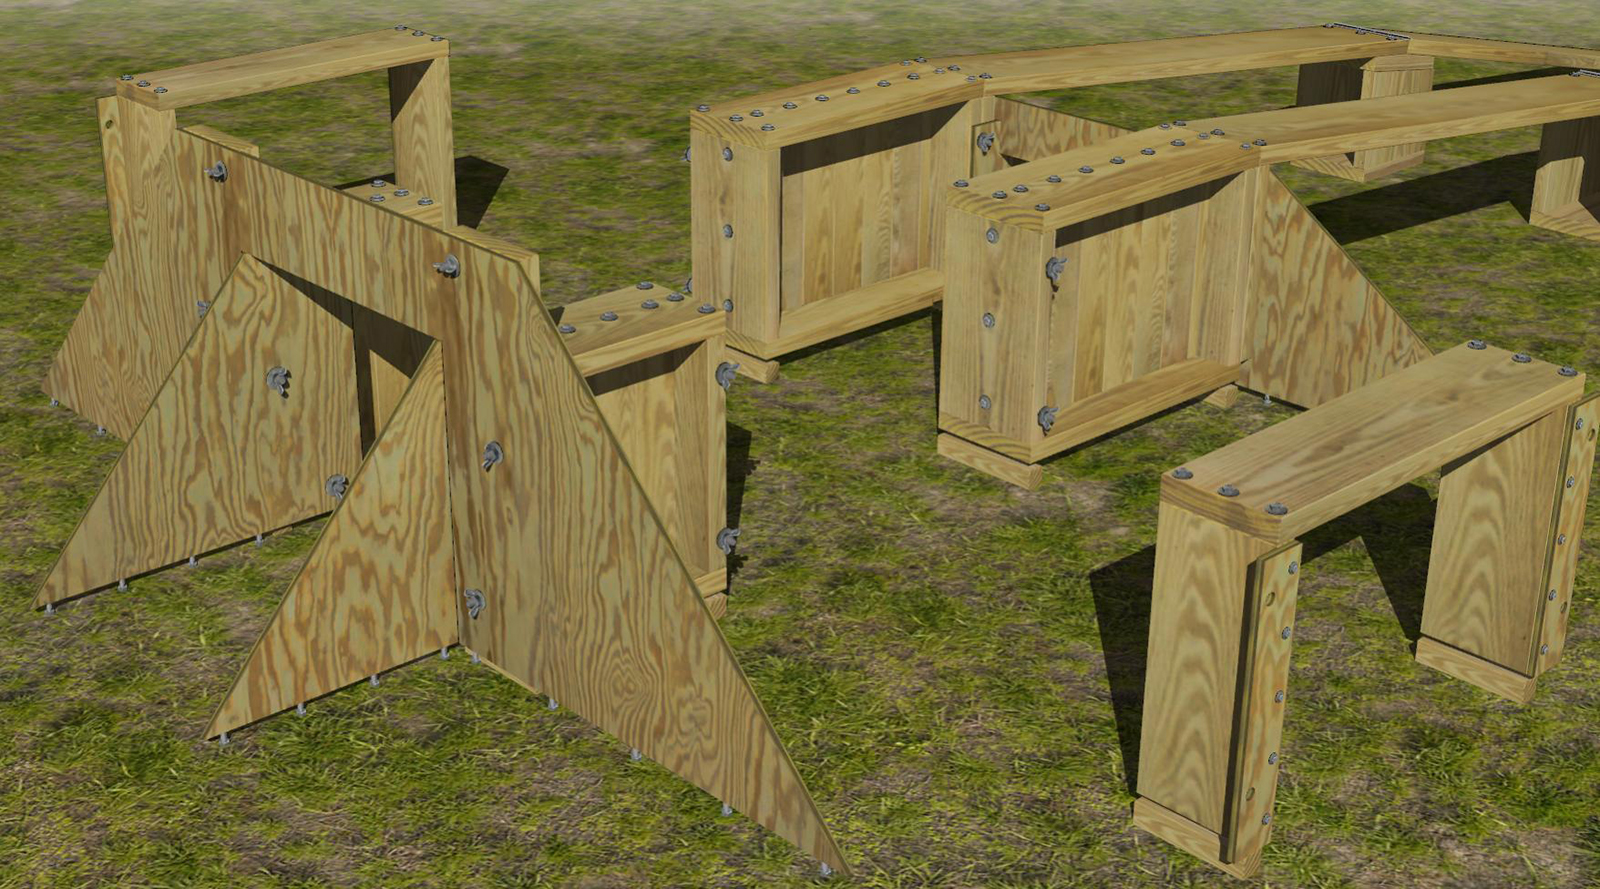
      An exploded view, probably more confusing than informative. The majority of the cuts are simple straight cuts, and the few exceptions aren’t anything that difficult. I actually bought all the treated lumber maybe six or seven years ago (after visiting stores all over the area to make sure I got the best I could find) and have had them stored so that they dried without warping. So they are more than ready for a suitable protective finish to be applied to each piece before it is assembled. I have done a lot of research on protecting treated lumber, and am aware that whenever you make a cut you are exposing untreated lumber. There are products specifically designed to take care of that. I actually photographed some of my lumber and used the photos to make the wood textures seen in the model. I also found a good supplier for all of the stainless steel hardware needed, and it’s been waiting and ready to go also.

      2019-04-24_150238.jpg
      2019-05-01_102315.jpg
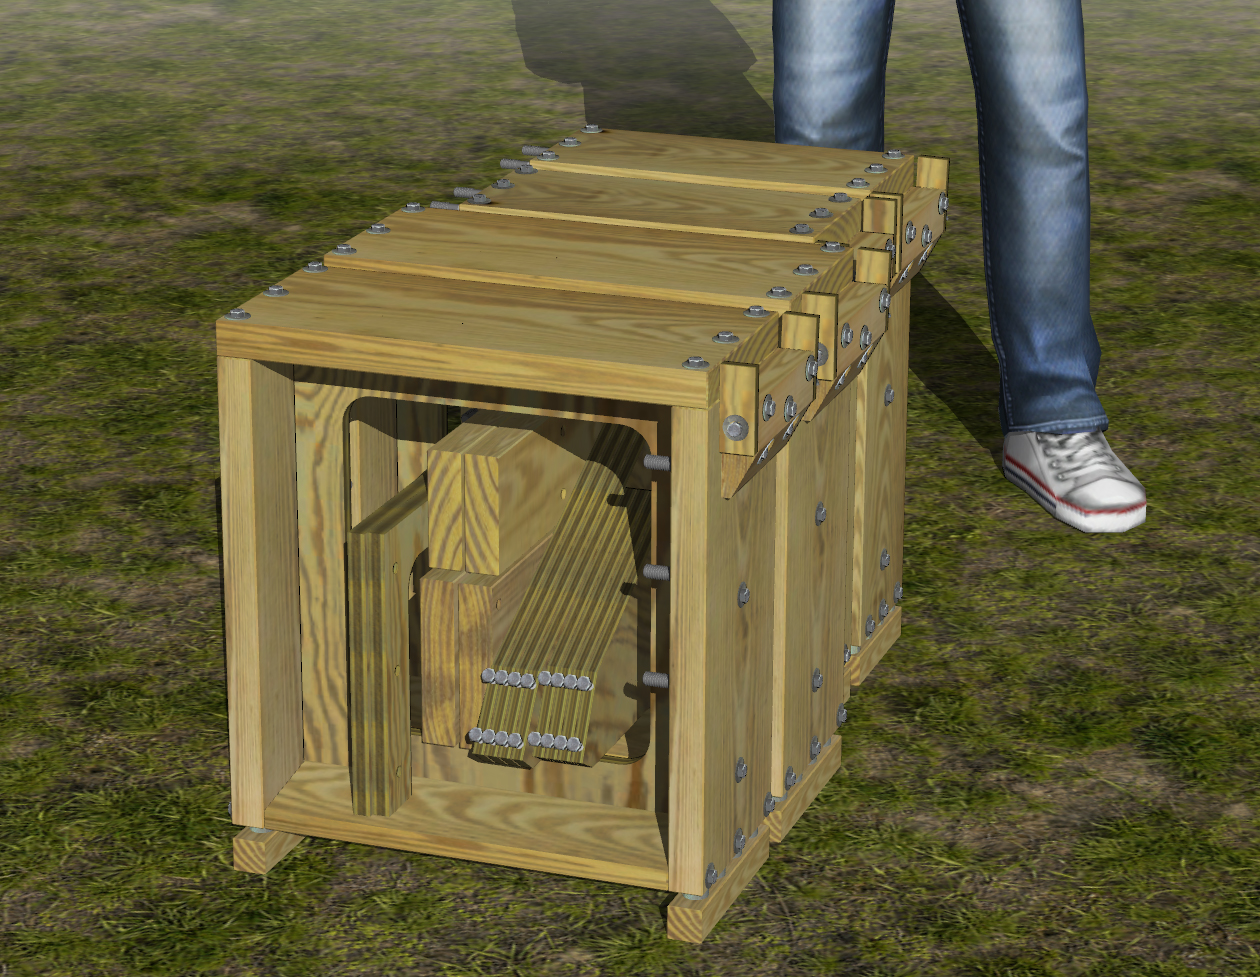
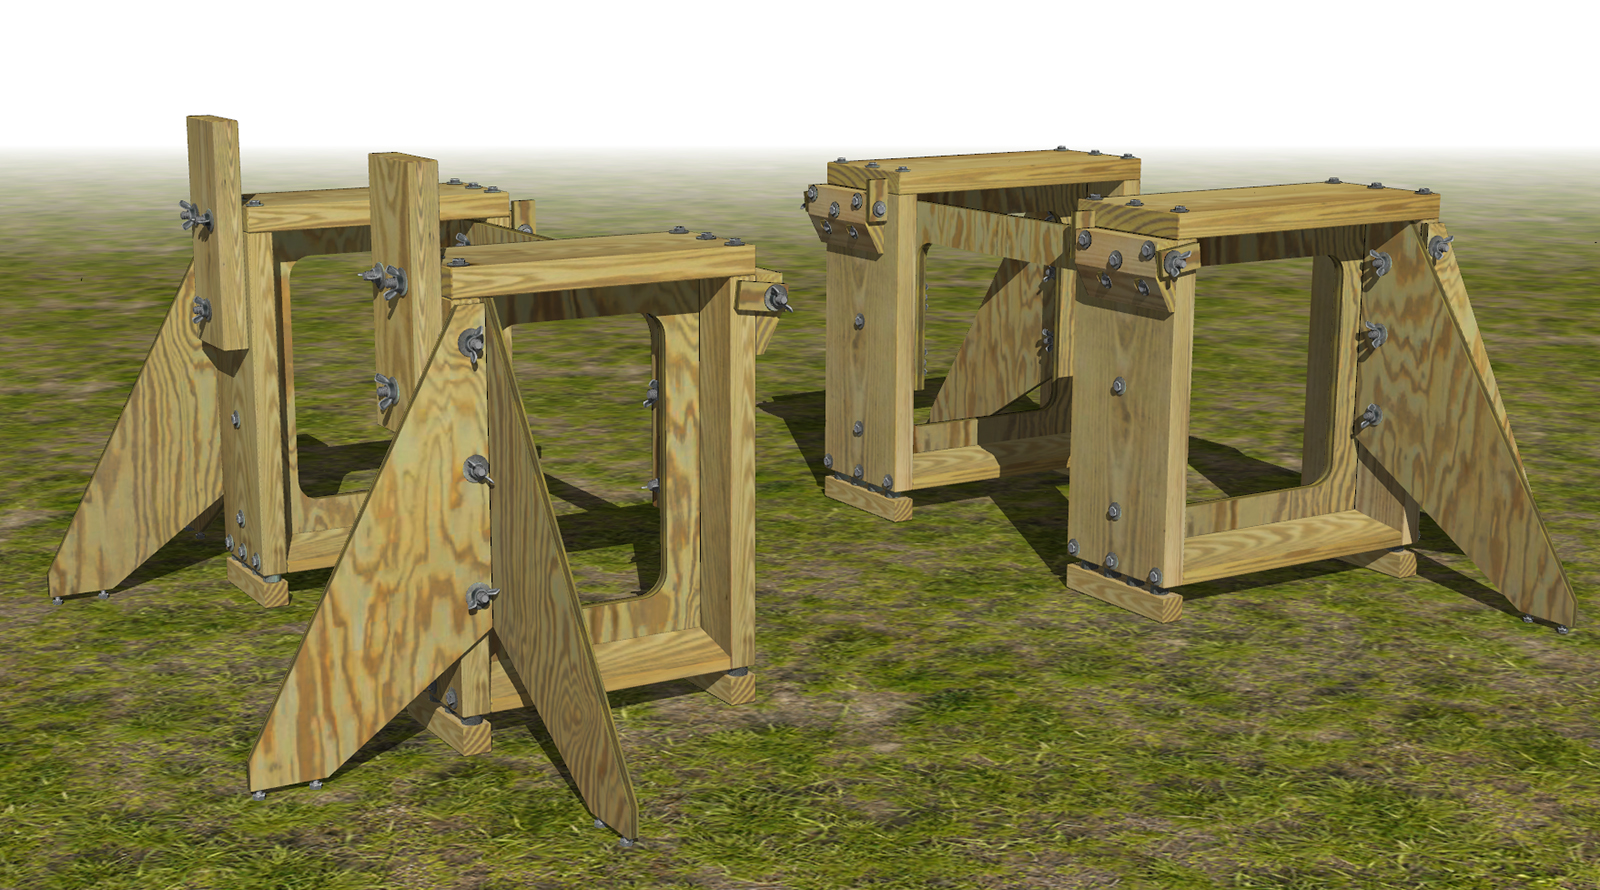
      The whole thing can be quickly broken down for storage, taking up very little space, just by removing a number of wing nuts (gonna buy a wing nut attachment for a drill to simplify this, just haven’t decided on which one yet. Might just make my own)
      (The guy is just a 3D figure I found in the Warehouse. I did not model him, just modified him a bit and scaled to 6-foot height to add a scale reference.)

      Well, I've about reached my limit on the number of photos you can post, so I'll add more in a new post.

      Hope everybody is doing well and staying safe

      posted in WIP
      hellnbakH
      hellnbak
    • RE: Junji Okubo Scout 23GN

      Nice work, Bryan.
      What's the purpose of the safety cone? To signify that the work is under construction?

      posted in WIP
      hellnbakH
      hellnbak
    • RE: Mid-April Snow Clearing Avoidance

      Hey Dave,

      I've always struggled to make threads. I've downloaded your video and will study it to see if it's something that I can actually use. But at this point I am assuming it will be over my head, like most things.

      Finally got to hear the Master's voice
      Master's Voice.png

      Can't complain about the snow this year here in southwest lower Michigan, been very mild. Unfortunately, that means a lot of wear on my snow tires, but I guess there's a tradeoff for everything.

      Stay safe, and keep the good info coming.

      Steve

      posted in Gallery
      hellnbakH
      hellnbak
    • RE: East German car "Wartburg 311" (still under construction)

      Very impressive work 👍

      @kolibri69 said:

      Almost exclusively with QuadFace Tools, Vertex Tools and SubD.

      Sure wish I knew how to use these plugins, would make my life a lot easier 😞

      posted in Gallery
      hellnbakH
      hellnbak
    • RE: Metal Fabric - just an exercise

      Thanks, HornOxx. I really don't remember how I did it, but your Metal Fabric is much more impressive to me. Well done 👍 !

      posted in WIP
      hellnbakH
      hellnbak
    • RE: Anyone Upgrading to 2020?

      @kaas said:

      Just to be a bit more future proof, you could update your classic license now its still available. Some rumors say this will be the last year a classic license will be available but there are no official statements.

      I appreciate the tip, but I'm not sure what you mean by "updating my classic license". I don't use the Pro version, just the make. So do I need to do something to ensure that I can continue to use 2015, or am I in danger of it becoming unusable at some point?

      posted in SketchUp Discussions
      hellnbakH
      hellnbak
    • RE: Metal Fabric - just an exercise

      Very impressive work! Obviously took a lot of thought and planning.
      I remember congratulating myself when I made this, but your work makes mine seem like basket weaving 😆 .
      2020-01-31_032320.png

      posted in WIP
      hellnbakH
      hellnbak
    • RE: Anyone Upgrading to 2020?

      Ok, so I'm still using 2015, and am pleased overall with it. I use very few plugins, do little architectural work, just basic SU stuff. Is there anything about any of the newer versions that might be of benefit to me?

      posted in SketchUp Discussions
      hellnbakH
      hellnbak
    • RE: SU 2020 inferencing issue

      @box said:

      Or wearing the hair on your tongue.
      😆

      posted in SketchUp Discussions
      hellnbakH
      hellnbak
    • RE: Can't figure this thing out

      @bep said:

      "So, at this point the spring has tension and the red part has made contact with the pin, and further movement of the handle will begin to slide the blade out of its contact. Right?"
      [highlight=#ff4040:2cbrobxo]Yes![/highlight:2cbrobxo]

      "But, just to keep my reputation as a royal pain-in-the-butt alive, I do have a question -- To keep the spring from just raising the blade with the arm, there would have to be tension, or pressure, that holds the blade in place until the arm raises the blade far enuf that it can break free and snap up, right?"
      [highlight=#ff4040:2cbrobxo]Yes!, the pressure should ensure for enough friction wen the spring gets loaded to prevent the blade from sliding out of the contact fingers
      Whit this design the "red part" slides the blade out off the contact fingers.
      Then at some point the blade snaps away from the contact fingers[/highlight:2cbrobxo]

      But, while every blade switch that I have found uses a contact that is formed into a sort of spring shape to ensure good contact with the blade this beast seems to have relatively thick "arms" that stick straight up, and I don't see how they can provide the spring action to ensure good contact, let alone provide enuf pressure against the blade to prevent it from just moving up with arm.
      [highlight=#ff4040:2cbrobxo]They somehow can get enough contact pressure wih this design, without enough contact pressure the contact resistance would be to high, and the switch could burn/melt at that place.[/highlight:2cbrobxo]

      "Also can't figure out why they would go to the trouble of cutting the contact down the middle like that. Does that have something to do with it?"
      [highlight=#ff4040:2cbrobxo]Yes, this is done to ensure a big enough good contact area, to keep the contact resistance as low as possible
      Wider fingers would be more difficult to get them plane to the switch blade[/highlight:2cbrobxo]

      About your drawing.
      A part of the blade and the top of the fingers should be slightly rounded, to let the blade slide in easier.

      Some things to read up on the switch topic:
      https://phasetophase.nl/kalenders/kalender_2009.html (translate with google)
      https://ecprops.com/products/knife_switches/knife_switches.html
      http://0330de8.netsolhost.com/test/html/products/knife-switch.php

      Together we have 4 active brain cells 😄

      Hopefully the move to your new home goes very well.

      Hey Bep,

      Really appreciate all the time and effort you have put into setting me straight on this. But for now everything has taken a back seat to other higher-priority things in my life.
      Again, many thanks.

      Steve

      posted in SketchUp Discussions
      hellnbakH
      hellnbak
    • RE: Can't figure this thing out

      @mike amos said:

      Good luck with the move Steve, keep us in the loop please.

      Mike,

      Well, after much research and many phone calls it looks like the AFRH is not going to happen. They recently tried to raise the rent for everybody, and that didn't work out very well. Over one hundred people left the home due to the increase, and now they're trying to backtrack on the rent hike to get more people to move in, and it's a big mess. They keep telling me that the rent will stay the same until 2023, but nobody will tell me what will happen after that. Nothing they tell me jives with what I can find on the internet, seems like they are willing to lie to get more people to move in. Bottom line is that I simply cannot trust them now.

      That's a shame, I really wanted this to happen. I was stationed at Keesler AFB in Biloxi twice, just a few miles away, and really liked the area (of course that was like 40 years ago, and everything has changed since then, especially after hurricane Katrina pretty much wiped the slate clean in 2005).

      But I really do need to get the hell out of Michigan, been here since I retired back in '89 and I cannot put up with the lake-effect Winters here anymore, plus I just don't like the area that much. It's boring. I only chose this area to be close to my brother, and six days after I retired he died of leukemia. Then inertia set in. God (or as I call him "The Cosmic Muffin") really does have a sense of humor, and it's a sick one.

      So now I'm looking at other areas. Gotta choose carefully, this is the last move I'm ever gonna make.

      Steve

      posted in SketchUp Discussions
      hellnbakH
      hellnbak
    • RE: Can't figure this thing out

      Bep,

      Well, I got one thing right - I told you that you knew a lot more about this sort of thing than I do 😆

      My mistake was assuming that the pin went all the way thru the parts and connected them together, so that they had to move as a unit. Also had no idea that arcing was such a big problem with this type of switch.

      So, at this point the spring has tension and the red part has made contact with the pin, and further movement of the handle will begin to slide the blade out of its contact. Right?
      2019-08-06_150345.png

      But, just to keep my reputation as a royal pain-in-the-butt alive, I do have a question -- To keep the spring from just raising the blade with the arm, there would have to be tension, or pressure, that holds the blade in place until the arm raises the blade far enuf that it can break free and snap up, right? But, while every blade switch that I have found uses a contact that is formed into a sort of spring shape to ensure good contact with the blade --
      vintage-knife-switch.jpg
      this beast seems to have relatively thick "arms" that stick straight up, and I don't see how they can provide the spring action to ensure good contact, let alone provide enuf pressure against the blade to prevent it from just moving up with arm.

      Yeah, I'm probably overlooking the obvious again, but my two active brain cells tend to limit my ability to apply logic or see the obvious. Or tie my shoes.

      Also can't figure out why they would go to the trouble of cutting the contact down the middle like that. Does that have something to do with it?

      Curious minds want to know.

      (Sorry I haven't been paying attention to the progress of this thread, but it looks like I may be moving to the Armed Forces Retirement Home in Gulfport, MS soon and there's so much to do. I finally might be getting away from these damned Michigan Winters!!!!!)

      posted in SketchUp Discussions
      hellnbakH
      hellnbak
    • RE: Can't figure this thing out

      @mike amos said:

      I've been racking my brain cell for an answer but have no clue. Very nice construction Steve, as usual. When can we see the rest?

      Hey Mike,

      Well, the model was pretty much finished (or so I thought). But it had been several years since I had looked at the thing, and when I revisit a model I like to do a search to see if any more useful photos have surfaced, and in this case a number of photos of much higher quality were indeed now available. So I need to do a lot of work on it to take advantage of all the new info and details. The fun never stops at the Hellnbak Weird Car Factory.

      Steve

      posted in SketchUp Discussions
      hellnbakH
      hellnbak
    • RE: Can't figure this thing out

      @bep said:

      The springs and A and B are used to open the switch quick after some preload on the spring.
      This should prevent serious arcing at the contact points.

      Bep, you seem to know a lot more about this sort of thing than I do, but please see my reply to Box's post above for my take on this thing.

      posted in SketchUp Discussions
      hellnbakH
      hellnbak
    • RE: Can't figure this thing out

      @box said:

      Double blades for carrying extra current and the springs stop the switch from accidentally closing from vibration etc.

      Box, unless I'm reading this wrong (entirely possible), this entire assembly moves as one piece, with a pin (A) connecting the main parts together. If that is correct, the springs would serve no purpose. The bar (B) is the only part that completes the electrical connection, the other parts serve no purpose in that.

      2019-08-05_045713 A.png

      I have done extensive searches for single-pole single-throw knife switches, every single one is very simple, essentially the same as this

      2019-08-03_123318A.png

      That is all that is needed to open and close the connection (hey, it worked well in all the Frankenstein laboratories).

      Again, my assumptions could be all wrong, I haven't completed my electrical engineering degree (mainly due to the fact that I never started it) and I don't have many photos to work from and they don't show the switch from enuf angles to be certain about everything.

      Also, these switches control the power to two large electric motors, each providing power to the rear wheels on the vehicle. I don't know if that's a factor, and it was built in 1901 so their way of thinking might have been different then.

      I will use the switches as I have modeled them, no choice there. I know that sometimes I get too caught up in my models and my curiosity bogs down the creative process, but hey, for me it adds to the fun. Bottom line, I'm just weird.

      posted in SketchUp Discussions
      hellnbakH
      hellnbak
    • RE: Can't figure this thing out

      @andybot said:

      Does that platform move? Maybe the springs are there to keep the switch from falling open if it's tilted past vertical. Edit - maybe not, I don't see that it would serve that purpose.

      No, it stays horizontal (it it did go vertical that would not be good, it's part of a 1901 vehicle 😆 )

      Plus, there is a pin (A) that runs through everything to hold the parts together, that's one reason I cannot figure out the purpose of the spring.

      Also could not figure out what the heck this (B) is, and why it's there.
      2019-08-03_121057 A.png

      posted in SketchUp Discussions
      hellnbakH
      hellnbak
    • RE: Can't figure this thing out

      @pbacot said:

      such great modeling!

      Thanks, much appreciated

      posted in SketchUp Discussions
      hellnbakH
      hellnbak
    • 1
    • 2
    • 3
    • 4
    • 5
    • 6
    • 105
    • 106
    • 4 / 106