
this is awesome. i just tried to apply a bump texture with the same method, and it works.
i wonder why is this not in any pdf manual?
EDIT: displacement doesn't work.
this is awesome. i just tried to apply a bump texture with the same method, and it works.
i wonder why is this not in any pdf manual?
EDIT: displacement doesn't work.
the model is at 49.190966N,16.611552E so the UTC+1 time zone should be fine - the shadows appear correctly at rendertime, i just miss them in the preview. no other view mode (shaded/textured/monochrome...) brings them back.
as for the toggle - as is seen on the screenshot, only the 'From Edges' option switches its state.
EDIT: ha, i found the solution; see attached screenshot. thanks everyone for answers 

thanks for the link, i was searching for this texture for so long!
anyway, i would try to apply the texture to a V-Ray infinite plane, and not just a regular rectangle, as is seen in your image.
EDIT: also you should follow the tip in this post (as the Texture/Environment options got rolled into one dropdown menu)
oh hi,
if you scroll up and find the image with red circles and numbers that i posted, then i found what number 2 is - it's apparently called a 'terminator problem' and a description of it could be found for example in this blender change-log (with images). for those interested, the more technical view is in this PDF, which is also cited in that blender article. the most detailed description i could find was in the Thea forums in this thread (with images).
so, since sketchup doesn't have Subdivision modifiers (only SDS plugins, which however are a) paid and b) create solid hi-poly geometry), this is apparently an issue of shader coding and the solution lies on the shoulders of the developers...
ping, dkendig?
EDIT: and another technical PDF with the description of the problem (and apparently some solution, too)
i opened your scene, and so far i've been copying lights around and vray always rendered for me o.O
if after closing and opening sketchup it works, do you think this could be a lack of memory issue? what is your pc's configuration?
EDIT: also, are you sure nothing happens after the flicker? maybe the scene is just being parsed; the task manager doesn't show any cpu usage?
yes, i am using 1.49.01, see my signature
i asked for your configuration because i thought that the memory insufficiency could cause the problem, but i guess 4GB is just enough. sidenote: while rendering, my task manager shows that sketchup grows to ~1240MB of RAM allocated. i also can understand that saving and reopening the file is even more upsetting in your case, since the 120MB scene takes ages to open...
the second issue i thought of was that maybe just the scene parsing and light cache warming up is taking place (which could be checked by looking at task manager and watching the cpu usage).
but now since there are already two people with the same issue, it's really becoming strange
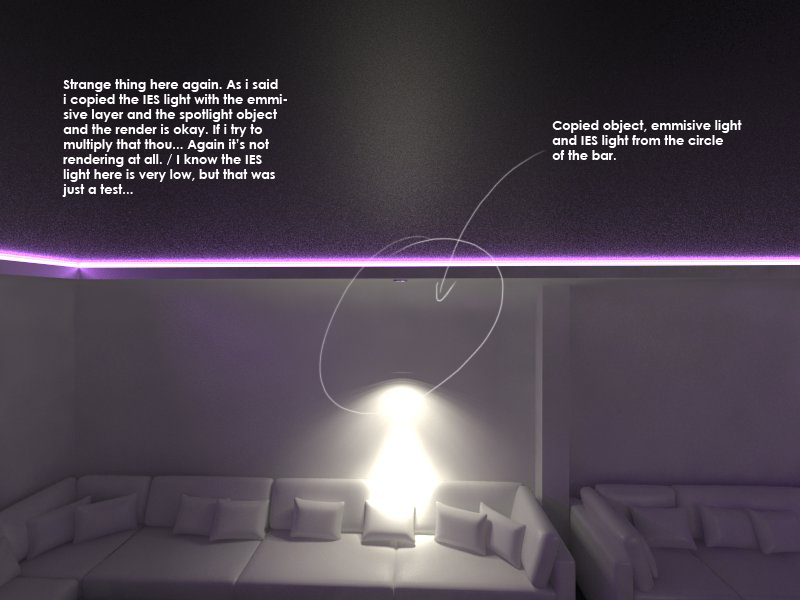
missing sofa - i honestly didn't notice, i touched no layer settings, i just moved the camera around and copied the spotlight objects (which are shown in Outliner as Vray IES Light).
EDIT: seems that although the sofas showed in SU's viewport, the Layer0 was turned off, and i had to turn it back on so that they are rendered in vray too.
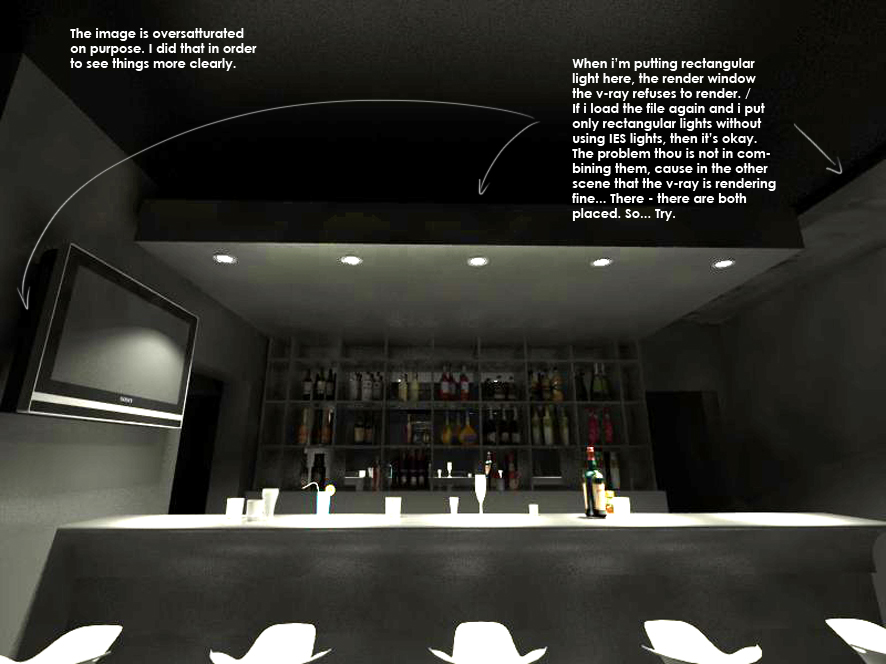
editing the chandelier rectangular lights - no crash, edited its color, ran the render... no problems. although i don't think this is how it should look like.
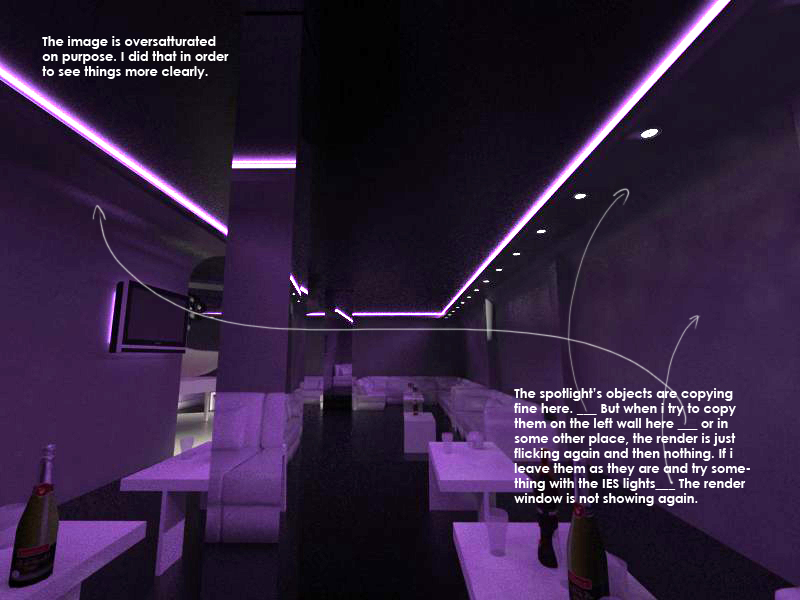
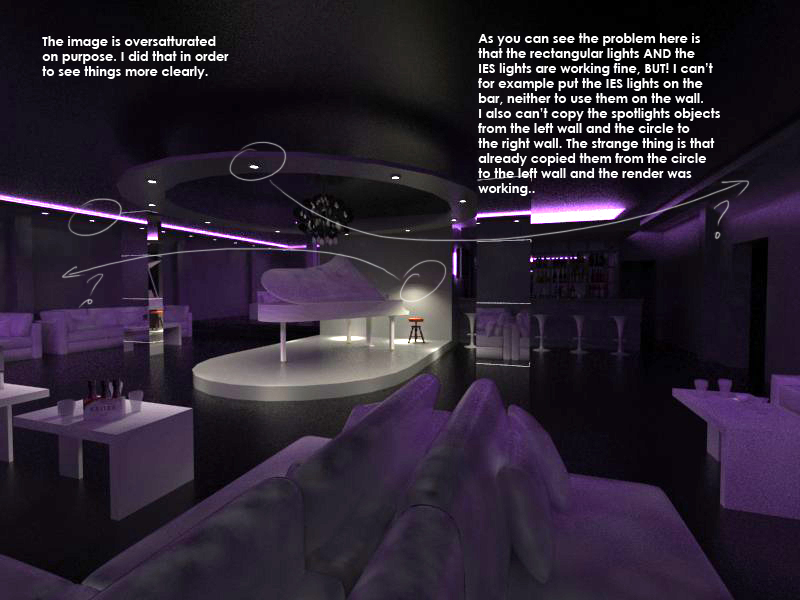
i attach first your explanatory pictures, and then my render.

sure, upload it here as an attachment, and i'll have a look at it (and maybe someone else will look at it too), and we'll be closer to solution
just to clarify, if i understand it correctly - you open the scene and it render every time. then you copy few spotlights and at first there's just a flick, and on the second try vray renders properly?
couldn't the spotlights be the problem?
as they are vray objects, it is possible that they are buggy. can you try with an empty scene, if it exhibits the same behavior?
when copying objects, do you have two sketchup instances running (each with a loaded V-Ray)? it is known that two running sketchups and vrays cause problems.
i would, but i may still not post there.
put the black&white perforated texture to the Reflection color slot, too
i think that putting it into the perpendicular slot is a better solution.
[questionable]i would say that the moment when a texture is loaded into the vray material editor, it doesn't make sense to edit the texture size in SU Material editor.[/questionable]
the solution, imho, is to change the u/v repeat values in the TexBitmap slot. (so to make the texture bigger, the repeat number needs to be lower.)
i like the first perspective, it looks like a proper architectural visualisation it has a foreground (bench with the woman), the middle (building) and the background (trees). in other images i lack this depth a bit.
other thing is that since the glass area is pretty dominant in the ground floor, other renders look flat, because they miss the reflected greenery. i know it's a bit tricky to add this in post-pro, but in such project imho necessary. (or to fake it you could have given the green areas a green color and it wouldn't be so strongly noticeable.)
also, how did you do the urban design with roads? did you use the city generator (or what's it called) from these forums? it looks good.
valerostudio, that's exactly what i found out.
at first i had a scene set up with vray sky only and then decided to put the hdri into the same scene following familiar Fernando's settings. it turned out to be way too bright, so i had to began messing around with the settings.
so first thing i tried was just to create a blurred version - to my surprise, it didn't erase the splotches.
then i tried to scale it down - splotches gone, severely underexposed (and i believe this is the reason Fernando suggests to give up vray's physical camera exposure controls, the iso/shutter/f-stop values would not make sense if they had to be set to extremes).
while the test images were rendering i was reading the vray documentation and realized how HSph value actually works (determines the lighting half-sphere subdivisions) - so to retain exposure controls (to be able to use the hi-res hdri) and to get rid of splotches (as blurring the image didn't work) i increased those HSph and Samples values.
the physics worked. although the rendering time got quite severely prolonged.
i'll try 3DSMax's Dome Light, when i'll have time again. sounds like a simplification of matters.
PS: i tested it with PGuthrie's "1325" HDRi map, which comes at ~7k px width i think.
thomthom, do you have any examples available?
when you mention the soft shadows - i actually forgot that my comparison is viable only in the 'sunny day' situations. if the sky was overcast, soft shadows might actually come in handy... hmm. more testing involving real-life photography needed.
valerostudio, so you suggest adding reflection layer, setting its color to ~50 and then using the Transparency in Diffuse layer?
thanks valerostudio, that's exactly the tutorial i followed and the settings are the same
the only diference was that i actually did use out-of-the-box hdri image, but had to increase HSph to 100 and Samples to 55 to get rid of the splotches (these numbers are the same in both scenes, but with Sky lighting only i can reduce the numbers to 50/25).
the advantage is that i can retain using the camera's exposure controls.
