good specs on this baby.
However, I need it for business. the stealth like design won't fit well on a formal meeting.
there is HP Envy 17. that has
i5-580M (2.66GHz, 3MB L3 Cache) with Turbo Boost up to 3.33GHz or pay $450 more for
i7-840QM (1.86GHz, 8MB L3 Cache) with Turbo Boost up to 3.2GHz
Oops, your profile's looking a bit empty! To help us tailor your experience, please fill in key details like your SketchUp version, skill level, operating system, and more. Update and save your info on your profile page today!
Sketchucation Tools 5.0.7 | Licensing improvements and bug fixes Learn More
D
Offline
Posts
-
RE: Hardware recommendations
-
RE: Hardware recommendations
here is the Vaio E 1,027.01 USD
Intel
 Core
Core i5-460M Processor 2.53 GHz with Turbo Boost up to 2.80 GHz
4 GB (2 GB x 2) DDR3 SDRAM*2
ATI Mobility Radeon HD 5650 Graphics 1 GB DDR3here is the Vaio F 2,056.60 USD
Intel
Core i7-740QM Processor 1.73 GHz with Turbo Boost up to 2.93 GHz1
8 GB (4 GB x 2) DDR3 SDRAM2 (Max)
NVIDIA GeForce GT 425M GPU 1 GB DDR3I'm a designer and don't really do renderings. SU is the most demanding application for me.
The added advantage to "F" is that the screen is not glossy and I like the design slightly better. However, forking out a whole grand is hard to justify for "slightly better looks".
So it seems I won't see a difference for the $1000. Also seems like the clock speed of i-7 is slower - does it mean that this particular i-5 would actually be faster? -
RE: Hardware recommendations
I'm about to buy a new notebook. I wanted to confirm that for SU productivity buying i-7 CPU vs i-5 is a waste of money. Sony Vaio F series carry i-7 but these laptops are about twice the price of the vaio E series. The principal difference between two laptops is the CPU.
Please, let me know what do you think about i-7 vs i-5 for SU. -
RE: Quick & Easy "Dennis Method" renderings [TUTORIAL]
those are 2d trees in SU. Their outline is a big help if you want to fill it in PhotoShop. Just use the bucket tool in PS to give it a color.
Did I answer your question? -
RE: Hardware recommendations
hi there,
did anyone come across the ATI Radeon HD 3200 on a laptop?also, If I buy a laptop in a store, and prepare a flash card with a viewer and a fat skp file, what is the best SU test I can do to compare available models?
-
RE: Quick & Easy "Dennis Method" renderings [TUTORIAL]
the textured one with shadows has no lines. theoretically it is your paint in the watercolor. lines are pencil. Artists do them separately, so they don't line up exactly.
Did I answer the question? -
RE: Quick & Easy "Dennis Method" renderings [TUTORIAL]
here is a thread on "how to post a video". I'm looking forward to see what you came up with.
http://forums.sketchucation.com/viewtopic.php?f=79&t=10103 -
RE: Quick & Easy "Dennis Method" renderings [TUTORIAL]
Swindel - clever thinking.
-
RE: Quick & Easy "Dennis Method" renderings [TUTORIAL]
of course - you just got to color a small part of your building and leave the rest to be white. that is it. It might take a bit longer to simulate "the painterly strokes" but I believe it is possible.
-
RE: Quick & Easy "Dennis Method" renderings [TUTORIAL]
Wow, I never expected that this little idea will have such a lasting effect.
So, I'm going to share one dirty trick:Add a watermark vignette right into your SU model!!!
In Photoshop erase a painterly "hole" on a white page and save it right in the .PSD format (SU) understands it. Add your signature to it and the stick it up as a watermark. Now you get an real time painterly effect even without doing any post processing. The down side is that this vignette doesn't "hug" your building. However, if you need 10 views rendered in 10 minutes, sometimes even this will do.Thank you for your warm comments.
Since the posted tutorial is "bare bones", I hope that people will post here their own tricks and samples on "D.M.".Dennis
-
RE: Quick & Easy "Dennis Method" renderings [TUTORIAL]
Fletch, my bad. You are right. I meant to say "hole". I'll go back and fix it in the text. A part of my brain that is responsible for spelling is missing all together. English in not my mother tongue even thou I'm a US citizen. However, my native Russian is even worse.
-
RE: Quick & Easy "Dennis Method" renderings [TUTORIAL]
Hm, interesting. I can't think of a good way to use the "follow me" tool with D.M.
-
RE: Quick & Easy "Dennis Method" renderings [TUTORIAL]
I hope this was helpful. Feel free to post your questions here and to visit my site http://www.archmodeling.com for more examples.
-
RE: Quick & Easy "Dennis Method" renderings [TUTORIAL]
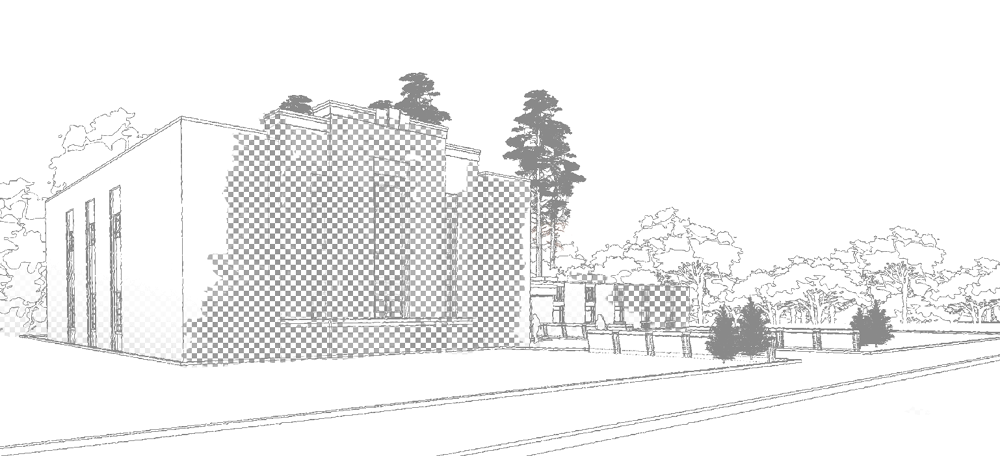
- Back on the screen you have the B&W Hidden Line layer completely covering your colored image. Set your eraser to 50% opacity and erase about 80% of the part of the building you intend to color. Make sure that you don’t erase any of the white layer over trees or entourage – it must remain white.
When erasing, pretend that you are painting the color fields onto your picture. This will help the image look more natural vs. artificial.
11. Turn your eraser to 75% opacity and go over the same area. This time cover only 70% of the part of the building that you are coloring.
12. Save the image, because you are done!
-
RE: Quick & Easy "Dennis Method" renderings [TUTORIAL]
That is all you needed to do in SketchUP.
Now, open the images you created with PhotoShop.-
Adjust your Hidden Line image to show grey lines instead of black. This will help to make it look like a pencil.
-
Use Copy/ Paste to place the Hidden line image on top of the textured one.
-
Pick up a large brush looking eraser and STOP!!!
-
Think. Think, what is the most expressive wall or part of your building? Only a part of this wall can show the color. Otherwise the image is not going to work. So THINK carefully what you want to see before you go on.
You will be erasing the Hidden Line layer two times with different opacity erasers. This helps to simulate colored strokes of a brush.
-
-
RE: Quick & Easy "Dennis Method" renderings [TUTORIAL]
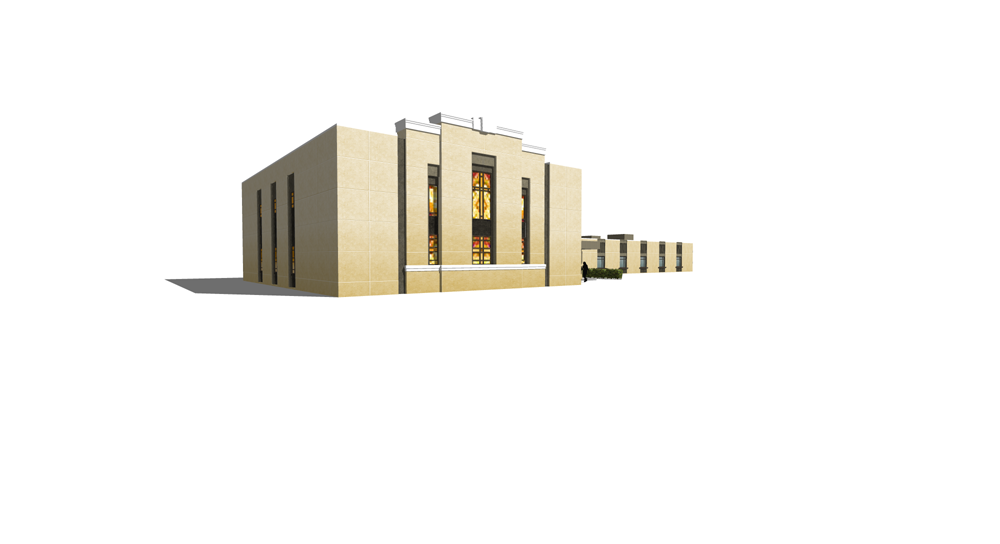
- In the same scene, turn on your shadows and textures. Export an image with the same resolution.
-
RE: Quick & Easy "Dennis Method" renderings [TUTORIAL]
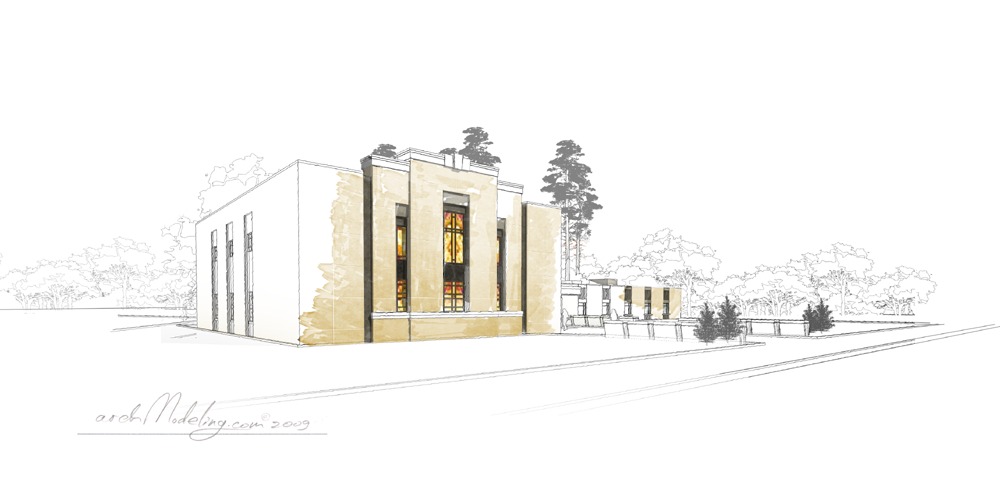
So, here are the step by step instructions for what became known as the “Dennis Method”
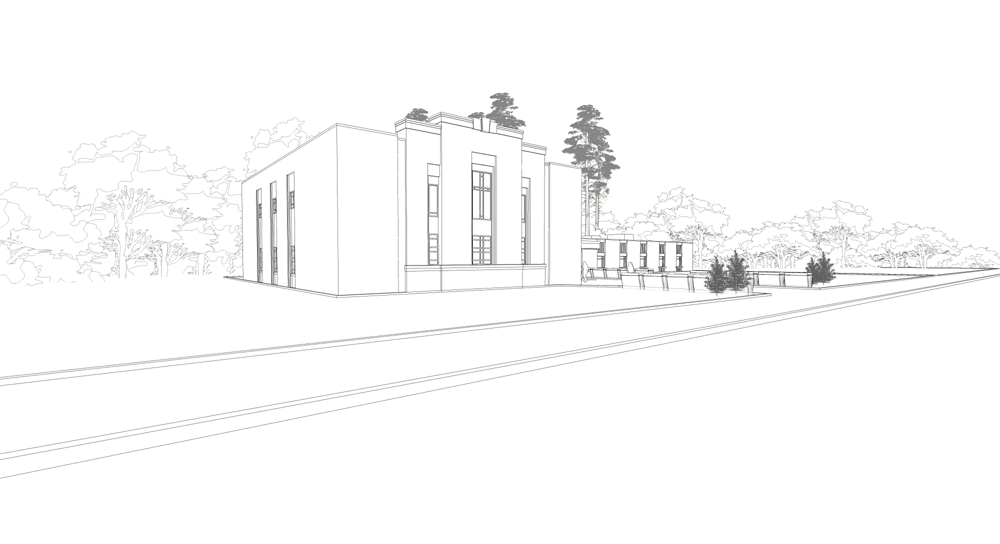
- We start by switching to the Hidden line mode and turning off your shadows. Make sure that your background is white.
- Line up a view that looks the best with these particular settings.
- Save the scene.
- Export the scene as .PNG file 4000 pixels wide. (.PNG files compress the SU graphics without loses).
-
RE: Quick & Easy "Dennis Method" renderings [TUTORIAL]
In short, you will export 2 images from your SketchUP Scene: a) Hidden Line Black & White image and b) textured one with shadows. Bring them together in Photoshop and then erase a hole in the Hidden Line layer with the colored textures showing through.
The whole procedure can take as little as 5 minutes. However, there is no limit to perfection as there is no limit to the time you may spend perfecting the image.
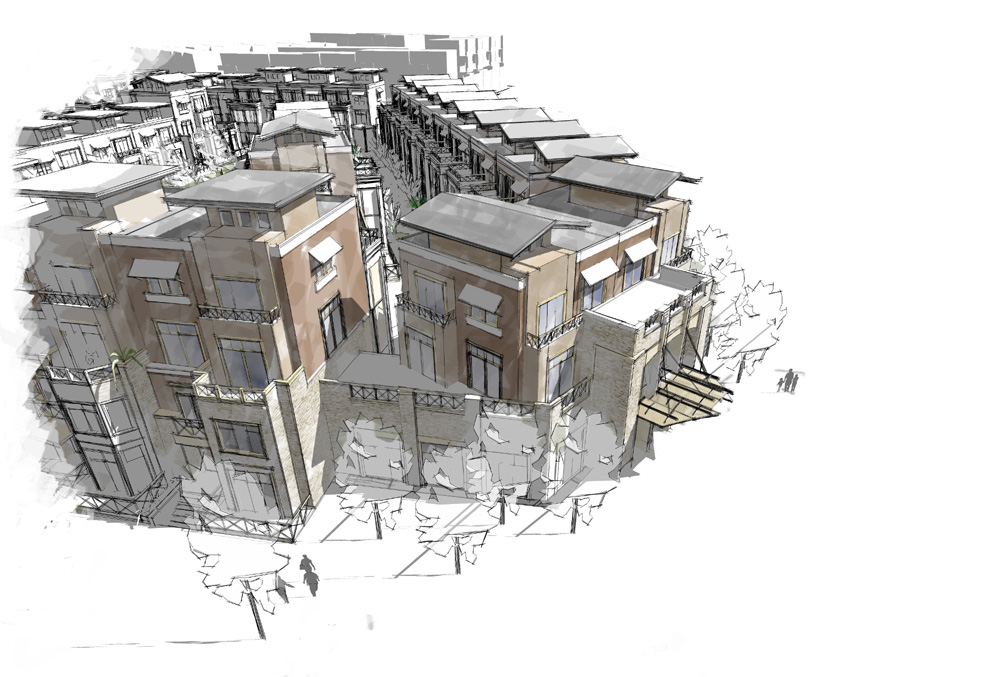
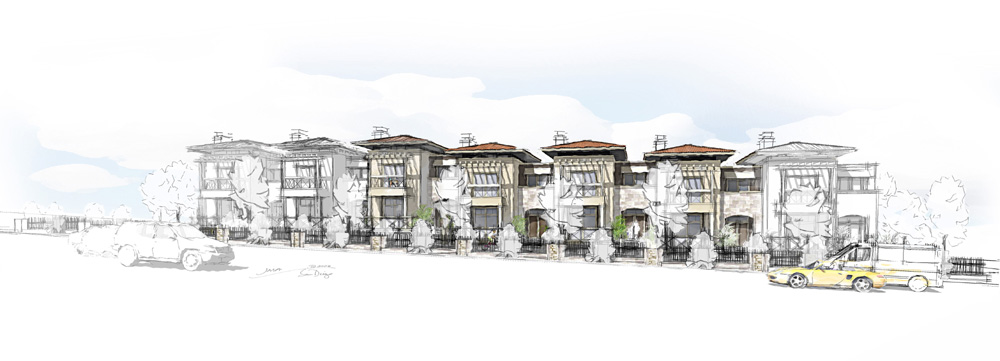
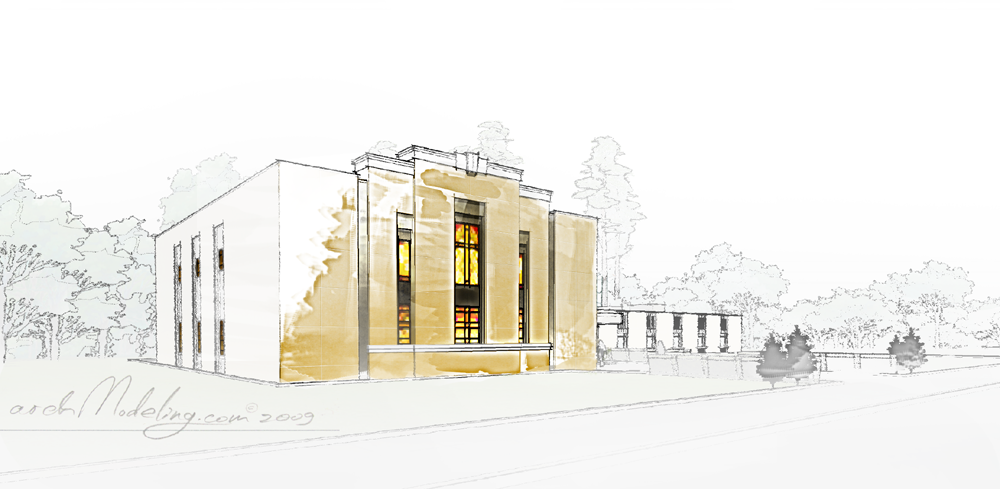
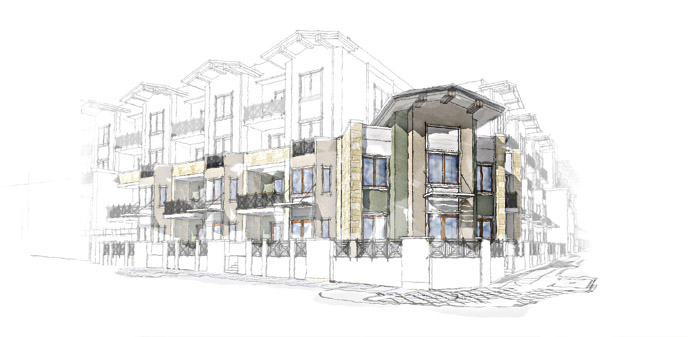
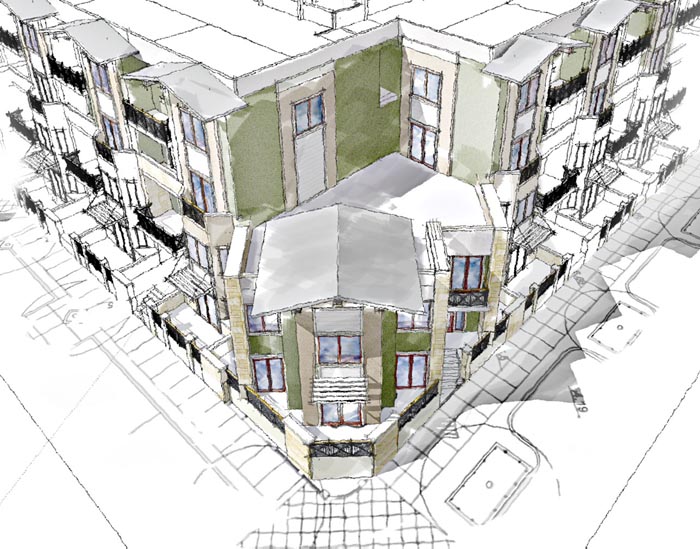
A few more examples to give you a better grasp of the final product:
-
Quick & Easy "Dennis Method" renderings [TUTORIAL]
Thank you everyone for stopping here to read about my little graphic trick.
My name is Dennis Nikolaev, I am a licensed architect, AIA member and a big fan of SketchUP.
Here is a quick and effective method of creating an artistic image from your SketchUP model. It was posted way back in 2005 on the original SU forum. The thread became so popular, it was active for over a year and a half and still could be found here
http://groups.google.com/group/pro-gallery/browse_frm/thread/ac10461fa662ede0/2181e36017e1604fq=dennis+method+review&lnk=ol& .
Here are a few examples:
-
RE: Dynamic Area Calculations
seems like Modular is a big chunk to chew on. Have you tried it?