Welcome, mightybluehunter,
This is a great place to learn, and discuss anything you can't find an answer for. Someone knowledgeable is always here to lend a hand.
Good luck!
Gigi
Welcome, mightybluehunter,
This is a great place to learn, and discuss anything you can't find an answer for. Someone knowledgeable is always here to lend a hand.
Good luck!
Gigi
That's a very cool idea, and I will keep that in mind for future animations, as well! In this case, I'd have to cut out so many frames that there would be a visible jump cut from just before the camera moves left at the door, to when it's back outside. So if anyone knows a way to make that walk-thru smooth in SU, I'd still appreciate it.
BTW -- this is the latest YouTube version of the flawed ani:
Thanks for that, though! Good information!
Gigi
I hope my subject line explains what's going on. I'm making my first animation. It's a very simple first floor room in a building that I'm standing in front of, in the first frame. So, next scene is at door; next, inside room at door; next, looking left; next, looking right; next, moving toward back of room; next, turning left; next, moving backward a tad more to take in more of room. At this point I played the animation the first time, and saw that in order to return to the first location, the "camera" moved left through the wall to the first frame/scene location.
So I knew I had to add interim scenes, and put another one back at the open door. I played the ani, and now the camera leapt up and over the wall (which isn't open anyway in real life -- there's another floor!) in order to return to original location!
So I added another scene after having stepped back outside through the door, and this time, the camera actually backed up(!) in order to move left through the wall again! This is crazy! What do I have to do so that it won't look like I have to dematerialize like a ghost to walk through walls, or develop super powers and leap over tall buildings?
I've searched through Help files, I've researched this forum for the answer, and I've watched numerous YouTube tutorials, and I could not find anything on this issue.
So any help is immensely appreciated!
Gigi
No, Gaieus, I haven't downloaded it yet, although I plan to. Time and other worries are not the reason, but an overloaded hard drive is. I have an external drive, but my HD is so full that it won't recognize it! My computer guru has me putting all my photos onto DVD's, so that I can clear up enough space. Otherwise my external HD won't do me much good.
Thanks for the compliment! And the good wishes.
Gigi
I'm so sorry I left some of you hanging like that. As quick an update on my son as possible -- it was a most harrowing ordeal. I planned to stay one night, since he and his fiancee have a house about two hours from my house, just to be with him through the day of his surgery. He had every complication one can have; terrible, awful things that I won't go into, and I ended up staying three weeks. I had to buy clothes because I couldn't go home. He was sent home on oral antibiotics, and after a few days was readmitted to the hospital for a bedside procedure and more IV antibiotics for another three days. He's not out of the woods yet, and is still recuperating at home. We don't expect him to be able to return to work (he's a lawyer) until early January -- if all goes well.
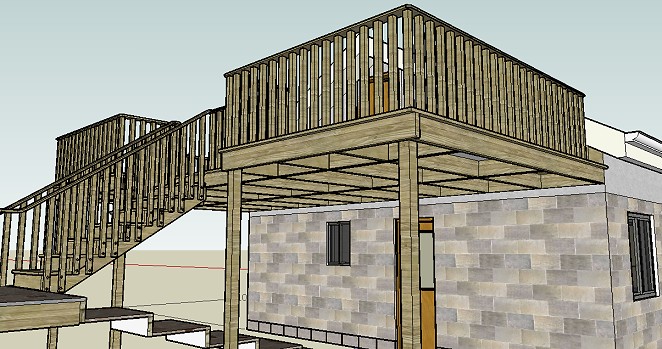
Thank you for your responses to my problem. I was able to shorten the deck with a lot of redrawing of line segments, but it was a very time-consuming process, and I have to believe there was probably an easier way to do it. However, I didn't have internet access most of the time and couldn't ask you for more advice about this. Below is a screenshot of the deck I had to shorten -- not an easy thing to do, eh? Tedious, but now, done.
Son in hospital. Surgery tomorrow. Promise to respond fully to everyone when I get back in a couple of days. Thank you, all! Gigi
Here I am again. I've collected a bunch of questions, as they came up, but in working through some things the answers revealed themselves. Others were solved by watching more tutorials. However, this one is still a puzzlement, to me.
In my current case of this problem, I'm dealing with the support structure of a deck. I've drawn all the beams and columns underneath the decking. Now I want to shorten the deck, and am beginning by eliminating faces of beams, below the deck. After deleting pieces of the faces, I am left with all the connecting lines. When I erase some of them, they delete entire faces -- sometimes attached to the lines, and sometimes from beams that are perpendicular to the beam I'm working on!
I've had this problem in just about all of the drawings I've made, and it's always frustrating. In many cases, I end up redrawing large parts of my drawing. In this case, I've decided to come to you for an answer because this structural part is so complicated that I don't want to find myself having to redraw the entire deck just to shorten it by three feet!
I've tried drawing lines that attach to the point at which I want the segment to end, hoping that the usual SU tendency to form segments that way will take effect, but it doesn't. So, IS there a way I can detach a line segment from a longer line that is foolproof and works every time?
I can't wait to see your answers to this one.
Gratefully,
Gigi
Hi, "S" (I suspect your first name begins with an "s"),
I would begin with your current employer! If you already have a job in the civil field that requires the use of AutoCAD every day, I'd say you already have a place where you can use SketchUp. Any field that does design work -- whether buildings, interiors, plazas, bridges, or drain pipes(!), has need to demonstrate what has to be constructed in 3D. These fields have been working mostly in 2D plans traditionally because it was the fastest way to demonstrate to the contractors and laborers what has to be built -- I suspect that if something like SU had been available in ancient Egypt, the pyramids would have been designed in it! So don't let the fact that it's not customary to show design intent in 3D dissuade you from presenting plans that way. Sometimes the 'powers-that-be' have to be convinced, and sometimes they're reluctant to change from the tried and true, the traditional ways of doing things, but if you can show that the 3D method consistently demonstrates how things fit together in a better way -- easier for the workers on site to understand, you'll be able to persuade them that this method has much to offer, and you'll be able to play with SU on the job.
I don't think SU can ever displace AutoCAD entirely, but it sure has made 3D conception much simpler than ACAD can do it! I think they will work hand-in-hand.
I'm sure some others may have other suggestions for you.
All my best wishes for future success,
Gigi
So sorry, James, I wanted to come back to thank you for your answer. Instead, I went straight over to SU to try it out, and you were entirely correct and I was able to make my sloped site, of course, but instead of thanking you I did the work and haven't come up for air until now. I swear, I start playing with SU from the moment I get up, and I fall asleep next to it on the couch. I'm an addict. And that's the only excuse I can offer for my apparent lack of social skills. I do THANK YOU, however!
Learning new stuff all the time! Woohoo!
Gigi
When I create a grid from the Sandbox "From Scratch," the grid doesn't show any diagonals, and the Smoove tool therefore does nothing -- it doesn't even change the cursor; it remains an arrow.
I've changed my units to meters for this job -- could that have anything to do with it? I can't imagine that's the reason. Oh, I should point out that this is the first time I'm trying the Sandbox, so I'm also not sure if I should have set some Preferences to give me those diagonals. However, the Help information doesn't say that, it implies that the diagonals are always there. In fact, they are even on the grid icon on the "From Scratch" button. It would seem that they should simply appear. Anyone have any idea what's going on with my sandbox?
Thanks,
Gigi
Well, at least it looks like nobody's getting fed up with me yet! Thank you for your great suggestions!
Chris, you didn't misunderstand -- your suggestion to copy a line and place it on the center of the circle was the easiest. Before responding to you, I ran over to SU to try it out, and got caught up in my drawing. Sorry -- you should have heard back from me last night. I appreciate the answer immensely!
Anssi, I tried making a circle with four segments and I got a square! Or a diamong/rhombus, really. Is there something I could have done to prevent the lines from becoming straight? Some key I could have held down to constrain the arcs to retain their curves? However, it occurred to me that I could make a square, or inscribe a square in my circle, and draw a bisecting line through the center of the circle, and then one of the sides of the square could serve as a line to copy and put in the center of the circle. Or maybe that's more trouble than it's worth.
And Jean, I checked out the tutorial, and at my level I find a still a bit confusing. I mean, I get it about inferencing the diameter from a nearby line that's parallel to the diameter I want, but that inferencing business still doesn't always work for me. It doesn't help that some of the text in the tut seems to be cut off, and there's no possibility of scrolling. I wish that some of the things the tut's writer talks about were shown, instead. But I'm sure with a few more weeks of playing under my belt, some of what he says will not be so arcane to me, anymore.
Mirjman, I noticed also that there was a reason it was working out so well in the tut. My circle segment did not have endpoints that fell so conveniently at the four quadrant points. I still think the borrowing of a line, and placing it at the center of the circle, is the best way for me to go.
I would have responded earlier to all this, but I wanted to try out the first suggestion, and got caught up in my drawing. Then life happened, and only now I'm back to play. Already feel like I've got a million more questions.... (sigh...)
Thanks so much, all of you!
Gigi
I sure hope I'm not going to get on anyone's nerves with my questions. I promise I always try to find my answers in the Help menu, and even look at videos again (I've viewed all the tutorial videos), but when I can't find what I'm looking for, you guys are my only hope.
I'm trying to find the point in a circle that is the endpoint of a diameter line which would be parallel to all of the lines drawn in one direction in my drawing (the other lines being perpendicular to that imaginary diameter line). In AutoCAD, it's so easy to find -- one just clicks on the Quadrant button, but here in SU, the auto-find system wants to hook onto an endline of one of the segments of the circle, and in my case, none of them match up with that "quadrant" spot I'm looking for.
Also, I can't use the measuring tool to make a guideline, because the circle is the top of a spindle in my banister, and it's sort of floating in space, and not next to any line I can use from which to get a guideline.
I'm pretty sure there must be a simple way to find this spot on a circle, and I just don't know it yet. Anyone?
Thanks in advance,
Gigi
Hi, Cory, and welcome! I don't have an answer to your question, but I did want to just say, "Hello!"
Gigi
Yeah, Gai, I had done a Ctrl-A and then thought I was hitting Ctrl-V instead of the Ctrl-C I meant to hit. Just a dumb accident. I haven't tried doing Ctrl-Z to see if I can back out of it, but if it happens again, I'll sure give it a try! Thanks!
Gigi
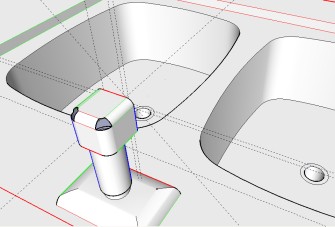
Yes, it's supposed to be the back of the faucet. I haven't gotten to the actual spout, yet. Went back to play with my banister in another drawing.
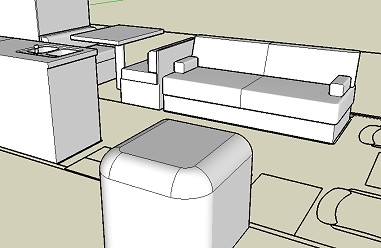
Yeah, the couch came out pretty well, didn't it? I couldn't figure out how to get it going 'round in two directions, so I used only one-half of the cushion, and did two halves, and then joined them together. Worked out well.
Thanks for your great tip! Will serve me well in the future!
Gigi
@chris fullmer said:
Oh good. So its really a sink faucet head or something? It doesnt look half bad at the XL scale as a big block cushion chair/couch thing.
That was the key, Chris -- thank you! As you can see, the resized version has all the nice round faces, and I've already reduced it again and placed it, and it kept all the faces, too. Thanks so much for your help!
Gigi
@chris fullmer said:
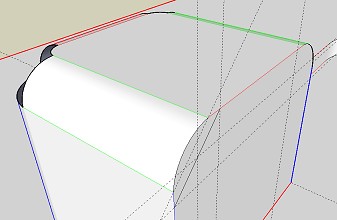
I'm guessing that SU might be having a problem with the size of the faces that need to be created on that part. Teeny tiny faces won't get made correctly. They just end up empty like that. You might need to rescale that piece to 10x its original size. Then run the follow me tool on it. The resize it down. Its annoying, but it should work.
Chris
This is the second time I'm writing a fourth post here -- because each time I have to log in again! I just wanted to point out that the second, identical image, is there because after posting the first (second) pic, I got the dreaded red X. Thought it was a board bug, and wanted to repost, and was asked to sign in again. After I did, and posted, there they were -- both of them!
Feel free to delete the repeated image, moderators! I hope I don't get kicked off a third time in this short session....
Gigi
Hmmm.... I attached two images, but I guess I can't do that. Here is the other one:
Okay, I said my problem would require a new post, so here it is.
I've been having lots of fun with the follow-me tool, which seems to make a lot of things possible. However, now something is happening that has me baffled.
I'm creating a faucet, and I want it to have rounded, "waterfall" edges all around. As you can see below (I hope), the base of the faucet was very cooperative, but now I'm getting these two little "cut out" pieces at the two corners. Any ideas how this might be happening, and what I should do to fix it? (I should mention that this is all taking place at a very small scale.)
Thanks,
Gigi
Hello, Ross -- looks like you posted while I was writing the previous item. And as you can see, I had arrived at that same logical conclusion for a fix that you suggest -- to 'copy' before sending. My fear is that I won't remember to do it, since I'm programmed to hit any kind of "SEND" button immediately after signing my name. Will take some reprogramming.
And, incidentally, I was going to do the same with this post, so I highlighted all, and then accidentally hit Ctrl + V, rather than C, and so I pasted my previous post here, and the first one I'd written vanished for good. So I guess unless one is perfect and never makes mistakes, this isn't a fool-proof method, either.
Thanks for your sympathy, and for chiming in!
Gigi