Precisely what I need. Thanx Box
Posts
-
RE: [Plugin] Show and Hide your toolbar
I found the 'Show and Hide your toolbar' plugin to be quite useful when I want to 'snag' a full screen shot that includes a 'lot' of close-up detail -- but without the toolbars.

Before this plugin came along, I had to de-select toolbars one at a time to get the screenshot I needed

It would be a shame if no-one updated this puppy so that it hides/shows 'only'
active toolbars. Like Gaieus, I discovered that the current version of this plugin turns on toolbars that I never loaded beforehand.
-
RE: Challenge: creating a seemless curved surface
Thanks folks....much appreciated.
The CNTRL + eraser tool worked perfectly. Man, you never stop learning with SU...I guess that's why I like it so much.


-
Challenge: creating a seemless curved surface
SU2013 pro 13.0.4812 on Win 7
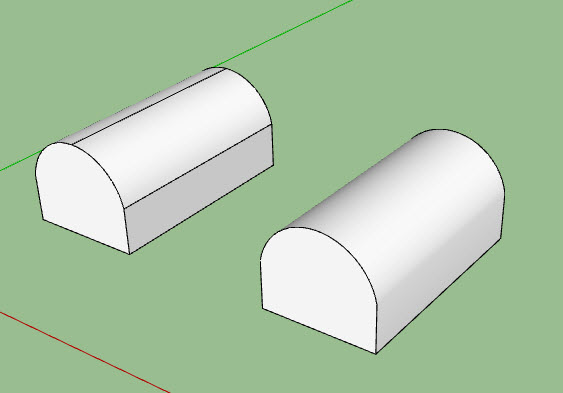
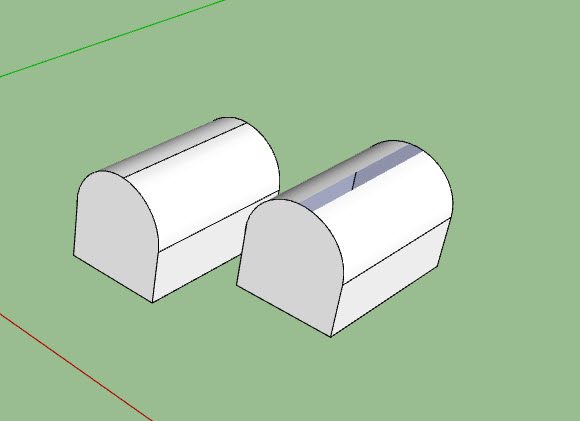
It seems that the only time I have any 'real' challenges with Sketchup, it's when I try to design something containing a curved surface. For example, when attempting to create, what looks like an old fashioned mailbox, I can see edges where the faces of the side of the box meet the convex surfaces. When I delete the edges in an attempt to get a seamless surface, I end up deleting an entire surface instead.
Question:
Is there a technique (or plugin) that can allow me to create a seemless mailbox design?
Thanks in advance for any insight on this.

-
RE: [Plugin] 2D Tools
Hi TIG,
I submitted a couple of suggestions (earlier) regarding the font and color selection options. It just dawned on me that I should have asked if this is beyond Ruby's capability?
Bob
-
RE: Need a SU Tap & Die plugin
Box,
I can't get into why I want to do this right now. It's something I'm working on.

gilles,
The Bolt Builder DC code isn't available to learn from as the author locked it down. However, I just got a PM from another developer who provided me with a script he was working with. Now I have a starting point to expand my understanding of Ruby programming.
Thanks guys for your input -- much appreciated.

-
RE: Need a SU Tap & Die plugin
Well I tried the Bolt Builder DC and it will definitely build bolts - sort of.
Sadly, it is very restrictive in what 'type' of bolt/nut assembly you can build. No thread options and no way to create 'other' than a standard nut/bolt assembly.
Since I employ different bolts used in furniture making e.g., 'connector bolts' and 'shoulder bolts', this DC can't help me a whole lot. As they say "Close, but no cigar".
It's unfortunate (for me) that the BB's code is locked down. It would have been fun to try and tweak it to better suit my needs.
Given the effort I've put in so far to find an automated solution, I think I'm going to simply build my own by hand.
I sure wish someone knew of a script that could create nut threads (inside) and bolt threads (outside), the rest I could probably do on my own.
Thank you gilles for your help.

Bob
-
RE: Need a SU Tap & Die plugin
gilles,
Man, I've been all over looking for a solution. Thanks for helping out

Bob
-
RE: Need a SU Tap & Die plugin
Pilou,
I'm sorry but I don't understand what you're asking. You want an in image of what? Threads, nuts and bolts?
I use SU7-2013 proBob
-
RE: Wudworx Toolbar quick fix for SU2013 build 13.0.3689
Yes Siree...all done and now...the fun begins.

-
Need a SU Tap & Die plugin
Folks,
I've been on a quest for the Holy Grail (yes, I watch Monty Python) i.e. a plugin that will allow me to add threads to the outside AND inside surfaces of components like a tap & die set.
I want to be able to model nuts and bolts that have industry standard thread properties.
Ideally (but not mandatory), I'd like a plugin that would allow me to select bolt and nut types as well as the thread parameters.
I've tried BoltMaker XII, but it somewhat limited, as well, it creates components in a non-standard fashion that I cannot easily correct i.e., inverts the z-axis.
Maybe a DC?
Any thoughts anyone???
-
Wudworx Toolbar quick fix for SU2013 build 13.0.3689
Guys/Gals,
If your running the 'first' release of SketchUp 2013 and do not see the Wudworx toolbar anymore after copying over their plugin -- read on:
Note: This seems to be happening with the Windows OS and seems to be a glitch with SU build 13.0.3689. to resolve this, you have two options: Update to the latest build (13.0.4124) or perform the following simple fix:
Quit SketchUp if running
Move SketchUp 2013 \plugins\wudworx\wwxtool.rbs to your desktop (temporarily)
Start SketchUp. SketchUp will complain that it cannot load the Wudworx plugins - that is expected and is OK. click "ok"
Quit SketchUp
Move wwxtool.rbs from your Desktop back to SketchUp 2013 \plugins\wudworx
Start SketchUp. Wudworx Toolbar should be now available for use.
The procedure worked perfectly with SU2013 13.0.3689 running under Win 7 64-bit
 .
.Enjoy
-
RE: Flipping Crazy
Dave R.,
No particular product as yet.
When it comes to woodworking tools, I'm pretty serious and somewhat picky about what I buy.
However, I've only begun my research into dovetail jigs. I have no 'hands-on' experience with them so I'm taking the time to learn as much as I can before buying anything.
We have a couple of places here that I like to shop at (Lee Valley and Busy Bee). They employ experienced craftsmen that actually use the tools they sell. Better yet, they offer free seminars to prospective purchasers. Can't beat that

Have you had different experiences with dovetail jigs yourself? If so, any tips about what constitutes a good dovetail jig would be welcomed.
Bob
-
RE: Flipping Crazy
Dave R,
Dovetails on folding furniture? lol...your right about that. Actually, I'm about to purchase a dovetail jig to add to my shop so the dovetail plugin is a perfect complement to it.
Bob
-
RE: Flipping Crazy
Dave R,
I 'really' liked the plugin you used to counter-bore. I design folding furniture that I ultimately make for myself so the counter-bore plugin you used would be a real time saver.
I found a suite of woodworking plugins https://sites.google.com/site/wudworx/plugins-and-tools/wwxboardmaker) and purchased the Wudworx Library Version 2(includes BoardMaker Pro, Dovetails, M&T, and Drill plugins).
I'm not sure if it's the same plugins you use. If so, you should get a kickback for semi-advertising their plugin

I can't thank you enough for the amazing support you've provided.
Warm regards
Bob
-
RE: Flipping Crazy
Hi Dave...
This is an excellent video tutorial. Thank you so much

 . I would prefer your solution to mine if I can get it to work on BoltMaker XII output. You see, BoltMaker automaticaaly sizes the bolt to match its target.
Just one question: was the bolt you used created with BoltMaker XII and if so, did you manipulate it's axis in any prior to gluing them?
To answer your question "Why do you put a fastener in a single piece?".
Answer: To illustrate the 'flipping' issue I was experiencing when using BoltMaker XII. I totally agree that a single bolt in just one piece would serve no purpose
 .
. -
RE: Flipping Crazy
Piloe,
Re "So you don't use a replacement method". Sorry to say, but I was going about this all wrong. I was using BoltMaker as a way to automatically create a bolt that would resize itself according to the dimensions of the target. I thought that by simply replacing the BoltMaker bolt with mine that it would be very easy to do. Sadly, I was wrong.
I do thank you for your efforts.
Bob
-
RE: Flipping Crazy
Hi Dave...
Forgive me if I already asked you, but could you remind me of the 'fewer' steps you use
 .
.I've had so much correspondence around this topic with so many people on different forums, I've lost track

Bob
-
RE: Flipping Crazy
Guys,
FINALLY...after listening to all of your ideas, I derived a solution based largely on your comments and it worked perfectly. When it happened, it was one of those cathartic moments.
The solution was mainly to forget all about trying to 'replace' a BoltMaker XII bolt with mine and instead, figure out how to 'insert' my custom bolt exactly where I wanted it in another component.
Steps followed:
1 - Selected my custom bolt component (the source).
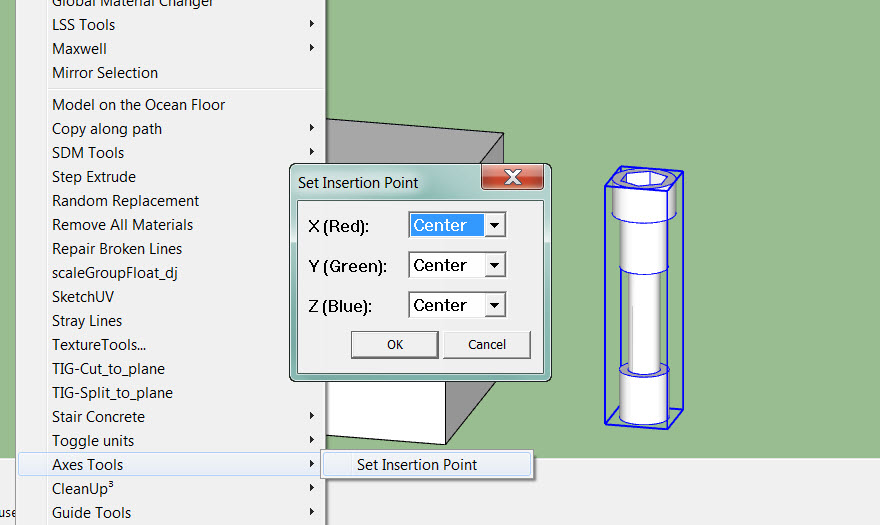
2 - Using ThomThom's Axis tool, set the insertion point of the custom bolt x-y-z axis to 'center'
3 - Selected the Box component (the Target).
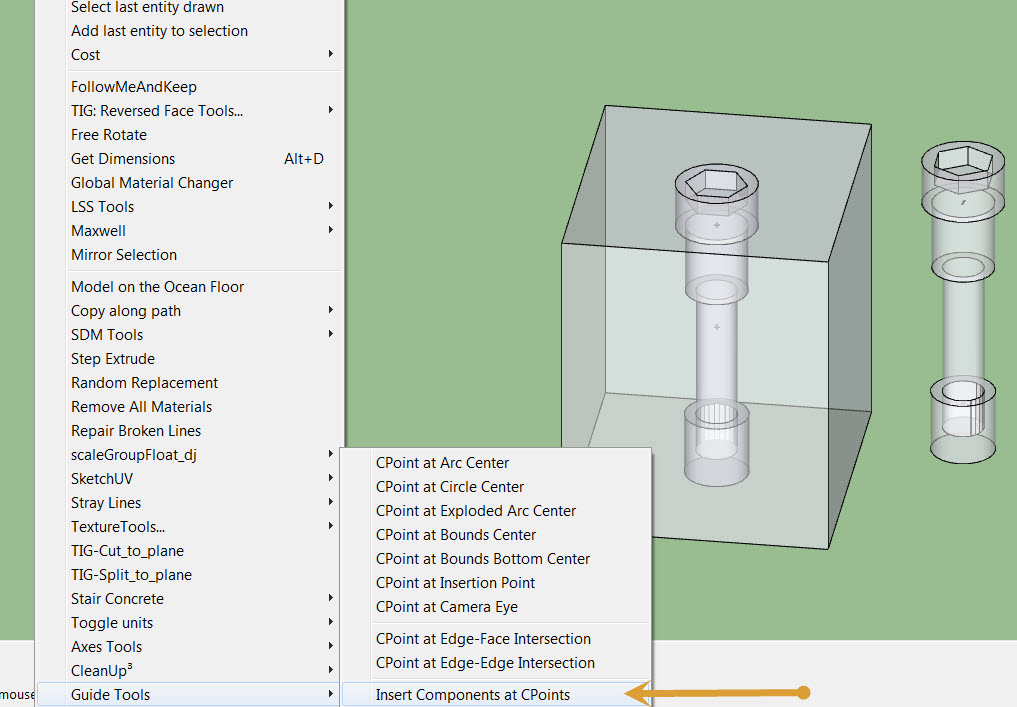
4 - Using ThomThoms Guide Tools plugin, set the Target's bounding box's cPoint at bound center.
5 - Click on the 'Source' component then CTRL-click on the 'Target' component.
6 - Using ThomThom's Guide Tools plugin, select Insert Component at cPoints.voila, the custom bolt is inserted in the block at the precise location I want.

THANK YOU ALL for your input


