Or just draw a short edge between a few of the edges on the flat top (not at the perimeter), select it and move upwards with Alt pressed.
Use FlipEdge to fix the flat areas.
Oops, your profile's looking a bit empty! To help us tailor your experience, please fill in key details like your SketchUp version, skill level, operating system, and more. Update and save your info on your profile page today!
Urasik Extensions | Lots of new extensions to check out Learn More
B
Offline
Posts
-
RE: Landscaped mound with rounded top
-
RE: From SU to papermodel - Thickness of paper issues.
And you don't fancy cutting edges with a passepartout knife, like this one : http://www.modulor.de/shop/oxid.php/sid/cef5e8b50b1dcdcd6f7d628b4e63bd8b/cl/details/cnid/LAN/anid/LANE ?
Cutting 300 hard 4mm+ cardboard with a knife isn't exactly fun...
I've built some laser cut model airplanes, and they were engraved with the laser too. That would make it easier to find the paired edges? This could also be burnt outside the parts, on the cutoffs?
Basically this is just a question of building a good layout system, that makes it easy to assemble afterwards. You could maybe burn some notches or holes to make it easier to keep track of the trimmed/non-trimmed parts? -
RE: From SU to papermodel - Thickness of paper issues.
Depends a lot on what type of models you make. For buildings with mostly 90 degree corners it should be pretty easy.
For each of the joints you simply subtract the thickness of the material on one of the parts.
Or mitre the joints at 45 degrees - if the laser can do it - or do it by hand afterwards.
Or cut all by hand from foamboard with the technique suggested by honoluludesktop?
For more complicated models it depends on what type of models they are. -
RE: Newbie desperately need help to keep her job
If you get your plugin problem sorted out - and still have your job
 , there is one more tool to consider using/buying/trying - Amorph (or PhotoScan) from tgi3D.
If you also have some good, uncropped photos you could model from them, eventually using PhotoMatch in SU (or PhotoScan) to get your models aligned with the potos, and ready for texturing all those carvings directly from the photos (you wouldn't want to model them in SU...)
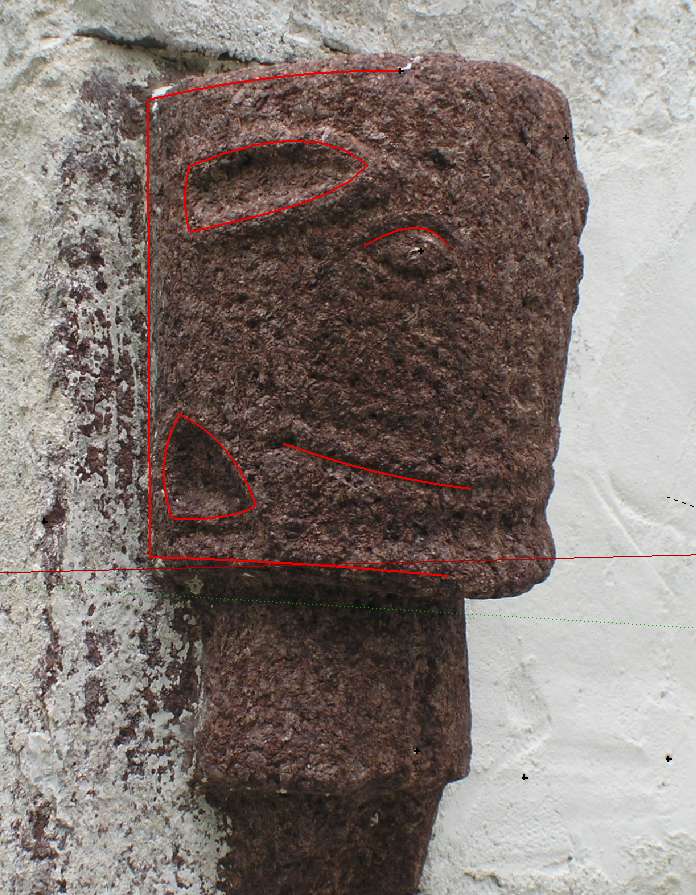
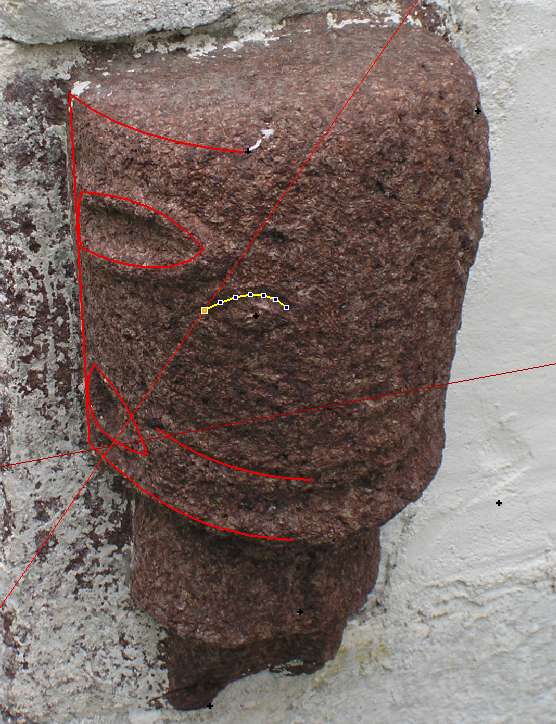
The attached images show a quick test where I algined the camera quite coarsely with your top photo (see that small red edge - it is a vertical edge aligned with the edge of the rack) drew the contours as curves in Amorph. Then they were view locked, and the second image shows a very quick view of the model from a different view, where I have moved the curves upwards along their lock lines (works alomst like normal inference locking), and a few holes filled in with meshes and smoothed. The proportions (and shapes) are not quite right, as the lack of truly aligned photos makes it a bit of trial and error. And I didn't spend more than about 15min here. The backs should be quite a bit higher compared to the seats...
If you still have access to the couch and can shoot some more photos, place a big box/crate (or several) on the floor that can be used for aligning the cameras with SUs PhotoMatch tool. Or use the rack for reference (need to see more of it then).

Equipped with Amorph/PhotoScan, Artisan, Curviloft, EdgeExtrude tools etc you should be able to model anything your employer throws at you
-
RE: 3d or 2d constructing
That explains the medieval "look" then

Great project in Poland. I particularly liked the toilet and the bicycle rack -
RE: Customizing Snap Options
To save you from the rehab/AA
- SU does not reset the focal length/fov by itself.
However, it stores the focal length in each saved page/view/scene by default. To avoid that you need to turn it off in the Scene manager and update the pages. -
RE: How to model a guitar neck
@unknownuser said:
What happens if you want to send someone a copy of your sketchup file? Do you have to send all the files together?
No. SketchUp never uses any external files AFAIK. It's all there inside the .skp file, including images and imported components/files. Makes it very simple to share, but may cause some huge files if you have a lot of textures/images. -
RE: 3d or 2d constructing
@unknownuser said:
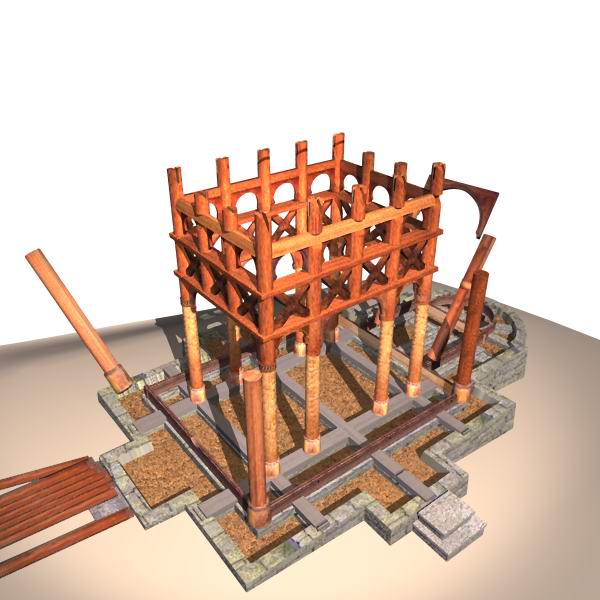
Something I just finished up this week:
Looks great
It instantly reminded me of our old stave churches (1200-1300), which I worked a lot with 10+ years ago (in trueSpace).
A lot of similar structures, isn't it?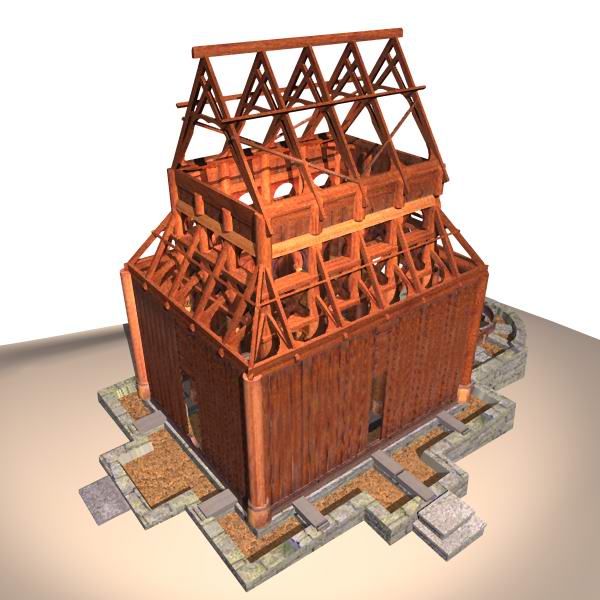
-
RE: Questions with components
Make your component with each of the 5 parts as subcomponents.
Then make a copy of the main component and rclick/Make unique.
Name the new component Comp1-split or whatever.
Double click the new comp and split it with move/rotate tools.
Whenever the subcomponents in either comp1 or comp1-split changes it will also change in the other component. But the placement of those subcomponents will stay different because the main components are not the same - only the subcomps are shared. -
RE: How to model a guitar neck
If you don't already have it, make keyboard shortcuts for hide/show hidden lines and X-ray on/off.
Then it is much easier to see what's going on.
In that guitar neck there may be some edges inside that should be deleted?
And the holes should probably easily be filled br drawing on top of one of the edges, if the guitar is modeled at a real scale 1:1. If it is smaller you should scale it up to avoid those problems with tiny dimensions. -
RE: A low-poly PhotoScan relief
As I started with 3D on a computer with 1MB RAM I'm still counting polys, always trying to make as few as possible
The number of polys you use depends on how many details you want, and how many pixels you have available. For a 500k model I guess I would have had to shoot some closeups too. Or just PhotoScan the main shapes and use other tools for details. It is perfectly possible to make a detailed model in PhotoScan without using the Surface/Image matching tools. There are very powerful upsample/downsample tools, as well as smooth and redistribute functions. Vertex locking and fixing are extremely useful for many tasks other than modeling from photos.
One of the great things with PhotoScan vs ImageModeler and Photomodeler is that you can use all the powerful tools and plugins in SU. The sides were here made with TIGs ExtrudeEdgesAlongVector. -
RE: A low-poly PhotoScan relief
I used 6 photos, but only really used 4 of them.
For a 3D-print model I would suppose you'd need several 100,000s of faces to get all that rough stone texture "translated"? -
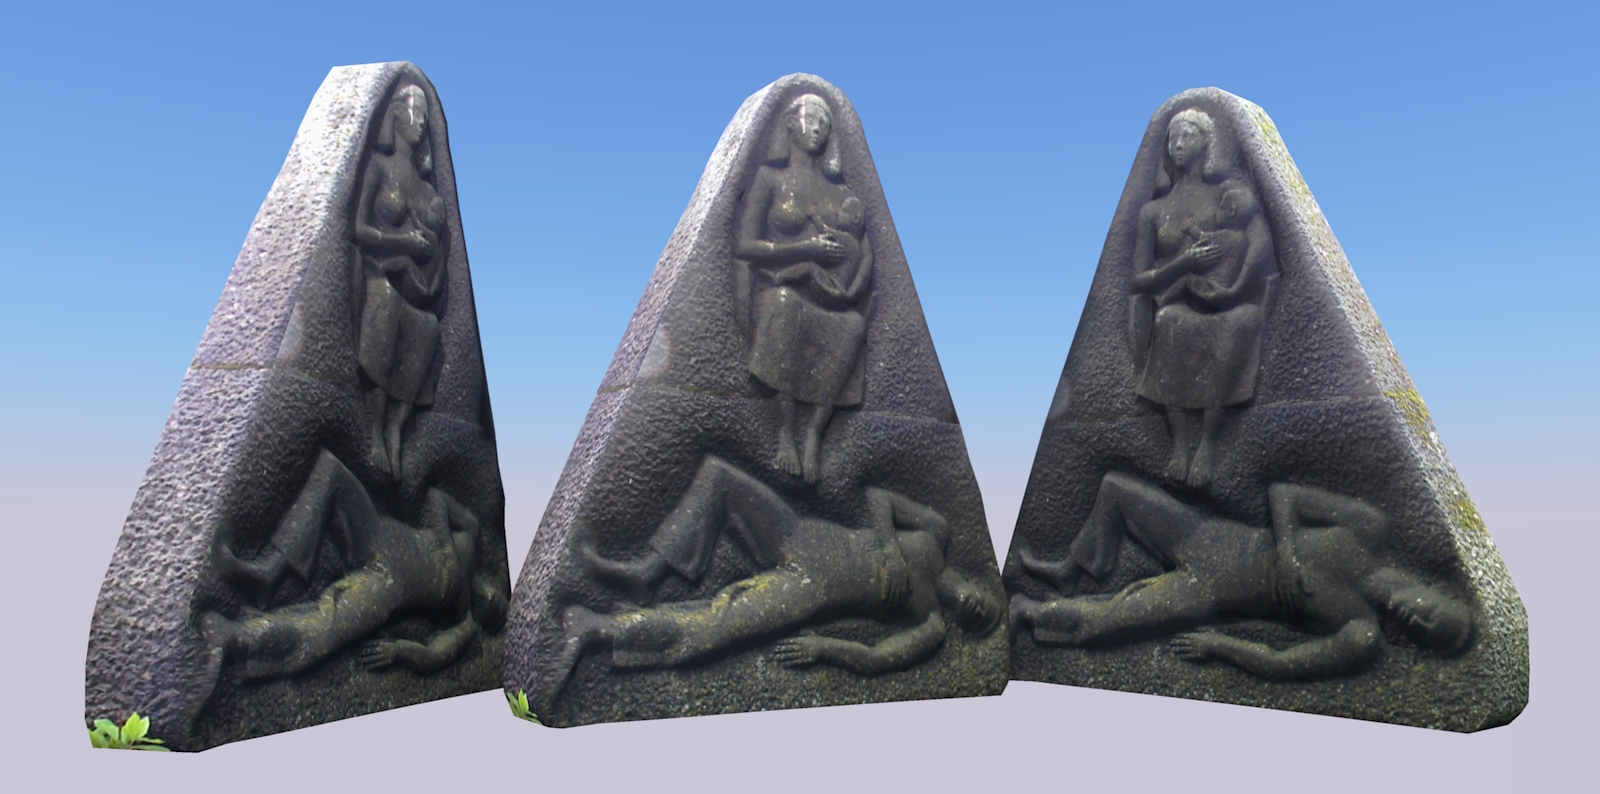
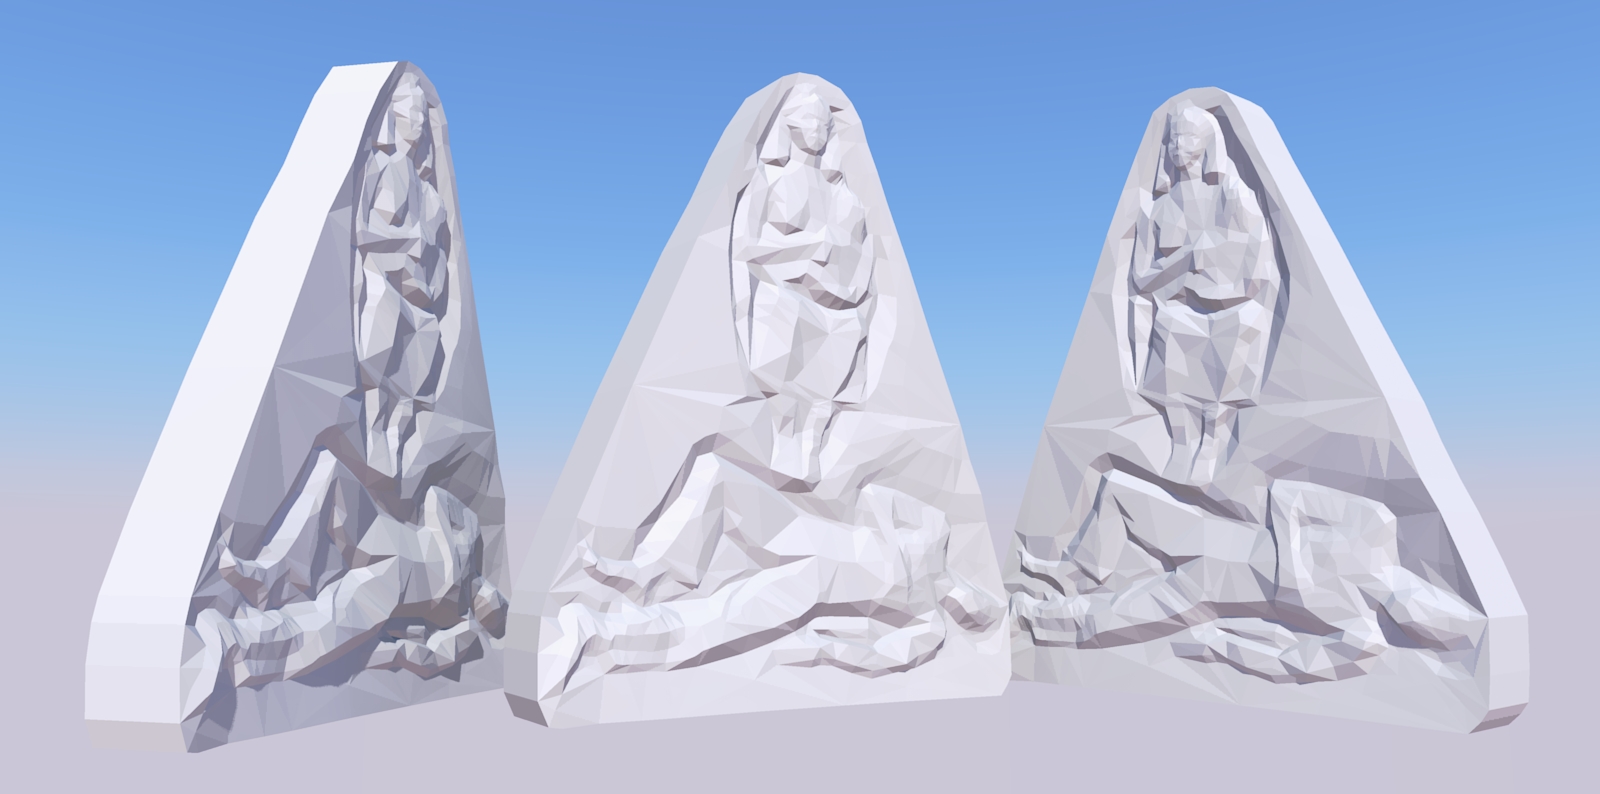
A low-poly PhotoScan relief
Here's a model of a local WWII monument, made with PhotoScan with only 2000 polys, and textured with projected photos (not edited afterwards). A coarse, flat model was made from a front photo and then shrunk to fit the stone (ie other photos).
Pretty convincing with textures on compared to the faceted clay version?
-
RE: Converting 2D dxf or dwg files
And before you do that you should make sure that you have at least one object in the scene.
The reason for that is that for some odd reason SU imports a dxf/dwg as a group only if there are already something in the scene, and you want it as a group - or at least I always do. Else it will import it as lots of "free" lines (and eventually some faces). -
RE: Theodolite phone apps - has anybody used them?
It would be great if you made a tutorial about how to use surveying techniques, theodolites (and apps) etc to reconstruct objects and landscapes in SketchUp
Have you considered doing that?BTW, would this app be of any help? http://photoephemeris.com/
It's great for calculating sun/moon positions. -
RE: Join lines
I rarely end up with many of those broken lines, as SU usually heals any joints if I remove a line. But I suppose there are different modeling styles?
Dragging a vertex to a neighbour works fine for me.
Another way is to draw a line at the point, preferably "into the air", ie free.
Delete the line again, and SU will auto-heal the broken line.
For a lot of joints you may move/copy the line to all the joints and delete them all in one go.BTW, drawing such temporary lines is also a great way to enable preselection of vertices in SU.
-
RE: Vacuum forming in SU
@gaieus said:
Well, the walls that we dig up are quite deep in the ground so I can more or less take photos from above standing there.
However nothing is excluded - a year or two ago, a firetruck came and lifted the archaeologist up in the air to take aerials!
Well. next time you volunteer to arrange the aerials session, and then you buy a pole and use the rest of the money for a PhotoScan license Seriously, I had an aerial photo job a while ago (the poles were far too short for an entire mall), and it turned out that it was cheaper to rent a helicopter for 20 min (it was very close to the airport) than to rent a lift/platform for a day (minimum). 40 min chopper flight == 1 PhotoScan license.@unknownuser said:
But enough of the Off-topic buildings - this is not about them but your model.
Actually it is about using and having fun with PhotoScan, but I found no other suitable category than WIP -
RE: Vacuum forming in SU
Looks like a great project to try it out with
Be sure to get yourself some telescopic poles for some aerials (I have 2 long + many shorter ones
.
Window cleaners poles (pro), pool cleaners and antennae poles, and microphone booms (expensive!) are all good sources.
But you may already be using such poles? -
RE: Vacuum forming in SU
PhotoScan and Amorph are extremely powerful plugins/applications, and I haven't been so quickly addicted to anything since I first met SketchUp about 8 years ago
It's like with the wheel - it looks very simple and easy, but is extremely powerful. In SU this "wheel" is inferencing, and in tgi3D it's called view lockingWhat about all those archeological excavations? You use a lot of sticks, ropes, grids and stuff to measure everywhere. But wouldn't it be useful to quickly and easily make a 3D model of the site, and use it anytime later for measuring distance between anything visible in at least 2 of the photos - with high precision? And at the same time be able to easily reconstruct ruins or disappeared buildings right on site?
-
RE: Vacuum forming in SU
Yeah, I thought that would be a nice tool for archeologists, Gaieus
It can replace laser scanning in many places, but at the same time it allows you to have/take much more control.
That dense eye patch mesh was made by drawing a rectangle in one photo, with 5 divisions on each edge.
View locked in one photo, and then PhotoScan did all the rest, including (partial) upsampling of the mesh.
5 min in all? The coarse, textured one was made in patches, with no features drawn, except for top and bottom.
SU applied the photos - a different one for each patch, and then PhotoScan made those textures into one single UV mapped spherical texmap. 10 min?Normally I would draw features and use the tgi3D tools to fit them into the other photos, like on these dumps.
You can't do that with a laser I think?