Some parts of the grass look like if they were rendered (the bright yellow bunch of grass is repeated).
Respect!
I try myself how to get realistic looking landscape and plant models, because photoshopping is only good for still images, not for animations.
Posts
-
RE: Bush Lodge - Vray - updated
-
RE: Animation Inside Viewer ?
A good reason why the SketchUp team should create some standards for animation ('animation API').
-
RE: Very heavy model.
Components reduce filesize and also performance because they contain certain geometry only once; if the component is used many times, each instance needs only coordinates, rotation and scale.
The issue above why components made some files larger was about unused components.
Maybe there are other solutions than what I can suggest:Firstly use as much components as possible. This way, you can easily edit and update identical geometry and the edges do not stick together. My current model has more than 150 000 polygons but less than 1MB.
The second thing is, I use a 'details' layer where I put all components and groups and detailed geometry that I do not need at the moment. When I need some geometry, I select it and put it on 'layer0' and turn off the 'details' layer. Textures are turned off in face style unless I need to see them for texturing. This way I can orbit very fast.
-
Texturing complicated organic shapes
I modelled a quite difficult rock formation, which needed to be textured:
http://sketchup.google.com/3dwarehouse/details?mid=d7801c562346005eb05fa4413d74cff0I tried external applications that unfold the model and apply UV coordinates for the texture image. Unwrap3d (commercial, no export in free version) and Blender would have taken me to much time to learn and the first results were a chaos of vertices because the shape is to complex.
So I used projected textures in Sketchup:
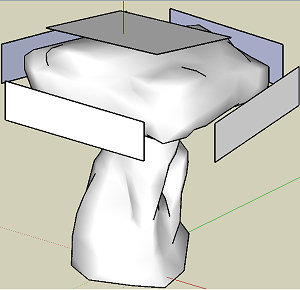
- Use View > Parallel Projection.
Place rectangles in the air that are roughly parallel to each side of the model.
Select each and click right > Align View and save the View as a new Scene.
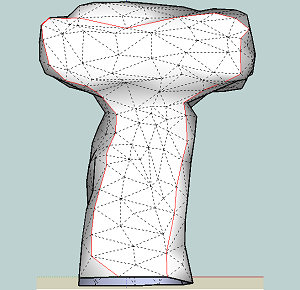
2. Make Screenshots (Alt+Print) of each Scene, cut them and import them as new textures.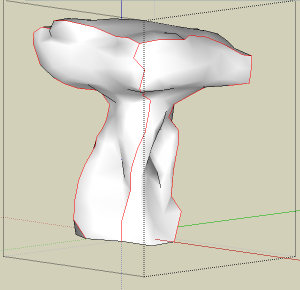
2./3. Optional: assigning colors to the boundary edges for each texture can be helpful.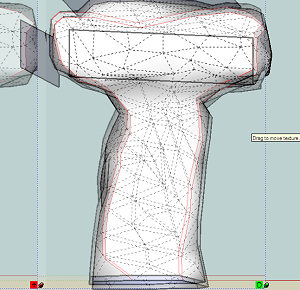
4. Place the textures on the rectangles and adjust them untill they match the geometry behind (hidden geometry on is helpful). Thus they match exactly to the view from where they where taken. Then right click -> texture -> projected. Use the [alt]+paint bucket to project the textures on the model. The projected textures will fit perfectly because they were taken from parallel perspective.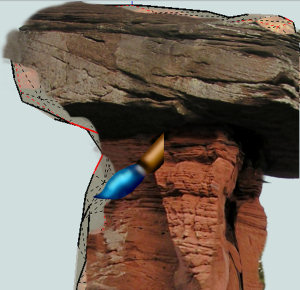
5. Now you can edit each texture in your graphics editor and overlay photos over the outlines of the textures. You only have to consider that the textures are fitting along the red lines. You may have to distort/paint on them until the model is seamless textured. Reload the texture images in Sketchup several times untill you are satisfied.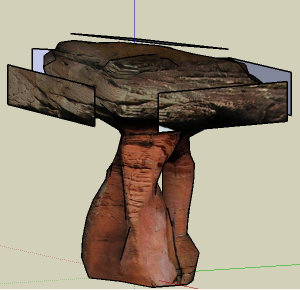
- Use View > Parallel Projection.
-
RE: Suggestion for sandbox-like tool
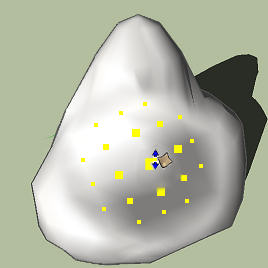
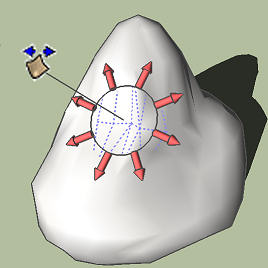
As I said it should be similar to the sandbox tool which is smooth on the borders (=> in the example the arrows have different lengths.) Of course I can just select specific faces and move them by hand or Normal PushPull, but then I have hard edges.


Ok, my image was not the best; maybe this one will inspire someone who knows ruby better than I:
-
RE: Large models ( high poly !) again
As you say the display speed is not comparable to other applications and must be improved.
There are other (additional) possibilities: a display style that replaces components by symbols or boxes like in Vue or in the CityEngine. In the CityEngine (which creates billion polygons), the user chooses some boxes to be fully displayed.
Another approach I would prefer is a progressive file format which only loads as much details as needed. The render engine does not need to render 10000 polygons for a tree in the background which is displayed 10 pixels large. As I observed, Google Earth already uses a progressive file format, but only for terrain and 3d-layer-buildings, but not kmz-files.
-
Suggestion for sandbox-like tool
Hello!
I unfortunately cannot make ruby scripts myself, but I have an idea for a very powerful improvement of the sandbox tool. Does something similar already exist?The sandbox tool only deforms in z-direction and moves all geometry that is under the curser, that means the upper surface and the lower surface. (when working with terrains this has no effect)
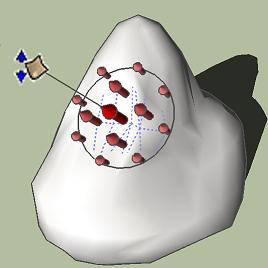
So my suggestion is a similar tool, that is not always orientated in z-direction but in direction of the normal of the surface over which you move the curser. Moreover it should only deform the foremost surface and ignore all surfaces behind.
There could be similar features like the tweaking tool in Inkscape, that can push, shrink and grow. The principle is shown in the images:
-
RE: Organic modeling from photos?
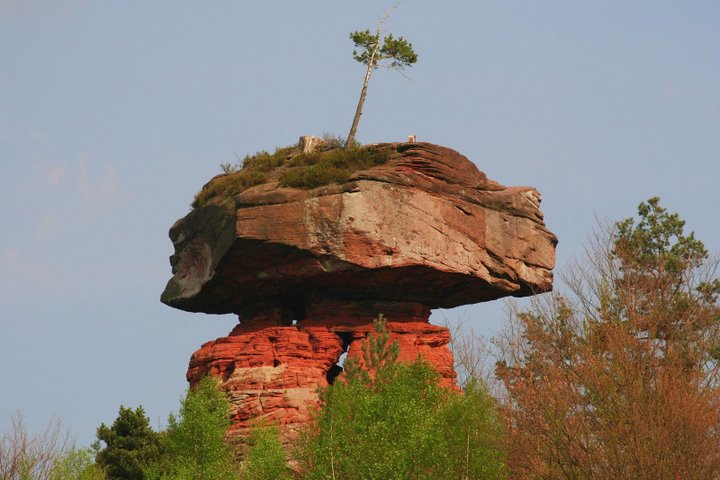
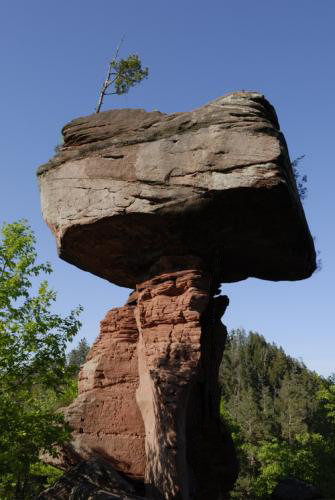
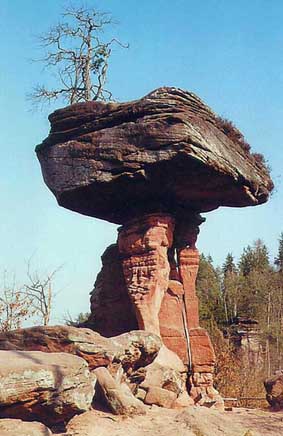
Here are the photos.
The rock has a total height of 12.5 m, the plate is 7m x 7m and 3.5m thick.
Has someone experiences with the Arc3D service? If it worked, I think it would be the best solution.Thanks for the replies
-
Organic modeling from photos?
Hello!
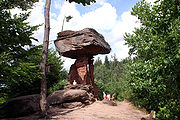
I want to create an accurate organic shape for which there are no blueprints:
[floatr:3e83izwi]
[/floatr:3e83izwi]
It's about a famous rock structure for Google Earth. It is to large to scan it or to meassure it with a tape, I have only 30 photos and the maximum dimensions (height, width, etc).
It is not possible to use SketchUp's photo match feature.1. I cut out the profiles of the 2d photos, scaled them and rotated them according to their perspective.
Then I placed them with the center points together so that they approximate the 3d rock shape. Now I tried to connect them with geometry.
This was the most real looking and most difficult result (not finished), but I don't know how accurate it is.2. I tried Microsoft photosynth which creates a 3d point cloud and uses it for a slideshow in 3d space. But photosynth can not export the 3d data.
I found Arc3D (http://homes.esat.kuleuven.be/~visit3d/webservice/v2/) that can create high quality models from photos for free. But at the moment there are database problems.
Then I found http://www.photo-to-3d.com which only uses 2 photos in the free version. For my case, two photos where not enough and resulted in empty collada-files.3. I made my own javascript based tool that allows to match identical points in different images and calculates the depth information. The result looks a bit similar to the real rock but too blurry and perspectively distorted.
Does anyone know other tools or strategies to get as much information out of the photos as possible?
thanks in advance
-
RE: [Obsolete] LibFredo6 3.0e (newer version available)
Hello!
I translated the plugin into german. I have to say that your library is a universal tool for developing/ translating scripts in infinite languages!
Thanks!