sketchucation logo sketchucation
    • Login
    ℹ️ Licensed Extensions | FredoBatch, ElevationProfile, FredoSketch, LayOps, MatSim and Pic2Shape will require license from Sept 1st More Info

    Curved wall w/ variable height

    Scheduled Pinned Locked Moved SketchUp Discussions
    sketchup
    22 Posts 8 Posters 3.4k Views 8 Watching
    Loading More Posts
    • Oldest to Newest
    • Newest to Oldest
    • Most Votes
    Reply
    • Reply as topic
    Log in to reply
    This topic has been deleted. Only users with topic management privileges can see it.
    • J Offline
      jfmalone
      last edited by

      Hey - I need some help with this one. I'm sure given the time I could figure it out but I need to figure this feature out quickly. I hope someone has done this before and has some ideas.

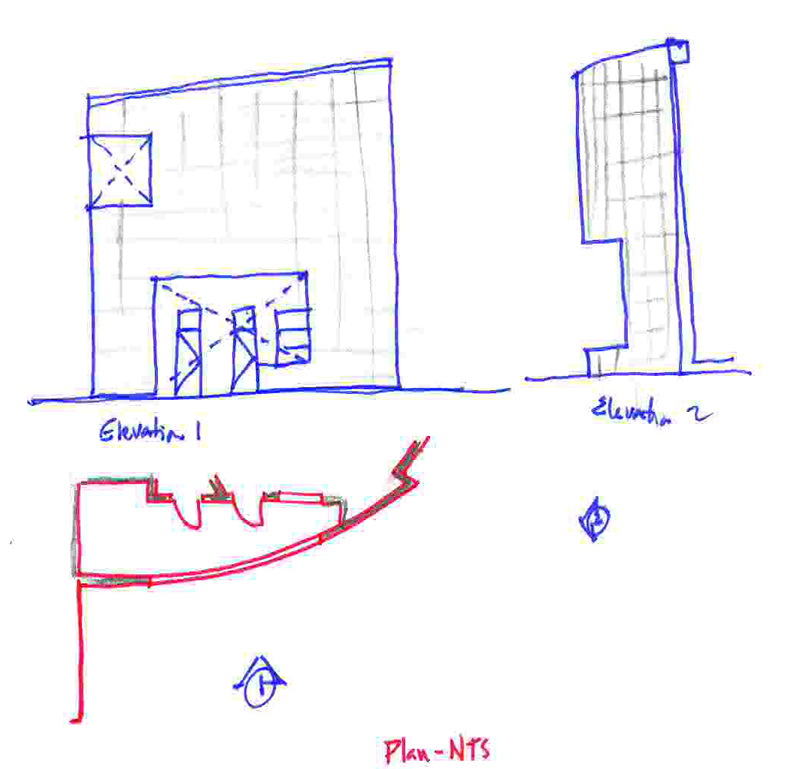
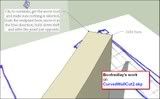
      Basically I have a curved wall that is increases in height along the lenght of the curve - see rough sketch attached. I'l like to acheive a clean curve with the fewest joints possible.


      CURVED WALL.jpg

      1 Reply Last reply Reply Quote 0
      • boofredlayB Offline
        boofredlay
        last edited by

        Here is a quickie I whipped up. I hope this is what you are looking for.
        Click image for Skp file.


        http://www.sketchucation.com/forums/scf/sas/ProUser/CurvedWallCut.jpg

        http://www.coroflot.com/boofredlay

        1 Reply Last reply Reply Quote 0
        • G Offline
          GreyHead
          last edited by

          Hi,

          Here's one way of doing it, it seems to be pretty smooth but may not be the minimum size.

          Bob


          Skippy tutorial

          1 Reply Last reply Reply Quote 0
          • J Offline
            jfmalone
            last edited by

            Fantastic - Thanks a lot guys!

            1 Reply Last reply Reply Quote 0
            • Wo3DanW Offline
              Wo3Dan
              last edited by

              @greyhead said:

              Hi,

              Here's one way of doing it, it seems to be pretty smooth but may not be the minimum size.

              Bob

              Bob,

              I don’t want to spoil your fun but looking at your curved wall made me curious.
              It looked so easy and for presentation it might be alright. But there is definitely something wrong like when you use the ‘Follow Me’ tool on a path that is not coplanar; that would cause a twisted cross section.

              In both Erics and your method the top cross section line is slanted but here the wall is getting ‘out of plumb’. This could lead to problems when relying on a straight wall construction.
              See:
              http://sketchup.google.com/3dwarehouse/details?mid=1c1b49900ebd37b44e97381e9f105417

              I can’t yet figure out why this odd behaviour occurs but unfortunately it’s a fact.

              cheers,
              Wo3Dan

              1 Reply Last reply Reply Quote 0
              • P Offline
                pmiller
                last edited by

                Neither the intersecting plan method nor follow-me will give you equal heights (90 angles at the tops of the wall). You will need to construct it manually the hard way. Note that the top surface is a sloped ramp (see the hidden lines that triangulate the surface). Follow-me in SU will always result in a twist when you are changing directions in 2 axes at once (although you won't notice this is the follow-me section is a circle like a pipe rail). In any event it will be just as hard to build in real life as it is to make in SU.


                curving_sloped_wall2.skp

                1 Reply Last reply Reply Quote 0
                • Wo3DanW Offline
                  Wo3Dan
                  last edited by

                  Paul,

                  About the twist when applying ‘Follow Me’ in NOT-coplanar curves I knew.
                  Also about the handmade stitching method. It’s the ‘out of plumb’ result of Bob Janes solution that I was pointing out and that could lead to (serious) problems when just depending on the accuracy of the construction. The top isn’t that important.
                  (I couldn’t believe my eyes seeing such a simple method for a curved ramp-like wall construction)

                  cheers,
                  Wo3Dan

                  1 Reply Last reply Reply Quote 0
                  • G Offline
                    GreyHead
                    last edited by

                    There are some interesting things going on here - and mostly they follow from some gaps in the specification, what the designer didn't specify on the plan. Those have to be filled in somehow which means that some assumptions have to be made.

                    The intersection method assumes that the degree of slope is uniform along the projection of the wall, not the length of the wall itself. In the case of jfmalone's wall that isn't going to make much difference, with my example with the sharper turn it will. In effect the end of the wall, which is in the green direction will have little or no slope.

                    My method leaves the decision to the internal workings of SketchUp and I have no real idea how it deals with that. But it does keep the curve more or less uniform along the length of the wall.

                    @unknownuser said:

                    the top cross section line is slanted but here the wall is getting ‘out of plumb’
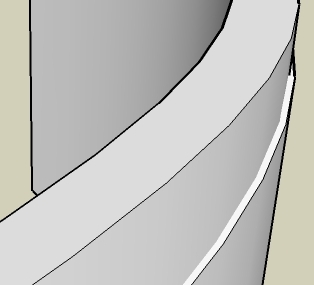
                    I hadn't noticed that, both end of the wall top are exactly at 90 degrees, but, as you say, the middle of the wall is out of plumb (see below). I'm afraid I'm going to lay that off on to the SketchUp algorithm, as far as I can work out it should be possible to lower the top surface without any lateral movement.

                    @unknownuser said:

                    Neither the intersecting plan method nor follow-me will give you equal heights (90 angles at the tops of the wall).
                    This is tricky, the ends of the wall do have equal height - for the space in between it depends on where you choose to measure. Because it's a curve the two sides have different lengths and there are no 'right places' to choose to have the right angles. Where they should be is a design assumption - and it looks like the SketchUp algorithm is quite a long way off ideal. Your assumption that they should be equispaced is probably a much better one.

                    Bob

                    Curved sloping wall 2.jpg

                    1 Reply Last reply Reply Quote 0
                    • boofredlayB Offline
                      boofredlay
                      last edited by

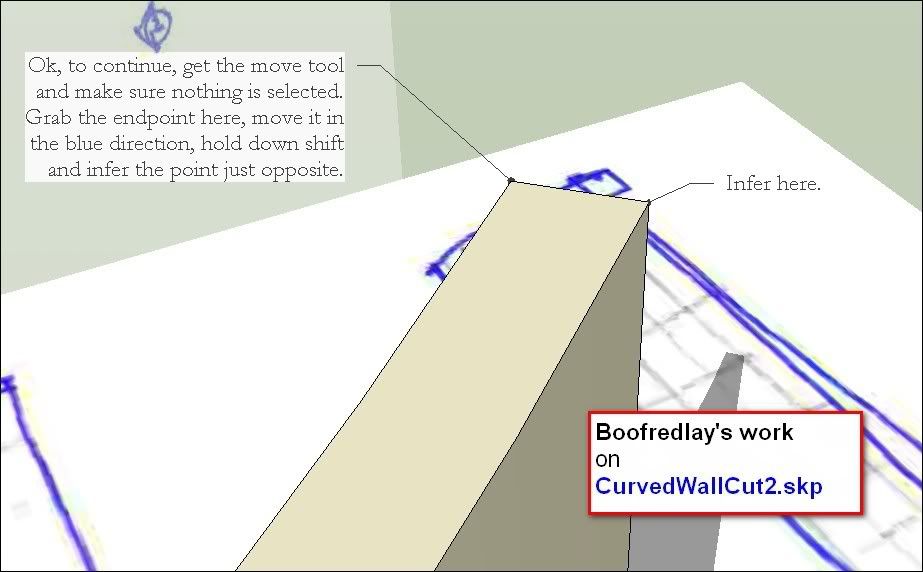
                      Here is a continuation on my tut. Sorry I did not get to it sooner.
                      Yes, the top is not 90 deg and you have to manually fix it but unless you have a massively large poly count it is simple and fast.


                      http://www.sketchucation.com/forums/scf/sas/ProUser/CurvedWallCut2.jpg

                      http://www.coroflot.com/boofredlay

                      1 Reply Last reply Reply Quote 0
                      • J Offline
                        jfmalone
                        last edited by

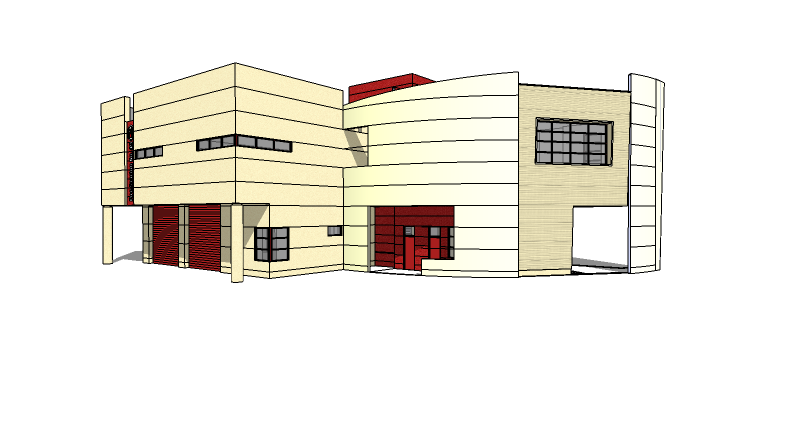
                        For what I needed, Boofredlay's system worked great and its looking good. I have some clean-up todo but here is the WIP.


                        building_2.png

                        1 Reply Last reply Reply Quote 0
                        • boofredlayB Offline
                          boofredlay
                          last edited by

                          Man that looks great. Glad I could help.

                          http://www.coroflot.com/boofredlay

                          1 Reply Last reply Reply Quote 0
                          • simon le bonS Offline
                            simon le bon
                            last edited by

                            Dear Boofredlay, thanks for your CurvedWallCut2.skp. I have found in what i was searching for. In re-doing your tut, in Scene3, you've Pushpulled the shape this way:

                            http://img166.imageshack.us/img166/5895/yourpushpullwallsa3.th.jpg

                            But the only pushpulled figure i can obtain is this one:

                            http://img166.imageshack.us/img166/3845/mypushpullwallib2.th.jpg

                            Can you explain how? ,, (great thanks for your all work in this place.)

                            1 Reply Last reply Reply Quote 0
                            • J Offline
                              jfmalone
                              last edited by

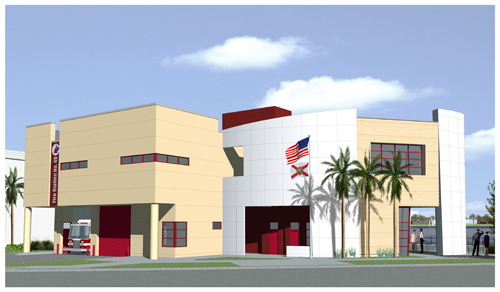
                              I forgot about this posting I did. Thanks again for all the help. Here is the finished image.


                              Camera1 Final_small.png

                              1 Reply Last reply Reply Quote 0
                              • boofredlayB Offline
                                boofredlay
                                last edited by

                                jfmalone, that is really nice. Thanks for giving us the final.

                                Simon, I got the same result you did when pushing that face. Then I just erased the top and side faces so you could see the face that was passing through the curved wall. Hope that helps.

                                http://www.coroflot.com/boofredlay

                                1 Reply Last reply Reply Quote 0
                                • simon le bonS Offline
                                  simon le bon
                                  last edited by

                                  Dear Boofredlay, at the end, after all my attempts and some thinking about, that was the conclusion i reached to.

                                  Hum!, elsewhere i haven't found a real Tut on Stitching. Perhaps one day, if you have little time...

                                  1 Reply Last reply Reply Quote 0
                                  • R Offline
                                    remus
                                    last edited by

                                    heres a very quick intro to stitching.


                                    stitching tut.skp

                                    http://remusrendering.wordpress.com/

                                    1 Reply Last reply Reply Quote 0
                                    • simon le bonS Offline
                                      simon le bon
                                      last edited by

                                      Dear Remus,

                                      Sorry i had not saw your post. Thanks for this short, simple and clear tut on STITCHING.

                                      (we can find the ruby CurveStitcher script you've talking about here on Smustard:CurveStitcher v.2.2 by Rick Wilson )

                                      I just would like add this tip to do manual Stitch you can find on Boofredlay's CurvedWallCut2.skp .(Second post, just clic on picture to download)

                                      http://i274.photobucket.com/albums/jj245/Spendauballet/SketchUp/Boofredlay_CurvedWallCut2.jpg

                                      simonlebon.

                                      1 Reply Last reply Reply Quote 0
                                      • D Offline
                                        dtrarch
                                        last edited by

                                        Hi All
                                        Good topic and there is a solution.

                                        Use the [extrudeLine] to pull up a single line and intersect for slice.
                                        Then use the [joint pushpull] (tab=keep original faces) to extrude a face.
                                        Check out the attached ☀

                                        Looks flat to me.

                                        dtr


                                        Flat Top slope.skp

                                        1 Reply Last reply Reply Quote 0
                                        • P Offline
                                          pmiller
                                          last edited by

                                          It may look flat to you, but the vertical surfaces (on the right side) are not vertical, nor is the top truly horizontal. Check by turning on display edges by axis (turn on hidden geometry).

                                          1 Reply Last reply Reply Quote 0
                                          • D Offline
                                            dtrarch
                                            last edited by

                                            P Miller

                                            You are right and my error.
                                            SU is just plain twisted.
                                            Top/bottom ortho view does show the out of vertical.

                                            Oh well.

                                            dtr

                                            1 Reply Last reply Reply Quote 0
                                            • 1
                                            • 2
                                            • 1 / 2
                                            • First post
                                              Last post
                                            Buy SketchPlus
                                            Buy SUbD
                                            Buy WrapR
                                            Buy eBook
                                            Buy Modelur
                                            Buy Vertex Tools
                                            Buy SketchCuisine
                                            Buy FormFonts

                                            Advertisement