sketchucation logo sketchucation
    • 登入
    Oops, your profile's looking a bit empty! To help us tailor your experience, please fill in key details like your SketchUp version, skill level, operating system, and more. Update and save your info on your profile page today!
    🔌 Smart Spline | Fluid way to handle splines for furniture design and complex structures. Download

    [Tutorial > Modeling] How a Pro Builds a House in SU pt 1

    已排程 已置頂 已鎖定 已移動 SketchUp Tutorials
    sketchup
    88 貼文 30 Posters 80.9k 瀏覽 30 Watching
    正在載入更多貼文
    • 從舊到新
    • 從新到舊
    • 最多點贊
    回覆
    • 在新貼文中回覆
    登入後回覆
    此主題已被刪除。只有擁有主題管理權限的使用者可以查看。
    • KrisidiousK 離線
      Krisidious
      最後由 Krisidious 編輯

      How a Pro Builds a House in Sketchup Part 1

      Continued in Part 2 http://sketchucation.com/forums/viewtopic.php?f=18&t=752
      Continued in Part 3 http://sketchucation.com/forums/viewtopic.php?f=18&t=723

      first we need a template setup for our architectural use.

      Tada... http://www.sketchup-house-plans.com/48-architectural-modeling

      now that we have our template...

      step 1
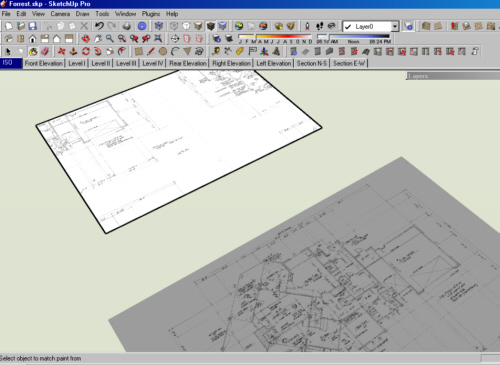
      import your house plan image as an image.
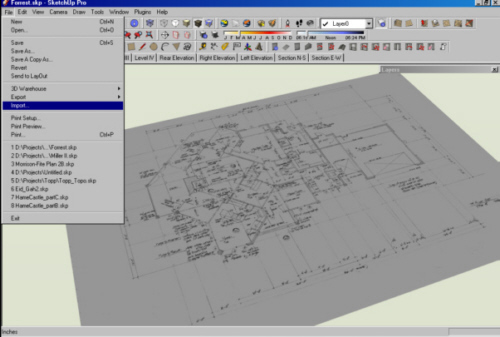
      Step_001.jpg

      step 2
      draw a line along a distance in the drawing in which you know what the distance is before hand. example a standard shower/tub is 5' so I would draw a line along the shower/tub wall.
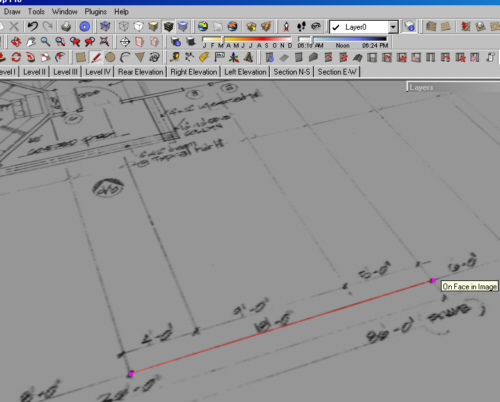
      Step_002.jpg

      step 3
      now group the house plan image and the line you drew together.
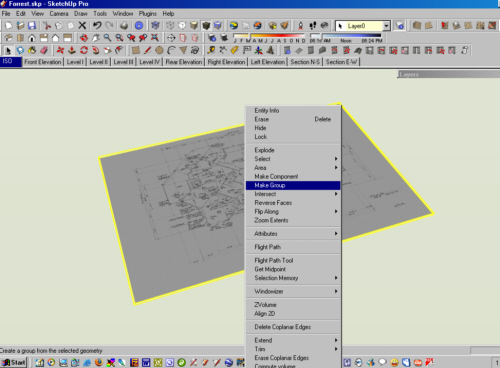
      Step_003.jpg

      step 4
      open the group you just made, and use the measure tool to measure the distance of the line that you draw in step 2. as soon as you click the second point on the measurement. type in the specification line 5' or the distance of the wall you chose. SU Will ask do you want to re-size the group? answer yes.
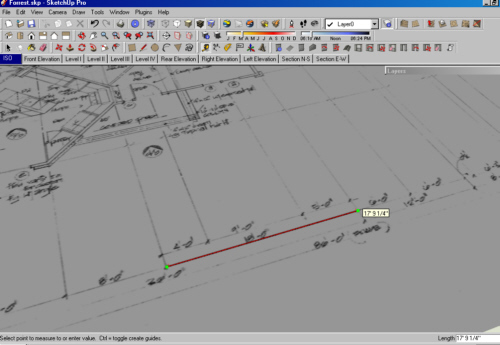
      Step_004.jpg

      step 5
      explode the group, and delete the line you drew. your plan should now be scaled, to real life dimensions.
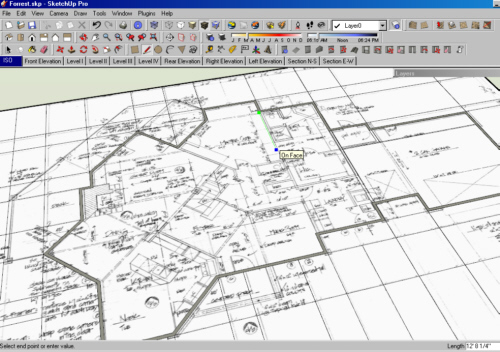
      Step_005.jpg

      step 6
      draw a large rectangle, larger than your plan. right click on your plan image and choose "use as material" and apply the material to the rectangle.
      Step_006.jpg

      step 7
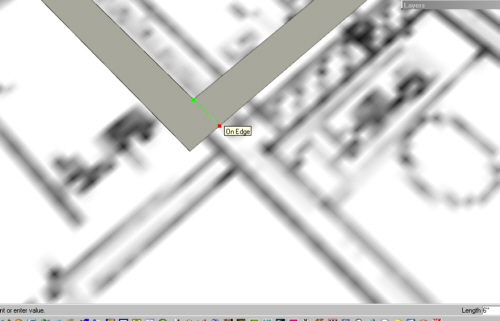
      you should now have your plan on a large face, trace the plan.
      Step_007.jpg

      step 8
      be sure to use proper thicknesses, such as 6" exterior walls for wood and 8" for concrete.
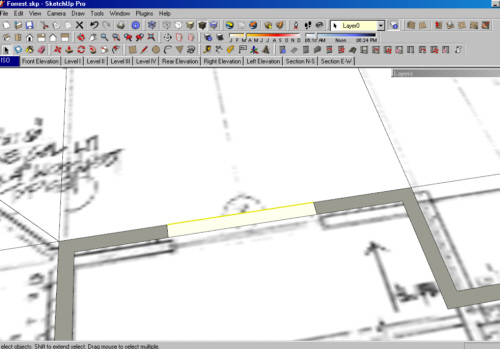
      Step_008.jpg

      step 9
      trace the door and window openings.
      Step_009.jpg

      step 10
      select your whole first floor plan and move it to the
      "level I" layer. and make a copy of it. and move it over about 100' feet or more to the side.
      stay with me... this copy will now become many things to us. it will be a truss layout, a foundation layout, a framing layout, the list goes on. we will use it over and over to create different levels of the home.
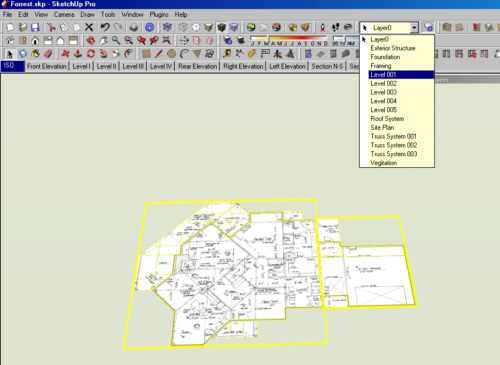
      Step_010.jpg

      step 11
      repeat this process for your foundation, your first level and your second level and third...

      next time we'll create components from each of the layers and show how to work on your house while looking at it too...

      see you then...

      By: Kristoff Rand
      Home DesignerUnique House Plans

      1 條回覆 最後回覆 回覆 引用 0
      • jujuJ 離線
        juju
        最後由 編輯

        Thx for the contribution, however the link you provided for the template isn't working.

        Save the Earth, it's the only planet with chocolate.

        1 條回覆 最後回覆 回覆 引用 0
        • KrisidiousK 離線
          Krisidious
          最後由 編輯

          ok that should fix it.... the link should work as a zip

          By: Kristoff Rand
          Home DesignerUnique House Plans

          1 條回覆 最後回覆 回覆 引用 0
          • GaieusG 離線
            Gaieus
            最後由 編輯

            Very informative kristoff. Looking forward to the next stage 😆

            Gai...

            1 條回覆 最後回覆 回覆 引用 0
            • N 離線
              not registered yet
              最後由 編輯

              I'm excited to see the next installment in this series! Keep it up!

              (rpargman)

              1 條回覆 最後回覆 回覆 引用 0
              • EdsonE 離線
                Edson
                最後由 編輯

                hi kris,

                i am following your two tutorials with great interest and have a couple of questions to make you.

                are you starting from the assumption that there is no plan in dwg or dxf format for one to start with and that all there is is some image scanned from a mag or some other source? i ask that because tracing over a picture is not that easy, as there are no edges or endpoints to grab on to.

                what is the point of applying the plan as material on the larger rectangle? you suggest one to use proper thicknesses but the larger plan is out of scale. please explain this.

                why not trace the plan over the rightly scaled plan and then make copies of it to put on other layers as you suggest?

                please continue this amazing thread. regards.

                edson

                edson mahfuz, architect| porto alegre • brasil
                http://www.mahfuz.arq.br

                1 條回覆 最後回覆 回覆 引用 0
                • GaieusG 離線
                  Gaieus
                  最後由 編輯

                  emahfuz, see Kristoff's step number 2 in order to get the scaling correct (as as close as possible).

                  Inference locking helps to keep things straight / square / plumb. Applying the picture to a square as a texture allows you to draw straight onto the picture (now a SU plane) - you can always removed the picture again later on.

                  Correct me if I'm wrong in my statements, please. 😉

                  Gai...

                  1 條回覆 最後回覆 回覆 引用 0
                  • N 離線
                    not registered yet
                    最後由 編輯

                    Guess What! I used HouseBuilder.rb to construct my house! Here is the file:

                    (Invader ZIM)


                    house_onstruct.skp

                    1 條回覆 最後回覆 回覆 引用 0
                    • GaieusG 離線
                      Gaieus
                      最後由 編輯

                      Must be nice houses Invader!
                      Just I cannot get them run... (edit: OK: you fixed it now...)

                      http://users.atw.hu/swb/smile/raz.gif

                      BTW - this topic is about a particular tutorial in the Tutorials forum. Could you please not divert it?!

                      Gai...

                      1 條回覆 最後回覆 回覆 引用 0
                      • EdsonE 離線
                        Edson
                        最後由 編輯

                        hi juju,

                        i did step 2 exactly as told and got the plan scaled right. my mistake was probably having used the texture tool to make the image fit the larger rectangle.

                        from what you said the plane under the picture helps keep things straight and plumb. would not that happen if i traced the plan that is not on the rectangle?

                        thanks.

                        edson

                        edson mahfuz, architect| porto alegre • brasil
                        http://www.mahfuz.arq.br

                        1 條回覆 最後回覆 回覆 引用 0
                        • jujuJ 離線
                          juju
                          最後由 編輯

                          Edson, what you're saying isn't quite making sense. The idea is to create a plane on which to "texture" the image plan and then trace it. It shouldn't be outside of the plane you created.

                          Save the Earth, it's the only planet with chocolate.

                          1 條回覆 最後回覆 回覆 引用 0
                          • EdsonE 離線
                            Edson
                            最後由 編輯

                            juju, sorry about that. let me try again.

                            i imported the plan and scaled it, ok? then i drew a larger rectangle close to it and copied the scaled plan onto it. since the rectangle was bigger than the image there ensued a tiling effect. in trying to get rid of the tiling (by using Texture>>Position) i threw the plan off scale. so i ended up with two plans side by side, one scaled correctly and the other slightly bigger while all the tutorial suggested was to have one scaled plan "textured" on the plane.

                            i hope it makes some sense to you now.

                            edson

                            edson mahfuz, architect| porto alegre • brasil
                            http://www.mahfuz.arq.br

                            1 條回覆 最後回覆 回覆 引用 0
                            • GaieusG 離線
                              Gaieus
                              最後由 編輯

                              Edson, you can also try to scale the "larger" rectangle in a way (not with the scale tool) but selecting the edge on the side you notice the tiling and moving it (make sure to lock the axis of movement) to the edge of the original drawing.
                              You can repeat this along the other axis. This way you end up with a rectangle which is perfectly covered with the image (and only one instance of it).

                              Gai...

                              1 條回覆 最後回覆 回覆 引用 0
                              • C 離線
                                Charlie__V
                                最後由 編輯

                                krisidious,

                                Many thanks for this,especially the scaling image part. :~)

                                C

                                Precision M1710/Win 7 Pro 64 bit/i-7 6920 Quad core 2.9 Ghz -3.8/16Gb ram/NVIDIA M5000M 8Gb

                                1 條回覆 最後回覆 回覆 引用 0
                                • N 離線
                                  Nick W
                                  最後由 編輯

                                  Kris,

                                  I've been walking through your process and it's very helpful and informative. I've learned a lot. Thanks for that Smile

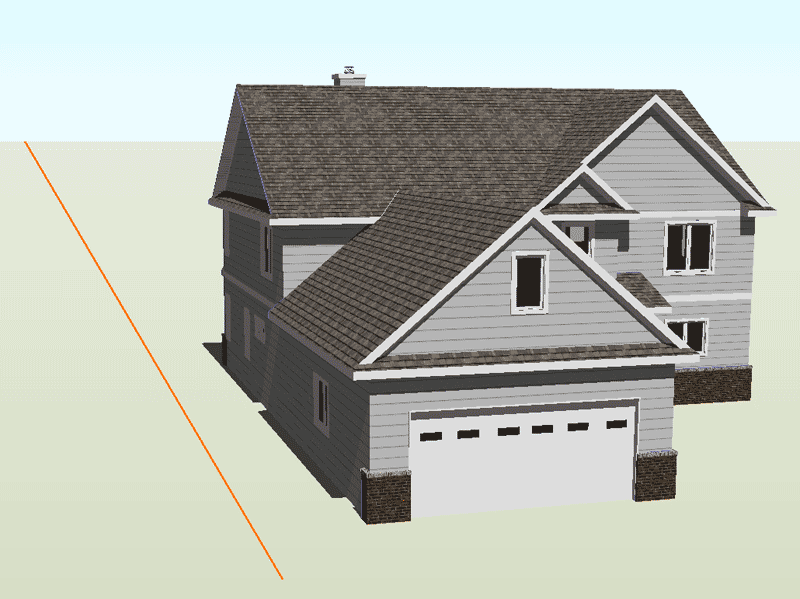
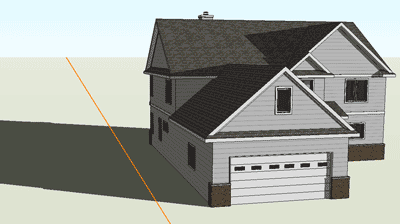
                                  What is the big orange line in your template (see attached)? I can't seem to track it down or hide it. It is congruent with the green axis and is visible only on the positive side of the origin.

                                  Thanks!


                                  housetemplate.gif

                                  http://www.nrwiesneski.com

                                  1 條回覆 最後回覆 回覆 引用 0
                                  • jujuJ 離線
                                    juju
                                    最後由 編輯

                                    The orange line is the direction where the sunlight is coming from. I use it on all my work to get accurate sun angles.

                                    Save the Earth, it's the only planet with chocolate.

                                    1 條回覆 最後回覆 回覆 引用 0
                                    • N 離線
                                      Nick W
                                      最後由 編輯

                                      If that is the case, do you know how to hide it?

                                      The orange line doesn't change when I change the position of the sun...

                                      I imagine it's something very simple... thanks in advance for your instructive help


                                      housetemplate2.gif

                                      http://www.nrwiesneski.com

                                      1 條回覆 最後回覆 回覆 引用 0
                                      • EdsonE 離線
                                        Edson
                                        最後由 編輯

                                        uncheck it and the sun's direction will not show.


                                        location.png

                                        edson mahfuz, architect| porto alegre • brasil
                                        http://www.mahfuz.arq.br

                                        1 條回覆 最後回覆 回覆 引用 0
                                        • N 離線
                                          Nick W
                                          最後由 編輯

                                          Thanks guys!

                                          I just realized that the non-pro version probably doesn't have that feature, as I can't find it right now. Though I've seen it before, which confused me on several occasions (I have Pro at work, but not at home).

                                          Peace!
                                          nick

                                          http://www.nrwiesneski.com

                                          1 條回覆 最後回覆 回覆 引用 0
                                          • KrisidiousK 離線
                                            Krisidious
                                            最後由 編輯

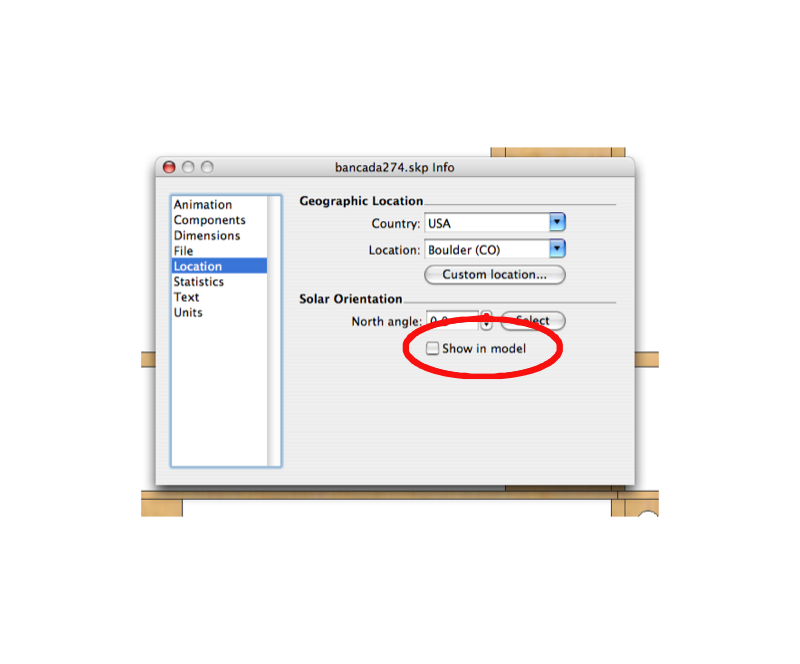
                                            it's the North Arrow... and you should have it in your model info

                                            go to the top of SketchUp...

                                            go to Window
                                            then to Model info
                                            then click on Location
                                            at the bottom it says Solar Orientation
                                            uncheck Show in Model.

                                            By: Kristoff Rand
                                            Home DesignerUnique House Plans

                                            1 條回覆 最後回覆 回覆 引用 0
                                            • 1
                                            • 2
                                            • 3
                                            • 4
                                            • 5
                                            • 1 / 5
                                            • 第一個貼文
                                              最後的貼文
                                            Buy SketchPlus
                                            Buy SUbD
                                            Buy WrapR
                                            Buy eBook
                                            Buy Modelur
                                            Buy Vertex Tools
                                            Buy SketchCuisine
                                            Buy FormFonts

                                            Advertisement