Requesting help skewing a 3D object
-
@box said:
Plus the thread belongs to the Original Poster and what anyone else learns from it is incidental, it should be directed towards the beginner user not the advanced user.
I don't agree here, I think this is the reason why Sketchucation is a great and helpful forum, otherwise a short PM would help too. You are right that often a plugin suggestion is not necessary for simple task and may mislead beginners...
**Another point here is the sometimes inappropriate selection of the sketchup level ...
And now I feel that we hijacked this topic
 **
** -
any answer is a good answer...even a wrong answer
-
As a side note:
When you proceed to deleting unwanted geometries, make the part soft and smooth and turn hidden geometry off.
-
Just a couple of tips now that I have looked at your model.
Your original profile is made up of exploded curves which means you have many small segments and when you extrude the profile get many facets rather than a smooth face. This can be corrected by smoothing in several ways but it is easier to "Weld" the segments together to begin with. Some version of weld is a plugin that should be included in SU but it isn't. Tig-weld, Recurve, curvizard are a few that can join those segments together.
If you then intersect the smooth faces clean up is simple because you only have to select a couple of faces to delete rather than a multitude of tiny lines. Also, keep track of how many segments you use in a curve, the more there are the smoother the curve but the greater the file size.
-
Hi All, and thanks to everyone for helping out - its much appreciated.
First some info requested upthread: I am using Sketchup 2013 v13.0.4812
Now some Updates on my progress:
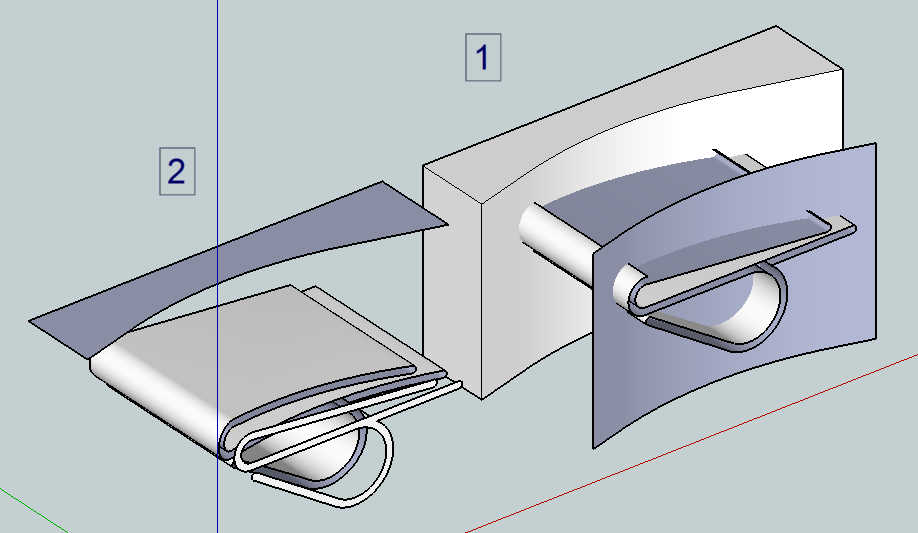
I downloaded Dave R's skp file to try out, and had some difficulties....you guys must find it annoying explaining basics, but it really helps me. Anyway I have posted both a pic and my updates to Daves skp to show what I mean. The RHS of the pic, numbered (1), is the central model in Daves skp. As he described, I selected the cutouts (from R to L - why is that important?) and hit delete, which removed all but the curved face from the cutout box, and left the clip sticking thro. However, I can't delete those remaining bits of the clip - as you can see, if I select an edge and delete, it simply removes the face along the whole of the clip. What am I doing wrong?So I then thought the problem might lie with groups. I went back to the LHS model in Daves skp, made the clip a group then extruded one of the 2D cutouts and made that a group too. I then intersected the cutout group with the model group, and finally selected and deleted the cutout group. This left an outline of the cutout on the clip, and I then selected and deleted that outline. This worked, but with 2 problems (see (2) in my pic); the cut edge of the clip is open, that is there is no face. and the face element is free floating (on the outside face of what was the cutout box. How do I solve that? Its easy enough to delete the floating face, but how do I close or heal the open face?
@ Giles - you said "When you proceed to deleting unwanted geometries, make the part soft and smooth and turn hidden geometry off". How do I make a part smooth and soft?
I then went on to try OSCoolean, and after a few initial problems, that works fine. Hurrah, and thank you Giles! I'm going to try Cotty's hole on solid method now.
Last thing - I understand the point about grasping the basics first before using plugins, and its a good idea - thats why I'm asking where I'm going wrong with Dave R's approach. But sometimes people just want to get something done and move on - and there plugins seem to help. Speakig as a newbie, its a balance between learning, and getting so frustrated you just abandon the whole project.
Thanks again to everyone for chipping in - it really does help
-
ADDENDUM to my post above - thanks Box, missed your post when I first replied.
Your comments re segments rings a loud bell with me, because I did increase the segment count in the circular sections. I assume that (1 of) the Tig-weld, Recurve, curvizard plugins should be applied to the 2D outline before it is extruded? Do the above differ from the "weld" plugin?
I guess this is also what Giles was saying with his comment "make the part soft and smooth and turn hidden geometry off" -
First, any of them should weld the curves. I could have done that in the model but I didn't.
If you make groups of the clip and the cutters before doing the intersections, you will only get the lines where the faces cross. Since the faces of each group are in different contexts, there'll be no faces left where you want them. That's why I didn't make groups or components of the clip and cutters before doing the intersections. By doing it the way I showed, the faces of the clip cut through the faces of the cutter. The cutter surface gets divided into faces inside and outside the perimeter of the clip.
I don't know why you didn't get an intersection along the top of the clip. Perhaps you didn't select enough geometry before running the intersection. There's no intersection on the lower side of that surface either. Try it again and select all of the geometry of the cutters AND the clip. A big selection box around them should do it.
Here are some quick screen shots.
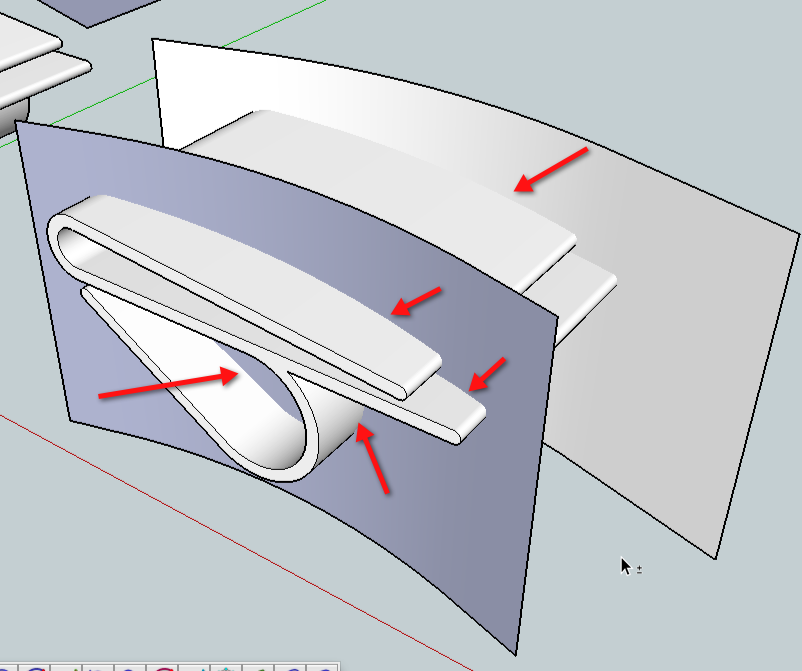
I've deleted all but the curved surfaces that actually do the cutting for clarity. The rest of the "cutter" geometry is only there as a result of using Push/Pull. Since it doesn't cut through anything, that geometry can be deleted ahead of time.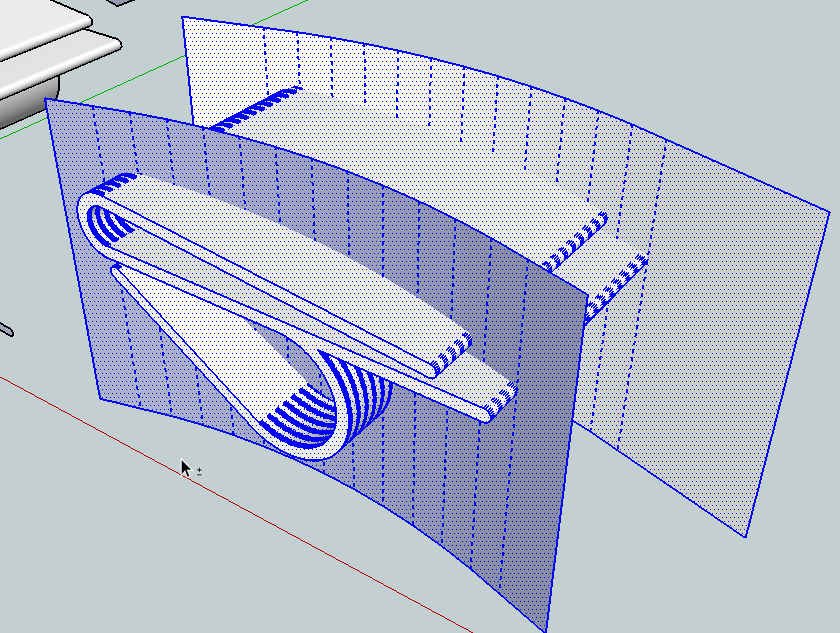
I triple clicked with Select on the geometry to select it all in preparation for the intersect but sometimes you need to use a selection box around it all to get everything selected. Use what works.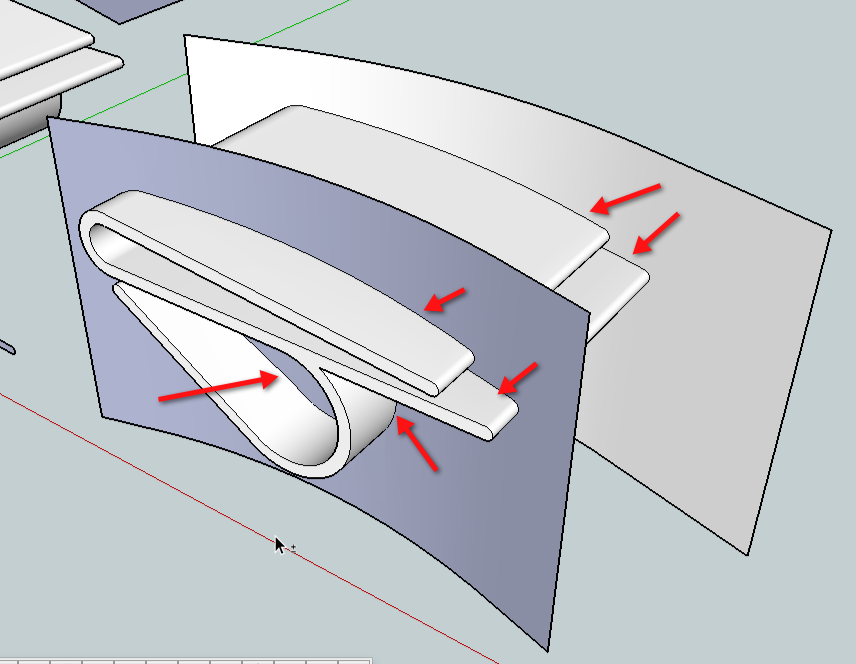
After intersection there are edges where the faces pass through each other.Again, for this to work correctly, the geometry of the cutters and the clip must be in the same context. If you want to make a component or a group of the clip before cutting it, that's fine but the cutters must be inside that same component or group to get it to work.
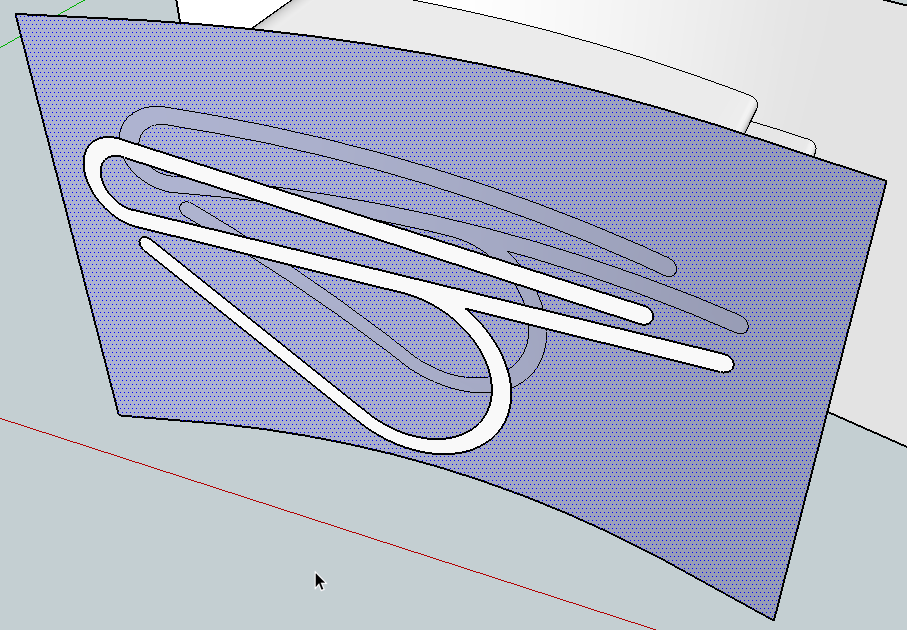
Here I've deleted the clip's surface on the waste side of the cutter and selected the now unneeded cutter face. Notice the blue face inside the perimeter of the clip is not selected indicating it is separate from the outside. This is a good thing to check to make sure the intersection is complete with no gaps.
The blue face on the edge of the clip needs to be reversed so its white side is out.
-
you have forgotten to save as "V6" ! All people have not the 2013 !

So we can't load your file!
-
@jant said:
Hi All, and thanks to everyone for helping out - its much appreciated.
First some info requested upthread: I am using Sketchup 2013 v13.0.4812
Now some Updates on my progress:
I downloaded Dave R's skp file to try out, and had some difficulties....you guys must find it annoying explaining basics, but it really helps me. Anyway I have posted both a pic and my updates to Daves skp to show what I mean. The RHS of the pic, numbered (1), is the central model in Daves skp. As he described, I selected the cutouts (from R to L - why is that important?right to left select everything touching the selection frame, left to right only whats is incude in the frame
and hit delete, which removed all but the curved face from the cutout box, and left the clip sticking thro. However, I can't delete those remaining bits of the clip - as you can see, if I select an edge and delete, it simply removes the face along the whole of the clip. What am I doing wrong?
on the pict I see no intersection
So I then thought the problem might lie with groups. I went back to the LHS model in Daves skp, made the clip a group then extruded one of the 2D cutouts and made that a group too. I then intersected the cutout group with the model group, and finally selected and deleted the cutout group. This left an outline of the cutout on the clip, and I then selected and deleted that outline.
you must intersect in the same context for this, paste in place your cutouts as raw geometry inside the main group select all inside the group then intersect
This worked, but with 2 problems (see (2) in my pic); the cut edge of the clip is open, that is there is no face. and the face element is free floating (on the outside face of what was the cutout box. How do I solve that? Its easy enough to delete the floating face, but how do I close or heal the open face?
@ Giles - you said "When you proceed to deleting unwanted geometries, make the part soft and smooth and turn hidden geometry off". How do I make a part smooth and soft?
select the geometry right-click / soften and smooth
I then went on to try OSCoolean, and after a few initial problems, that works fine. Hurrah, and thank you Giles! I'm going to try Cotty's hole on solid method now.
Last thing - I understand the point about grasping the basics first before using plugins, and its a good idea - thats why I'm asking where I'm going wrong with Dave R's approach. But sometimes people just want to get something done and move on - and there plugins seem to help. Speakig as a newbie, its a balance between learning, and getting so frustrated you just abandon the whole project.
Thanks again to everyone for chipping in - it really does help
-
This can help to, lot's of info to pick up.
-
@jant said:
, I selected the cutouts (from R to L - why is that important?)
Left to right, solid selection frame, selects only things within the selection box, and right to left, dotted selection frame, selects everything the selection box touches.
-
And as said Pilou, save in lower version.
-
seems more of an issue of how to delete stuff than what methods/plugins are used for the intersecting.. paste in place is your friend here
 (and the eraser tool is the enemy in these scenarios)
 -
@jeff hammond said:
seems more of an issue of how to delete stuff than what methods/plugins are used for the intersecting.. paste in place is your friend here
 (and the eraser tool is the enemy in these scenarios)
Yes, according to the complexity of the geometry I use to select the faces I want to keep, cut them, select all I don't want, delete then paste in place.
-
-
Hi all,
Just logged in and must apologise to Pilou and others - attached is the model saved as SU version 6, hope this helps.
Wanted to post the v6 model up quick, then I'm going to read all the help proferred and see where I am! Will be back in an hour or so
Thanks all
-
That's a neat method, Jeff. I should do a video of mine and count the steps. I think mine might require fewer steps to get to the same end in this case. I can see some situations where your method could be faster, though.
-
Back again, just had a read thro all your comments and a play in SU. First up, a big THANK YOU to everyone - I finally get it (well, some of it some of the time, anyway).
Predictably, it turned out to be user error - thanks Dave for having the patience to step through the procedure, and jeff H for the video which rammed the point home. For the sake of other newbies like me, the error I was making was not intersecting the faces. So in Daves skp file (see upthread), I extruded the cutouts down past the model and assumed that this act alone created the intersection - it doesn't. You have to select everything, then right click - intersect faces (this puts the 2 elements, cutout and main model, into the same context, yes?) and NOW its easy (see Daves pics & Jeffs video). You have edges where you need them to delete the outside stuff you don't want. It takes seconds to clean it up. Jeffs method is kinda the inverse of this, and it also works really well. I've spent hours trying to do this, when in reality it should only take seconds - if you know how.
So now I know 4 seperate ways of doing this, 2 with inbuilt tools and 2 with plugins. I really appreciate everyone taking the time to offer help and advice.
I have a related question, prompted by some stuff upthread - if the mods think it better to make it a seperate thread, no problem.
Gilles said "When you proceed to deleting unwanted geometries, make the part soft and smooth", and Box mentioned welding the segments of the curves together. It got me thinking, because the ultimate aim is to print a real clip on a 3D printer (I'm new to that, too.....).
Now I know that SU draws circles as a series of straight lines, and I wanted the final 3D printed object to be circular not blocky, so I increased the segment count on the half circles to 100. Is this sensible, or just way too much? Gilles mentioned smoothing - does that just improve the visuals aspect of the image in SU, or does it have a real impact on a 3D printed object?
And Box mentioned welding the lines/segments of the curves together (presumably because the model was exploded at some stage in its history). I googled about this, and got rather confused. I understand that welding the lines together creates a polyline (polygonal curve), but I'm not clear how that actually differs from a regular line, and whether the arc/circle tools in SU create a series of regular lines or a polyline. And in the context of 3D printing, is it better that the curves be default SU arc/circles, or polylines?
Phew, another whole bunch of questions. I would like to finish with another, very sincere thanks for all the help you guys have given.
-
@Jazzyjeff
Wicked tut.
-
First, as to segment counts for arcs and circles, exactly how many you need will depend on a number of things. The actual size of the arc or circle and in the case of 3D printing, the resolution of the printer. You might get along fine with fewer. That'll be kind of a trial and error sort of thing.
As to welded versus unwelded curves, If you weld the segments of the curves, when you run Push/Pull the surface will be smoothed. You won't get all those parallel lines from the vertices as shown in your first screen shot. It also makes handling those entities easier because with a single click you can select the entire curve. I didn't weld the curve in the file I made. Instead I selected the geometry, context clicked and chose Smooth/Soften which softened the edges on the surface making the parallel lines disappear (they are still there, just not visible) but the edges are not welded. It would have made sense to weld the curves before you extruded with Push/Pull.
It isn't unusual when curves have many segments and small radii that they show up as exploded. I don't know why this is but it happens from time to time.
BTW, I'm glad you finally got it all worked out and you learned a bunch of stuff, too.
Advertisement


