Help me please with bevels
-
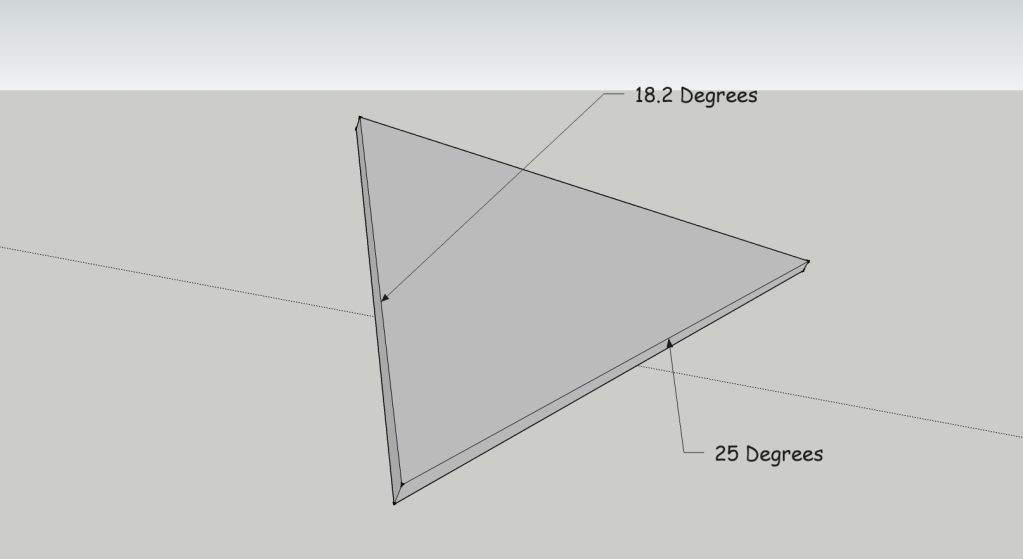
I'd like to add bevels to the following object.
I'm surprised at how difficult this is. I must be overlooking something. I even installed a 'bevel' plugin but it only seems to "bevel" in so much as rounding corners... not accurately beveling specific edges by degree.
Any advice please?
-
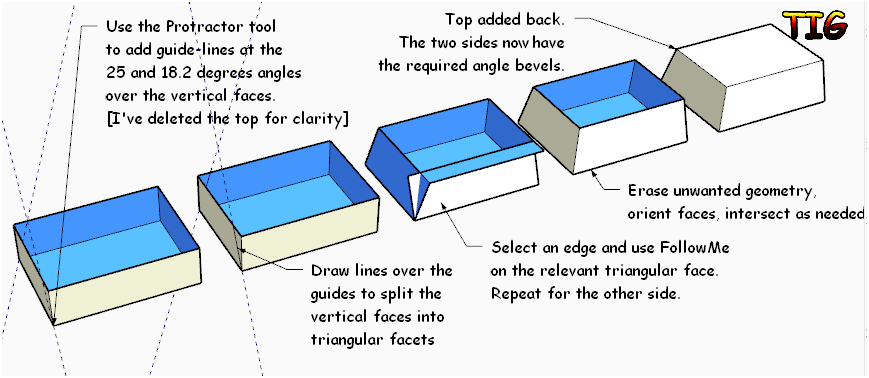
... and just to preempt any lengthy explanations.... I'm looking for a tool or plugin to do this. I am aware that I can create disposable planes 180 degrees to and intersecting the face of what I want to angle. Then I use the protractor to place a measuring line. Then I draw lines to form an object. Then I erase the plane line by line and erase the disposable object I've just created line by line. And finally arrive, after a lot of clunky effort, at the angle I desire.
There has to be an easier way.
-
I miss understand; If angles are different then the projected face length is different( For same thickness that is). Is that distortion OK.?
-
You're right, you'd expect some tool like this. I'll be interested to hear if someone knows of one (or creates one). Each side takes about 7 steps.
-
Yes it's classical variable fillets

Maybe with the Pro Version
Calculate one volume with round Corner By Fredo6 with one angle value
Calculate one copy of the volume with the another angle value
Make a boolean operation between the 2 solids ?
-
This is relatively easy with native tools...
-
@unknownuser said:
Re: Help me please with bevels
Postby Pilou on Sun Sep 23, 2012 2:18 am
Yes it's classical variable filletsMaybe with the Pro Version
Calculate one volume with round Corner By Fredo6 with one angle value
Calculate one copy of the volume with the another angle value
Make a boolean operation between the 2 solids ?
Frenchy Pilou
Is beautiful that please without concept!
Speedy GaleriePlease expand on this? Is it as complicated as it seems to my ear?
Tig, thank you very much for taking that time and showing a graphic. Can I ask you to repeat that process using, or ending up with, the triangular object that I showed in the first image?. I'm still unclear on this.
You began with a rectangle offering squared faces that readily translate into correlates of 18.2 and 25 degree on the resulting faces using the protractor tool. If you use the protractor tool similarly on the edge of an already existing face at the edge of an acute angle as opposed to a right angle, as I would have to do on my triangle if I followed your example, and then used the follow me tool, or took the long way and created a disposable area and removed the excess lines afterward, the resulting face of the angle would be somewhat less than the 18.2 I had started with. Attempting same on an obtuse corner, of course, would result in somewhat more than 18.2. To illustrate......
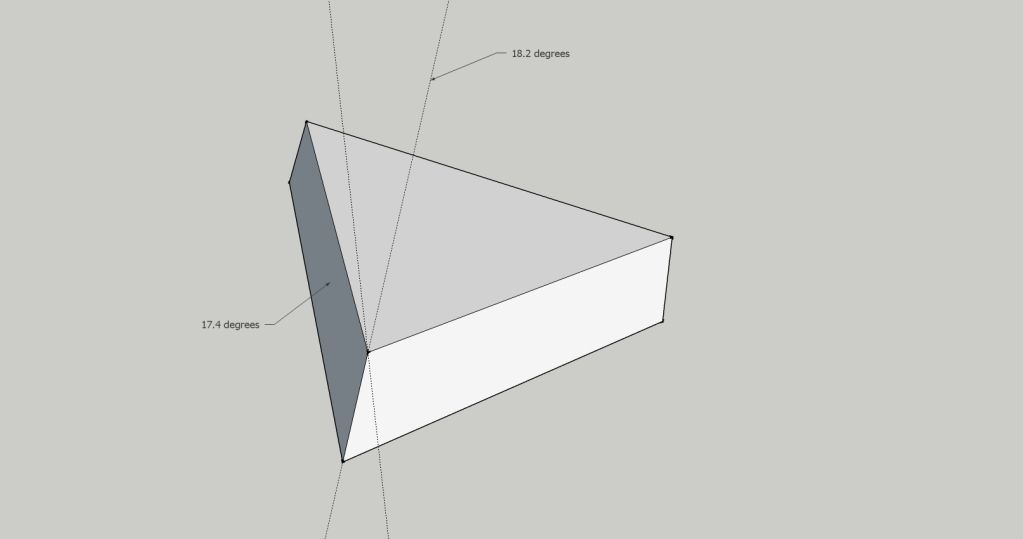
Using the protractor tool on that nearest face to mark an 81.2 degree angle ends up translating into a 17.4 degree actual angle on the face I'm actually trying to angle correctly. There likely is, if I pause long enough to think about this, an quick mathematical conversion utilizing the degree of the original angle on the triangle or parallelogram that is being used, and the angle you wish to end up with, that you could then apply to the protractor... but isn't that often just what ruby scripts are for? (scripting is waaaaaaay out of my league).
This is why I, and others, have pointed out that creating angled edges, on an irregular shape (triangle or parallelogram) ends up being a tedious exercise in fabricating perpendicular disposable planes and then erasing a clutter of lines.
I may, of course, be being a bit obtuse myself on this one. If your illustrated method above translates accurately onto a triangle, or parallelogram, in some way that I'm missing, please show me.
-
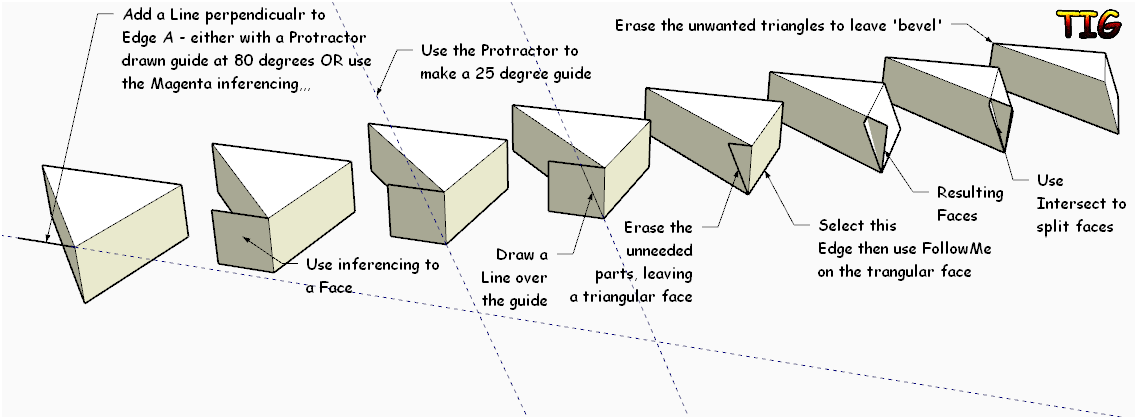
It doesn't seem like this is so complicated that it deserves a plugin. I did it in a few quick steps without even orbiting the view.

A triangle. In this case no edges parallel to model axes.

Add four guidelines. The first two at the bevel angles. I put them at the midpoints of the bottom edges.

Use the Line tool to draw in the required edges. I shifted to Wireframe and selected the new edges so they can be seen but I drew them while in Monochrome mode.

Delete the unneeded edges, correct the face orientation as needed, delete guides. Done.
-
Ah it's bevel or chamfert and not fillet
But seems by method of Booleans can also worksHum not same result as yours
-
Simply brilliant.... and I'm just being simple apparently, but this is the step I'm missing.
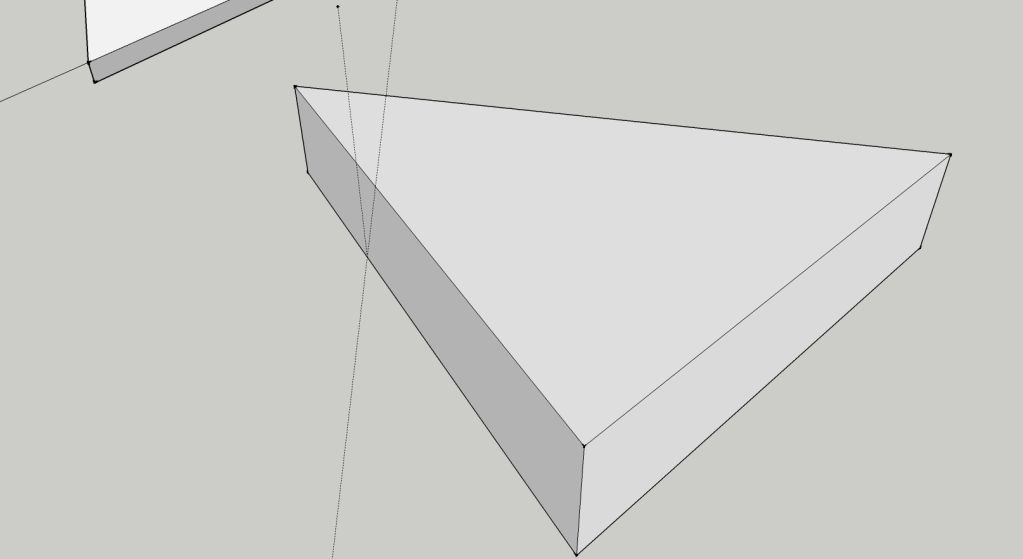
Just how did you introduce those 18.2 and 25 degree guide lines in the above image? It's not immediately obvious. Please walk me through this.
-
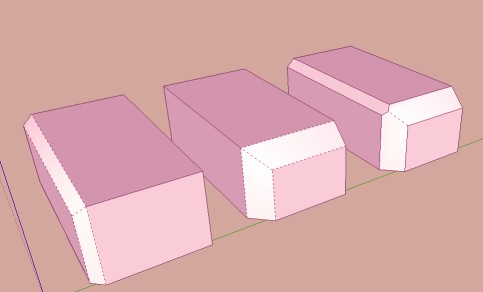
Here's another way with FollowMe when there are no sides to the form that are perpendicular in plan.
-
@frascati said:
Simply brilliant.... and I'm just being simple apparently, but this is the step I'm missing.
Just how did you introduce those 18.2 and 25 degree guide lines in the above image? It's not immediately obvious. Please walk me through this.
Thank you.
Placing those guidelines at the angles like that is a basic maneuver in SketchUp. Get the yellow Protractor tool, click, hold and drag along the edge. The protractor will be set perpendicular to the edge. Release the button after that. Move the cursor up in this case so you get the blue dashed line following the cursor. Click and release to set the start of the angle. Drag in the desired direction, type the angle and hit Enter.
There's a similar function with the Rotate tool, as well.
-
I'm making a video clip to demonstrate. Will post ASAP.
You can't be doing exactly what I described or you would get the same results I get.
-
I'm sorry. I'm really trying here. I've been using the protractor tool in exactly the fashion you describe for a few years now. But following your directions the protractor will only draw establish guide lines along the face of that side, not perpendicular to it in order to get the lines as you have them drawn in your illustration.
Without establishing a plane perpendicular to the face to act as a guide/base for the protractor tool I am only able to place the protractor against the face and draw angle guides on that.
Notice that my angle guides only apply to the face and not perpendicular to it.
How did you induce the protractor tool to draw the angle perpendicular to that face and not parallel to it?
What am I doing wrong?
-
I thought there wouldn't be lengthy discussion.

See here for similar approach, my first YouTube:
http://forums.sketchucation.com/viewtopic.php?f=18&t=15162&p=430420#p430368(Caveat: Today I find the move tool in some instances fails to snap and TT's VertexTools does just fine moving the points. I think it's a bug.)
-
Here we go. Take a look at this.
[flash=640,509:3lpawnjj]http://blip.tv/play/gYhbg4TLUQA?p=1[/flash:3lpawnjj]
-
Holey buckets!
 You aren't really trying to draw in SketchUp using a touchpad, are you? Well it's no wonder you're having problems. Stop right now and get yourself a mouse. It can be the cheapest mouse you can find as long as it has left and right buttons and a scroll wheel/ center mouse button.
By using a touch pad you are missing the ability to do a lot of things and you're working much too hard to do what you are able to do.
-
Wow, you made a video in the time it took me to try to type a response! I see that there is indeed a 'method' to this. I'm currently trying, but my protractor refuses to submit as cleanly as yours does. Could it be the fault of using a touchpad to input commands? When I figure out how to upload a video I'll show you what's going on. Dragging the protractor along the line indeed does present me with new axis on which to establish a base, but unfortunately they seem to cycle willy-nilly through a lot of odd ones... like it's a matter of luck if one is appropriate for my needs. I did finally get one established that looked correct, only to find that it simply drew the angle on the bottom face of my object.
-
@pbacot said:
Today I find the move tool in some instances fails to snap I think it's a bug.)
No, I thought so also in the past but if a face is planar the move tool won't allow it to become triangulated unless you hold the ALT key while moving an endpoint. It invokes Autofold
-
Ok, got it. Once I got it it seems amazing that I didn't know how to do it. Seems bizarre that it took this long for the thread to get solved. Can it be that this is actually not 'common knowledge' to many users far more advanced than me?
Believe it or not I have a decent usb wireless microsoft 4000 series mouse that is adequately sensitive for this stuff. Iv'e used it, but my sketchup demands are evidently simple enough that I end up just using the trackpad most of the time and don't seem to miss the mouse. I've grown rather used to sitting in the recliner and drawing on the trackpad. This is the extent of my drawing skills......
http://sketchup.google.com/3dwarehouse/search?uq=0605551351760483260051330&scoring=m
I know if my drawings ever got more complicated I'd need to evolve.Thanks so much for the video and your patience.
Hello! It looks like you're interested in this conversation, but you don't have an account yet.
Getting fed up of having to scroll through the same posts each visit? When you register for an account, you'll always come back to exactly where you were before, and choose to be notified of new replies (either via email, or push notification). You'll also be able to save bookmarks and upvote posts to show your appreciation to other community members.
With your input, this post could be even better 💗
Register Login


Advertisement