sketchucation logo sketchucation
    • 登入
    ℹ️ Licensed Extensions | FredoBatch, ElevationProfile, FredoSketch, LayOps, MatSim and Pic2Shape will require license from Sept 1st More Info

    [Plugin] Scale Face to Target Area - TIG

    已排程 已置頂 已鎖定 已移動 Plugins
    46 貼文 11 Posters 25.3k 瀏覽 11 Watching
    正在載入更多貼文
    • 從舊到新
    • 從新到舊
    • 最多點贊
    回覆
    • 在新貼文中回覆
    登入後回覆
    此主題已被刪除。只有擁有主題管理權限的使用者可以查看。
    • H 離線
      hebeijianke
      最後由 編輯

      @tig said:

      I've updated the .rb in your post and edited the post's text to match [hope you are OK with that 😉 ]

      This plug-in only applies to the quadrangle

      1 條回覆 最後回覆 回覆 引用 0
      • TIGT 離線
        TIG Moderator
        最後由 編輯

        NO, it works on any face.
        The selected face is simply scaled to have the desired area.
        The dialog shows the current area in current units.
        You enter the new area and OK.
        The selected face is made to have that area.
        So if it's a square, a star or a circle it doesn't matter...

        TIG

        1 條回覆 最後回覆 回覆 引用 0
        • bmikeB 離線
          bmike
          最後由 編輯

          This is a great little plugin.
          Any chance to make it work in square ft, when my units are set to Architectural?

          Or do I need to divide by hand first...?

          mike beganyi design + consulting llc

          1 條回覆 最後回覆 回覆 引用 0
          • EarthMoverE 離線
            EarthMover
            最後由 編輯

            Works on almost any face. Faces created by the freehand tool seem to fail to resize properly. Not sure why.

            3D Artist at Clearstory 3D Imaging
            Guide Tool at Winning With Sketchup
            Content Creator at Skapeup

            1 條回覆 最後回覆 回覆 引用 0
            • J 離線
              jorge2011
              最後由 編輯

              @thomthom said:

              @jorge2011 said:

              You see this plugin?

              http://rubits.com/play.php?file=areascale

              That's nice looking. The VCB is a nice way to control it. But I think $10 is too much for such a trivial script. 😕

              YES thomthom. You are right, it's a plugin with a high cost.
              I made the post, the plugin is very interesting, and has features that can be added to the free version plugin of sr. TIG.

              1 條回覆 最後回覆 回覆 引用 0
              • TIGT 離線
                TIG Moderator
                最後由 編輯

                @bmike said:

                This is a great little plugin.
                Any chance to make it work in square ft, when my units are set to Architectural?
                Or do I need to divide by hand first...?
                Here's a version of the code for users who want to work in feet OR inches [any kind] and see 'sq ft' areas; it also does 'sq m' areas if the user is using any metric units [m/cm/mm]... Copy the code and paste it into the .rb file using Notepad or similar plain-text editor - overwriting all of the original code...

                require 'sketchup.rb'
                ###
                module TIG
                ### scales a selected face about its center to a new area, in current units.
                	def self.scale_face()
                		model=Sketchup.active_model
                		es=model.active_entities
                		ss=model.selection
                		fa=nil
                		fa=ss[0] if ss[0]
                		unless fa && fa.is_a?(Sketchup;;Face)
                			UI.messagebox("Scale_Face;\n\nPreSelect ONE FACE !")
                			return nil
                		end
                		ar=fa.area
                		mo=model.options["UnitsOptions"]
                		if mo["LengthUnit"] > 1 ### metric
                			units="m"
                			ar=ar*25.4*25.4/1000/1000
                		else ### ft/"
                			units="ft"
                			ar=ar/12.0/12.0
                		end
                		rs=inputbox(["New Area [sq "+units+"];        "], [ar], "Scale_Face")
                		return nil unless rs
                		na= rs[0]
                		na= -na if na < 0
                		unless na>0
                			UI.beep
                			return nil
                		end
                		ro=Math.sqrt(na/ar)
                		pt=fa.bounds.center
                		tr=Geom;;Transformation.scaling(pt, ro)
                	  model.start_operation("Scale_Face")
                		es.transform_entities(tr, fa.vertices)
                	  model.commit_operation
                	end
                	###
                	UI.menu("Plugins").add_item("Scale_Face"){self.scale_face()} unless file_loaded?(__FILE__)
                	file_loaded(__FILE__)
                	###
                end
                ###


                TIG

                1 條回覆 最後回覆 回覆 引用 0
                • EarthMoverE 離線
                  EarthMover
                  最後由 編輯

                  Thanks TIG. That's even better!

                  3D Artist at Clearstory 3D Imaging
                  Guide Tool at Winning With Sketchup
                  Content Creator at Skapeup

                  1 條回覆 最後回覆 回覆 引用 0
                  • TIGT 離線
                    TIG Moderator
                    最後由 編輯

                    Do you want to add an alternative version .rb in the first post ?

                    TIG

                    1 條回覆 最後回覆 回覆 引用 0
                    • EarthMoverE 離線
                      EarthMover
                      最後由 編輯

                      Sure, I can. If you feel like dropping it in it's own thread for proper indexing, let me know and I'll remove the bracketed plugin wording. Or feel free to edit it yourself if need be. I don't mind at all.

                      3D Artist at Clearstory 3D Imaging
                      Guide Tool at Winning With Sketchup
                      Content Creator at Skapeup

                      1 條回覆 最後回覆 回覆 引用 0
                      • I 離線
                        irich
                        最後由 編輯

                        Hi guys!

                        Thank you for this plugin it’s very very useful.
                        My question is, is it possible to make it scale texture on face too?
                        If you for example have one projected texture on face.

                        1 條回覆 最後回覆 回覆 引用 0
                        • GaieusG 離線
                          Gaieus
                          最後由 編輯

                          Hi Miso,

                          You may be interested in this plugin: http://forums.sketchucation.com/viewtopic.php?t=18992

                          Gai...

                          1 條回覆 最後回覆 回覆 引用 0
                          • zhangyu200831Z 離線
                            zhangyu200831
                            最後由 編輯

                            Thank you TIG

                            1 條回覆 最後回覆 回覆 引用 0
                            • L 離線
                              luozhan
                              最後由 編輯

                              Thanks TIG. It's a very useful tool. Is there a way to scale the other faces with the same ratio? The plugin only scale the selected face, but the remaining faces remain unchanged as shown below:

                              step 3.png

                              Please let me know. Thank you so much again!

                              Best regards,
                              Leo

                              1 條回覆 最後回覆 回覆 引用 0
                              • L 離線
                                luozhan
                                最後由 編輯

                                Never mind. I finally figured it out after I look into the rb code. I just use the scale tool and type in a ratio = square root of (new area/old area).

                                1 條回覆 最後回覆 回覆 引用 0
                                • O 離線
                                  ovaleks
                                  最後由 編輯

                                  The one who causes is like the one who does .Teşekkür ederim tig

                                  1 條回覆 最後回覆 回覆 引用 0
                                  • O 離線
                                    ovaleks
                                    最後由 編輯

                                    https://img.onl/OCybYb
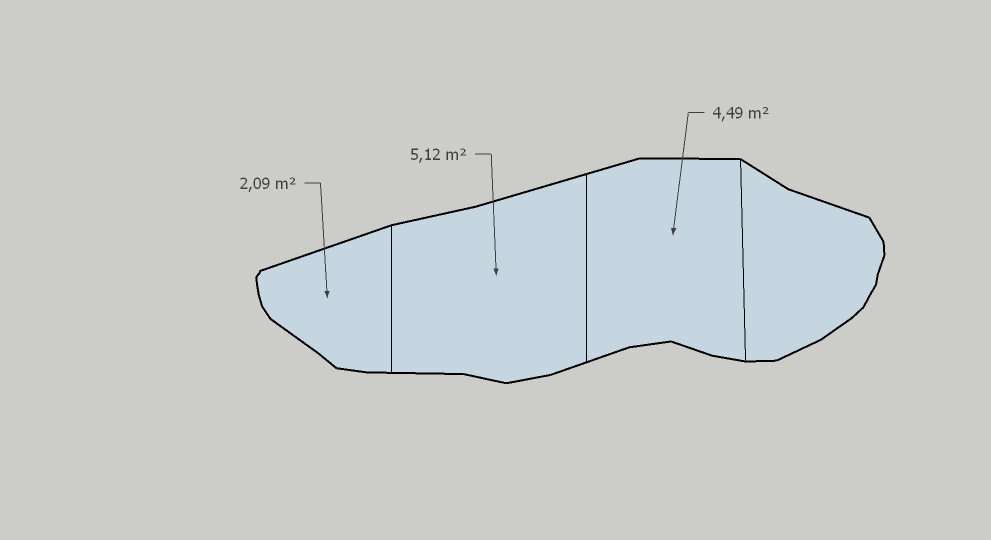
                                    Hello, thank you for the plugin. It's great.

                                    How can I equalize the areas in the photo I sent? Equal area

                                    1 條回覆 最後回覆 回覆 引用 0
                                    • TIGT 離線
                                      TIG Moderator
                                      最後由 編輯

                                      The plugin isn't intended for that use.
                                      I assume you ask how to add lines across a single face to end up with four faces of equal areas...

                                      How about this for an idea...
                                      Get my CofG tool.
                                      Delete any edges that spit the face, so that it's now one.
                                      Give that face a thickness with PushPull, so it's a solid volume, then group it.
                                      Now use CofG on the group, and the center of the volume is marked.
                                      Edit the group and add a line across it through this center marker.
                                      This should now have equal areas for the two parts.
                                      Copy the group to one side and now re-edit the group and PushPull one side till it disappears.
                                      Now you have a part with the half-area.
                                      Repeat the edit on the group copy, this time erasing the other half.
                                      Now you have two groups containing equal area parts.

                                      Repeat the whole process on each group to end up with four groups containing 1/4 area parts.

                                      Edit the groups and delete the unwanted faces/edges so you end up with single faces.
                                      Viewing sideways and selecting by fence is a quick way to leave just the top face.

                                      Arrange the 4 groups so that they align on the cut edges.

                                      If desired, explode the 4 groups so that the 4 faces join along the cuts.

                                      You can total/measure the whole starting area, the 1/4 parts are easily calculated and then checked against this.

                                      TIG

                                      O 1 條回覆 最後回覆 回覆 引用 0
                                      • O 離線
                                        ovaleks
                                        最後由 編輯

                                        @tig said:

                                        The plugin isn't intended for that use.
                                        I assume you ask how to add lines across a single face to end up with four faces of equal areas...

                                        How about this for an idea...
                                        Get my CofG tool.
                                        Delete any edges that spit the face, so that it's now one.
                                        Give that face a thickness with PushPull, so it's a solid volume, then group it.
                                        Now use CofG on the group, and the center of the volume is marked.
                                        Edit the group and add a line across it through this center marker.
                                        This should now have equal areas for the two parts.
                                        Copy the group to one side and now re-edit the group and PushPull one side till it disappears.
                                        Now you have a part with the half-area.
                                        Repeat the edit on the group copy, this time erasing the other half.
                                        Now you have two groups containing equal area parts.

                                        Repeat the whole process on each group to end up with four groups containing 1/4 area parts.

                                        Edit the groups and delete the unwanted faces/edges so you end up with single faces.
                                        Viewing sideways and selecting by fence is a quick way to leave just the top face.

                                        Arrange the 4 groups so that they align on the cut edges.

                                        If desired, explode the 4 groups so that the 4 faces join along the cuts.

                                        You can total/measure the whole starting area, the 1/4 parts are easily calculated and then checked against this.

                                        tig, excellent explanation, I will try and work on it, thank you, I follow you closely, your help is invaluable, thank you for your interest, best regards, tig

                                        1 條回覆 最後回覆 回覆 引用 0
                                        • O 離線
                                          ovaleks @TIG
                                          最後由 編輯

                                          @TIG said in [Plugin] Scale Face to Target Area - TIG:

                                          The plugin isn't intended for that use.
                                          I assume you ask how to add lines across a single face to end up with four faces of equal areas...

                                          How about this for an idea...
                                          Get my CofG tool.
                                          Delete any edges that spit the face, so that it's now one.
                                          Give that face a thickness with PushPull, so it's a solid volume, then group it.
                                          Now use CofG on the group, and the center of the volume is marked.
                                          Edit the group and add a line across it through this center marker.
                                          This should now have equal areas for the two parts.
                                          Copy the group to one side and now re-edit the group and PushPull one side till it disappears.
                                          Now you have a part with the half-area.
                                          Repeat the edit on the group copy, this time erasing the other half.
                                          Now you have two groups containing equal area parts.

                                          Repeat the whole process on each group to end up with four groups containing 1/4 area parts.

                                          Edit the groups and delete the unwanted faces/edges so you end up with single faces.
                                          Viewing sideways and selecting by fence is a quick way to leave just the top face.

                                          Arrange the 4 groups so that they align on the cut edges.

                                          If desired, explode the 4 groups so that the 4 faces join along the cuts.

                                          You can total/measure the whole starting area, the 1/4 parts are easily calculated and then checked against this.

                                          After a lot of experimentation, the mobile areas are close to each other but not exactly the same.

                                          1 條回覆 最後回覆 回覆 引用 0
                                          • TIGT 離線
                                            TIG Moderator
                                            最後由 編輯

                                            Each of the 'splitting' lines must be drawn exactly through the CofG AND parallel to one of the 'axes' of the CofG [i.e. suspension-point markers].
                                            If you are not very careful, then the results won't be exactly 1/2 or 1/4 of the whole.
                                            What are you dividing, and how accurately does it then need to be split up ?

                                            TIG

                                            O 6 條回覆 最後回覆 回覆 引用 0
                                            • 1
                                            • 2
                                            • 3
                                            • 2 / 3
                                            • 第一個貼文
                                              最後的貼文
                                            Buy SketchPlus
                                            Buy SUbD
                                            Buy WrapR
                                            Buy eBook
                                            Buy Modelur
                                            Buy Vertex Tools
                                            Buy SketchCuisine
                                            Buy FormFonts

                                            Advertisement