[Plugin] SketchUV - now free
-
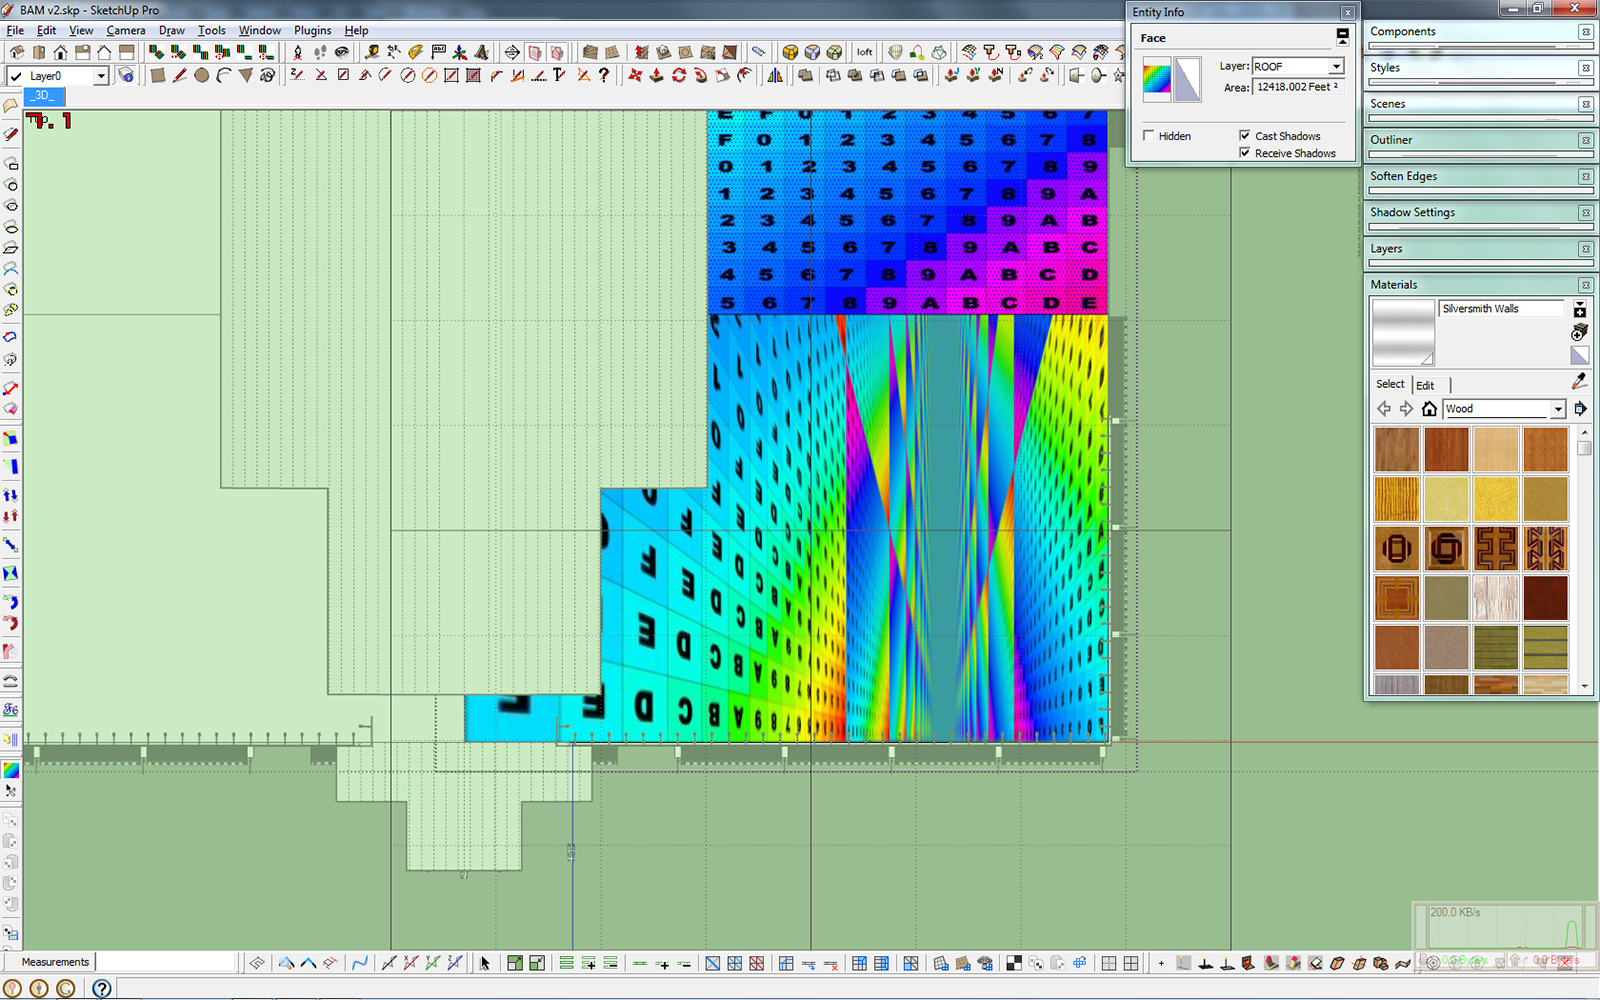
I'm having another issue with sketchUV it seems. I have used the plugin to apply a planar and box mapping on a roof, the roof uv's turn out pretty wacked out and nothing seems to correct it. I can apply another texture on it and basically start over but the next time I try to adjust the uv map, rotate or scale with sketchUV it becomes messed up all over again. I tried trangulating the planes but that doesn't fix the issue. I'm not sure what I'm missing here, the roof in this case is about as simple as it gets so why would a projected map not work correctly?
I have another instance on a curved roof where one piece of the roof just goes completely wack as well, I can't fix it without removing the plane and redrawing it but it generally does not fix the situation.
Is this just poor design on my part or have I forgotten a step in there somewhere?

-
Can you share the troublesome area?
-
It's happening pretty randomly it seems, I noticed it happens on random pieces of the brick work and the roofs mainly. Here's a heavily reduced file, the full file is a bit more than triple the file size.
-
You have internal faces here and there. Check the recessed corners on the curved roof you'll see the is a misalignment.
Same goes for the doors. Is it an imported model?
-
The model was imported as a .dxf from a revit file I received from the architect. The sketchup model has went through several revisions so i guess I should have known to check that they were all front facing. Thank you for identifying the issue so quickly, I was really starting to think I had some kind of other issue going on here.
Thanks!
-
It's a bad model with funky geometry. Some times it's quicker to redraw than fix

-
Yeah, I'm totally not surprised there's some wonky geometry in the model, I'm still picking up some new methods for developing the models in sketchup (it's a pretty large sidestep coming from Revit/CAD). I can already tell that for the next model I will need to break things down into even more groups and components. Still a lot to learn about the program but I will say I really do love how quick and dare I say enjoyable it can be working in sketchup, even though it lacks a lot of the tools that you might need.
Thank goodness for all the rubyscripts and information to be found on this site, I'd truly be lost without all of your guys plugins, tips, and help!
-
Purchased, installed and ready to use, thanks

-
Hi all,
I bought, installed. I learn.
I have read the whole thread. I watched all the movies found on SketchUV but I have not found the answer to my problem.I have a texture with dimensions of 10x10cm. I import it into Sketchup and I set the dimensions 10x10cm. After applying it to the object of its dimensions change. After application can scale the texture. But this is not accurate. How can I get SketchUV to use texture on a 1:1 scale. In this case, 10x10cm.
Regards,

-
@skibbbi said:
Hi all,
I bought, installed. I learn.
I have read the whole thread. I watched all the movies found on SketchUV but I have not found the answer to my problem.I have a texture with dimensions of 10x10cm. I import it into Sketchup and I set the dimensions 10x10cm. After applying it to the object of its dimensions change. After application can scale the texture. But this is not accurate. How can I get SketchUV to use texture on a 1:1 scale. In this case, 10x10cm.
Regards,
One way is to first create some reference lines using the tape measure tool that correspond to a 10x10cm grid. Then use SketchUV scaling by keying the scale (eg. '*5') or hold down shift and press the arrow keys. You should be able to get it very accurate if you zoom in closely as you press the arrow keys. Try to match the scale to your reference lines.
-
@whaat said:
... You should be able to get it very accurate ...
This, unfortunately, is not enough. For example, if I impose a texture on the wall of the glaze. I need to be able to apply precise dimension, for example, has a plate size 597x597mm and 2mm on the fugue.
Currently, I was faced with the problem that I have a lot more texture than the object (very fine texture of wood) as in this case, to deal with texture mapping on a scale of 1:1.
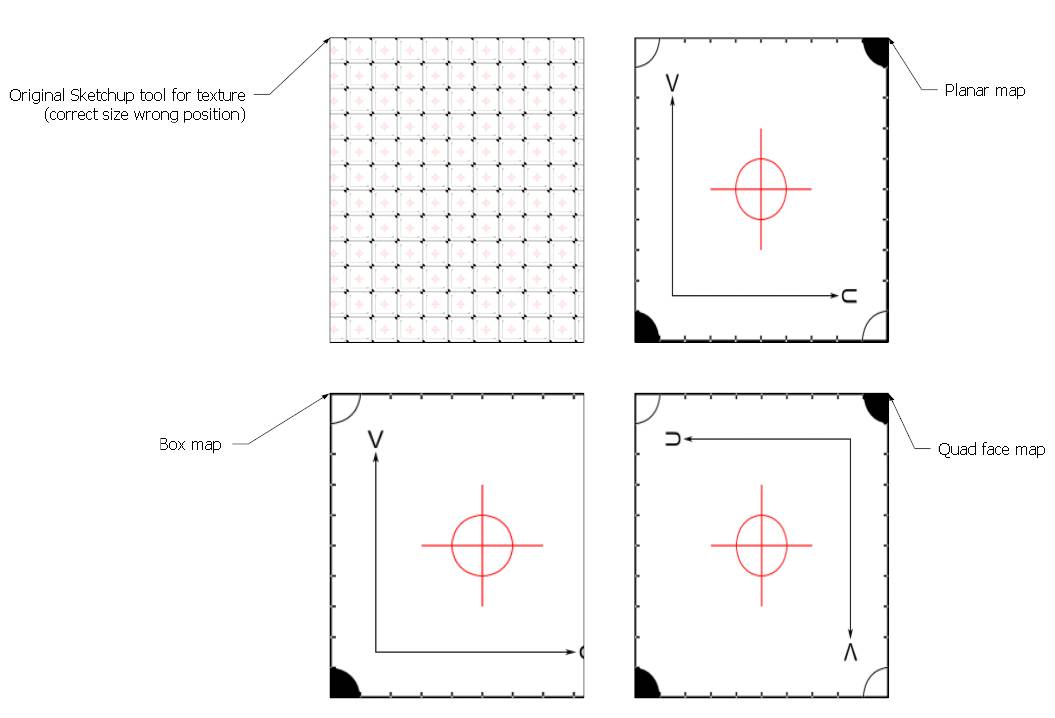
The Quad Face Tool plugin is the function of the "Use material size". Maybe it is also possible to introduce such a feature SketchUV.
I do not want to be the smartest but you may want to change the approach to the dimensions of texture. Maybe instead of using the '* 5' or '/ 5', convert it to a percentage system. 100% texture dimension 1:1, 80% reduced texture size, 150% increase texture size. All simple and clear, and always under control.
I'm curious what others Total Members this plugin think about it.
Or maybe there is another opportunity to have full control on the dimensions of texture?
-
Hi,
I've been using the plugin for some time now and all works great and love it!
But on my latest project I encoutered a problem with SketchUV and transferring the mapped texture/UV's to Thea Render.
Let me try to explain

When exporting a model from SU to TR via the TR-plugin, I get a model-entry with every material I applied in SU. This entry has the UV's included.
When I map an object in SU with the Planar or Box tools, the mapped texture is correctly transferred to TR with the correct UV's.
From here on out I can properly apply any TR material I wish.But, when I have mapped an object with the Cylindrical or Tube tool it all goes wrong:
For every face of the object, an texture is imported, named as the main texture (i.e. 'SketchUV') and folowed by a number (i.e. 'SketchUV-21').
This gives an enormous amount of modelentries in TR and keeps me from properly appying a material in TR.Here a simple example setup:
Basic object with the different SketchUV tools applied

The way of exporting the object to TR

Here the object in TR mapped with Box tool
Notice that in the tree, under 'Models', there is just one entry of the texture (=correct)

Here the object in TR mapped with Cylindrical tool
Notice that in the tree, under 'Models', there are 23 entries that came with this object.

Here the object in TR mapped with Tube tool
Notice that in the tree, under 'Model', there are 288 entries that came with this object

Is there something that I'm doing wrong or is this just not right?
Hope you understand the problem and can help me on this one!
Realy need to map by Tube for my current project
-
Did you try triangulating before exporting?
What version of the Thea plugin are you using?
-
Rich,
Thx for the quick reply!
In the examples there is no triangulation, 'cause I thought it didn't matter in this case if it was triangulated or not and tested it before.
I was wrong


Traingulation does the trick!
Before I only triangulated when mapping was doing something weird, but from now on I'll always triangulate
Thx for the (oh so simple and obvious) solution!!
When I was testing your solution I encoutered another thing I don't understand and I hope you can enlighten me on this one:
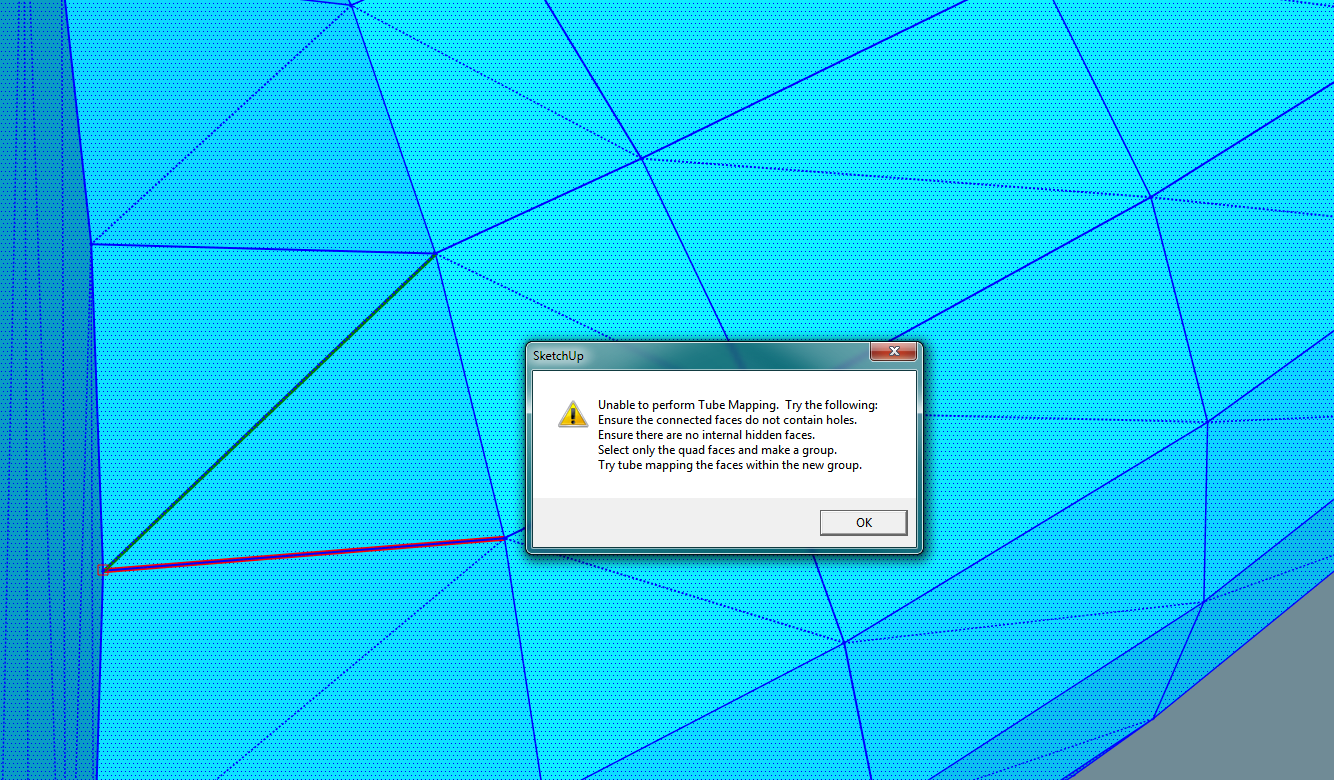
When tube mapping, I encouter an error (see attachement) when I first triangulate the tube and then apply tube mapping.
When I start off with tube mapping and afterward triangulate the tube, it works.Is this (first map, then triangulate) the preffered way or is there something I need to change to first triangulate and then map without the error?

-
Tube Mapping only works on quad faces. So if you triangulate it's not a quad.
-

Again, thx!
-
First of all - I love the plugin. Thank you so much for your work. This is my major tool for uv mapping.
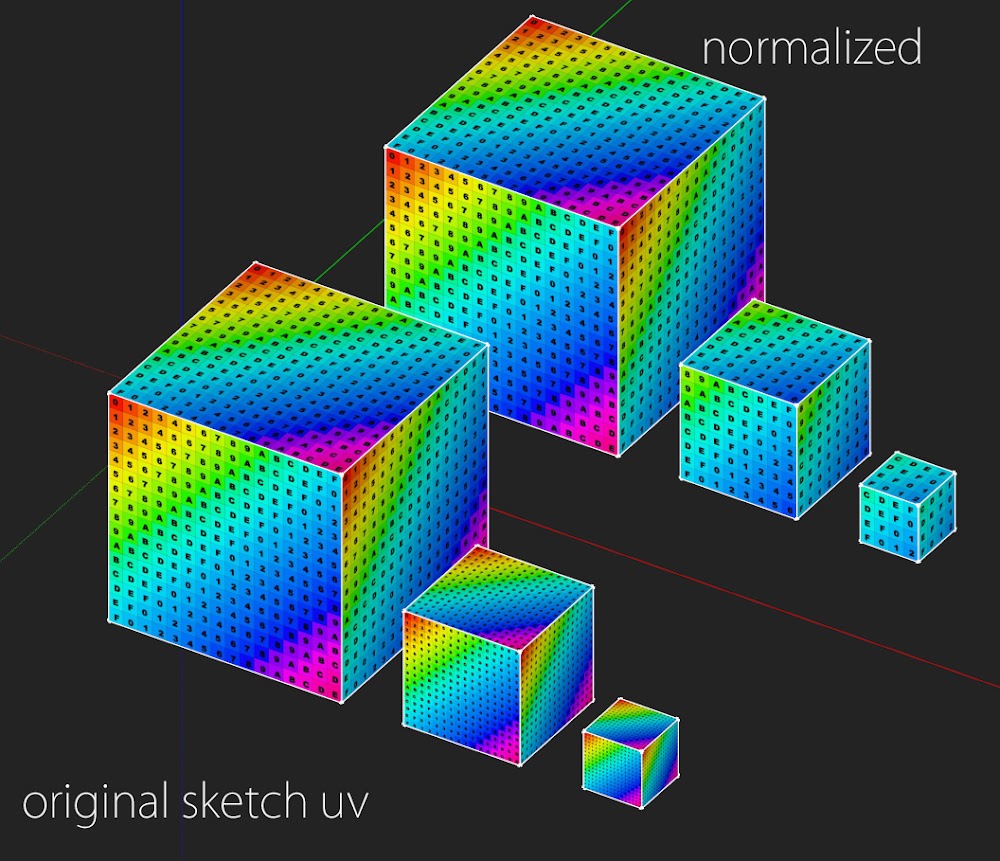
When I uv map different groups or components of different sizes I get different sized sketchuv texture. What I usually do to normalize them (make their texture sizes equal, see the screenshot) I just use '*' or '/' operations but this is extremely time consuming for hundreds of different groups and in most situations this gives me only approximate results. So my question and big wish is - is it possible to add extra feature to auto normalize sizes of the same sketchuv texture?
Kind regards,
Sebastian

-
HI
Looks like a great plugin. I am considering buying the plugin.
I am the user of Sketchup and Octane render, have any one tested if the UV mapping created with sketchuv are correctly exported with the octane render exporter (made by TIG).
I mean both normal faces and triangulated faces.
???Brg.
Claus -
@smicha said:
First of all - I love the plugin. Thank you so much for your work. This is my major tool for uv mapping.
When I uv map different groups or components of different sizes I get different sized sketchuv texture. What I usually do to normalize them (make their texture sizes equal, see the screenshot) I just use '*' or '/' operations but this is extremely time consuming for hundreds of different groups and in most situations this gives me only approximate results. So my question and big wish is - is it possible to add extra feature to auto normalize sizes of the same sketchuv texture?
Kind regards,
Sebastian
Hi Sebastian,
What you are suggesting should be possible. I will consider it in a future update. Thanks!
Dale -
@unknownuser said:
HI
Looks like a great plugin. I am considering buying the plugin.
I am the user of Sketchup and Octane render, have any one tested if the UV mapping created with sketchuv are correctly exported with the octane render exporter (made by TIG).
I mean both normal faces and triangulated faces.
???Brg.
ClausIt should work fine with Octane render. If you are getting unexpected results, try triangulating your faces using the tool in SketchUV. The tutorials on the Smustard website demonstrate the workflow.
Cheers,
Dale
Hello! It looks like you're interested in this conversation, but you don't have an account yet.
Getting fed up of having to scroll through the same posts each visit? When you register for an account, you'll always come back to exactly where you were before, and choose to be notified of new replies (either via email, or push notification). You'll also be able to save bookmarks and upvote posts to show your appreciation to other community members.
With your input, this post could be even better 💗
Register LoginAdvertisement


