Is there a plugin to shrink/grow your selection set?
-
Thomthom's QuadFaces has a Grow/shrink feature
-
Doesn't really do as you ask though

Will look again...
-
@unknownuser said:
Doesn't really do as you ask though

Will look again...
? Grow and Shrink does exactly that...
-
Not if I select all geometry on 'From scratch' and then choose shrink. Otherwise it works flawlessly.
The are occasions where some faces are selected outside the boundary though but I'm sure it me and not your plugin.
-
You're tool is exactly what I'm talking about (that sounds dirty
 ), but it doesn't really work for my situation. Actually, the more I think about it the more I realize I don't think anything could work for my situation.
I'm basically starting with something like the image below and need to select all of the big squares in the middle (but not the ring around them). No big deal for this small example but in real life there'd be a huge wall with lots and lots of these squares. I need to select the squares so I can pull them out with the move tool creating a bunch of beveled surfaces. Sort of a greeble but with a specific bevel (1" offset pushed 1" out creating a 45 degree bevel)
Anyway, upon reflection I realized that 3ds Max's grow tool wouldn't work like I was thinking either and I'm not sure something could be programmed to do that.
-Brodie
-
Here's how I'd do it manually
-
It's actually even easier than that. Those are exactly the steps I follow, except there are fewer since you misunderstood what I'm going for slightly. It's quite easy to do, it's just that I do this for almost every job (we do brick occasionally) so I have to do this a LOT. Anything I can do to automate any part of this process would help.
I'm not having great luck with multi-offset. If my linework were perfectly clean it might be ok, but any minor quark causes the script to stop after just a few faces. If it would skip the trouble areas and let me come back and do them by hand it would be ok but at this point I'm wondering if it might be easier to just go back to doing them all individually instead of troubleshooting multi-offset's problems.
Here's an example of the output I want
Here's an example of the scope of my issue. Lots and lots of joints.
And here's an example of the multi-offset issue. If you run the script on this geometry you'll see that it doesn't work on all of the squares and any time it reaches one of these squares the script ends (rather than skipping that square and moving to the next one).
-Brodie
-
Doesn't this call for a [gluing/cutting] component that you then copy with Move+Ctrl in an array with NNx later for the story-heights ?
-
I think you lost me at NNx. Can you explain a bit further what you mean?
-Brodie
-
You make a component with the form you want.
Then repeat it adding its instances in the horizontal, keeping a collection/selection of all of the instances.
Now copy the collection/selection in the vertical at a give height a number of time [NNx]... -
Hrm, let me see if I understand what you're saying I'd basically just hand create the bottom layer and make a group of it. Then copy that up, go into the group and adjust the height for each level. Then go back and delete the squares where the windows are? Is that about what you're getting at?
-Brodie
-
@unknownuser said:
Not if I select all geometry on 'From scratch' and then choose shrink. Otherwise it works flawlessly.
hm... I see. I just so happen to behave like this in 3DsMax as well. But this might not be desirable. But in order cases you might want that; if you selected parts up against a corner, the selection "sticks" to the corner while shrinking. What's desired behavior could be 50/50.
@unknownuser said:
The are occasions where some faces are selected outside the boundary though but I'm sure it me and not your plugin.
Can you give an example of this?
-
I would definitely build those walls with components.
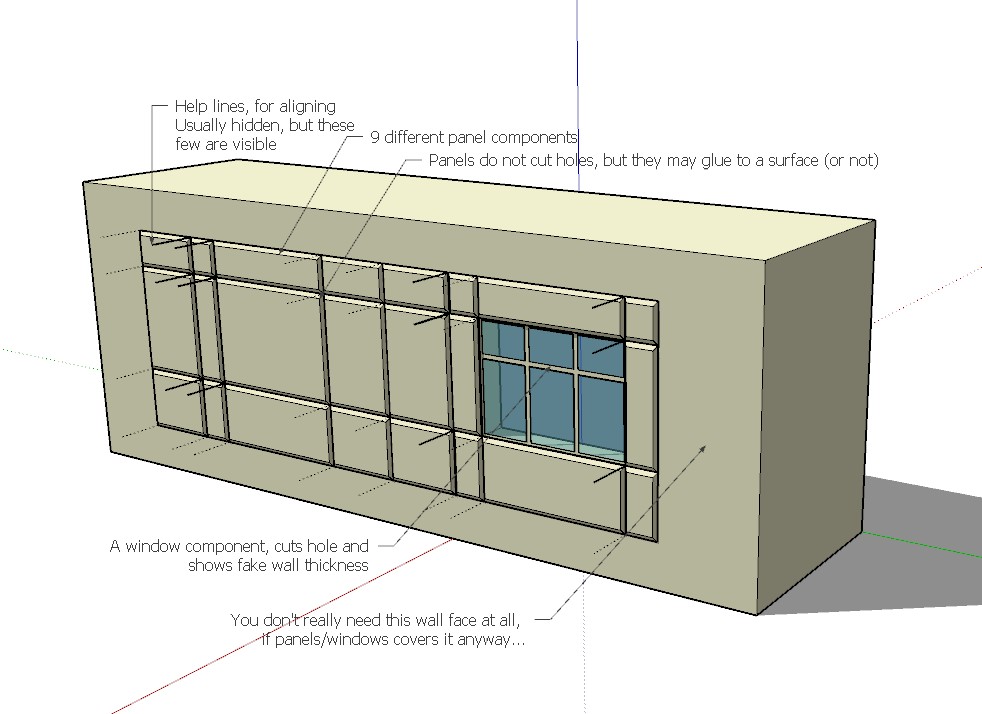
Like in this screen dump showing 9 different panels. all made as uniques from the same original, and one window component. The panels do not cut holes, but the window does. But you don't really need any wall behind the components anyway.
Those extra lines are just for helping aligning such flat comps. They don't usually export anyway, but could be hidden or deleted after the wall/building is finished. -
The problem I see with that is that I have no good reason to maintain all individual panels as components. There are a lot of panels but the overall number of polygons is pretty small nevertheless. So there's no real intensive in terms of memory.
There's also no intensive in terms of flexibility. It's not uncommon for things to change in terms of wall dimensions, joint locations etc. In your version if one vertical joint moved left by 6" you'd have to make all of the components on either side unique, go into each one, and adjust. If all the panels were lumped together you could make one careful selection and just move the vertical joint in one go.
And I don't see a speed intensive. If I only had a handful of sizes to keep track of that's one thing but on one job I'd probably end up with 50ish unique sizes - too many to keep track of. The fastest way to do it with this method I think would be to create a panel, copy to new location, adjust the size, copy, move, adjust, etc. all along the bottom, then copy those up to the next level and just adjust the height for off of them at once, etc. I do like the idea of being able to just create one level but I don't think this copy, adjust method would be faster than creating an offset for each panel and moving the middle portion out for all the panels at once.
Am I misunderstanding your method at all?
-Brodie
-
Well, my experience is that such panels come in standard module sizes, and most of them use those sizes.
But if you end up with more comps than you can handle you could just as well make them groups, and just move/copy sideways sideways. For non-modular joints you just select and group all affected panels on each side, explode all groups/comps and move the joint wherever you want it in one go.@unknownuser said:
Am I misunderstanding your method at all?
If you can't see the speed/flexibility benefits you either didn't quite understand it, or your work methods are very different from mine?
-
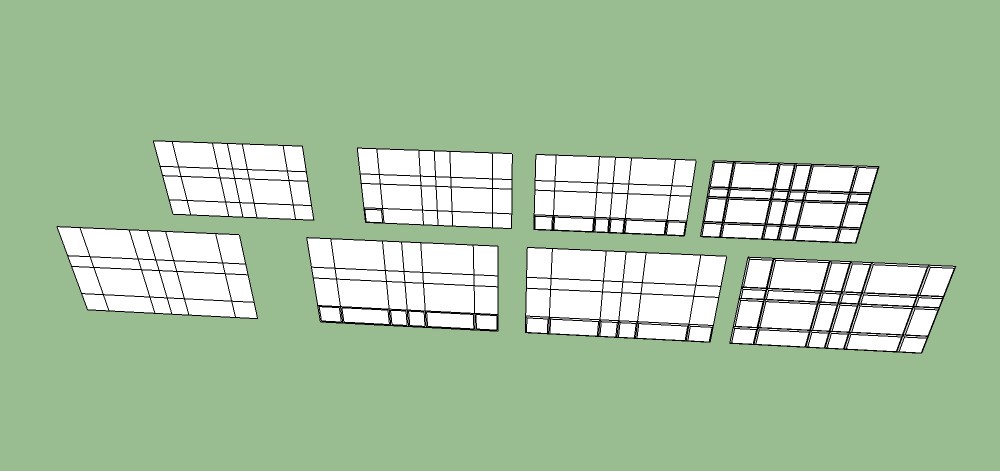
Here's an image of how I'm understanding the two methods. I'm conceding that it's faster to just do the bottom row first, and use it to create each of the other horizontal rows going up. I think the method you're talking about is shown on the top. Let me know if I'm misunderstanding.
-
This would be the geometry brought in from Autocad although it should just be lines, not faces.
-
Create a single panel, make it a group
-
Copy the group all along the horizontal row, enter each group, select a polygon, move it to give the panel the correct length
-
Select all panel groups, explode, create one overall group, move/copy up to all horizontal rows, enter each group select all top polygons and move to correct height
In the other method I'm talking about which is on bottom
-
Original geometry
-
Offset all of bottom row by 1"
-
Select each inside rectangle, move all 1" out to create panels,
-
Same as in first method although explode is unnecessary
Does that illustrate the difference, do you think?
I should mention that these aren't modular panels. They're representing an EIFS wall which is a bit like stucco. The joints are a bit exaggerated to show up in renderings better.
-Brodie

-
-
Method 1 is similar to how I would've done it, except that I would rather make a vertical row(column) first, because that would make it easier to select (unless it is a very tall building).
Hello! It looks like you're interested in this conversation, but you don't have an account yet.
Getting fed up of having to scroll through the same posts each visit? When you register for an account, you'll always come back to exactly where you were before, and choose to be notified of new replies (either via email, or push notification). You'll also be able to save bookmarks and upvote posts to show your appreciation to other community members.
With your input, this post could be even better 💗
Register LoginAdvertisement


