SketchUP 8
-
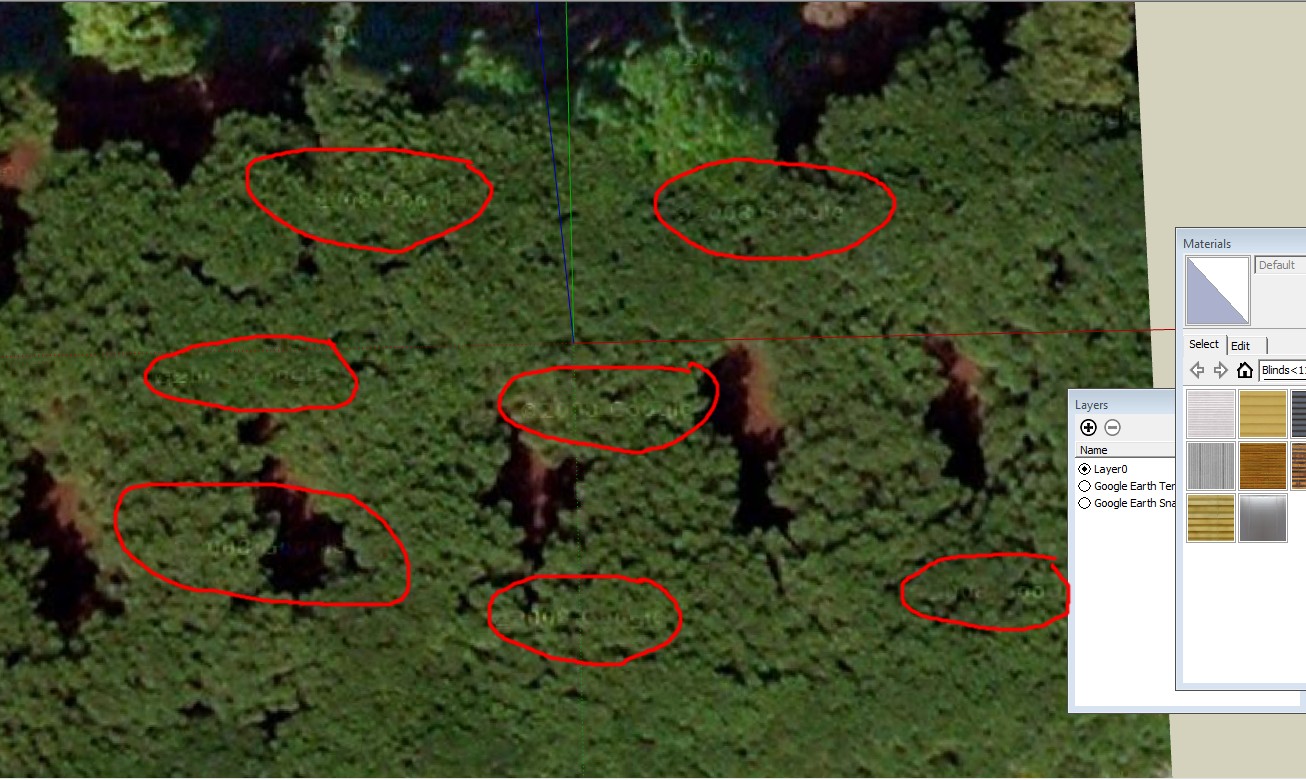
The copyright notice is all over the image, not just in the corners. See attached. (Click on the image to see it in full size).
Grabbing a much larger area results in a much less detailed image. When used to texture built-up terrain it looks terrible.

-
@bmike said:
As for rotation - once in SU, unlock both the terrain and the image and you can rotate, copy, move, etc.
I'm sure Peter meant to rotate the map in the "Add Location" window. For efficient modeling, we actually used only as much of the satellite image as necessary. That means if a rectangular building is directed towards south-west, we rotated the view in Google Earth so that the building fills the view as much as possible (for best resolution and to get rid of the corners).
There are lots of users who critizise this regression although I can understand that the SU team had to drop the Google Earth method for long term (deprecated). -
The problem of taking too large an image for low quality is reduced with this update - I like that I can go back and grab more terrain an imagery at a later date as needed.
For my needs, this works better.
Perhaps Google can add rotation / skew / etc. to the 'grab' process - much like those pins on material / texture adjustments. -
@pmolsen said:
The copyright notice is all over the image, not just in the corners. See attached. (Click on the image to see it in full size).
Grabbing a much larger area results in a much less detailed image. When used to texture built-up terrain it looks terrible.
To be honest, I think that is a small price to pay in return for a (free) colour landsat image. You wouldn't necessarily use that for a final image anyway, because it's so dreadful. It's fine to most clients- especially for mockups etc (which essentially is what SU is for anyway, right?). I'd rather use good post-processing tools to create an artificial landscape than use that crappy photo.

-
Google requires or at least strongly recommends that models be textured with their imagery for models submitted for inclusion in the 3D Buildings layer. Failure to do so can result in the model being rejected. Naturally for other purposes it is irrelevant.
When texturing built-up terrain it is essential to use the GE image in order to achieve a seamless result.
I have in the past recommended (and if Google is reading this, I recommend again) that Google add a new texture option to Sketchup called "Google Imagery". Any texture with that attribute would have the standard GE imagery (full resolution, not a grainy substitute) automatically applied to it when displayed in the 3D buildings layer. When viewed independently it would have whatever texture is actually applied to it.
The big advantage is that when the GE imagery is updated the model and built-up terrain etc. would automatically receive the new texture without the need for the user to re-texture it. It would reduce model size and would also result in perfectly seamless integration of models and built-up terrain with the underlying Google Earth imagery and terrain.
Naturally if there was a significant sideways shift in the imagery it could require manual adjustment of the building location by the modeller but for built-up terrain that would not be a problem.
This model of mine is a good example that would benefit from that: http://sketchup.google.com/3dwarehouse/details?mid=736735667eaa157548846c67671d9660
This is another one, which I have had to completely re-texture twice already due to new imagery: http://sketchup.google.com/3dwarehouse/details?mid=8f0ba6075e797f2248a0c60ecb66c42
-
You do have a good point there. I'm also a little perplexed and confused why high resolution isn't included in SU Pro, when it is available in Google Earth Pro. Maybe we have to buy that as well?
-
@pmolsen said:
This model of mine is a good example that would benefit from that: http://sketchup.google.com/3dwarehouse/details?mid=736735667eaa157548846c67671d9660
Looks like a fantastic model. Why can't I download it (no download button)?
-
@unknownuser said:
Looks like a fantastic model. Why can't I download it (no download button)?
It will be made available for download at some point, dependent on discussions I have been having with the Peruvian Tourist Bureau (Promperu).
(Linked at http://www.peru.info/en/culture/archaeology/machu-picchu-1140-2-576-4.1.16.7 )
-
One more basic feature that could be added: Why can't I type the rotation value when rotating a texture? Or the distance value when moving it or stretching it? It's just another object and should be open to manipulation by all of the basic commands.
-
@genma saotome said:
One more basic feature that could be added: Why can't I type the rotation value when rotating a texture? Or the distance value when moving it or stretching it? It's just another object and should be open to manipulation by all of the basic commands.
Great idea!
-Brodie
-
Two more very specific suggestions:
There are times where I take a component in a model and rotate it for use in another situation. Because the axis of the component instance also rotates. I have many situations where that's not acceptable, so I have to explode the new instance and make a new component under a new name. It would be far easier if there was a function I could use that reoriented the component axis to the same as the whole model -- the move axis feature is far too cumbersome... I simply want a single click - bang - it's done solution.
The other one is about textures (again). This morning I'm orienting textures along an arc'd surface... many polys, each of which requires a rotation AND positioning the red pin on a vertex. Now if these were poly faces I could easily grab a bunch and move them but textures have to be done one by one. So how about letting me highlight multiple textures-on-faces and let me move them all at the same time? The ideal would include another function to snap red pin to nearest vertex.
-
Hi Dave,
As for texturing arches, ThomThom has a nifty plugin: UV Toolkit which can do wonders. Look at this mini-tut I made with the use of it.
-
-
One note;
You can assign the same "mini-texture" to each facet at the same time (select all > paint) and then while all are selected, run the plugin. to quad-UV map them. This will create a very homogeneous looking arch however so if you want to invest a bit more work, you can paint the facets individually with a few variations of the stone/brick textures and run the plugin individually on each. This takes longer (though you sill save your time from positioning the texture) but will provide a more convincing arch.
And do not forget to combine the small texture pieces as you will end up with a whole bunch of them!
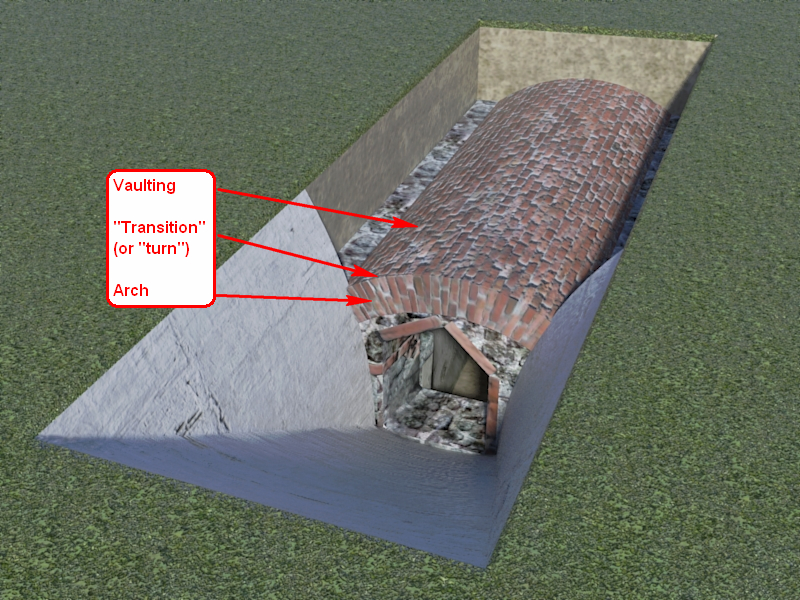
I developed another technique as well but that is also slow and manual - but will provide a nice transition (as the texture turns or wraps) between the cylindrical vault and the arch on its edge (see an example with an Ancient Roman burial chamber below) IF you need to display both. Once I have some time, I will make a tut of this as well.

We are getting off-topic however (sorry folks) so that will be in another topic... -
Very nice Csaba, i'd love to see a tut on this.
-
@genma saotome said:
There are times where I take a component in a model and rotate it for use in another situation. Because the axis of the component instance also rotates. I have many situations where that's not acceptable, so I have to explode the new instance and make a new component under a new name. It would be far easier if there was a function I could use that reoriented the component axis to the same as the whole model -- the move axis feature is far too cumbersome... I simply want a single click - bang - it's done solution.
Absolutely dead on. In most cases I have to maintain a separate copy of a comp. on a development layer simply to preserve the axis alignment for editing.
==============================
In a similar vein, component scaling should be modified as well. When you copy a scaled comp, say a set of comps that taper, such as a flap linkage component of a wing, big at the root, small at the tip, the scale of the copy is at the original scale. If the intermediate comps scale at 1.78% per object, AND must maintain axis alignment (along a non axis guide line) then it becomes very difficult, as well as growing inaccurate to compound scale the original comp, rather than just applying a common scale factor to each subsequent copy.If you need a copy at the original scale, then take it from the comp.library, or the original object.
Better yet, if copying a scaled comp, popup a d-box asking for "original scale", "last scale ratio" or "new scale ratio" and be done with it.
Last Scale Ratio would be especially useful where the scaling is different along the 3 axis, ie: not 2x all round, but 2x green, 2.5x red and 1.995X blue.
Advertisement


