Follow Me on a miter component
-
Hi AirBear,
any chance you could attach the file? That would be much helpful to visualize what you want to achieve and what could be done about it.
Also there are cool plugins to do this almost automated but let's see how you can do it in the "manual way" first (before Pilou chimes in)

-
Perhaps this video will help. No audio. Its dated, but worked for getting a friend understanding how to miter a corner of crown molding.
Create a dummy box that is taller than your molding. (you can make it a component if needed)
Rotate the box 45 degrees.
Move it to the corner to start the miter.
Explode the dummy box.
Edit the molding component.
Triple click to select all geometry in the molding.
Right click and select 'Intersect' > with model.
Exit the component.
Delete the dummy block geometry.
Edit the molding component.
Delete the faces you do not need. -
i dunno mike, that looks unnecessarily complicated to me.. here's a fairly simple mitre method: (pretty much the same idea without that box)
shows a mitre on one end then, with an extra line and a little more cleanup, a compound mitre on the other end.
[flash=660,405:2vw646dc]http://www.youtube.com/v/MIOkucG3Q_g?fs=1&hl=en_US&rel=0&color1=0x2b405b&color2=0x6b8ab6&border=1[/flash:2vw646dc]
[and i'd basically do the same thing if were drawing it myself (with rubies) except i'd go with a different method to get the cutting plane.]
-
A duh moment for me: I never know you could use the follow me on a single line like that
 Great vid Jeff
 -
@unknownuser said:
i dunno mike, that looks unnecessarily complicated to me.. here's a fairly simple mitre method: (pretty much the same idea without that box)
shows a mitre on one end then, with an extra line and a little more cleanup, a compound mitre on the other end.
pretty cool technique.
i'm usually mitering several heavy timber components (valley rafters) together - and I try to account for housings and joinery - so when I developed my method i was copying my valley (or hip) components off to the side to so the original was left unchanged, and in place.i also teach this method to timber frame designers - so it had to be rock solid, even if it involves an extra step or two.
typically we'll trace existing geometry (the ridge, or ridgeline, or the inside face of a housing if dealing with joinery) to create the 'dummy' block. this is then expanded to give us enough real estate to intersect with the part needing the miter or compound cuts... i try to get folks into the habit of seeing this 'in situ' so they understand what is happening to the geometry.
and its not always pretty 45 / 45. when roofs collide (10/12 into a 6/12 for instance) - things can get ugly, especially for a novice designer, afer adding backing cuts / etc.
cool technique though. will keep it in the bag of tricks.

-
Thank to all for responding.
I guess, as usual, I didn't make myself clear. What I am building, in effect, is a empty picture frame. I will be using the stile bit on all four components on the inside edge to accomodate the raised panel. I then will use the stile bit again on one end of the four components. Next I will be using the rail bit on the opposite four ends of each component. What I end up with is a type of mortise and tenon joint on each corner. The end of each component then has to be changed from 90 degrees to 45 degrees. When put together they form the picture frame to put the raised panel in. I also need a way to expand or contract these parts to accomodate other cabinet doors of different sizes. I am going to try to include the pattern of the stile and rail bits I previously made. Also there is two boards which have to be joined, the ends put at 45 degrees, and the stile pattern placed on the inside edge between the two 45 degree ends.
Thanks again.Cope Base.skpStick Base.skpStile and Rail Dados.skp -
@airbear58 said:
What I am building, in effect, is a empty picture frame.
Why do you want correct details inside the frame? These won't show in a finished model.
Assuming that you'll need to explode the parts (or otherwise show these details) begin by simplifying the problem. Start with three boards, each a group. Along the length of one, cut the female shape. Along the length of another cut the male shape. (Use FollowMe or just PushPull.) Qrotate (Q = keyboard shortcut) the male and female boards 45 degrees. Slide the shaped boards onto the unshaped board, picture frame style.
This is a nuisance, but you only do it once. Explode, Edit/Intersect/Intersect with Model. Delete the lines you don't want. Save!
Start with the correct width. Use the Scale tool along the length of the finished board to "cut" as many different lengths as you like.
-
The attached pdf file is my approach to creating a raised panel frame with mitered corners.
-
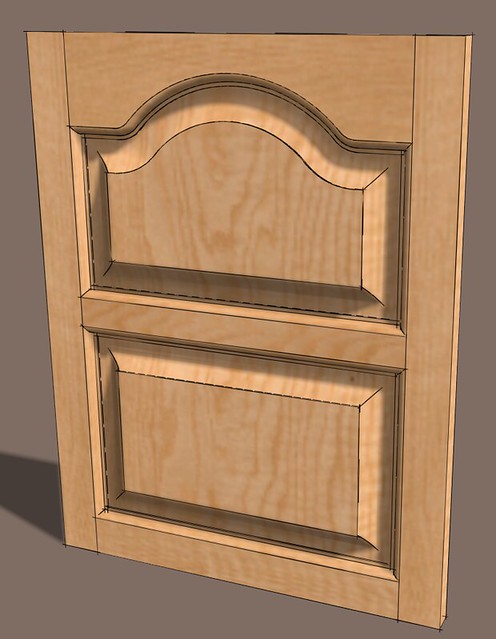
Something like this? This one is probably fancier than you're after but you could make the top rail a copy of the bottom. And this one comes apart. This door is too short for the intermediate rail but it was just done as an example.
Here's the final set.

-
I have a little tutorial on a shape similar to Daves here:
http://sketchucation.com/resources/tutorials/36-intermediate/147-inner-bevel-with-a-bit-of-trickOf course, it is not as complex - and the different parts are not separate components but to imagine a basic technique you can develop further...
Hello! It looks like you're interested in this conversation, but you don't have an account yet.
Getting fed up of having to scroll through the same posts each visit? When you register for an account, you'll always come back to exactly where you were before, and choose to be notified of new replies (either via email, or push notification). You'll also be able to save bookmarks and upvote posts to show your appreciation to other community members.
With your input, this post could be even better 💗
Register Login


Advertisement