Stretching with an offset + stretching on all sides
-
(Another two stretching Qs, before I'm even done with the first one!)
-
Is there any way, plugin or otherwise, to stretch something using a specific offset instead of a ratio?
-
When I stretch all sides of an object with CTRL, the value field is disabled-- I can't type in the stretch ratio. Is there any way to bypass this somehow and be able to type in the ratio?
-
-
When you say Stretch here, do you actually mean Scale?
Answer this and we will see where to go from there. -
Well, "Scale" stretches. So, yes, but not exclusively. If there's some other tool that does what Scale does but allows using an offset then I'd like to use that tool.
-
In this program, using the word Offset means using the Offset tool which will indeed offset entities by a specified amount entered into the VCB(value control box) at the bottom right, while holding down the left mouse button. It will do this readily on a closed planar surface, and under some circumstances on non closed stuff.
An alternative would be to Control M (move,copy) edges a specified distance entered into the VCB.
When I first started with Sketchup, I had similar questions. One of the resources I used, in addition to this forum was the Help menu in the top line menu of the Sketchup workspace. You can type in keywords related to the question and maybe find additional information.
If I did not answer your question satisfactorily, perhaps other folks will fill in the gaps.
Best wishes.
mitcorb -
I was afraid of this. I know about everything you just mentioned but I was hoping I had missed some little-known shortcut. I guess not.
It's not a simple planar surface. I had to manually (and very carefully) get the current bounding box size of the object, then I scaled it, and then I re-positioned it very carefully...
In this case I was making a ship (boat) hull. I had to reposition the smaller inner hull piece in the center of the larger outer hull piece.
- First, I got the bounding box.
- Second, I drew a line from one side of the top-midpoint of the hull piece to the other side.
- Third, I hid the skin of the piece.
- Fourth, I copied the piece. Then, I calculated the smaller piece sizes and scaled/stretched each side appropriately.
- Fifth, using the midpoints of the line I drew, I re-positioned the smaller piece in the middle of the larger piece.
- Sixth, I deleted the lines and un-hide the skins.
It's a lot of work for something that should have been in the basic Sketchup interface to begin with...
-
@agamemnus said:
I was afraid of this. I know about everything you just mentioned but I was hoping I had missed some little-known shortcut. I guess not.
Some of these problems have simple Ruby Console solutions. I'm not sure I understand what you were doing, tho. Would a picture be possible?
-
@martinrinehart said:
@agamemnus said:
I was afraid of this. I know about everything you just mentioned but I was hoping I had missed some little-known shortcut. I guess not.
Some of these problems have simple Ruby Console solutions. I'm not sure I understand what you were doing, tho. Would a picture be possible?
Take a look at my ship WIP:
http://forums.sketchucation.com/viewtopic.php?f=81&t=26699What would you do if you wanted to scale the hull to a certain width/height/length? The inner skin of the hull needs to be scaled exactly as much (in terms of absolute size--ie, +10 meters in length) to maintain the shell size, but the regular Sketchup scaling tools can't do that.
-
agememnus
I haven't read the whole thread but you say you can't Scale to a set size...
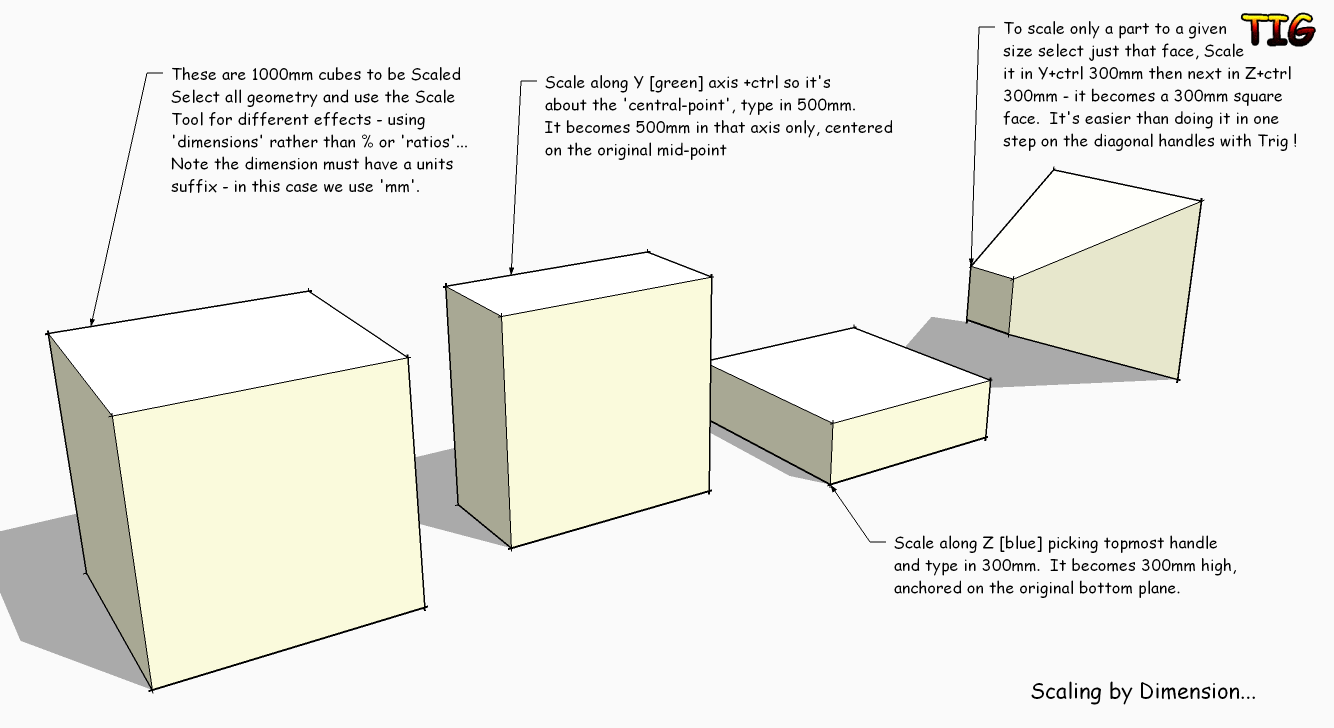
You can use the Scale tool and enter a dimension with a text suffix identifier - e.g.10m, it will scale in the selected axis/axes to make it 10m, rather than plain10which would make it 10 times bigger...
See here...
-
@agamemnus said:
What would you do if you wanted to scale the hull to a certain width/height/length?
Go with TIG's stuff.
-
Hi folks.
In addition, you can control how far the Scale Tool will go by using any geometry to snap the scaling action.
In your case, you could, for example, add a guide or a line or whatever at the specified offset distance that you want and then use this guide or line or whatever to controll the scaling action.
Of course, you may need to do this on all 3 axes one by one. You could use the symmetric scaling capability of SU to do only 3 scaling actions instead of 6.
Just ideas.
-
you could of course simply use fredoscale. his scaling and stretching tools have all the functions you seek and a few more.
http://forums.sketchucation.com/viewtopic.php?f=323&t=17948&st=0&sk=t&sd=a&hilit=fredoscale -
@tig said:
agememnus
I haven't read the whole thread but you say you can't Scale to a set size...I wanted to add a certain height/width/length, instead of setting it to a particular size that I knew in advance.
xrok1, I'll keep looking at fredoscale but I find I have to constantly remove it because it disables grouping, rotating and flipping for some objects.
-
You must usually have some idea of the dimension you require 'in advance' ?
If so, then enter it in the NNNunits format; if not then you must want it to match up to something already in the model - so use Jean L's ideas of snapping the scaling to some existing geometry [with inferences etc] or perhaps to some guide-geometry that you could have drawn beforehand to suit... if it's neither of the above then how are you to make it any meaningful 'size' ?... then can only scale it dragging a handle 'by eye' ?? -
@tig said:
You must usually have some idea of the dimension you require 'in advance' ?
Well, usually but not always.
@unknownuser said:
if it's neither of the above then how are you to make it any meaningful 'size' ?... then can only scale it dragging a handle 'by eye' ??
I'll try to rephrase... this tool would work like so: whatever the size is, add X meters to it. Even if I knew the original size, I would have to add! Just adding one mesh is not so bad, but if I have several meshes that I want to resize by some amount it gets more tedious.
-

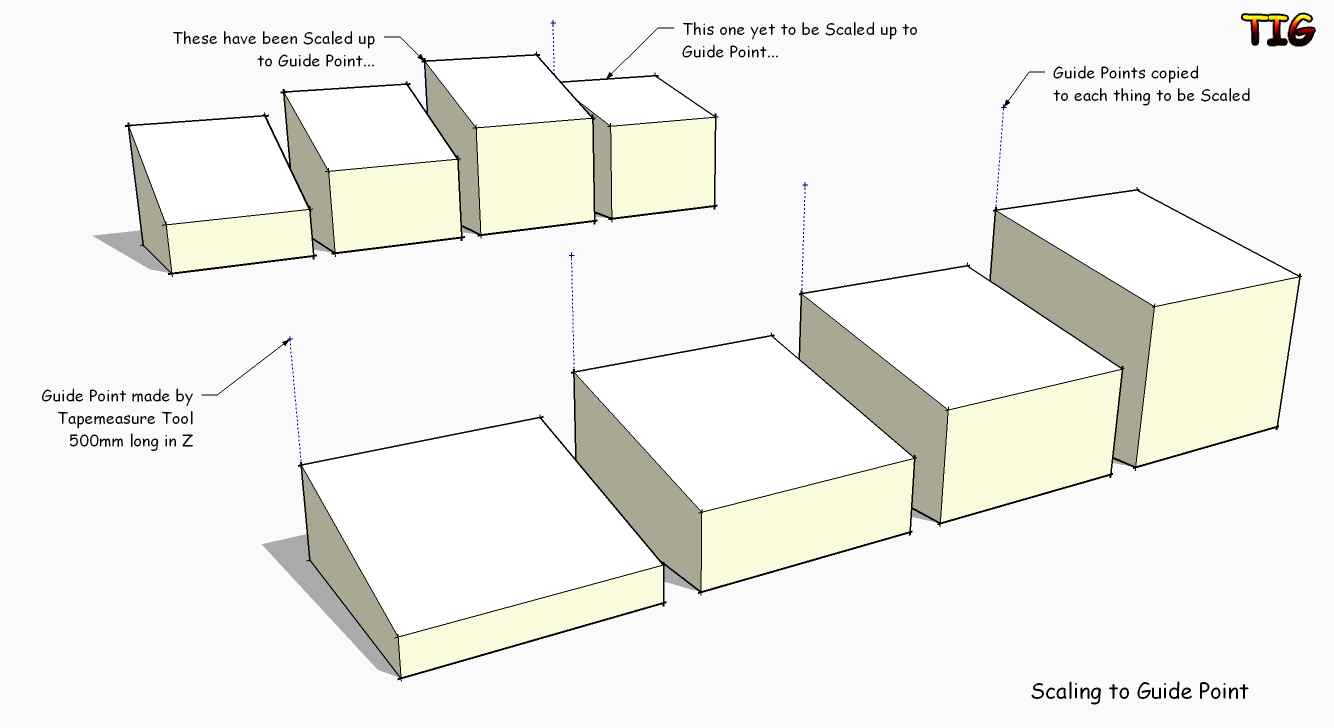
Use the Tapemeasure tool to make a guide-point offset along the axis from the things to be 'enlarged' by the required amount - say 500mm - copy it to several things that you want to Scale.
Make other guide-points at other offsets as needed...
Scale each of the things using these guide-markers to snap to.
Every 'thing' has been scaled by that fixed amount.
Delete all guides on completion [Edit mass delete tool]...
In this example you could have selected all of the top faces [hold Ctrl to add to selection] and simply 'Move' them up in the Z by 500mm [constrain in axis by holding Shift]... BUT on more complex shapes Scaling will give different results... -
Oh, of course! Thanks.
Would be interesting, though, if you could just do something like +5m in the Scale tool and it would do the same thing.
BTW, while we're on the subject, I am having trouble inserting a value when I "scale on all sides" (CTRL+scale): typing a number doesn't work.. what's going on there?
-
You are falling it the Scaling Pythagoras Trap !
When you scale from the center on a diagonal and type in a scale value it scales the XYZ sides to match, but when you type in a dimension it sets the size of the diagonal, not the XYZ sides size.
So for example if you have a 1m cube and use Scale+Ctrl and type in 500mm the cube scales about its center so that the diagonal is now 500mm long - if you wanted the sides to be 500mm long you should have typed 0.5...
You need to do a bit of pre-planning and work out the ratio first NewSize/OldSize = scale_factor - here 500mm/1000mm=0.5.
Entering a dimension is pretty impractical in this type of scaling unless you do want the diagonal to become a set length...
Alternatively use the uniform Scale + Ctrl with a side handle and the modifier 'Shift' key and type 500mm to make all edges 500mm, scaling from the center ???

-
For this reason I do not even use the diagonal scaling (well, unless I want to do some quick and dirty operation). The side grips are much more easy to work with - just use the mod keys to scale uniformly and such.
-
@tig said:
You are falling it the Scaling Pythagoras Trap !
When you scale from the center on a diagonal and type in a scale value it scales the XYZ sides to match, but when you type in a dimension it sets the size of the diagonal, not the XYZ sides size.
So for example if you have a 1m cube and use Scale+Ctrl and type in 500mm the cube scales about its center so that the diagonal is now 500mm long - if you wanted the sides to be 500mm long you should have typed 0.5...
You need to do a bit of pre-planning and work out the ratio first NewSize/OldSize = scale_factor - here 500mm/1000mm=0.5.
Entering a dimension is pretty impractical in this type of scaling unless you do want the diagonal to become a set length...
Alternatively use the uniform Scale + Ctrl with a side handle and the modifier 'Shift' key and type 500mm to make all edges 500mm, scaling from the center ???

Yes yes, I usually use a scaling factor when I do this, so it's not a problem...My problem is that I CAN'T type a number when I press and hold CTRL (or CTRL+SHIFT)!
-
@agamemnus said:
...My problem is that I CAN'T type a number when I press and hold CTRL (or CTRL+SHIFT)!
Don't then. Start the operation with these mod keys - then release them, type your value and hit Enter without ever touching them again. SU is smart enough to remember what you are up to!
Advertisement


