Podium Photomatch (AGAIN!) [TUTORIAL]
-
Oli
You seem to have made a point in mastering this whole photo-match thing...well done!
I have never really had a need for this in the past, but recently I've had a call for a few of these, I use a whole different technique and software to achieve what I was asked for however you seem to have a very much easier and quicker solution (so it looks), do you think if and when you get a chance that you would be willing to throw a quick tutorial or even video together on the basics of your technique? It would certainly be something we would add to our growing anthology of tutorials and something that will benefit many users, myself included.
-
Solo.....of course I will. I've learnt a wealth of information from your works and tutorials so I'd be more than happy to return the favour! I'm kinda flattered that you, render god, can learn something from a mere mortal like me!
(and yes the technique is easy)
Watch this space.........
-
yessir......
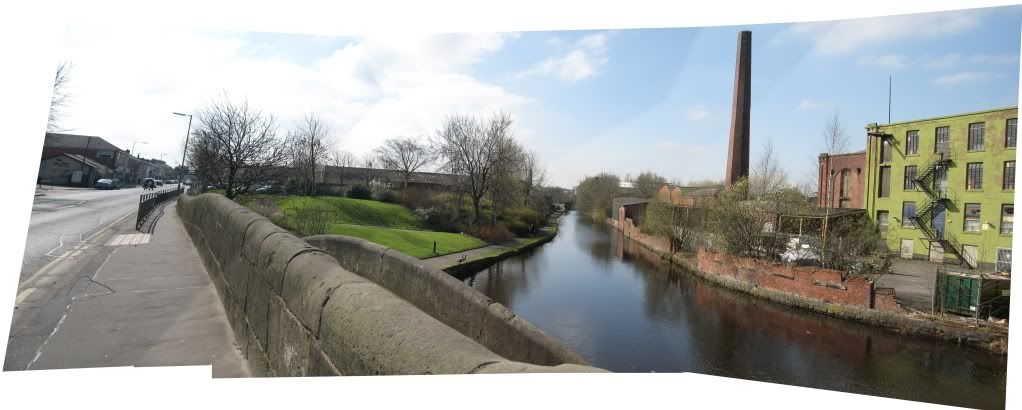
Here is the original photo before the building was applied: (I updated the first post too)

I would post an non-edited panoramic without the building but the image is flat now, sorry!
[edit] Here is the original panoramic before I stitched it better, without the building. Do you get it now?
-
I must admit I always use more complicated ways of doing this. Your way Oli using Photomatch makes far more sense, seems very accurate and will save time.
Look forward to your tutorial, although what you have already posted is a very big help
-
The results can be amazing if you start off with the right photos. When I took my pics the sun went in and out of cloud....you can see the change in tone between the 5 photos which make this image up. (I also didnt use a tripod haha) I'm really not that good at photoshop otherwise I would have tried to make it completely seamless, maybe next time!
-
Mate awesome work again! I knew I was on to something when I said in another thread that I needed to watch your threads!!!!
-
I dont know why you are impressed Richard, your work infinitely cacks all over this!!
-
@olishea said:
I dont know why you are impressed Richard, your work infinitely cacks all over this!!
Why????
Because you've shown some great artistic merit, true mastery over your applications and proof of simplicity in approach!!! All impress me mate!
-
nice and mastee piece of work

-
thanks guys!

-
Well done
You have inspired me to give it a crack
-
good stuff, ill make a step by step tutorial for this next week
-
This is an old post, but i am hoping one of you fine gents might be able to steer me in the right direction. I have been looking for a quick way of rendering SketchUp PhotoMatch views within Sketchup via a rendering plugin. I cant find any that will SEE the PHOTOMATCH background. Any ideas of a package that will render everything together?
I have been using this compositing method above also but want to avoid photoshopping if necessary to save time. These photomatches are the only thing i cant take care of in Lumion(really needs a photomatch feature), so its usually a quick, down and dirty thing...but i would like to do better, faster.
I used to use Kerykythea alot, which will import the PHOTOMATCH if i remember correctly... its been a long time and im not sure i want to get back into Kerykythea since it has not been moving forward at all in development.
I usually just end up exporting directly from sketchup, like this, but i would really like to render it even if its a so-so render solution for Sketchup...just to be able to get light and shadows, etc on photomatches.
any advice welcome.
Thanks,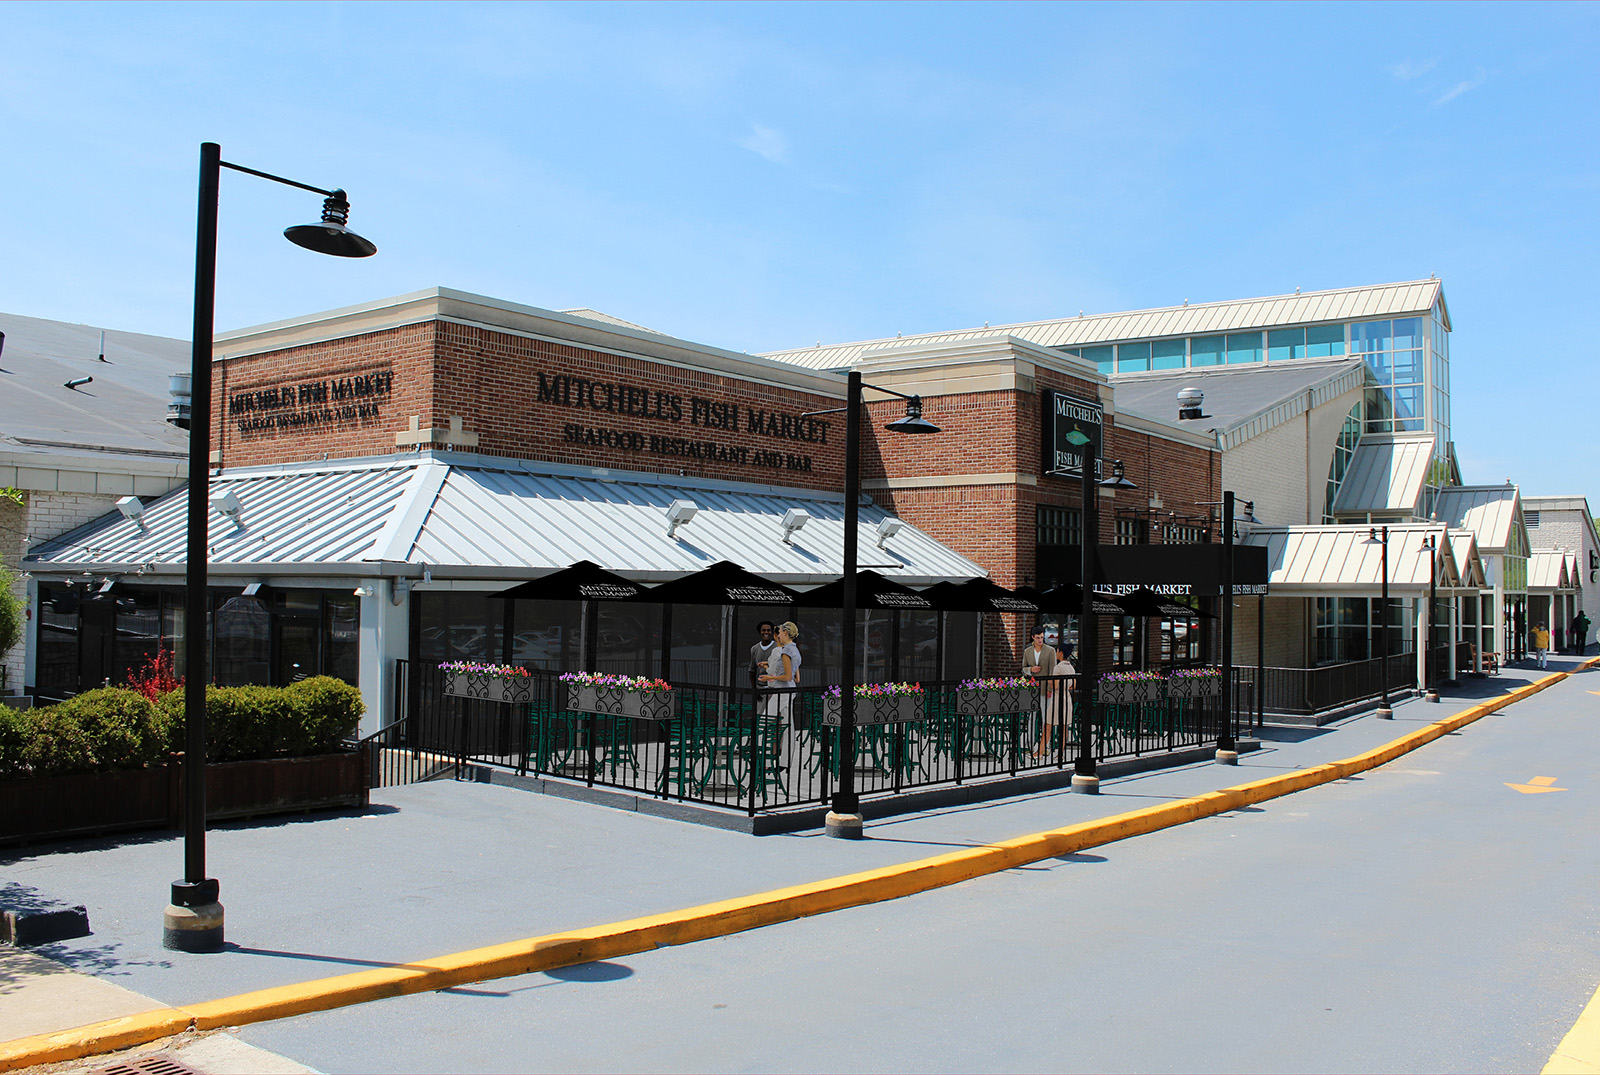
-
Oli, did you ever get a chance to make that tutorial - I'd be really interested. I've just recently started rendering my work (with Twilight Render) and need to fit models into photographic backgrounds quite often. I started with a similar technique of marking the model image & superimposing it into the background in photoshop. However, I couldn't get a good masked image (halo lines around objects).
I then tried (now, my preferred method)- dropping the background image into SU as a watermark, positioning the models to fit into background, then setting the same background up in the Twilight environment setting. It hadn't occurred to me to match photo the background - good idea!
-
seems you can also try the free Visualizer for obtain some transparent backgrounds ! ?
-
Thanks Pilou. I'll definitely be trying that.
-
With Twilight did you try an alpha mask?
-
The tutorial is in the first post of this thread....I didn't show every photoshop method though.
For masking you should really look at this tutorial. It really does make perfect masks. You can choose to mask more or less and completely eliminate halos. Don't be afraid to close stamp halos out either, there is nothing worse than white halos.

Masking Hair in Photoshop CS3
Masking hair is one of the harder challenges faced when you want to move a subject from one background to another. Here are two techniques for getting this done.

Layers Magazine (layersmagazine.com)
If you can mask hair you can mask anything.
Don't forget you can always select your mask in photoshop, then Select>Modify>Expand (or Contract)....you can nudge the mask by a pixel or two to crop the edge of the mask.
-
Hi Oli
Today I have seen your excellent example - a great and very accurate work and thank you for showing your "Making Of". The location of your building is great (the building itself as well of course!). This Medieval bridge (?) must be a great view for users of your building.
Since this surrounding is so interesting, it is not only correct but even necessary to use Photo Match here!


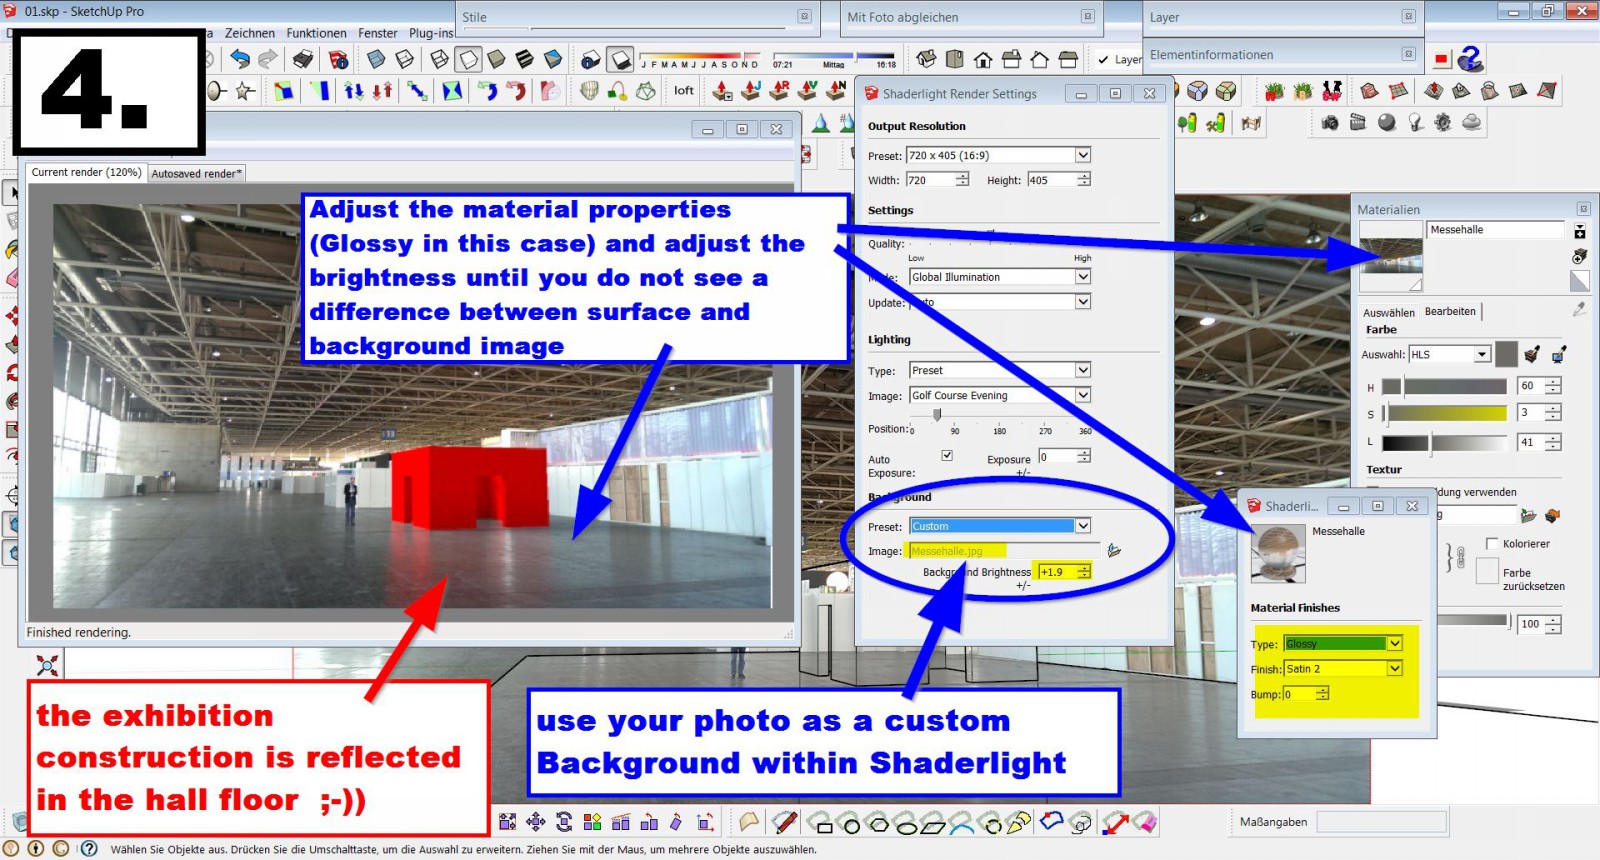
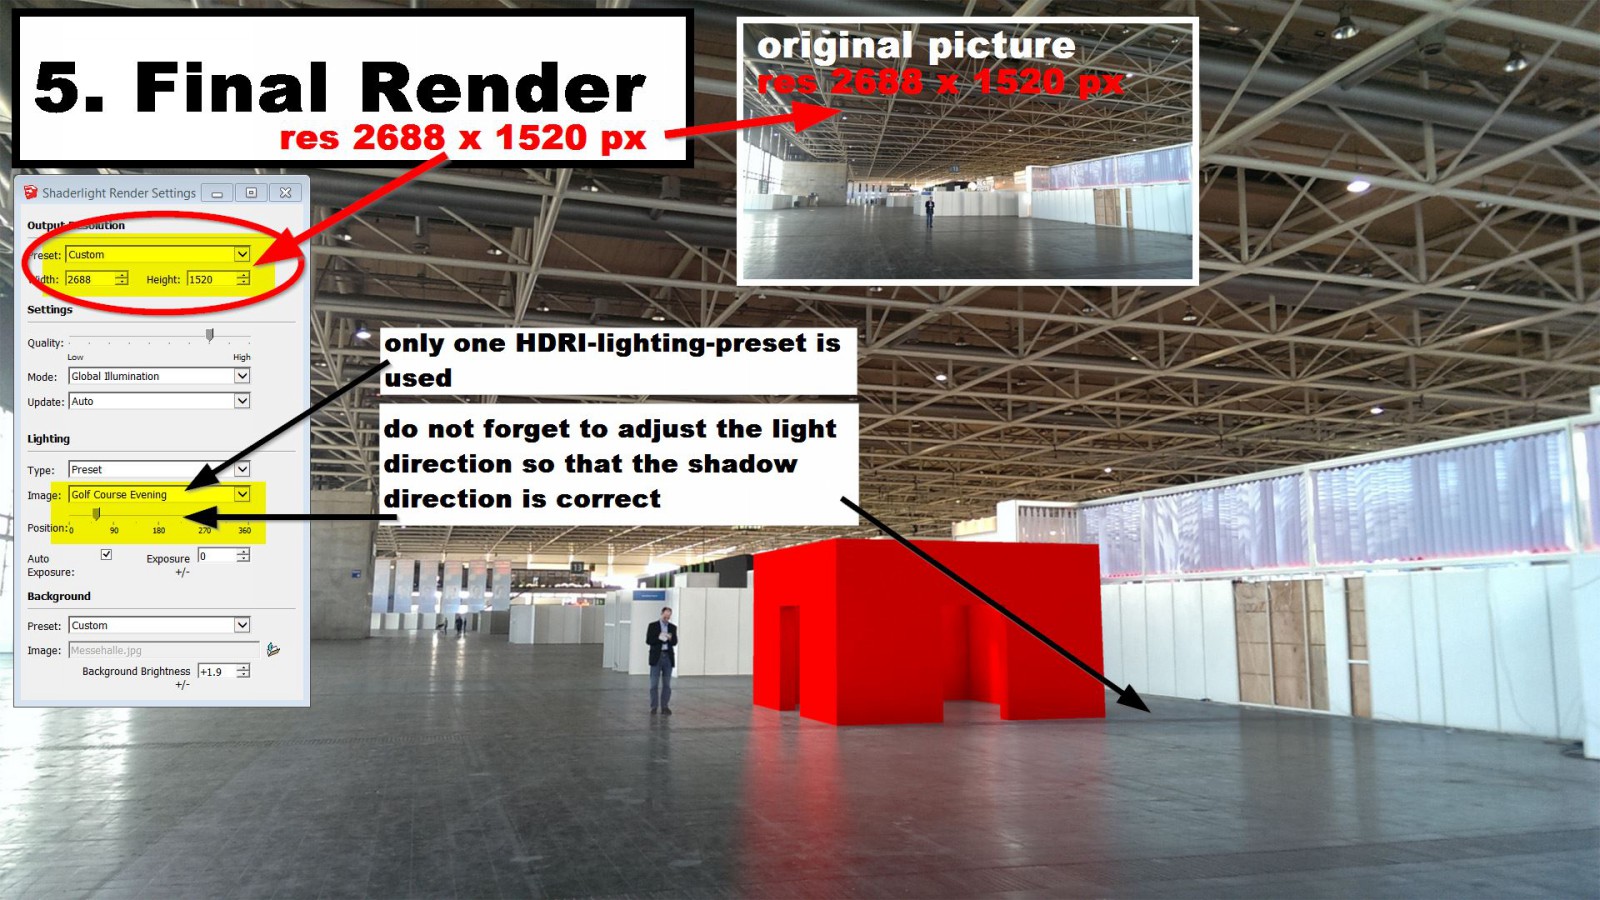
Since I've done a similar Making Of example a few days ago, I think your thread might be a good place for adding it here and I hope that´s ok? (In my case I used Shaderlight for rendering but the working principle is the same as using Twilight or Podium etc.)
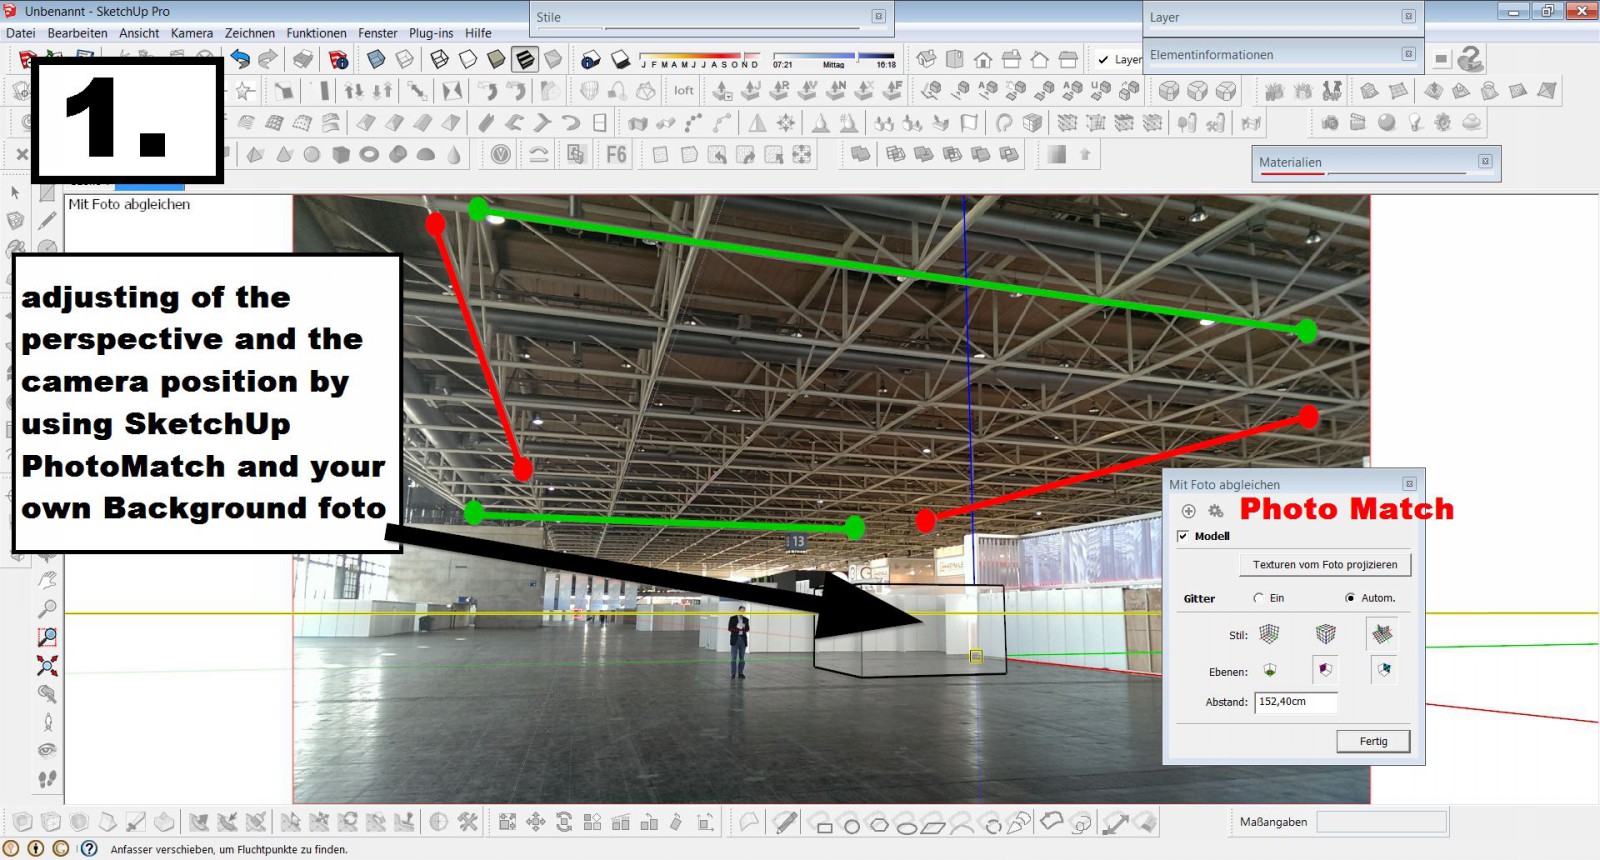
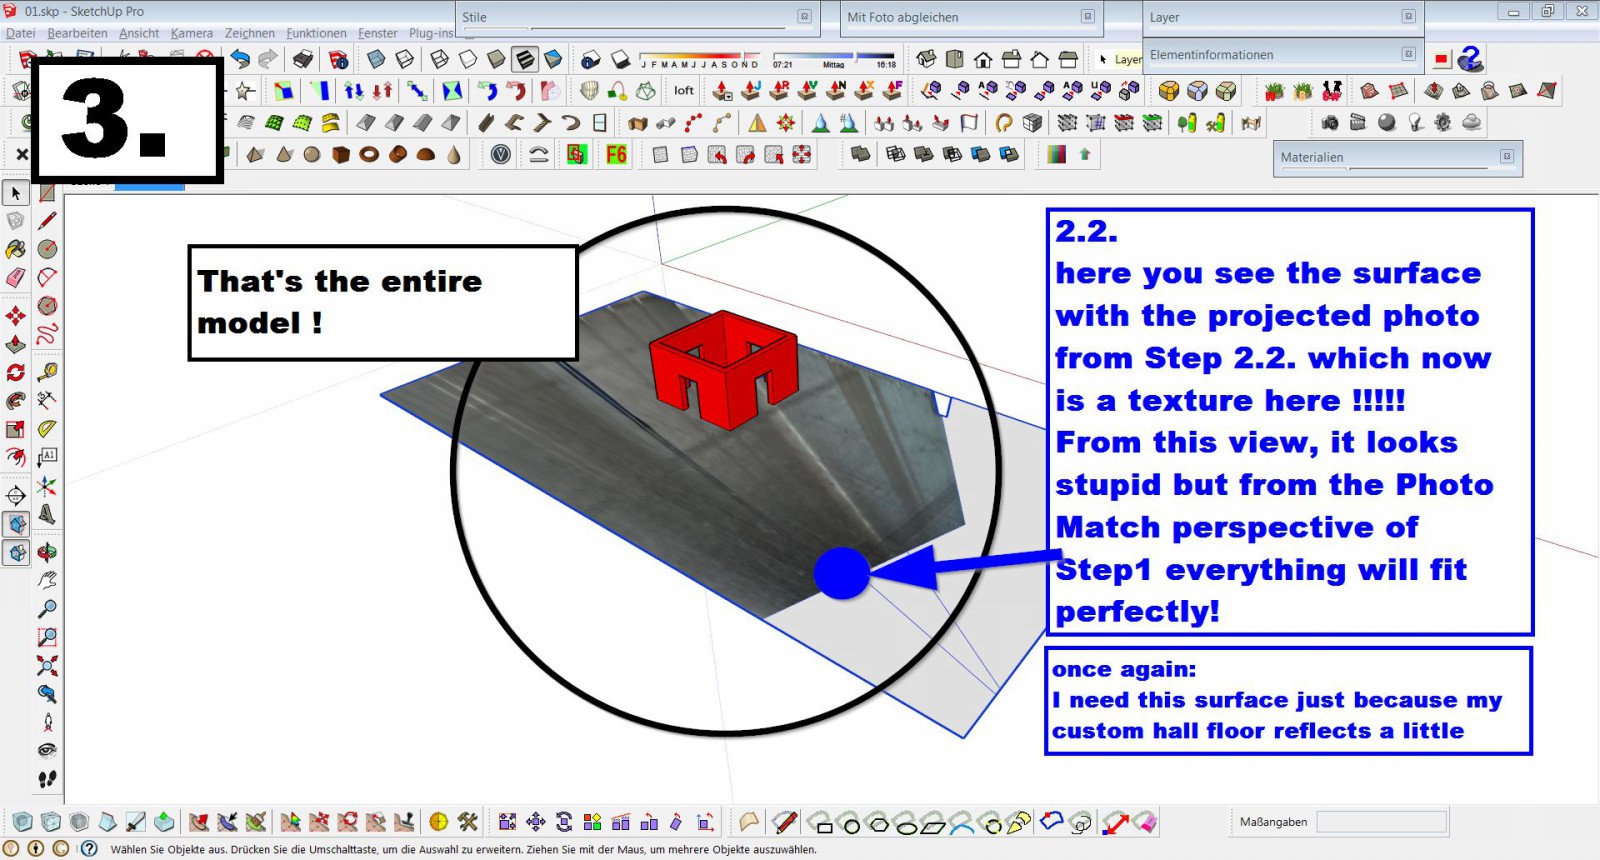
Using a simple dummy scene, the attached pictures will show the steps which are necessary to make a simple interior exhibition simulation by using SketchUps “Photo Match”.
An added bonus of this example is, that the exhibition design should be reflected in the glossy reflecting floor of the exhibition hall.
For the result shown here, I have only used SketchUp and Shaderlight, no postprocessing in Photoshop - but only because this scenario was so simple of course.
I hope this Photo Match mini-tutorial is useful as well ...

-
I think what i have been looking for is possible if a renderer allows the use of the custom background image, which most should. That way, the same image that was used for PHOTOMATCH can be used a background image and hopefully avoid the need for masking and comp'ing when doing quick photomatch exercises.
i am still on the look out for a quick render package that will just render the model and the photomatch photo natively.
Shaderlight looks interesting. Hope to test that out as a quick solution when not using Lumion.
Thanks guys!
Bob
Advertisement


