Need help makeing screw edge
-
see where its supposed to come together thats where the threds need to be also it has to wrap around the model at least once "preferably twice". It has to be the same way for the other part as well. Basically the top part of the right object and the bottom part of the left object need to screw together.
I dont know how to go about doing this. Maybe is easy but I got a brain fart right now PS~ the left side isn't rounded its a 90 degree angle
I found a good ref pic http://www.bodymodern.com/jewelry/tunnelbigcz.jpg
This is how I want the screw teeth to look like http://upload.wikimedia.org/wikipedia/en/e/eb/Unified_Thread_Diagram.gif
-
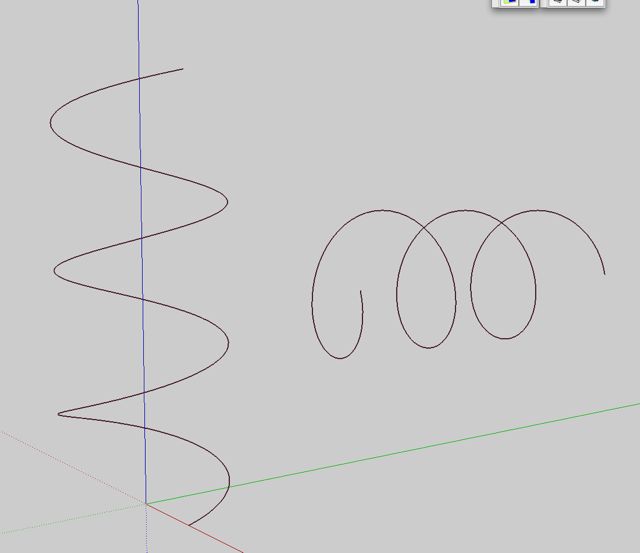
I just don't get it I got the folowme spiral done but when I follow it it ends up getting messed up, the bottom twists.

-
If the problem is that FollowMe twists, then you could try this plugin: http://www.sketchucation.com/forums/scf/viewtopic.php?f=180&t=16465
-
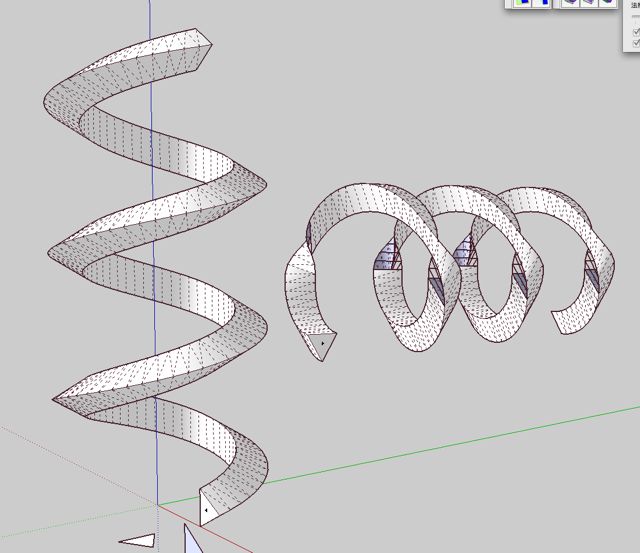
this is a great plugin though I have another problem now, it does this when I do it,

Whats up with all those menus on the right? I didn't get those when I installed the plugin.
-
Hm.. it looks like it's twisting 180 degrees. How is your line built? multiple curves? I'm wondering if the normals are flipped for each segment.
I'd try to weld all the lines making up the path and try then.
If that fails, Try to use the tool only one of your segments that does work, and then copy the extruded segment afterwards.And you might want to mention this to the author of the plugin. He might tell why.
The buttons on the right is not part of the plugin. That some kind of organizer plugin of some sort.
-
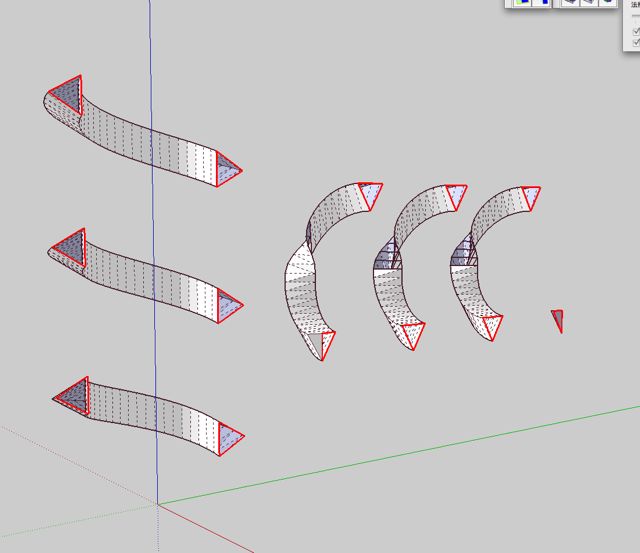
didn't work, looks like the problem is that the box isn't going around the loop following the lines instead it wants to stay upright and when it gets close to the sides it glitches. on the right is one segment.

-
Hmmm. yea. What happens when you use the regular FollowMe?
Can you post the model? Or the parts that's causing problems? -
what happens in the regular follow me tool is that if you follow the entire loop then the shape starts to turn a little kinda like this
but extremely small so that by the time you end the loop it seems that you can see the bottom end.
-
OH that worked Jeff thanks. Will upload a few shots in the gallery when I'm done ill leave this post here for anyone else who wants to make screws and bolts.
-
weird.. i just tried it and i ended up with similar results..
then, i tried it with the helix laying flat instead of sideways and it worked.. so yeah, draw the helix and threads Then rotate it vertically
[EDIT] oh, i should add that i used 1001bit's extrude tool for that skp.. i also did the same thing with FAK.rb though and both acted in similar manners regarding the vertical/horizontal orientation.
-
and i might point this out before you get too much further into the model..
the threads are going the wrong way in this picture (well, not necessarily 'wrong' but opposite of the standard)
remember: righty tighty, lefty loosey


-
that is going to the Right think about turning counterclockwise thats how it goes.
-
hmm.. i'm gonna have to disagree with that.. (well, sort of).
you're right, the way you have it drawn is to turn it counter-clockwise in order to tighten it.. usually, you turn a screw counter-clockwise if you want to loosen it.
-
oh yeah your right.
-
always remember. . .Lefty-Loosie! Righty-Tighty!

-
@unknownuser said:
always remember. . .Lefty-Loosie! Righty-Tighty!

That is just a general rule of thumb, there are many items and bolts out there (especially in the automotive world) that are the opposite due to a rotation of a part and not wanting it to un-thread during operation.
-
yes. . .this is true. I just like saying lefty-looie.
-
What's happening here is very logical.
You are using a Ruby that keeps a section profile always "upright standing".
Imagine what the profile could do when the path is also vertical...
And look carefully Blah 11, you are not getting your threads right at any points of the spiral except at the bottom (as in the 3rd image).
The solution for the problem is, I assume, to make the reference path stand up and then re-apply the ruby.
Hope the images will explain it better.


-
Well spotted takesh

-
@takesh h said:
What's happening here is very logical.
You are using a Ruby that keeps a section profile always "upright standing".
Imagine what the profile could do when the path is also vertical...
And look carefully Blah 11, you are not getting your threads right at any points of the spiral except at the bottom (as in the 3rd image).
The solution for the problem is, I assume, to make the reference path stand up and then re-apply the ruby.
Hope the images will explain it better.i'm not really following this.. what do you mean by 'you are not getting your threads right at any points of the spiral except at the bottom' ?
is that in reference to the original post or the state of the thread when you made your post? as far as i can figure, the threads are correct at all points of the spiral (i'm talking about the .skp in the 8th post of the thread).. are you saying something is wrong with that that i'm not noticing?
Advertisement


