What's your beginners tip?
-
hello everyone and all the french community in the world ^^ my tips for beginners it's to learn with the video on youtube cut your screen in two , one youtube one sketchup and practice on one things everyday first the basics with sketchup4school but they are american so it's hard to undrestand because of there texas accent eating bublle gum ^^
and go far , found "good" technical tuto is quite difficult like how using the light in vray or how smooth or connect the edge but there is !!!
like "andeciuala" he speak a undertandle englih speak slowly i think he was indian cool people and explain very well and so technic amazing i use a plugin for firefox to save this tuto it's download helper a free plugin that's all .
i design for jewellery in france . -
@mm5949 said:
It took me a while, but I finally learned the "Intersect with Model" tool. This is a good (only?) way to make accurate mortise and tenons for woodworking. It's explained on page 222 of the (downloadable...887 pages!) SU User's Guide which I downloaded from the official SU website (at http://sketchup.google.com/support/bin/answer.py?hl=en&answer=116174). It is a powerful tool.

To save the palaver of deleting a lot of unwanted geometry after using an intersect operation, I find Bool Tools from Smustard indispensable.
-
Never draw anything twice. Never draw anything twice. In my cad days it was Blocks.
In SU, make it a component. My tip, Bob -
use the shift key, early and often.
08-Feb-2010 edit: avoid using mouse to select "hide" from context-click menu. every once in a while the mouse will mistakenly click "erase", and the result will appear the same as if mouse had clicked "hide". Unfortunately, much later (even later after a few unhide-all's) you will wonder to where some parts have disappeared.
-
CONVERT INTERSECTION CONTOUR LINES TO UNIFORM B SPLINES FROM FREDO's PLUGIN!!! THEN EXTRUDE BY RAILS!!!! FROM TIG's PLUGGINS!!! ANYTIME YOU INTERSECT TO FACES TO CREATE A CONTOUR LINE FOR COMMAND EXTRUDE PROFILE AND RAILS!!.. AND DO IT AT 100!!!! SO IT IS SOFT AS A BABY'S BOBO!!
-
It may have been said several times in this topic:
Go through all of the 9 or so pages in this thread.
Then look up the Duh/Doh thread. There "may" be some gems there, too. -
@pmolson said:
Beginners of an appropriate age of course.
Awww...really?
-
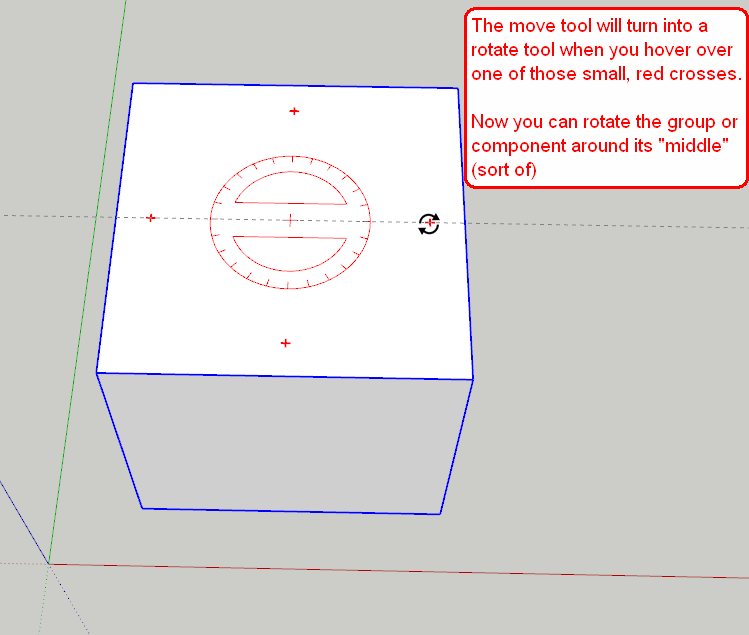
I've no idea if this has been covered before but one think I have just discovered (embarassing!) is the fact that when moving/rotating groups or components, rather than having to use the rotate tool (which can be tricky if the object hasn't a flat face, e.g a person or a tree) you can just use the move function and rotate with the little red crosses that appear on the faces.
I know this is probably old news but it saved me a load of time/heartache.


-
As a beginner myself, I don’t feel that I am really qualified to give tips, but … I have found that learning to use layers properly has helped me enormously. By turning on and off layers, you can access and see parts of your model that would otherwise be very difficult to work on. Imagine if you could do this in real life - you would be able to scratch your feet without taking your shoes and socks off! Bliss!
-
@iiian2009 said:
As a beginner myself, I don’t feel that I am really qualified to give tips...
This is not true. There is nothing more important in the learning process than these "enlightenment" moments and sharing them with other beginners can bring seemingly basic but not necessarily obvious things (more experienced users may not even think about) to their attention.
Now as for your "discoveries"; if you turn some layers off and make a scene (View > animation > add scene - or when you already have one, just rightclickon the tab and "add..." or add one from the scene manager - see below) then turn them on again and make another scene, next time you do not even have to go and turn them on - just click on the scene tab and the parts "vanish".
Best is to open your scene manager (Window menu) and uncheck the "camera location" and "Include animation" when you only use the scenes for working. Don't forget to refresh the scenes if you make any changes in existing ones.
-
maybe the wrong place for this question...
Is there one place to see all available plugins?
I find posts about the ones I want but have a hard time finding the actual file for download. I am looking for: line_normals
gabwil
-
Hi Gabwil,
Here is an extension index where you can find most of the plugins ever published and here is a list of plugins published on these forums (some are not listed in the index above). The actual plugins are generally attached to the bottom of the very first post (by the author) in each topic.
-
and the #1 beginner tip is.... post a picture (even 2d or hand drawn!) of what your trying to acheive with your question****!!!!!****

-
Learn keyboard shortcuts. It really speeds things up
Another one: When you export an image do so at about 3000 pixels. Then reduce image size in Photoshop to smooth the lines. -
-
If you use Microsoft Office, check out MS OneNote for collecting and organizing notes about SU.
-
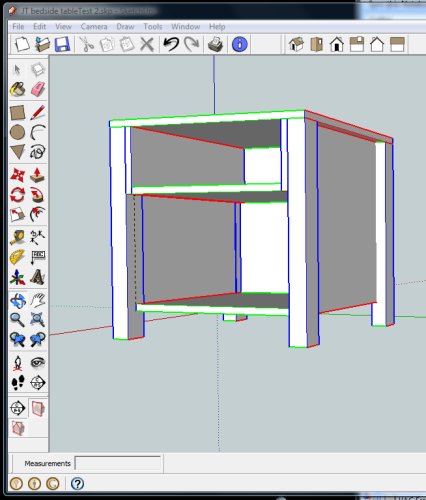
First time you open Sketchup to see what it's all about, consider setting it up to look like the attached image. Check out View/Toolbars.

-
-
Hi. I wanted to share a technique that I learned. While working with large projects, the computer becomes slow while using the orbit tool for rotating, or the Pan tool. I usually switch to wire frame mode just before using those tools, and after rotating or panning, switch back to the shaded view. I think this method reduces the load on the computer.
Another method is to assign plants, furniture, vehicles etc., to particular layers, turn off those layers and turn them back on after completing the detailing works. This also reduces the load on the computer. -
I would like to share another method that helped me to keep every thing in order. Suppose you are modelling a complicated shape, like a designer window inside one of the rooms in a house. First you turn the window into a group. The window should be at the exact location where you want it to be in the finished model of the house.Move this group a particular distance, say about 300 cms or 10 ft(using multiples of 100 will be easy. Also dont forget this distance) along the blue axis in the upward direction. Now the group is away from the model of the house. Now you can select the house without affecting the window and hide it. This will reduce the load on the computer. The parallel projection mode and front, side or rear view can be used with advantage for selecting the house. Now do the detailing works on the window. After that unhide the house and move the window 300 cms down.
-
Hi James,
What if you turn the window into a component instead of a group and only move a copy a little out of the way? In this case, you can work on the component while the original copy (being just another instance of the same definition) will instantly inherit any changes you make on this copy component.
You basically spare only one step; moving the window back to its original position but this can even be a bit more tedious and in this case you need not even do those movements so precisely etc.
Another way to work on elements without the disturbing surrounding is to "hide the rest of the model" while working inside a group/component (this can be found under Window > Model info y Components - but you can also add a toggle shortcut key)
-
I agree with you Gaieus. Components are more powerful than Groups. But I had a feeling that all features of Components are not available in Sketchup free version. I am trying to learn more about them.
-
You get the full features of Groups and Components in the free version.
There is very little difference between Pro and Free. The main differences being file export and Layout. There are a few more but all the modelling tools are the same.
Hello! It looks like you're interested in this conversation, but you don't have an account yet.
Getting fed up of having to scroll through the same posts each visit? When you register for an account, you'll always come back to exactly where you were before, and choose to be notified of new replies (either via email, or push notification). You'll also be able to save bookmarks and upvote posts to show your appreciation to other community members.
With your input, this post could be even better 💗
Register LoginAdvertisement


