[Tutorial > Modeling] Basic Roof
-
@gaieus said:
I knew this technique but hadn't seen those videos yet (there's a bunch of really cool ones). I think after this transfer I'll start putting a "help links post" in the newbie forum. These come in really handy.
As for Eric's tutorial - it scrambles up my toolbars, too.

Odd, maybe his computer doesnt play nice with others.And I was going to post a pile of links with a title of each video and a short description of what is explained, but then I found Aidan Chopra's website and figured if it was all up there and for his book that maybe I shouldnt post links. Could any of you maybe contact him and see if he is ok with it? I know they are on a public site, but being part of his book...
I actually had about half a page started on that post too. If that would be ok I would be more than happy to watch every one of those videos in my spare time and make that post.
-
Everything is OK, Masta, this is a community forum where people help each other and not the mods telling who can help...
We just don't really have the time for this at the moment, you see... -
@gaieus said:
Everything is OK, Masta, this is a community forum where people help each other and not the mods telling who can help...
We just don't really have the time for this at the moment, you see...I know exactly how much of a hassle it is to move posts. I think I will start on this list of links to all the videos in a day or two if nobody gets to it first. Green friday (black friday according to any other store) is coming up and I have been blessed with 12+ hour shifts, so until next week I dont have much energy to start it.
I just didnt want to start posting all the links and then irritate someone like I have done before. It almost got me in a lot of trouble once.
-
OK, thanks.
I created a "Getting started" topic in the Newbie forum. If you wish, you can post in it any time and the first post will be updated accordingly.
I might split this thread however and move it into the ideas forum (getting off-topic a little bit
) -
@goggin said:
When you say "select all", do you mean go to the edit pull-down menu and click on "select all"? Then I have to right-click on something to get the "intersect with model" option, and it's unclear where I should click, or if that matters. But nothing happens when I do that.
Can you explain what step 6 is for? Once I click on that face, I get an extrusion as soon as I move my mouse to do something else, and the extrusion comes forward or backwards, depending on which direction I move the cursor-- ie, to go up to the edit pull-down menu.
Maybe I'm just being slow, but it seems like there are some steps missing between 6 and 7.
Sometimes I explain things assuming everybody knows what I do
 sorry.
It seems if you are getting an extrusion you still have the follow me tool selected.
Make sure you have your select tool. Then triple click on the roof. Click three times fast. This will select all the geometry that is connecting, I.E. select all.- Or, you can window around all the geometry, hence selecting all. -
Then right click on one of the faces or lines that is now selected. You will see the intersect option. Use intersect with model.
Sorry again for the vague directions.
I hope this helps. -
@masta squidge said:
@gaieus said:
I knew this technique but hadn't seen those videos yet (there's a bunch of really cool ones). I think after this transfer I'll start putting a "help links post" in the newbie forum. These come in really handy.
As for Eric's tutorial - it scrambles up my toolbars, too.
Odd, maybe his computer doesnt play nice with others.Or maybe your computers are not as accepting as they should be. Ever thought of that

Seriously, I have never had anybody's tut mess up my toolbars. You must have your Sketchup in "Restore Down" mode rather than full screen. When you open a new instance, I.E. a tutorial, it can mess up the toolbars. Another reason for a locking toolbar update! I think I have been on that soapbox for years now.

-
@unknownuser said:
@masta squidge said:
@gaieus said:
I knew this technique but hadn't seen those videos yet (there's a bunch of really cool ones). I think after this transfer I'll start putting a "help links post" in the newbie forum. These come in really handy.
As for Eric's tutorial - it scrambles up my toolbars, too.
Odd, maybe his computer doesnt play nice with others.Or maybe your computers are not as accepting as they should be. Ever thought of that
Seriously, I have never had anybody's tut mess up my toolbars. You must have your Sketchup in "Restore Down" mode rather than full screen. When you open a new instance, I.E. a tutorial, it can mess up the toolbars. Another reason for a locking toolbar update! I think I have been on that soapbox for years now.
I like your thoughts about my computer better than my own.
And I for one am right in line for that locking toolbars thing. -
Now that IS interesting. Nice video. Talk about a time saver. Thanks.
Dan
-
In step 4 of the tutorial, it says to "extend the roof profile to half the largest distance." I understand what that means, but I don't know how to do that. Can someone please explain? I'm sure it's an easy step.
-
Say an easy way would be:
- start drawing a line from the top endpoint of your profile
- hover over the slanting edge until you get the inference "on line"
- now press (and keep pressed) the Shift key to lock your line in that direction
- start extending the line towards the middle of the roof (shift still pressed)
- use the midpoint of the edge of the "ceiling" closest to you to set the extent of your line
- now you can click to finis drawing the line
- draw a vertical and a horizontal line to close the face
- delete extra geometry...
Also you can start (at step 2) with a rectangle big enough to reach to the middle of the roof.
-
interesting, i really liked this tutorial, everyone should learn these types of tutorials. At any rate, there is the roof tool which can handle most of the work, for which i use now instead of doing it the long way. Still, should learn this anyways.

-
Yes that's true. But IMO learning the basics and realizing the ways SU work is essential before getting to tools that are not supposed to do the job instead of us but to help us and speed up the workflow.
Yet I hope that our scripter friends won't misunderstand my words and think that I put their works down.
-
I wrote Roof.rb AND I agree that you should know how to do a roof "manually". I will still make simple roofs by hand. Sometimes even complex roofs are easier that way too - try roofing a cranked star shape and it'll fail - there are shapes that can't be roofed with a hip that's all the same pitch - it's just physically impossible - so that's when doing it 'the long way' is needed...
Understanding what SUp can do 'straight out of the box' helps you see where some plugins MIGHT help in complex tasks, but knowing how to do something is invaluable, even if you rarely need to actually do it...
-
Hi,
is there any way to retrieve original file for this tutorial (on the first post)?? the link seems to be broken ..
I already used both tuto "How a Pro Builds a House in Sketchup" Part 1 and 2, but I'm still asking many questions about best way to design roof and positionning it on the second floor walls ...
Thanks in advance ...
AG
-
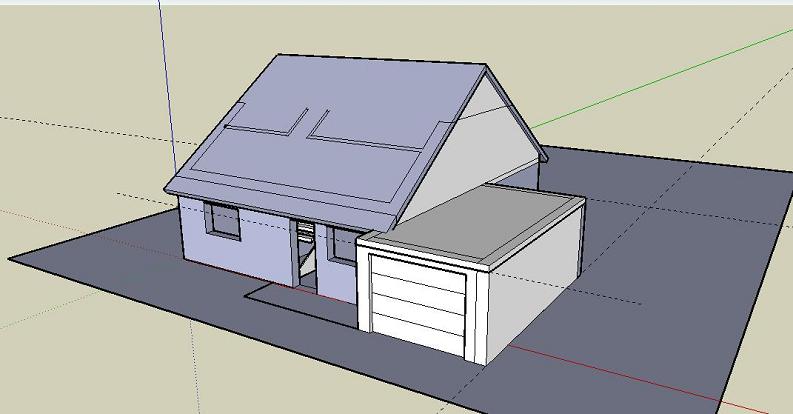
Anyway, this is an opportunities to show what happen with the roof I designed :
So first, I trace the floor plan :
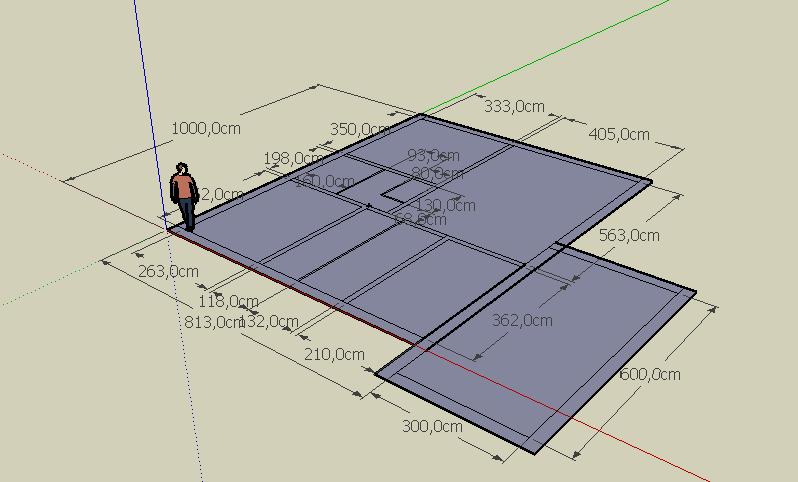
Then I build up the walls :
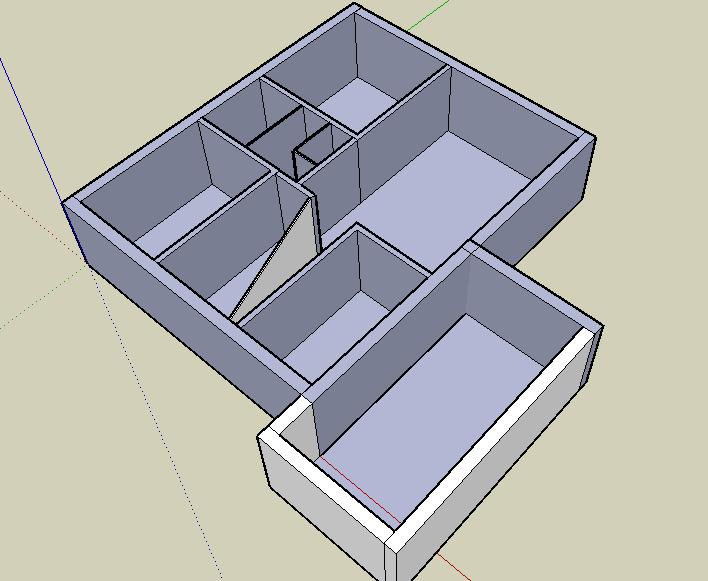
.. I never get any best practise for 2nd floor ... so I did same than 1st floor. I built the floor, I draw the plan on it and I build up the walls :
My first error here is I don't designed door and windows on the plan ... anyway, I did them be extrusion but I think it would be more confortable from the plan.
to be continued...
-
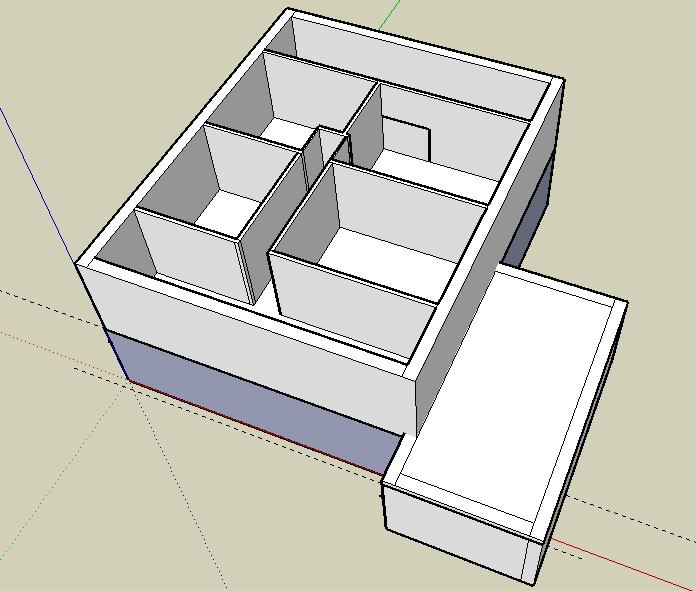
Then, I built the roof apart and I positionned it on the 2nd floor. My idea was to cut the walls with the roof and to keep only parts needed. But, what a mess finally !!! Many walls are wide open now and it's difficult to retrieve closed geometrical forms :
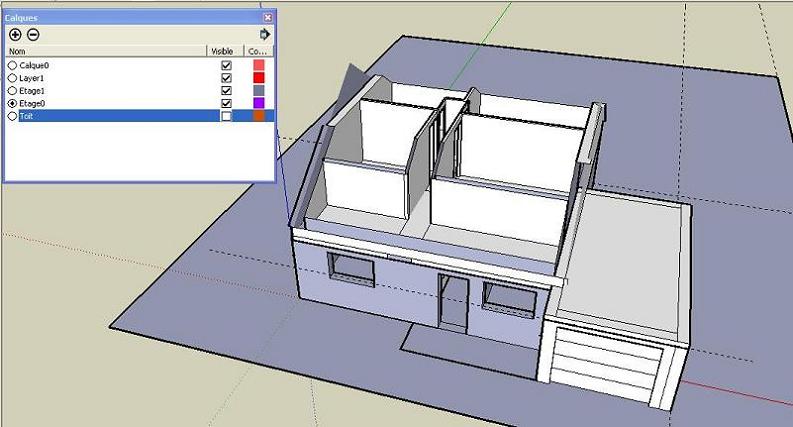
Anyway, presentation is nice ... and my first objectif is a volume study for an extension to be coming :
Many thanks for all the help I found on this forum.
Aegedus
Hello! It looks like you're interested in this conversation, but you don't have an account yet.
Getting fed up of having to scroll through the same posts each visit? When you register for an account, you'll always come back to exactly where you were before, and choose to be notified of new replies (either via email, or push notification). You'll also be able to save bookmarks and upvote posts to show your appreciation to other community members.
With your input, this post could be even better 💗
Register Login


Advertisement