Problems with a half-torus
-
@teig said:
@pbacot said:
Somehow your holes ended up in an odd position, partially showing insides of the bell shape
This is a bellmouth, it goes on outside of a carburettor - the rounded edges boost the adjoint of air that can be drawn in by ~6%. The two inner holes are atmospheric balance vents so have to be where they are.
So it's a case of reversing those two little faces. I get it now, I guess.
-
@teig said:
@box said:
A couple of things to note.
The faces inside your vent holes should be reversed, look up the hole it should be white.
I noticed your model was getting a lot of Clipping (when things sort of disappear when moving around or zooming in).
Two things are causing this and can be easily eliminated.
Your model is a long way, relatively speaking, from the origin. Working away from the origin can cause problems so it's best to stay near them as much as possible.
You must have changed the model origin at some stage too, best to reset that unless you specifically need it the way it is.
So if it was me, I would right click on one of the axes in open space and select reset. Then move your Group to that origin, explode the group to remove any possible oddities with the group origin, flip the two reversed faces and finally select all of it and make it a component.Yes, it moved from the origin when I scaled it, I had the origin bang centre at first. I don't know how to put it back right in the centre

Edit: fixed my axes now

-
Sub Stack11v6solidFinal.skp
@pbacot said:@teig said:
@pbacot said:
Somehow your holes ended up in an odd position, partially showing insides of the bell shape
This is a bellmouth, it goes on outside of a carburettor - the rounded edges boost the adjoint of air that can be drawn in by ~6%. The two inner holes are atmospheric balance vents so have to be where they are.
So it's a case of reversing those two little faces. I get it now, I guess.
I tried reversing the faces of the holes but they just went darker (indicates the inside I understand) so I'm not sure what to do?
Sub Stack11v6solidFinal.skp -
No, I meant this bit.
-
@teig said:
(I don't have a mouse)
Buy a cheap 3 button mouse, the type with the scroll wheel as the third button immediately. You will never look back. You can zoom/orbit/pan all at the same time while using other tools.
-
@unknownuser said:
it was no easier to work on when I multiplied it to 100x.
First: SU don't like these mini measures because operations between volumes generally fall!
(cut, boolean diff etc)Second: When you use a render this one takes many more time than with more normal unites!
That was the case for your object!
Third: try to import your object in an existing scene!
@unknownuser said:
"pasted welded".
In the reality how these 2 parts are built? Fondry ? (except the 3D Printing)
-
@box said:
No, I meant this bit.
Thankyou Box, well spotted
I have sorted those out.I then tried to save it as a solid but the entity info says it a Group(1 in model) I ran SolidSolver and it reported this:
**SolidSolver:
The Selected Group is still NOT 'Solid' !
77 Unfaced/Coplanar Edges Removed
0 Holes Healed
0 Small Faces Healed
26 Partition/Flaps Removed
0 Split-Edges Merged**Clicked on the 'yes' to get them removed and then this message:
**SolidSolver:
This Group/Instance can never be solved into a 'Solid'!
Try manually adding/removing Edges/Faces...
[Undo if appropriate]**I'm afraid I'm not sure how to find these edges and faces in order to delete them
-
Use a combination of Xray mode and SectionPlanes to 'look inside' the object.
You can select a face and press <delete>, or [where it's not 'destructive'] use the Erase tool to delete unwanted edges and related faces.To reiterate what was said several times before...
A 'solid' object cannot contain anything but geometry [guides are acceptable BUT best avoided]
That geometry consists of edges and faces.
Every edge must have exactly two faces associated with it.
No fewer, no more.
So that means...
No faceless edges.
No edges with only one face - e.g. around a 'hole' or forming the edge of a 'flap' or 'shelf'.
No edges with more that two faces - e.g. internal 'partitions' where some edges have three or more faces, or two otherwise solid-looking forms [like two cubes] sharing a 'common edge' - so that some edges have four faces !
No overlaid faces - this is rare, but sometimes two faces 'that ought to auto-merge into one' continue to exists and so their edges then have extra faces too !In your case the SolidSolver messages suggests multiple 'internal partitions'.
If these are too convoluted, then deleting one might then compromise what's left and so result in no solution...
In that case only a manual fix suffices...
My algorithms [aka 'brain'] isnot up to solving some of the complex balls-ups which you users can contrive !!

-
Teig, two of the holes on the bottom are causing the problem, as pointed out in the following image.
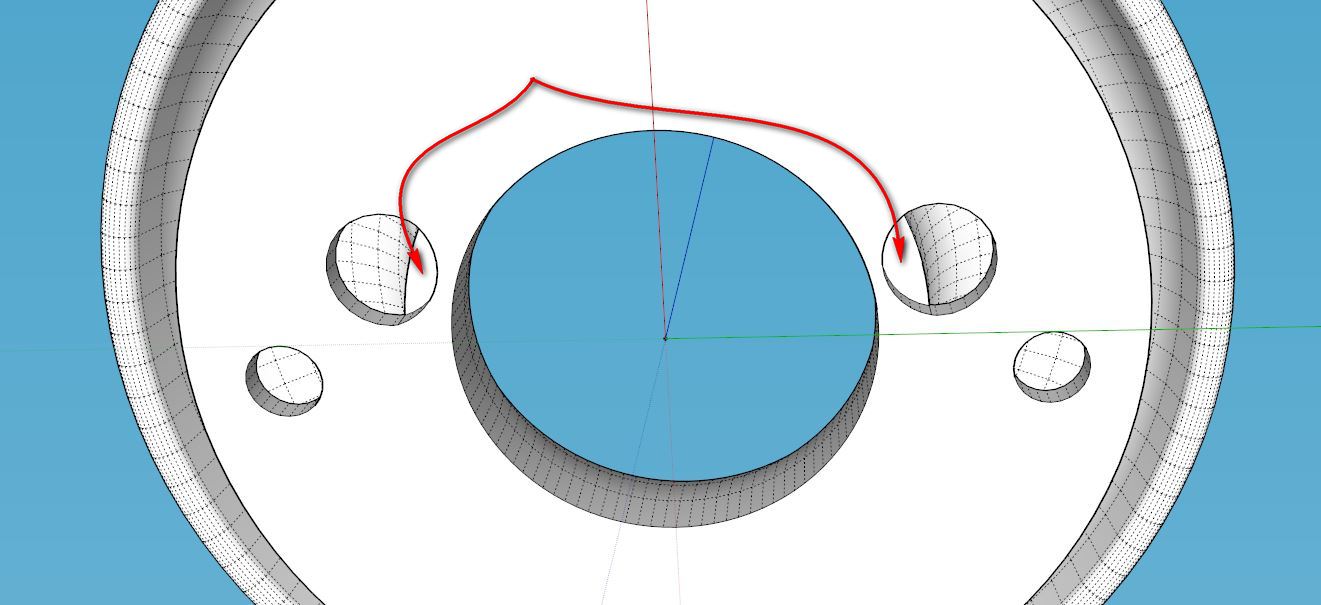
If you pull those 2 faces down a fraction of a mm and clean up the resulting internal faces, the model becomes solid.
@teig said:
So I don't need the supporting material if I go to a commercial printer? I'm starting to think that it might be the better option.
For a part with this complexity, you'd be better off. Something like Shapeways Strong and Flexible (S&F) plastic should work well. BTW, since this is a part for a carburetor, how hot would the piece get? Shapeways S&F melting point is ~180C.
ABS from a desktop printer melts at ~200C.
-
@tig said:
Use a combination of Xray mode and SectionPlanes to 'look inside' the object.
You can select a face and press <delete>, or [where it's not 'destructive'] use the Erase tool to delete unwanted edges and related faces.To reiterate what was said several times before...
A 'solid' object cannot contain anything but geometry [guides are acceptable BUT best avoided]
That geometry consists of edges and faces.
Every edge must have exactly two faces associated with it.
No fewer, no more.
So that means...
No faceless edges.
No edges with only one face - e.g. around a 'hole' or forming the edge of a 'flap' or 'shelf'.
No edges with more that two faces - e.g. internal 'partitions' where some edges have three or more faces, or two otherwise solid-looking forms [like two cubes] sharing a 'common edge' - so that some edges have four faces !
No overlaid faces - this is rare, but sometimes two faces 'that ought to auto-merge into one' continue to exists and so their edges then have extra faces too !In your case the SolidSolver messages suggests multiple 'internal partitions'.
If these are too convoluted, then deleting one might then compromise what's left and so result in no solution...
In that case only a manual fix suffices...
My algorithms [aka 'brain'] isnot up to solving some of the complex balls-ups which you users can contrive !!
I'm sorry if it doesn't sink in quickly... Your explanation there is useful - a bit more 'plain English' that I can understand
-
@d12dozr said:
Teig, two of the holes on the bottom are causing the problem, as pointed out in the following image.
[attachment=1:1wvyo62i]<!-- ia1 -->Capture.JPG<!-- ia1 -->[/attachment:1wvyo62i]If you pull those 2 faces down a fraction of a mm and clean up the resulting internal faces, the model becomes solid.
Thank you very much once again d12dozr.
 I pulled those faces down by 0.03mm, grouped it again, it reported back as a group sigh . I exploded it again, pushed the faces 'up', it wanted to snap to .04mm so I left it, did the other one. Drumroll It reported back as solid!!!
@d12dozr said:
@teig said:
So I don't need the supporting material if I go to a commercial printer? I'm starting to think that it might be the better option.
For a part with this complexity, you'd be better off. Something like Shapeways Strong and Flexible (S&F) plastic should work well. BTW, since this is a part for a carburetor, how hot would the piece get? Shapeways S&F melting point is ~180C.
ABS from a desktop printer melts at ~200C.
You pre-empted my next question
Either of those two plastics should be fine then, I can't imagine it getting over 180C even in traffic on a summer's day? The venturi will constantly pulling cool air over it as well.
[attachment=0:1wvyo62i]<!-- ia0 -->Sub Stack11v6solidFinal.skp<!-- ia0 -->[/attachment:1wvyo62i]
-
Great! It's a learning process, and you're getting a crash course
-
@d12dozr said:
Great! It's a learning process, and you're getting a crash course
You're not wrong there!!!

Just trying to get a quote now, had one for £43 which I thought a bit harsh so I'm trying some other companies now.
I can't see the plastic you recommended so I've just gone for 'standard' ABS.
-
-
Looks good!
You can use the soften edges window to smooth out some of the lines (no difference for printing, only looks nicer ).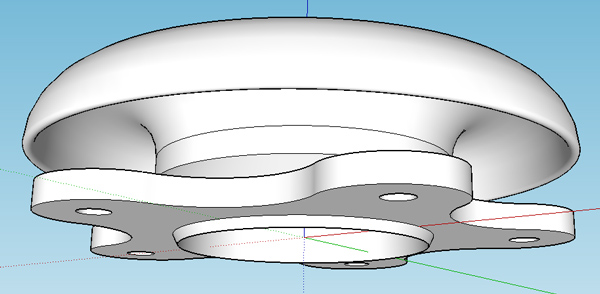
-
@teig said:
Just trying to get a quote now, had one for £43 which I thought a bit harsh so I'm trying some other companies now.
That's about the best price for a part of this size on a commercial printer. Cost on a desktop printer is about 1/10 that price, which is the biggest advantage of using one of them. With your newer design, you actually have a little more room for cleaning out support material.
@cotty said:
Looks good!
You can use the soften edges window to smooth out some of the lines (no difference for printing, only looks nicer ).+1
On the flip side, this is closer to what it'll look like after printing:
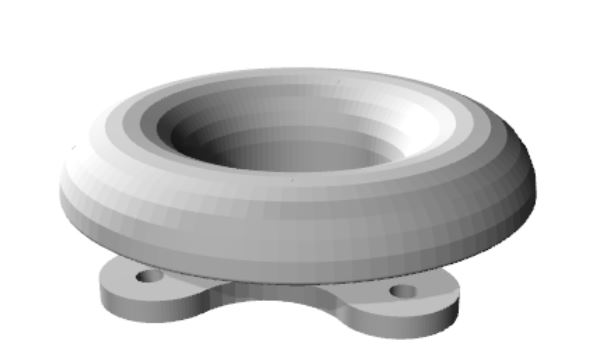
See the faceting on the curved bell surface? If you want that to print smooth, you'll need to increase the # of segments on the curves (Chapter 4 of the book). If the faceting is no problem, then you're good to go.
-
The faceting is a problem, I would need to polish all those off to a mirror surface, for the bellmouth itself at least, the mounting flange etc doesn't matter.
I've been told that some desktop printers will automatically build in support material so it looks like it's going back to that again -
Can I increase the number of circle segments now? Or will I need to redraw it from scratch again?
-
Definitely redo the model with higher resolution curves then - no reason to polish by hand more than necessary! Once you've push/pulled or follow-me'd, it has to be redrawn, unless you saved the intermediate steps like I show in the book.
Yep, pretty much any printer will automatically add the support material - that's whats shown in the T-rex model I posted before. Cleaning the support material is the tricky part, especially in an enclosed area like your model. Sorry if I didn't make that clear earlier.
Here's a video showing how the support material is cleaned out. On this particular model, it went very well.
-
Thanks again d12dozr, that is a real help. I thought I had to put in all those supports and had been scrabbling around the t'interweb trying to find where and what spacing you put them in at.
Back to the drawing board for v14 it is then....

Hello! It looks like you're interested in this conversation, but you don't have an account yet.
Getting fed up of having to scroll through the same posts each visit? When you register for an account, you'll always come back to exactly where you were before, and choose to be notified of new replies (either via email, or push notification). You'll also be able to save bookmarks and upvote posts to show your appreciation to other community members.
With your input, this post could be even better 💗
Register Login


Advertisement