Reversed Faces
-
I am preparing some models for 3D printing and finding that there are a bunch of reversed faces in my model. I do not understand why. Can someone enlighten me and tell me why this happening and what is the most efficient way to get them corrected?
-
Could you perhaps give us an image or a model so we can understand your problem better.
-
@box said:
Without any images, .skp's or other information the only answer possible is, Bad Modelling.
I will post one tomorrow but from looking at other posts, it seems to be a common problem.
In particular, the model I was just looking at has some four sided support beams that all have reversed faces.
-
I may be wrong but I seem to remember reversed faces being mentioned several times in your previous posts.
If it is white it is the front if it is blue it is the back. They need to be the right way around for 3D modelling. The most basic way to fix them is to right click each blue face and select reverse face. There are more complex and simple ways of fixing it, but understanding which face is which and how to flip it is fundamental.
-
If it is white it is the front if it is blue it is the back. They need to be the right way around for 3D modelling. The most basic way to fix them is to right click each blue face and select reverse face. There are more complex and simple ways of fixing it, but understanding which face is which and how to flip it is fundamental.[/quote]y
But I have colored most faces before I was a aware of all of this so now I can not just look at the model and identify the reversed faces.[quote="Box"]I may be wrong but I seem to remember reversed faces being mentioned several times in your previous posts.
-
Go, View menu, monochrome.
-
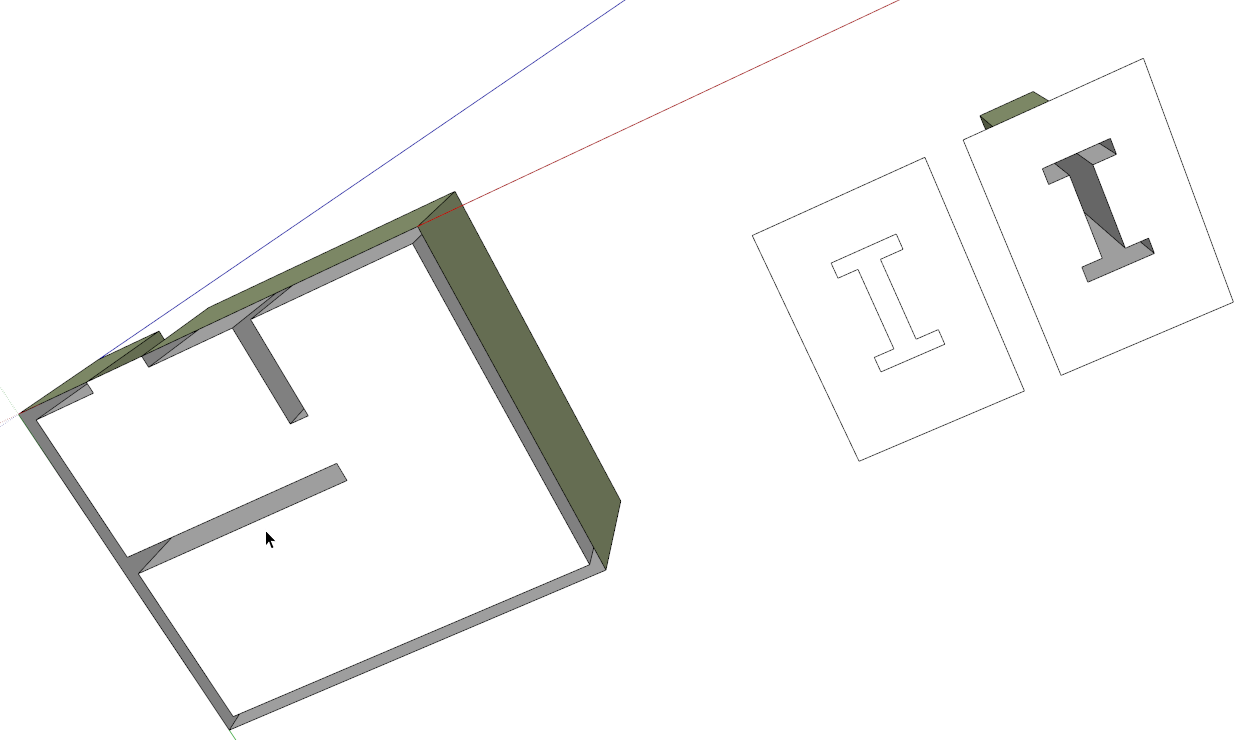
There are a number of reasons why you might have reversed faces. A very common one occurs when a shape is drawn on a face and then extruded on the side of that face's back side. This is common when people draw a floor plan on a face that was drawn on the ground plane.
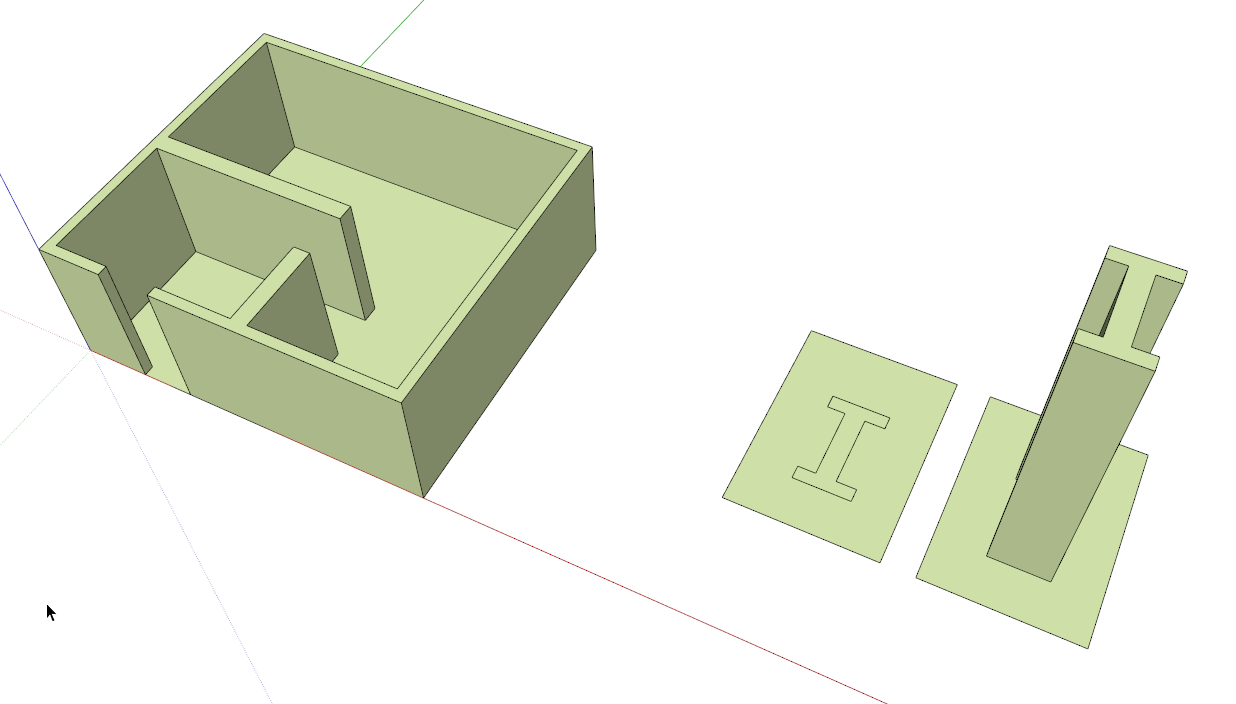
It might not seem logical that it happens that way but it is. If you look at the underside, there are holes. The exact same thing would happen if you were pushing a recess into a surface.
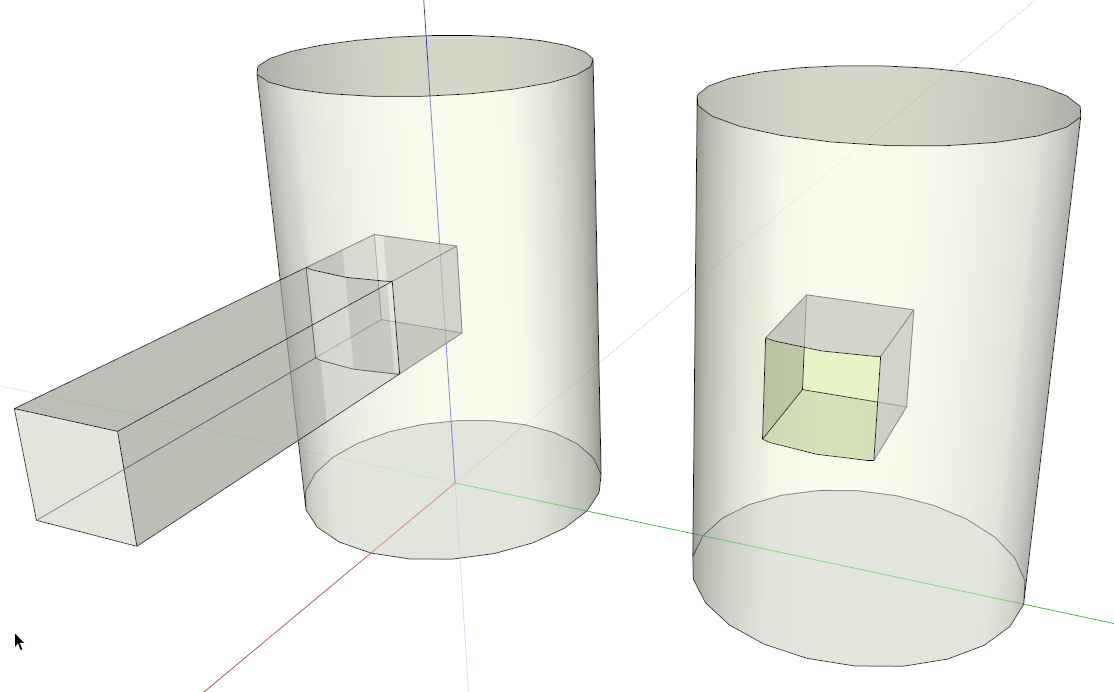
Another common cause is intersection of geometry. In this example the rectangular shape is used to put a hole in the side of the cylinder. Act the intersection and removal of the waste, the faces in the hole appear as reversed. That makes sense since the sides of the hole are actually part of the box and you're seeing the inside of the box in the hole.
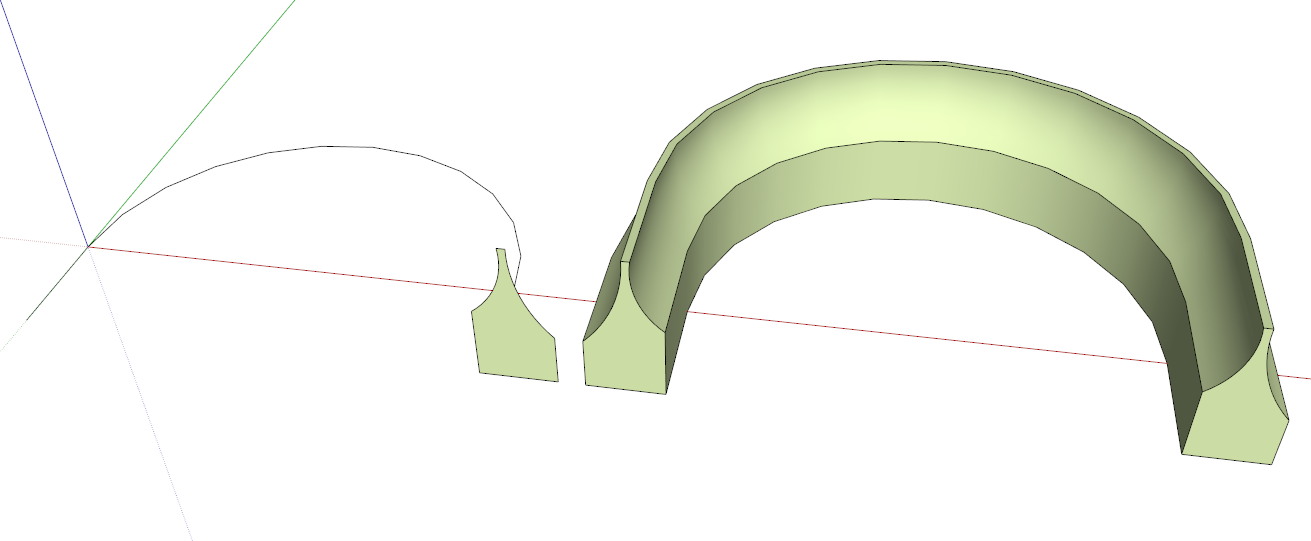
A third common cause is the result of Follow Me. It has to do with face orientation and the direction in which the path was drawn.
Sometimes it's going to happen. Don't worry about it but don't be sloppy in your work. Correct the face orientation as reversed faces occur. Newbies always seem to be anxious to get materials applied to their models. Don't do that. Do the drawing work first and make sure you've got good clean modeling before you spend time painting. And as Box indicated, work in Monochrome face style so you can see the reversed faces. While you're working on making clean models, also look for things like stray lines and unneeded edges and delete them. All this might seem like extra work but if you keep on top of it as you go, it's really not a big deal. And like most anything having to do with computers, GIGO applies.
By the way, I use the green you see in these images as my back face color. I find it easier to see even when there's just a tiny little hole in a surface. I find that the default blue-gray is easily mistaken for shaded white on many displays.
Oh, and when you draw a face on the ground plane, it is normal for the back face to be up. SketchUp is a 3D modeling tool and as such, it expects you'll make that 2D face 3D. When you do, that face typically becomes the bottom and the back face is automatically inside.
-
After checking monochrome as was mentioned there's a nice plugin called "front face" that you just drag the curser over all reversed faces and it automatically changes right. plugin by Tomaz in the Sketchucation plugin store. After installed you can find it under plugins menu "Start Front Face".
-
The direction of a face's outer loop edges determine the '
face.normal' - i.e. clockwise/counter-clockwise...
A face that is draw flat on the ground [z=0] ALWAYS faces down, regardless of the direction of its edge-loop.
This is because SketchUp assumes you will want to PushPull it UP into a wall, column etc AND keep its bottom face.
If aface.normalis in the direction of the extrusion you will get a 'hole' where the original face used to be.
[Unless you pressCtrlto force the original face to be retained].This unique behavior affects manually draw faces on the ground AND faces created in code.
If a plugin is coding a face to use with a
face.pushpull(distance)orface.followme(points), then thatface.normalneeds checking and then ido aface.reverse! if face.normal.parallel?(Z_AXIS) && face.bounds.z==0
Similarly a plugin making an extrusion with.followmewill have a some points to be used and it ought to be set soface.normal == point.vector_to(point1).normalize, so that the extrusion is NOT inside out... BUT again if the newface.normal **!**= point.vector_to(point1).normalizethen it's been flipped by SketchUp whenz=0 && point.vector_to(point1).normalize.parallel?(Z_AXIS), and so then it needs aface.reverse!to fix it before doing the.followme...

-
Dave R - You passed along some VERY good tips. I like the idea of the green back color as it is very obvious when you have the reversed face. I also like the tip of not applying any colors or materials until I am done drawing the model. This, coupled with the more obvious back color could be a great time saver in the long run.
@TIG - Some interesting information about the Ruby coding (I assume this is Ruby) but I am not doing any Ruby coding so hard to see how to apply any of the information.
I am going to download the plugin suggested and give it a try on my file. I am posting my .skp file as requested before so that you guys can give me more tips.
Now for some more "newbie" type questions:
- How do I create and save my own styles (want to apply Dave R's suggestion)?
- Since I am not an architect nor an artist, I sometimes struggle with this concept of drawing in 3D. I have downloaded plugins like Profile Builder and some others to help me when drawing things like structural beams and etc. I think the Push/Pull has lead to some of my problems (like changing the size of a cylinder with the Offset and the push/pull items a couple of you have mentioned. Now the question, what is the best method for people like myself to really learn to use the tool correctly?
- I have a collection of around 100 components that have been built to be used in models. Does anyone have a good approach for going back through all of those components and cleaning up these problems? Yes - I am going to assume there is no alternative than to just go back and painfully clean up some probable messes.
This thread has been a real eye opener for me and I really appreciate the feedback that has occurred/is occurring.
-
To change the back face color, go to Window>Styles and click on the Edit tab. You can change the face colors as well as things like the thickness of profile lines. I prefer those to be set to 1 while I'm working but there can be advantages to leaving them thicker for beginners. When you've made the changes you want, type a new name for the style and click on the little plus icon in the upper right part of the Styles window. This will create a new style for you. If you open the secondary pane of the window, the other plus icon not in the circle, you can set the secondary pane to maybe the Default styles library and drag the thumbnail from the top to the bottom. This will make that style available for future use.
If you want to make that style change part of your starting template open a new file, make the desired changes or select this new style from the Default library. Purge the unused style(s) from the In Model library and then immediately use File>Save as template... Make sure when you save it you tick the box for Use as default.
As for learning to use SketchUp properly/effectively, that's a hard one to specifically define. I think the thing to do is spend a lot of time practicing and reading here on SCF. Ask questions when you have them and pull the info together. A lot of it is like anything else, you have to practice to build familiarity and muscle memory.
Also read the help files from the Knowledge Base. Try not to learn bad habits.
Another thing to do is connect with someone who is proficient with SketchUp and see what you can glean from them. There are many good folks here who have good practices. The challenge is discerning good practices from the bad. That will come with time.
As to all your other components, your best bet is to go through and clean them up one at a time. Depending on the components you may find it is faster to just redraw them. There may be other things that need correcting or adjusting besides face orientation. If you are making components for later use, you might look at how they import into a model. Where is the component's origin and what direction are the component's axes aligned to. When you insert the component into a model can you just drop it in place and move on? Or do you have to fiddle with it to get it into the right location. Maybe now is the time to make sure they are easy to insert and use.
-
OK - I need some help/advise. I am attaching a SKP and a STL file for a component I am trying to get printed in 3D. I have used the Solid Inspector plugin and the Reverse Faces plugin (along with Dave R's trick of setting the back face to a green color - which I might say is a really neat trick) to inspect faces and make sure I have eliminated those two types of problems. However, when I view the STL file, it is still pointing out problem areas but I do not understand what is wrong with them.
I am hoping someone can point me in the right direction to solve these problems. I am going to have a bunch of models/components to review and want to understand this before I move on.
Mitter&WrapWashers_updated_4.skp
Looks like it is not letting me add the STL file

-
Dave C.
You probably aren't printing that whole machine in one shot? Maybe you should post the sketchup file of one solid object that you are having trouble with in STL.
-
@unknownuser said:
when you draw a face on the ground plane, it is normal...
A mystery solved!

But why if I reverse this blue ground face first and pull it up
I obtain the same "white box" ?
Maybe it's he same ystery!
-
@pbacot said:
Dave C.
You probably aren't printing that whole machine in one shot? Maybe you should post the sketchup file of one solid object that you are having trouble with in STL.
I did post it in my previous post...........and yes, I am selecting the whole model when creating the STL file.
-
I expect you'll need to go through and clean up so all the bottom level components/groups are solid. If you're 3D printing this you probably can't print it all in one go so breaking it up into sub assemblies is a good idea.
I'm curious but are these big rotating brush assemblies supposed to be off center?
-
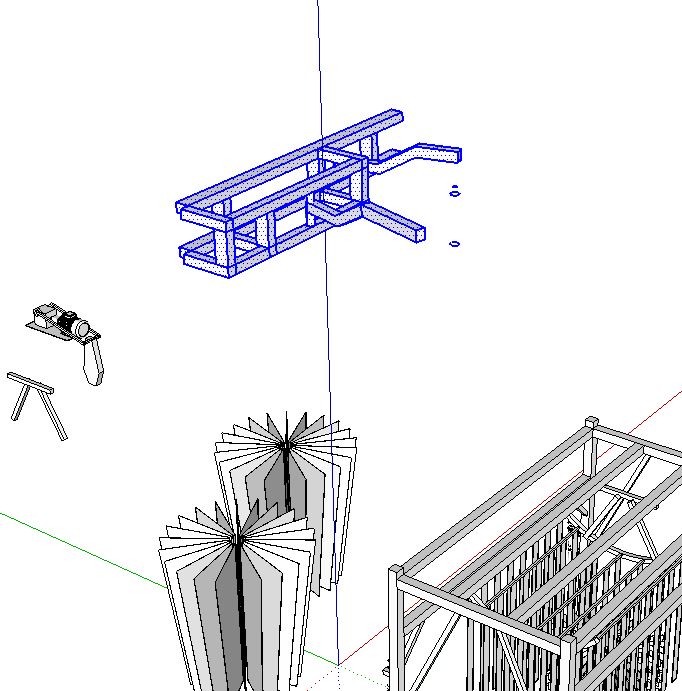
@dave r said:
I expect you'll need to go through and clean up so all the bottom level components/groups are solid. If you're 3D printing this you probably can't print it all in one go so breaking it up into sub assemblies is a good idea.
I'm curious but are these big rotating brush assemblies supposed to be off center?
[attachment=0:2sjix9d0]<!-- ia0 -->2014-02-26_12-06-21.png<!-- ia0 -->[/attachment:2sjix9d0]No, they were not supposed to be off center. The part that is out of alignment was something that was not solid. I moved it and fixed that but did not get them realigned correctly.
I actually did not draw this one. It was done by my predecessor. This is the first component that the client wanted printed so I am trying to clean it up. Not going real well so far.
I do not understand why it cannot be printed as one unit.
Please bear with me through this as I am trying to learn from this one.
-
What's the capacity of the 3D Printer? How big do you want the finished model?
As for cleaning it up, I looked it over and decided if I was tasked with that, I'd rather start from scratch and draw it correctly from the beginning.
-
@dave r said:
What's the capacity of the 3D Printer? How big do you want the finished model?
As for cleaning it up, I looked it over and decided if I was tasked with that, I'd rather start from scratch and draw it correctly from the beginning.
Thanks for the feedback. We are using a 3rd party for the 3D printing so I do not know anything about the capacity. I was thinking something along the line of 1" or maybe 1/2" to the foot.
I will probably not start over. Just trying to find out what with wrong with the pieces that keep showing up as problems in the STL file (about 5 or 6 of them - support arms). I have checked them for solids and have cleaned up the reverse faces. For what we are doing, I do not understand what you see as being so bad. Yes, I did mess up the alignment after I fixed the solids problem with the rotating brush but in the models that are built using these components, they show up fine.
This is a part-time endeavor for me (I am retired) and to date, the client has been very pleased with the results. We just attended an export this past weekend where these components were used in some animations allowing the viewer to walk through an entire car wash.
-
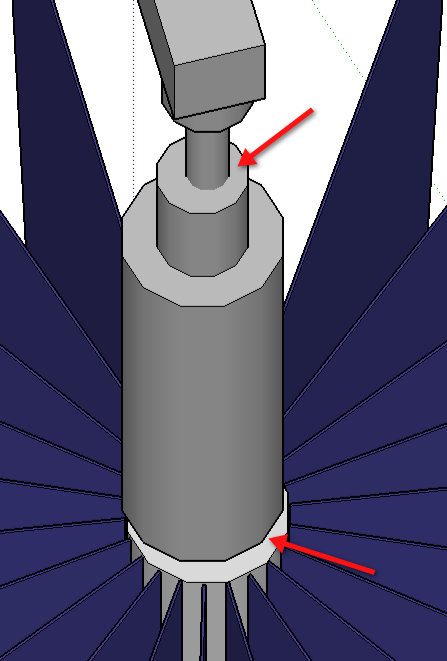
One of the first things to fix in the model is the highlighted section in the image, it is all loose geometry and therefore isn't a solid and can't work in 3D printing. There are other sections that are floating in mid air and parts that cut through other parts. And there are still some reversed faces on the mount of the motor.
Hello! It looks like you're interested in this conversation, but you don't have an account yet.
Getting fed up of having to scroll through the same posts each visit? When you register for an account, you'll always come back to exactly where you were before, and choose to be notified of new replies (either via email, or push notification). You'll also be able to save bookmarks and upvote posts to show your appreciation to other community members.
With your input, this post could be even better 💗
Register Login


Advertisement