How to create blurry and clear mirror material use an iMAGE?
-
Hi you all, i think if it's possible to use a a image/alpha mask that create blurry and clear mirror effect. can someone show me how to do it step by step?
attached an image to give you a better idea what im talkin about.
i tired to use vector file from adobe illustrator then the pattern which was curve became straight lines.

-
i wonder how to maintain curve when i imported curves from illustrator.

-
I would export your pattern as a "png" image file. You should also make a black and white version, which you can then use as a mask in your vray material.
Step 1. Generate a tiling (repeats in a consistent way) pattern from your illustrator file. (If you don't know how, I'm sure you can find a tutorial on Google.)
Step 2. Export a colored image version (in png format) to use as a pattern in Sketchup. (Make a new material in your Sketchup material editor)
Step 3. Export a b&w version to use as a mask in vray. (Make the frosted part pure black, and the brown background a pure white.)
Step 4. apply the material to your mirror surface, open the vray material editor.
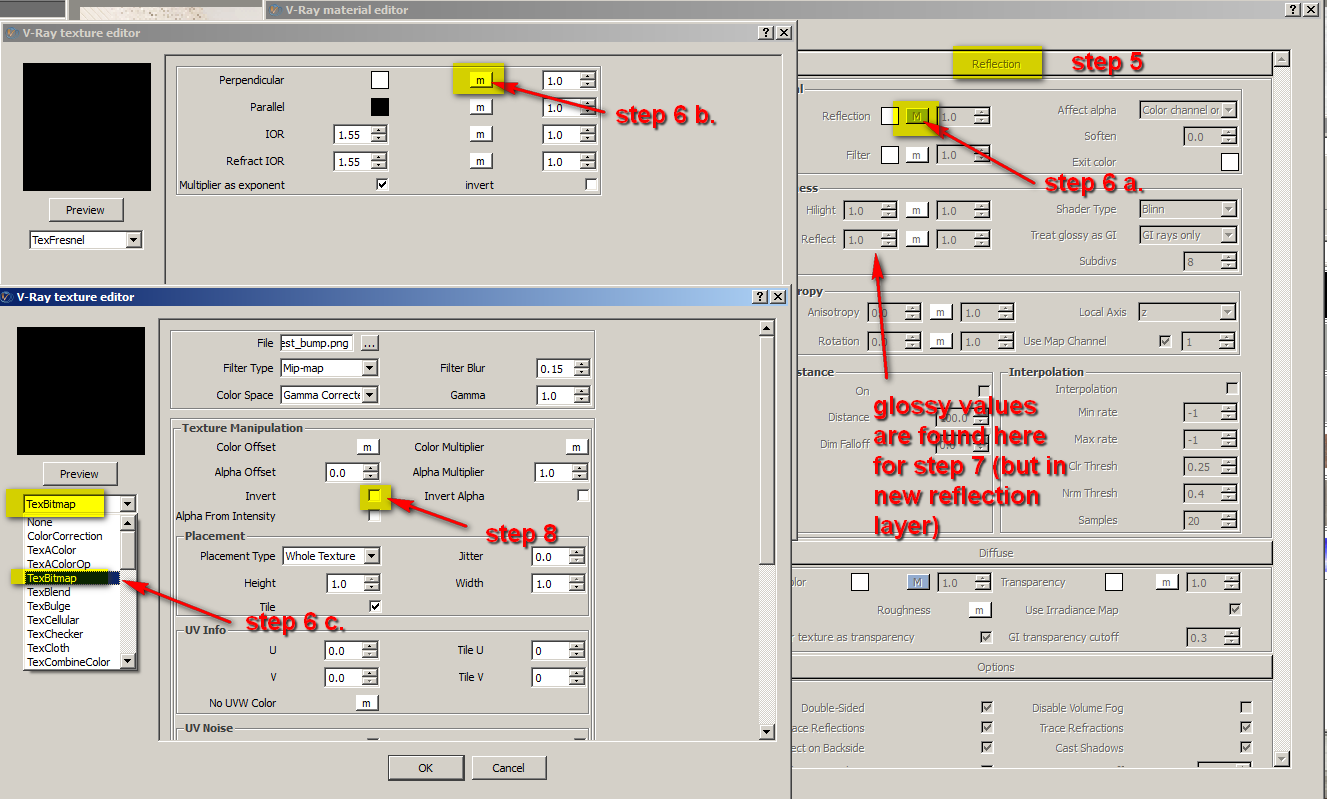
step 5. add a reflection layer in vray, change the filter color to the background brown color.
step 6. edit your "reflection" material (the blue "M") and in the "perpendicular" material (little "m" in white box) add in your mask material (choose "TexBitmap", the select your image file.)
Step 7. add a second reflection layer to your material. Change the "Glossiness" value for Hilight and Reflection to 0.6, change your subdivs to 16
Step 8. Check you material preview - if the pattern is inverted, you can edit the "Perpendicular" material mask by selecting the "invert" option.Let me know if any of these steps are not clear

-
hey andobot!! i owe you a lot!!! it worked!!!! after following your step by step instruction, i finally successfully did it. Thank you thank you thank you!!!
my thoughts:
1.i didn't set the blurry reflection to 0.6 though, it's too much it kills the reflection. i set it about 0.85. i guess it depends.
2. think texture map = photoshop mask. that helps me understand the concept in this situation.again thank you andybot! really appreciated!


-
@sketchuh said:
hey andobot!! i owe you a lot!!! it worked!!!! after following your step by step instruction, i finally successfully did it. Thank you thank you thank you!!!
my thoughts:
1.i didn't set the blurry reflection to 0.6 though, it's too much it kills the reflection. i set it about 0.85. i guess it depends.
2. think texture map = photoshop mask. that helps me understand the concept in this situation.again thank you andybot! really appreciated!
 You're very welcome!
Glad you were able to adjust everything to your needs (there are indeed many many options
 )
) -
Sweet material and sweet tutorial Andy.
Hello! It looks like you're interested in this conversation, but you don't have an account yet.
Getting fed up of having to scroll through the same posts each visit? When you register for an account, you'll always come back to exactly where you were before, and choose to be notified of new replies (either via email, or push notification). You'll also be able to save bookmarks and upvote posts to show your appreciation to other community members.
With your input, this post could be even better 💗
Register Login


Advertisement