Problems drawing a surface for a roof
-
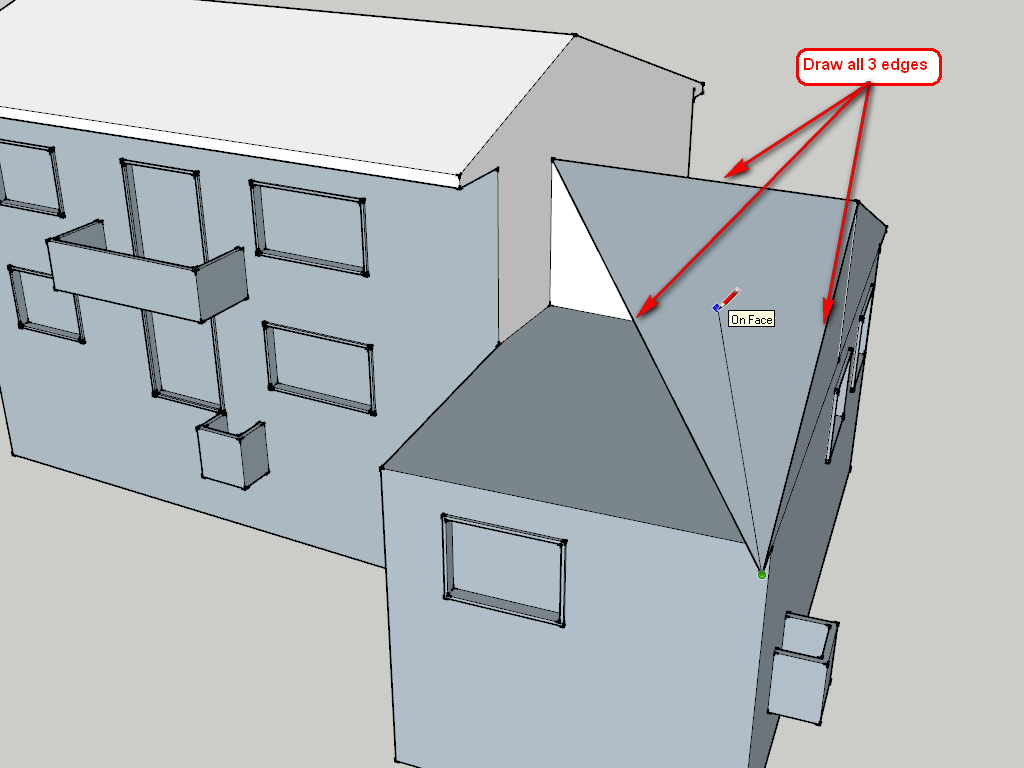
You can also use "On face" inferencing to start with. Since your whole building is grouped, draw all three edges of the only triangle you know needs to be on the final face. Then from the corner, start pulling the line tool and wait till it says "On face"
Now press the Shift key and keep it dow then pull the line tool somewhere way aside.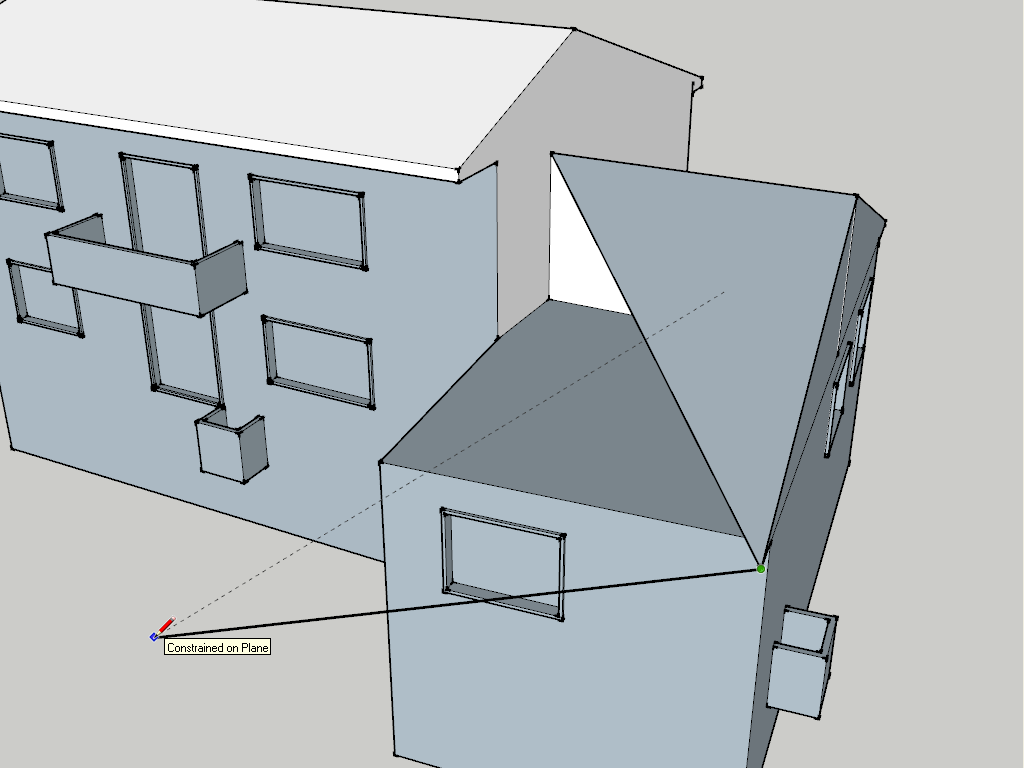
Click there to finish an edge then close the second triangle on the endpoint of our first triangle. At this point, we could even delete the dividing edge as our two triangles are already coplanar.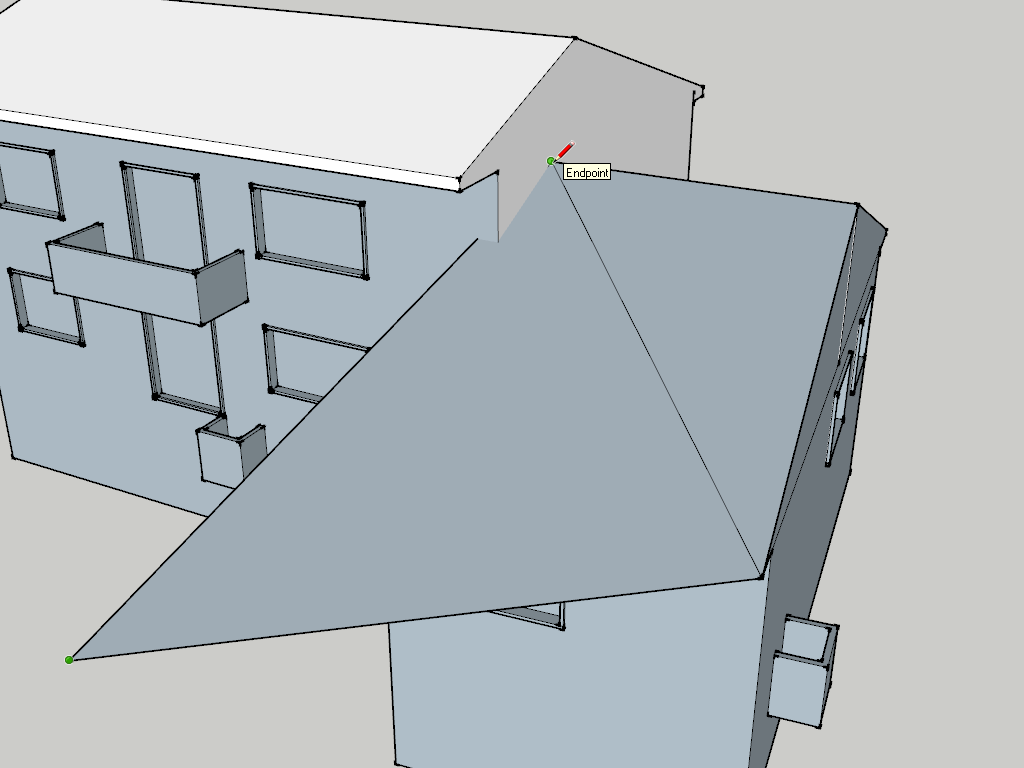
Now start drawing a line vertically from the end of your building.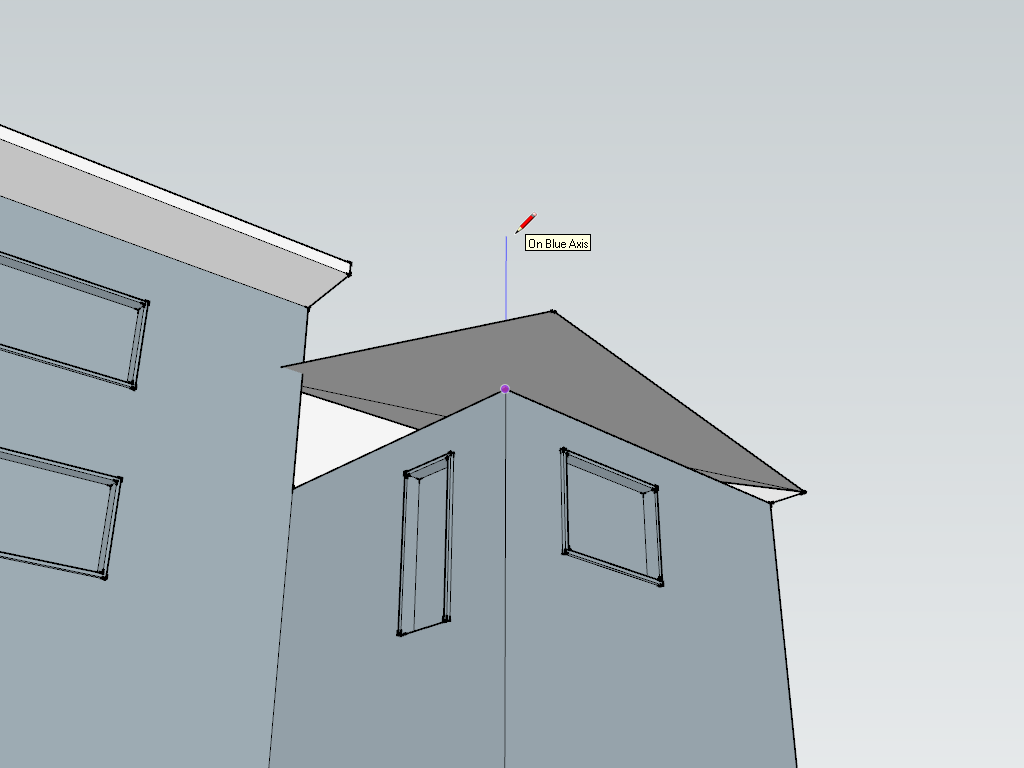
Draw another one matching the height with the previous one.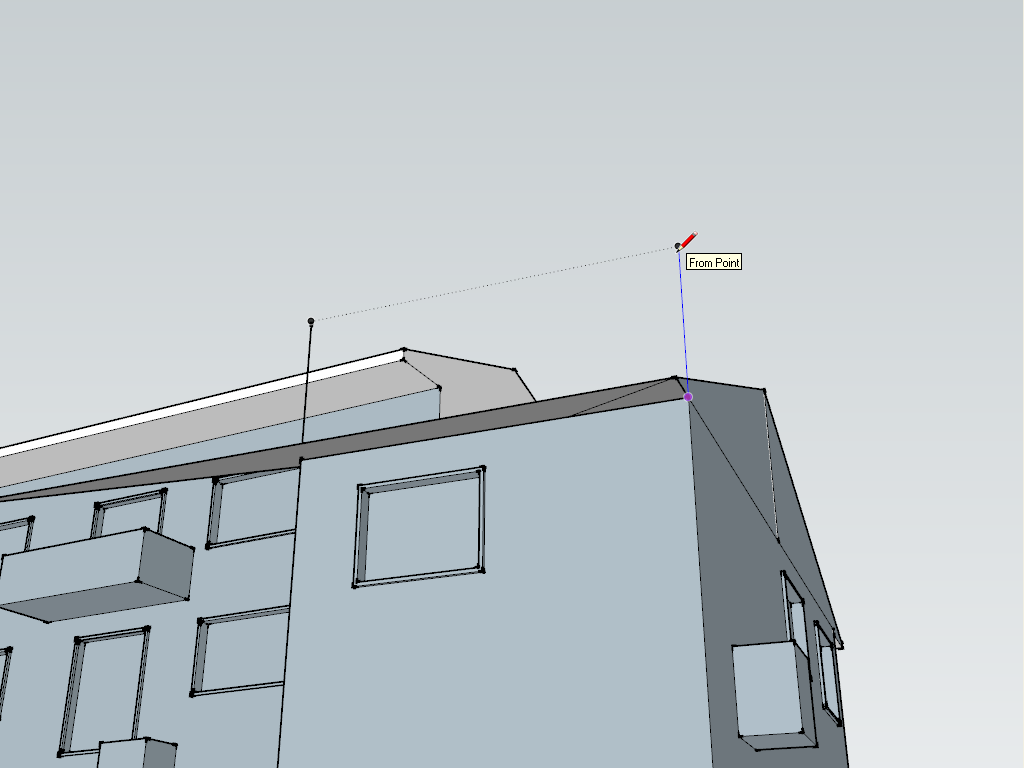
Once finished the top and bottom edges too (remember to draw the bottom as the building is a group), you can use inferencing from endpoint to intersection to set the edge of the roof. At this point you can already delete the rectangle above the roof.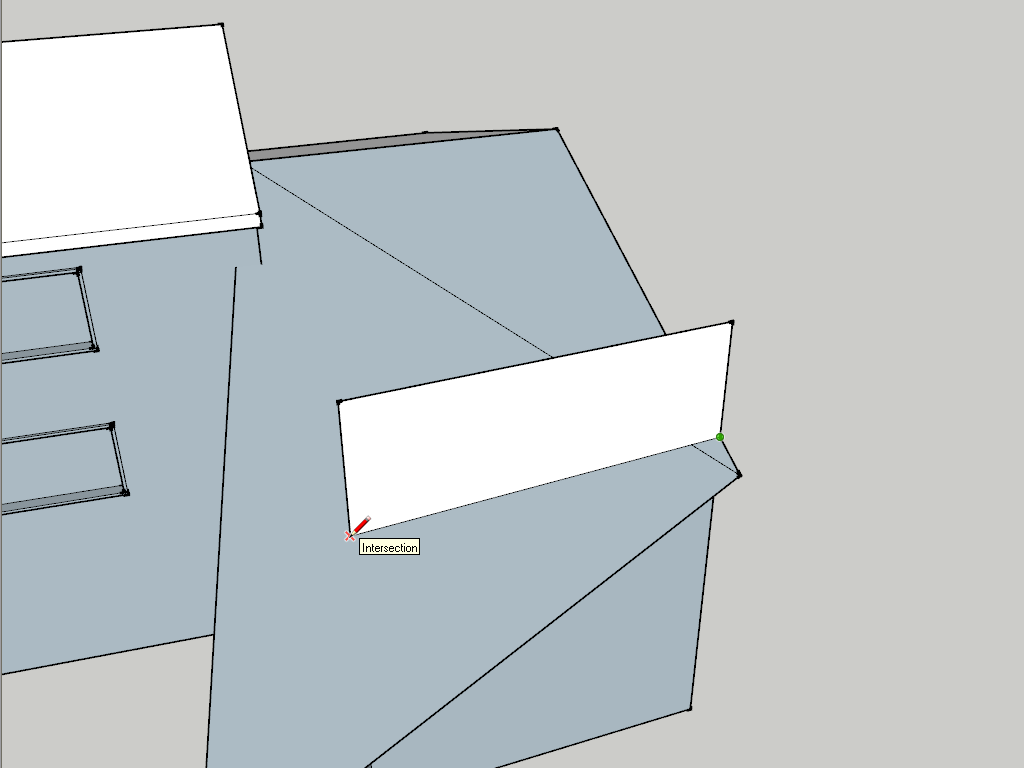
Now draw the other edge of the roof again, from endpoint to intersection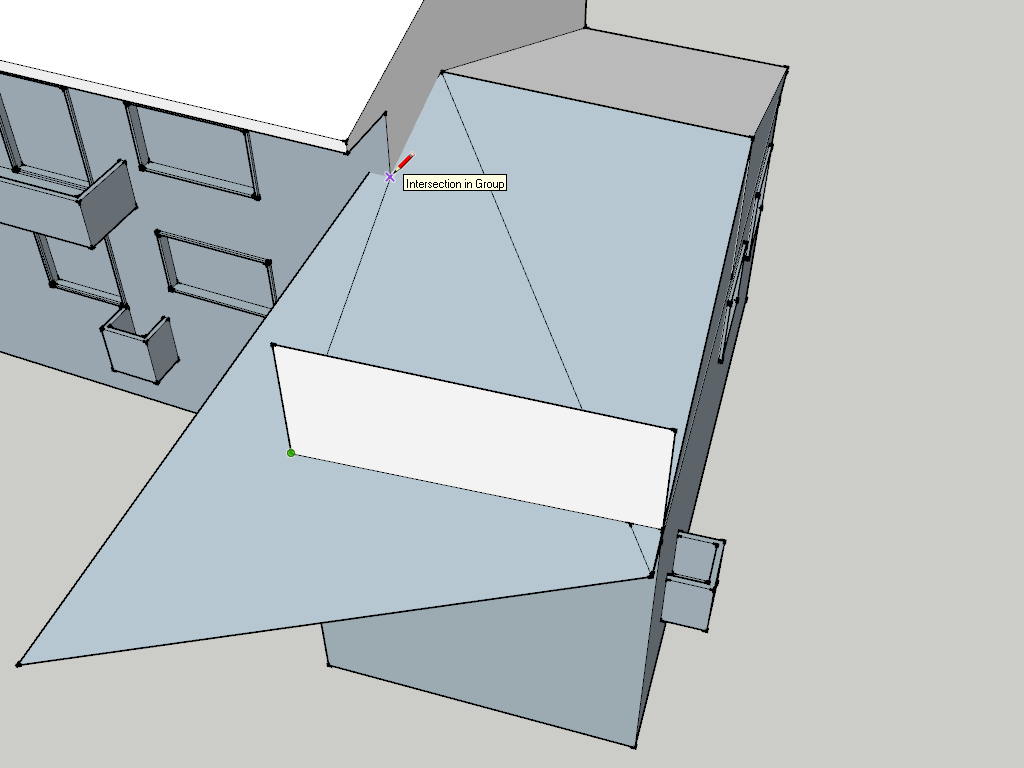
Finally finish the roof returning to the top endpoint.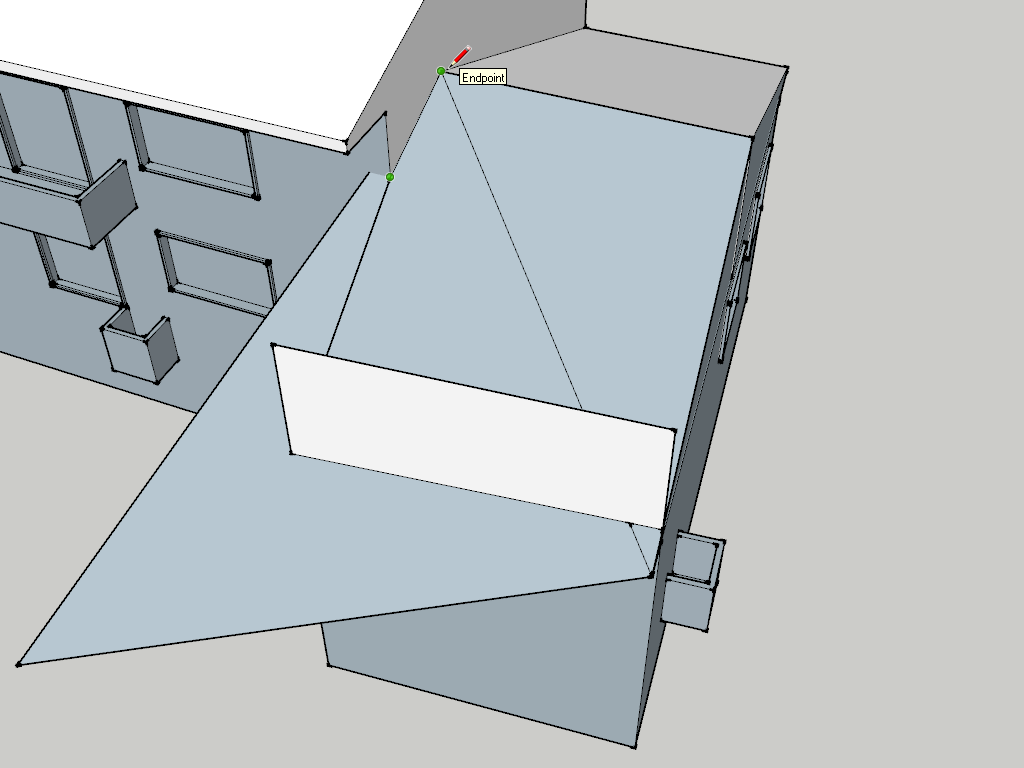
You now only need to finish the soffit (?) part and you're done. Delete unwanted geometry and finish faces missing on the sides etc...Here's the model (I made this part of the roof a separate group). There are a whole bunch of other issues but you will learn as you go.
-
Almost off topic...
Many of your faces appear to be 'reversed'.
The blue-gray back material should always be inside.
You texture the faces' fronts.
You can check this later using using View > Monochrome mode even after texturing...
It's important to keep faces properly oriented as you model... otherwise reversed faces will pushpull unexpectedly, and many third-party renderers will only accept materials on face-fronts, so if later on and you have loving applied your materials onto the wrongly oriented 'backs' you'll get surprising results - with renderers varying from default back-face material from white to black, or even 'transparent'.
The easy to use tools to keep things in order are in the default context-menu when faces are selected - Reverse and Orient... Learn to use these... Making a shortcut key to each is recommended... -
Exactly. That's why I also added "There are a whole bunch of other issues but you will learn as you go." (I was just too lazy to go into details after that long post.)

-
I would be curious to know what the reason is for that skewed face. The angle is so minimal, it doesn't seem to be a design expression.
-
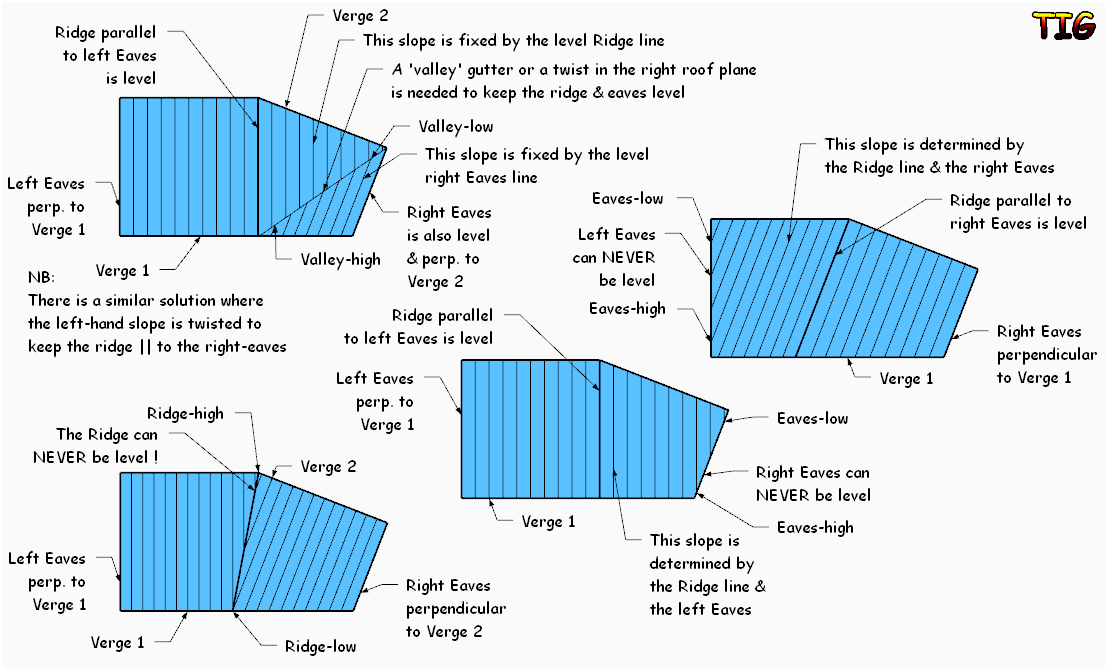
My thought for drawing that roof is to look at how the real thing was built. Since you have it available, take a look at it and see if you can get an idea of how the surfaces were built. Where does the ridge line hit the house? Is there some sort of shallow valley? Or did they build in a twist.
I agree with Tim. The angle seems strange to be a feature.
-
Hi Adrian, hi folks.
Not only is this part skewed relative with the rest of the house but this front part is not square.
See Scene 2 of this file for ideas.
-
Assuming the side extension is indeed at a slight angle in plan to the main house...
The eaves, front and back, are shown level.
Irrespective of the font/back roofs' slopes, if they each have a single single plane then they will intersect forming the ridge line, but that can't be horizontal unless the roofs themselves 'twist'.
It's basic geometry...
Here are some of the permutations...
-
On second thought: It did not immediately occur to me that this "skew" may be an existing condition, and the OP has not yet introduced any new construction geometry. I just assumed that this was a new addition and new roof to an existing house.
-
That can indeed be the case as he says "I am drawing our house to use it later as the base for a building application". Here, downtown (the historic centre of my city) you can hardly find a rectangular building for instance. These Medieval masons must all have been drunk when working.

-
So, my next word of caution would be--if this is existing concrete slab-- to verify the bearing capabilities of that slab before imposing significant weight of construction.
-
Hey, thank you all for your help and comments!! I see, I have to learn a lot...
Especially, thanks to Gaieus for this step by step guide.And yes, the floor plan is exactly according the drawings. (The house was built in 1961.)
-
Not sure, but some medieval masons may still have been working in 1961.
-
Hi Jean Lemire
Thank you too for your drawing and your tipps in the drawing.
I have one question: your lines looks much smoother than mines / i.e. the basic points are not shown in your drawing. This looks pretty bether than mine.
How can I achieve that? -
You are probably speaking about endpoints and such. Go to Window > Style > In model (that small house icon) > Edit and the first icon is "Edge settings". There you can turn endpoint on/off (or give them some less emphasized size), adjust profile width etc.
Note that these settings are not only aesthetic things but can often help trouble shooting issues. For instance, if a set of edges (dividing a larger face) are thin, they actually merge into the face and create smaller faces but if you have profiles on and see thicker edges, they indicate that they do not merge.
The same way, being able to see where endpoints are can be advantageous when dealing with something more complex.
-
Gaieus beat me to it, but since I already typed it here's my equivalent...
Play around with different Sketchup menu Window > 'Styles' from the installed Styles list- save them in Scene-tabs for comparison purposes - OR try editing your current Style's settings [model-tab > Edit] and/or save that as a new Style.
The way faces and lines display etc is determined by the Style's various settings...
For example 'end-points' are shown at the ends of lines - useful when modeling so you can readily see the ends, but for a final printed version you'd probably switch over to another Style that doesn't display them...
You can 'export' [save_as] your own Style into your Styles folder for reuse in other SKPs later, or even better make it the default Style in a new Template - save an empty SKP that uses that Style 'as a Template' - tip: also setup your preferred dimensions, text etc in the Template too, so that it's as you want next time you start a new model... -
Also, you can set up different scenes with different styles. This would allow you to have a "nice style" in one scene and a "trouble shooting style" (which would probably also be "heavier" for SU) in another. In this case, turn off camera settings in the scenes so that they do not go elsewhere but stay where you are when switching scenes.
-
Hi badera, hi folks.
@badera said:
Hi Jean Lemire
Thank you too for your drawing and your tipps in the drawing.
I have one question: your lines looks much smoother than mines / i.e. the basic points are not shown in your drawing. This looks pretty bether than mine.
How can I achieve that?If you read the text that I attached to your model in Scene 1, you will see:
**Your model. I took the liberty
of changing the **styleand reorienting
the faces so the front of all faces is
outside.Just ideas.
Hello! It looks like you're interested in this conversation, but you don't have an account yet.
Getting fed up of having to scroll through the same posts each visit? When you register for an account, you'll always come back to exactly where you were before, and choose to be notified of new replies (either via email, or push notification). You'll also be able to save bookmarks and upvote posts to show your appreciation to other community members.
With your input, this post could be even better 💗
Register Login


Advertisement