FREE Maxwell Render for Sketchup (free version).
-
I'm probably not the right person to ask about that -- I paid full price for the Maxwell Render Suite, so to me the stand-alone plugin is a great deal.
Best,
Jason. -
I understand...for my purposes, doing this just as a one-off for my own project, I can't invest in a paid version if a very good render plug-in (for my needs) exists. My concern is making the best choice among those.
-
@mmm717 said:
I understand...for my purposes, doing this just as a one-off for my own project, I can't invest in a paid version if a very good render plug-in (for my needs) exists. My concern is making the best choice among those.
Mate the paid version of the standalone (not the suite) is very cheap! Though if you still want a free plugin, I doubt you will find one with the shear ease of use and certainly no where near the results. Most free render apps are free as they can't sell them. In Maxwell's case they have just put limits on the available features!
-
I agree. I'm sure it's a great value. At the same time, at least coming to this world for the first time, I've been very impressed with what is provided for free. It's a great program, even if waiting for rendering to occur can sometimes be like waiting for paint to dry. That's probably at least partly due to my computer though.
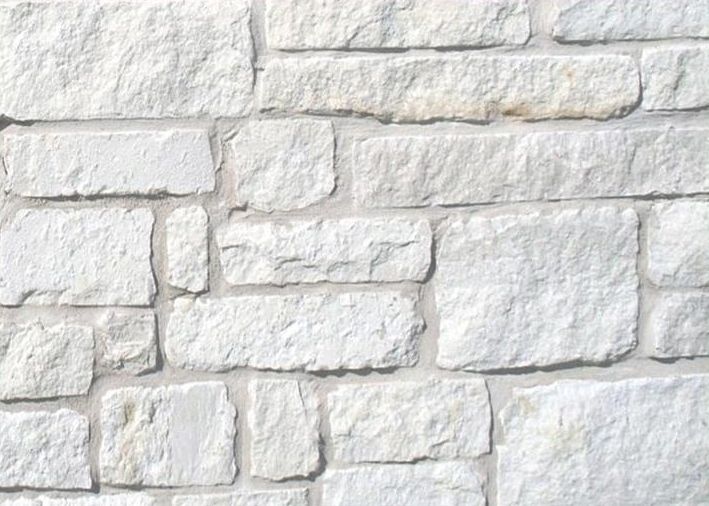
I am having a problem with rendering one of my materials. The file looks like this, before any changes within Sketchup or Maxwell:

I tried a bunch of different material types for this and ended up on SSS, but I don't know that this is ideal either. Within Sketchup (before rendering) I remember making just minor adjustments to the file (maybe adding just a touch of saturation), which kept the basic look but brought out just a bit of the color within the stones (the goal for these is to still stay basically white for the stones themselves, plus the color of the fill seen between the stones). I also set the dimensions in Sketchup for the material to 2' 6" wide and 1' 9 7/16" high, which made the stones look the size I want them. In Maxwell, I have the SSS material type set to:
7% roughness
7cm thickness
402.23 density
-28.49% asymmetry
0 change to saturation
+5.75 brightness
+7.25 contrast
no inversionFrom a darkness/lightness standpoint, it looks OK (the above adjustments basically have helped with that more than anything else), but I'm not easily making the stone texture visible. I once ran a render with the resolution all the way up to 800 pixels and a high stitch level, and I don't remember being able to make out the stones in any useful way until the stitch level crept up to at least 10 or 11 IIRC, and that was at a somewhat close distance to one of the objects using this material (the project is a moderate sized motel). Pull away from things (as I will have to for some shots), and I'm seeing more of a textured off white than anything, which is not the goal. Part of the design is to be able to see these as stones.
Any suggestions re material type to better render the above? Settings/adjustments to help at least get things "in the ballpark"? Something that I should be doing but I haven't (or vice versa)? Anything else?
Thanks again in advance. This forum has been quite helpful with my few questions so far...

-
I'm no expert but I am trialing Maxwell as well. I tried the texture you put up and got a pretty good stone look with just "automatic" setting at 97% roughness (default setting) the bump is at 100 and looks pretty nice... I notice the texture is not tiling seamlessly.
So maybe that will help until the experts arrive.
-
Thanks.
Stupid question - I haven't done anything with bump so far (and might be what I need to get this to look OK). When I click on the "bump" button, it shows a setting as a default with -100 saturation, leaving the image black and white. What am I supposed to do with bump? If this is in the manual pdf, let me know - I don't want you to type something unnecessarily...
-
Thanks. I'm trying adjusting the bump strength. It didn't seem to help with using automatic/default, and I'm waiting on a render with the SSS settings noted above and will see how that goes.
I don't see any controls that say displacement. Is displacement the min/max settings? I haven't altered those at all from default...
-
Oops yes the setting is -100 (minus). Yes the bump should be covered in the manual. If your texture warrants it you can adjust strength with the settings. Bump and displacement are to create the 3d appearance for the texture. Sometimes you use a specific bump map to get the effect you want, or it might be based it on the texture itself.
-
No, displacement is another mode like bump (you choose it by clicking where it says "mode"), but capable of more extreme molding of the shape, and more time consuming than bump. You might look at this tutorial by Jason that has some information on bump. Clip number 3/8
http://www.maxwellrender.com/index.php/maxwell_for_google_sketchup/tutorials -
Great, thanks! Jason's videos are excellent, and really helped me in getting this far. I've already watched the first seven, but will look at #3 again...
-
Mate you will get all sorts of issues turning on displacement unless you divide the surface up a lot! Plus additional render times.
Peter is right that this material should work well just as automatic, though I would reset the colour in SU prior to rendering with fire and make any adjustments to the material in the plugin. Weird things can happen when you add colour to the material in SU.
Certainly SSS would be the right kid of material for this stone in the real world but use some caution rendering, and if you do use SSS then ensure the geometry has volume!
-
@richard said:
Mate you will get all sorts of issues turning on displacement unless you divide the surface up a lot! Plus additional render times.
I see that!

I tried displacement with around a 27mm setting, and it really didn't help me. I then tried 56mm, and I can't even get it to render. The manual states there are two different displacement modes (one with a note that it is harder to render than the other), but my computer isn't giving me a choice of displacement modes for whatever reason. Maybe that's all the free version has...
I'm going to try an in-between displacement size and see if that will render...
-
This thread has more info about using displacement based materials in SketchUp: http://www.maxwellrender.com/forum/viewtopic.php?f=107&t=38223
However I would avoid displacement based materials whenever possible if you are rendering within SketchUp since you are limited in RAM.
Materials are a very complex topic (possibly the most complex issue when dealing with Maxwell) and if you really want to learn more about them in depth then it might be worthwhile watching these series I made:

Maxwell Render 2 Training Videos
This VTC online course on Maxwell Render 2 is designed to get you up & running with Maxwell Render quickly & effectively. Sign-up today to learn more.
vtc (www.vtc.com)
They are both a little dated (mostly in the fact that they pre-date FIRE) -- but the materials related content is still valid and it would likely save you many hours of trial and error.
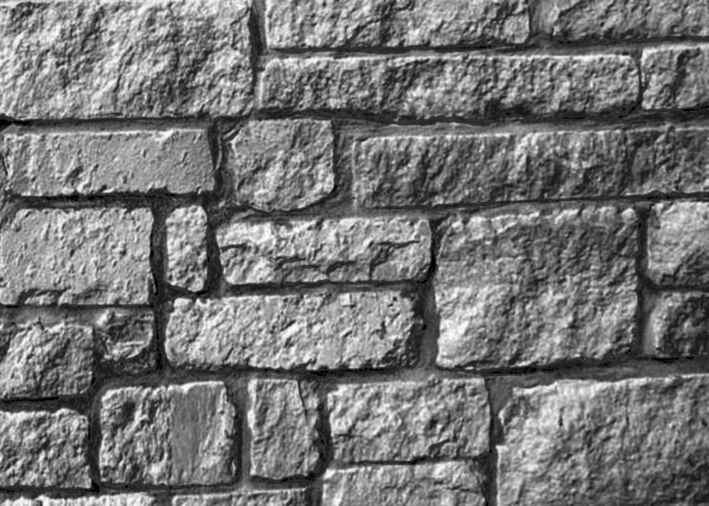
For instance, what you have here is not likely to make a good bump map because the contrast is too low -- which is perfectly natural considering it is white rock. So you would want to increase the contrast (and possibly modify the brightness as well) so that you get dark "darks" and light "whites" in the texture for the bump map, which will significantly improve your resulting detail (this can be done much better in Photoshop using levels if you know how). Here's a quick example of a what a better bump would look like:

When you start getting into textures you often come up against the issue of "baked in lighting" (as you have in this texture) which can be a real problem -- better quality textures are photographed in such a way as to reduce "baked in lighting"... which will make the resulting material render much better.Best,
Jason.
-
Thanks for your help, Jason. Are there any of these videos in particular that I should take a look at that best relate to this issue?
-
Not particularly -- it's more of the fundamentals of the material system (in relationship to the rendered output) and the SketchUp to Maxwell series expands on those ideas to talk about the embedded character-type materials and what their strengths and weaknesses are.
The idea is to get a solid foundation in what the various materials settings do in Maxwell and how you can bend them to your desired purpose with the least amount of trial and error possible.
If I've seen any one area where more people are confused than any other (in regards to Maxwell) it is definitely materials -- it is really important to understand the fundamentals of the system to avoid wasting your time... I would just start with the free videos and I bet that would be enough to answer many questions already for you.
Do bear in mind that I recommend anybody using the stand-alone plugin to download the trial version of the full Maxwell Render Suite to have access to MXED (allowing you to create your own custom MXM files for use in the plugin).
Best,
Jason. -
Thanks Jason! You've been a big help...
-
I've been considering adding some trees/bushes/etc. to my model. I looked through the Sketchup 3d warehouse, and tried out these two first:
When rendering in Maxwell, the both the tree and bush are rendering 2d/flat instead of 3d.
Should I be looking for a particular type of model that appears 3d in Maxwell? Is there something I can do to make the above ones (or others) appear 3d, even though they're showing 2d presently?
Thank you...
-
SketchUp can't convert a 2D image to 3D. Try searching the warehouse for a 3D tree.
-
Thanks. I thought these were both 3D models, since each page allows for a "3D View", but I guess not!

-
Can I keep Kerkythea plugin in SU at the same time or would it cause conflict?
Advertisement


