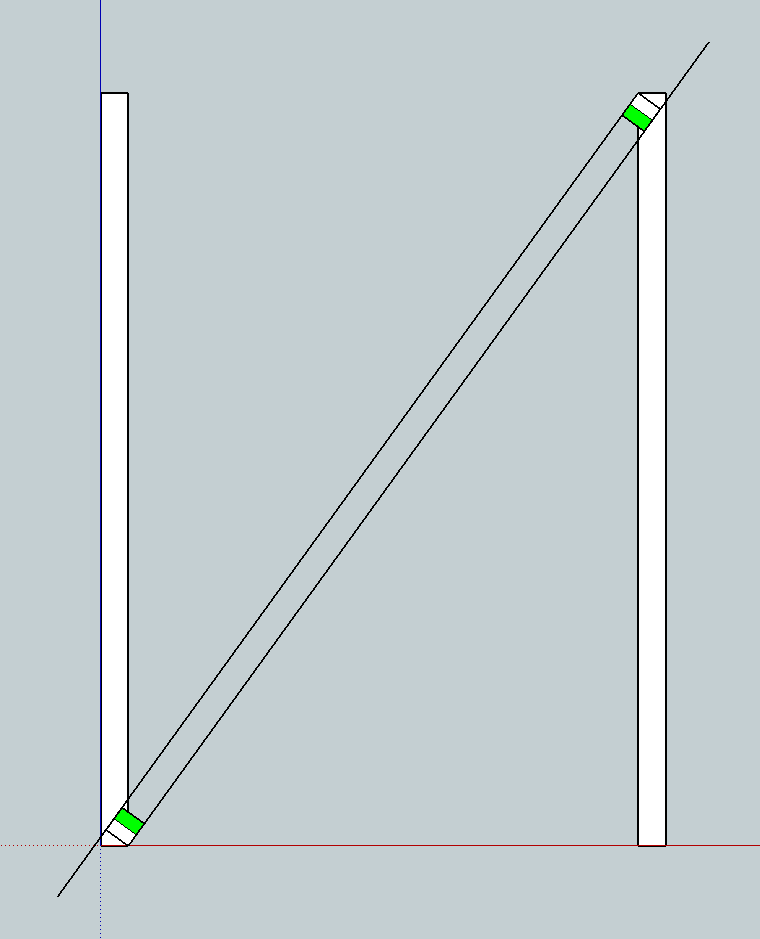
Mini-challenge
-
TIG,
To me the problem is that d/2 should be measured perpendicular to the final edge, not the diagonal.
Peter
-
@pbacot said:
TIG,
To me the problem is that d/2 should be measured perpendicular to the final edge, not the diagonal.
Peter
Exactly right - I was adding that to my last post as you posted...
The difference between offsetting the diagonal and the sides is the error.
-
@pbacot said:
Gilles,
I Have no idea how you figured that out
 One snaps to a line that is not there until the execution. That's wild!
Peter
Indeed - components interacting with each other during manipulation has always been baffling to me. Some things work and some don't (for example try to move a line in a mirrored component so that it's on the mirror plane - it won't snap to the other side, it'll just keep going past the mirror plane)
-
I have yet another 'drawn' solution...
I can't fault it... but then again... you might...
-
@tig said:
I have yet another drawn solution... I can't fault it but then again...

that appears to work... instead of copying the line up by the thickness of the brace, i +rotated about the center of the original line 180d. then traced over everything to get my shape.
except, when i use the tape, with 0.000000 accuracy, i get 5.995197, instead of what should be 6" in my example.
copying the bottom line up 6" (2x the measurement i used for 1/2w) should yield better results, but then i'd guess that the top or bottom would be off. or the rotate tool is inherently inaccurate.
-
@unknownuser said:
I Have no idea how you figured that out One snaps to a line that is not there until the execution. That's wild!
The line was not here but exist so you can interact with, I use this technic frequently.
-
A slight variation on TIG's
-
@bmike said:
@tig said:
I have yet another drawn solution... I can't fault it but then again...

that appears to work... instead of copying the line up by the thickness of the brace, i +rotated about the center of the original line 180d. then traced over everything to get my shape.
except, when i use the tape, with 0.000000 accuracy, i get 5.995197, instead of what should be 6" in my example.
copying the bottom line up 6" (2x the measurement i used for 1/2w) should yield better results, but then i'd guess that the top or bottom would be off. or the rotate tool is inherently inaccurate.
Move+Ctrl to copy the bottom long-side lines up to 'T' [as there are two lines, split by the width/2 perpendicular line...] moved up to the top of the right-hand post [T]... -
@unknownuser said:
A slight variation on TIG's
http://www.screenr.com/7VC8
Another working solution [I think!]... but it uses a script
-
A script that should be a default tool

If only Google accepted sketchUcation's offer to buy Sketchp that time

-
@unknownuser said:
A script that should be a default tool

If only Google had accepted SketchUcation's offer to buy Sketchup that time
I know... I know... but we are now all Trimblers-in-our-boots
-
@tig said:
I have yet another 'drawn' solution...
I can't fault it... but then again... you might...
Without doing a test, I don't see the logic that when you rotate the line back up, that point E hits the diagonal at any meaningful (or snappable) point. It can't be hitting the 'M' midpoint of the diagonal... therefore it isn't width/2 off the true axis of the board. In fact, isn't the angle created the same as measuring width/2 from M to the bottom edge?
-
That's was the point... you snap it to M but E can never 'touch' it - but it will align... landing on the centerline.
BUT... you have me 'banged to rights' - it doesn't work as it's not an exact fit, so there is still a tolerance issue


Back to the drawing board...
-
Driven
I think this a variation of the two-instance-rotation-with-mutual-snapping solution posted earlier today...
Can you elaborate...
So far, I think that is the only good way [along with Fredo's weird snap inferencing example] ???
-
been watching with no spare time...
my solution, two instances of square component, the second moved to top of target post and rotated 180º, then in edit mode rotated again from pivot point and snaped to first instances [also rotating] none pivot corner.

john
-
Tig,
your most likely right, I haven't had a good look at all the 'solutions'
I'm working 18hr days at the moment and just had a quick shot at it, needed a play before sleep...
john -
mini__mac2.skpHere is improved on solution I posted early and all dimension have been verified to SU 32 bit float accuracy against the close form solution I presented above.
Note I have been using some of the post dimension Jeff posted early of 96" post height, 65" spacing and 3.5 rail width.
No plugin is used.
I did use the technique I posted almost a year or so ago on the exact solution of sphere line intersection. -
@mac1 said:
[attachment=0:1pq9h5l0]<!-- ia0 -->mini__mac2.skp<!-- ia0 -->[/attachment:1pq9h5l0]Here is improved on solution I posted early and all dimension have been verified to SU 32 bit float accuracy against the close form solution I presented above.
Note I have been using some of the post dimension Jeff posted early of 96" post height, 65" spacing and 3.5 rail width.
No plugin is used.
I did use the technique I posted almost a year or so ago on the exact solution of sphere line intersection.Hey Mac1 - what "sphere" are you using? It's not clear in your model what your steps are.
-
@andybot said:
@mac1 said:
[attachment=1:3b4i0fcr]<!-- ia1 -->mini__mac2.skp<!-- ia1 -->[/attachment:3b4i0fcr]Here is improved on solution I posted early and all dimension have been verified to SU 32 bit float accuracy against the close form solution I presented above.
Note I have been using some of the post dimension Jeff posted early of 96" post height, 65" spacing and 3.5 rail width.
No plugin is used.
I did use the technique I posted almost a year or so ago on the exact solution of sphere line intersection.Hey Mac1 - what "sphere" are you using? It's not clear in your model what your steps are.
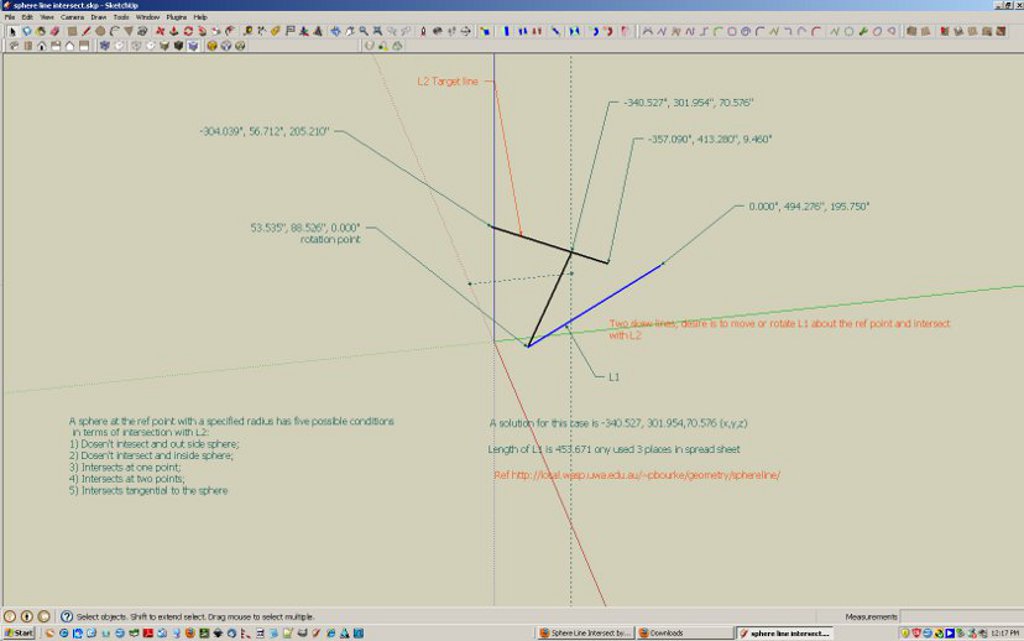
Sorry did not make my self clear enough for you. At the bottom right I show the intersect point, at the bottom left I show the center of the sphere. Since SU is a 3d program any time you talk about intersecting a rotated line with a target line it must be on a spherical basis. There was no intent to show a sphere but the math basis must consider that or you do not have a closed form solution. SO the directed line segment from the line rotation point ( aka center of sphere) to the intersection of the target line( used as ref for guide point) is the points one needs to get the angle of rotation and the intersect with the rail width to the left post. SO the intersect ( guide point ) at the target line, the two 3.5 inch spaced guide lines are all rotated to the top of the left post to establish the points needed to draw the 3.5 rail to the proper points. Here is a screen shot of the skip file I posted some time ago.
[attachment=0:3b4i0fcr]<!-- ia0 -->SPHERE LINE INTERSECT.jpg<!-- ia0 -->[/attachment:3b4i0fcr]

-

BTW you need ground truth to know if your model is correct.
I presented the closed form solution for the 2d case above. Here is the excel results to check my model'
Hello! It looks like you're interested in this conversation, but you don't have an account yet.
Getting fed up of having to scroll through the same posts each visit? When you register for an account, you'll always come back to exactly where you were before, and choose to be notified of new replies (either via email, or push notification). You'll also be able to save bookmarks and upvote posts to show your appreciation to other community members.
With your input, this post could be even better 💗
Register LoginAdvertisement


