Conic section - how?
-
Hi, I want to make a conic section, i.e. split a cone into two separate objects using a plane. So far I have been able only to leave a mark on the surface of the cone, i.e. an ellipse, parabola or hyperbola, but could not cut the cone into two parts though.
Any tips?
Also, would like to place the cone strictly on its side (think of kicking a traffic cone). Sketchup doesn't seem to allow to align the side to one of the axis (as it's rounded). Once again, any tips would be appreciated.
Thanks.
-
See the attached.
After drawing your cone, you can use a guideline to create a snap to line for the rotate tool. When you draw the cone, make sure there's a vertex on the base at your center of rotation.
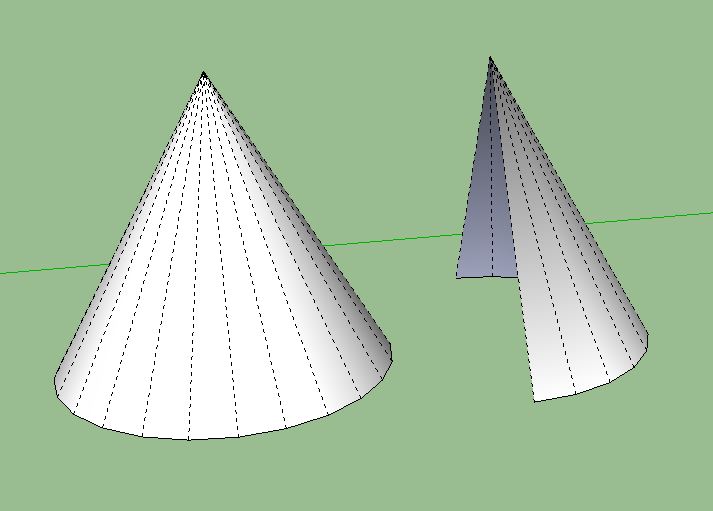
To create the two parts after intersection the plane, you can either select one part and Move/Copy it away from the cone. Then delete the unneeded bit on the original. Or you can do as I did for demonstration purposes and copy the entire cone. Then delete the unneeded part on each copy.
-
@dave r said:
See the attached.
After drawing your cone, you can use a guideline to create a snap to line for the rotate tool. When you draw the cone, make sure there's a vertex on the base at your center of rotation.
To create the two parts after intersection the plane, you can either select one part and Move/Copy it away from the cone. Then delete the unneeded bit on the original. Or you can do as I did for demonstration purposes and copy the entire cone. Then delete the unneeded part on each copy.
Hi, thanks for the attachment. Question though. So how do you create a cone in the first place? When I create a circle, then an orthogonal triangle and do the Follow Me on the triangle, the flat bottom surface of the cone disappears, and I have to re-glue it once again.
Secondly, once I cut the cone with a new rectangular surface and erase the unwanted part, the cut is empty, i.e. has no surface drawn between the cut contour. Is there any way to keep it?
Thanks, once again.
-
You can always "heal" a missing face by redrawing an edge or segment along its perimeter (provided the perimeter is coplanar and forms a closed loop...)
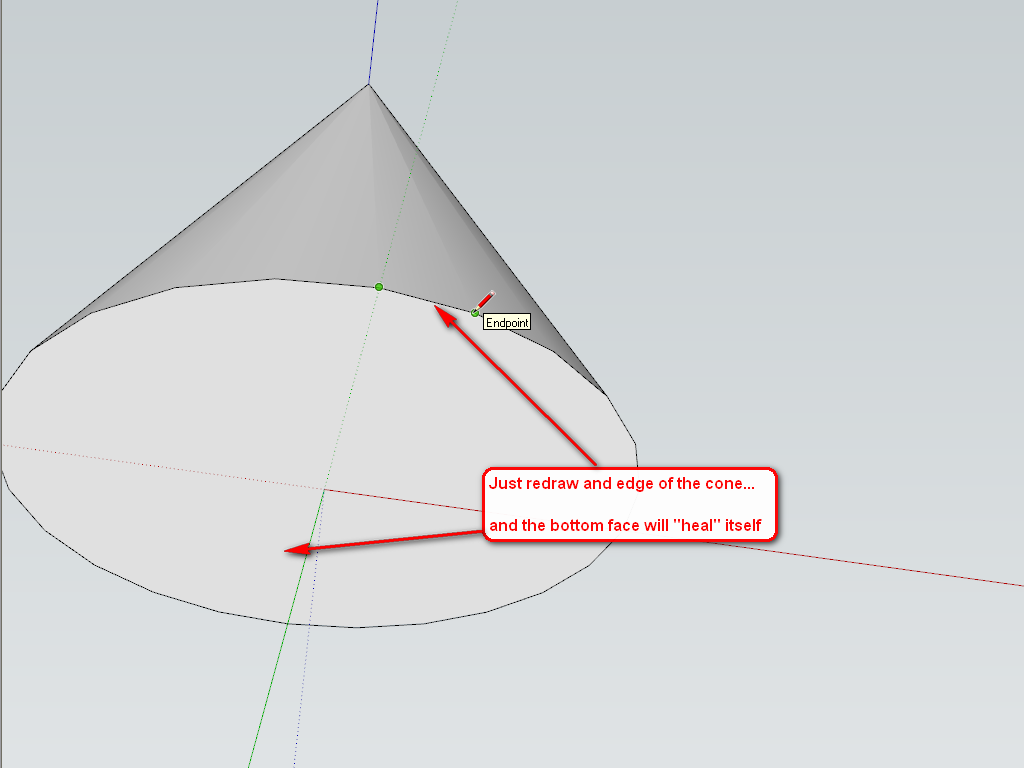
Then you can do this with your missing "cut" or when deleting the unwanted geometry after the intersection, do not delete this. You can always deselect a face and all its bounding edges by double clicking while holding down the Ctrl and Shift keys.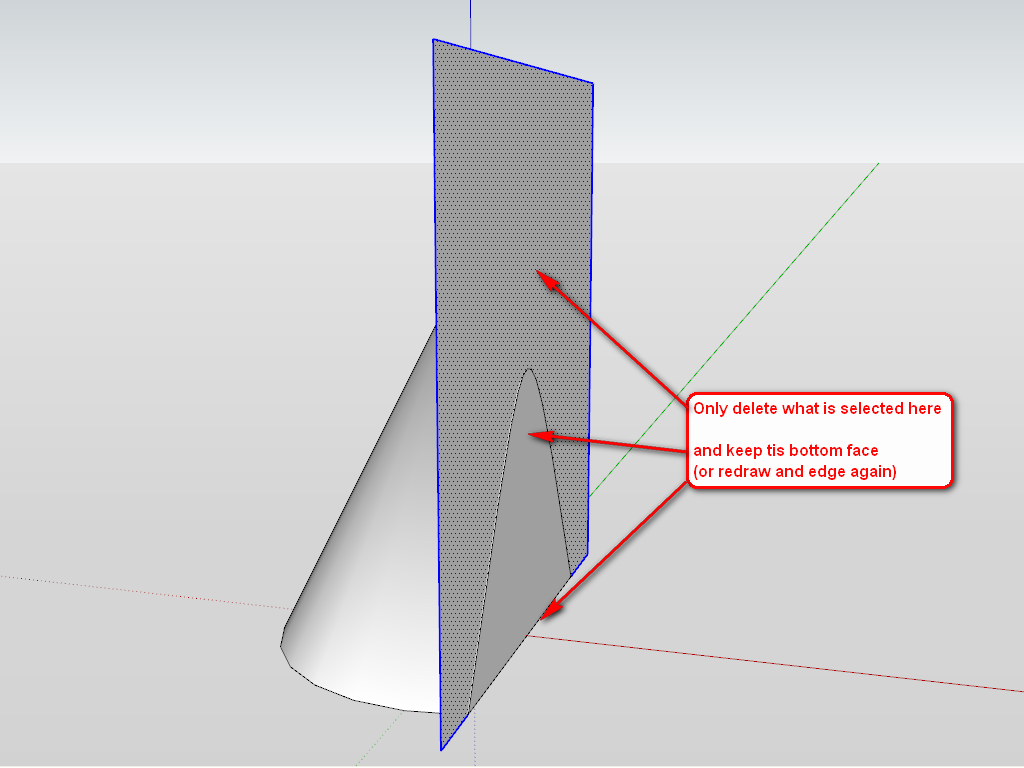
-
There's nothing wrong with creating the cone as you describe but before running Follow Me, select and delete the face of the circle. Follow Me adds faces where there aren't any but deletes faces in it's path. That's probably the easiest way to describe what's going on.
In my case, I drew the circle for the base of the cone, used Push/Pull to extrude it to a cylinder and then got the Move tool. I hovered over the edge of the circle at would be the pointy end until I found a "Cardinal Point." You'll know you're on the Cardinal Point because the circle will not be highlighted as it is when you hover over any other part of the edge. I clicked and then pushed the point in toward the center to make the cone. Moving a Cardinal Point changes the diameter of the circle.
As to winding up with a surface where the conic section cut is made, if the cutting plane and the cone are in the same context, i.e one isn't a component or group separate from the other, the part of the cutting plane inside the cone should remain as long as there is a closed loop. Think of it this way, when you make the intersection, you're not only cutting the cone with the plane, you're cutting the plane with the cone. Deleting the exterior edges of the plane deletes the region outside the cone but leaves the one inside. If you didn't have the face on the base of the cone when you made the cut, you wouldn't have a closed loop on the plane so it would still be one face. Deleting an exterior edge would delete the entire surface of the plane.
-
Hi.
After reading this much earlier, I looked in the Components folder for Shapes and found Cone, among other polyhedrons. I inserted the cone component. Alternatively, you can make the circle, draw a radius, rotate copy that radius x number of segments in the circle, hit spacebar for select, click in open space to be sure nothing is selected (or use Control +T to unselect). Select Move tool and click on center of circle, pull up along blue axis to desired height. Select pencil tool and draw over one of the segments on the circle to close the bottom of the cone. Build your standing rectangle or other plane for cutting. -
Tim, that's an interesting method for creating a cone.
 Seems like the long way round but the method does have some uses and would be valuable to know.
 -
One other tid bit. If you use the section plane to make the conic it gives you the option to make the section slice a group.
-
Zorro2 is a very good an easy cutter.
http://forums.sketchucation.com/viewtopic.php?t=16038#p124862
And if you right-click a section plane you have the option to slice at section plane.
Also there is TIG's Workplane
http://forums.sketchucation.com/viewtopic.php?t=31204#p274345 -
@Dave:
Yes, my process is a bit more involved. I don't regularly do this. But, like I said, "Alternatively,..."Regarding tipping the cone on its side: This involves Rotate. Hit the rotate button, or use the Q command. Hover in space over the model to get the protractor on global axis, click on a vertex on the circle and then click on the apex of the cone. If you are using a working surface on the ground plane, then when you rotate the object you can inference the tilt to an edge on the working surface. or any edge for that matter.
-
Hi Dave, hi folks.
How do you create a perfect cone by pushing a cardinal point ?
When I try, the best I get is a very small circle. The circle being resized will not vanish in a single endpoint. The net result is a cone frustrum.
Just ideas.
-
And ditto for me
-
@jean lemire said:
Hi Dave, hi folks.
How do you create a perfect cone by pushing a cardinal point ?
When I try, the best I get is a very small circle. The circle being resized will not vanish in a single endpoint. The net result is a cone frustrum.
Just ideas.
right, but if you look at dave's file, you'll see the little circle in there as well..
i don't think you can make a pointy cone with cardinal points.. (or the scale tool for that matter.. you can't enter 0 as a scale value which is what it would require)another cone drawing option is to draw a circle.. draw two diameter lines (or a + ).. ⌘ vertically from the intersection.. soften lines..
@vonwill said:
Secondly, once I cut the cone with a new rectangular surface and erase the unwanted part, the cut is empty, i.e. has no surface drawn between the cut contour. Is there any way to keep it?
i'm probably adding more confusion to the thread than value but..

if you happen to have suPro, you can use one side of a box as your intersecting plane the use solid tools 'split' function.. you'll end up with the two parts of the cones, as groups, with faces intact
-
I too was trying to create a conic section. Circular cones don't seem to work, so instead I made a 24-sided polygon, then followed a diagonal line around it to make a 24-sided cone. Since this shape has real edges, I was able to easily trace the intersects of a plane.
-
you don't need to draw all radii to the segments of a circle. just draw a diameter that is broken by a vertex at the center. Move up the center point while pressing the up arrow. Now option-eraser to soften one edge. But tell me why: for the second edge you need to shift- erase to keep the cone smooth.
-
Hi Peter, hi folks.
@pbacot said:
you don't need to draw all radii to the segments of a circle. just draw a diameter that is broken by a vertex at the center. Move up the center point while pressing the up arrow.
I have difficulties with this. I know the method with two radii or one diameter divided in two (rigth click then choose divide in the context menu) but I cannot see how to draw a diameter that can be broken by a vertex at its center if I don't draw something else to break the diameter.
@pbacot said:
But tell me why: for the second edge you need to shift- erase to keep the cone smooth.
SHIFT-Erase hide an edge.
CTRL-Erase smooth an edge.
So, for a cone made by pulling and endpoint at the junction of 2 radii, these 2 edges must be smoothed.
Smoothing is not the same as hiding. Hiding an edge still shows the angle between the two faces separated by this edge while smoothing softens this angle and blends the two faces into one that gives the appearance of one continuously curved surface.
Just ideas.
-
It's an old thread, but I notice nobody mentions splitting the cone simply by using hidden geometry rather than intersecting etc.
-
@jean lemire said:
Hi Peter, hi folks.
@pbacot said:
you don't need to draw all radii to the segments of a circle. just draw a diameter that is broken by a vertex at the center. Move up the center point while pressing the up arrow.
I have difficulties with this. I know the method with two radii or one diameter divided in two (rigth click then choose divide in the context menu) but I cannot see how to draw a diameter that can be broken by a vertex at its center if I don't draw something else to break the diameter.
@pbacot said:
But tell me why: for the second edge you need to shift- erase to keep the cone smooth.
SHIFT-Erase hide an edge.
CTRL-Erase smooth an edge.
So, for a cone made by pulling and endpoint at the junction of 2 radii, these 2 edges must be smoothed.
Smoothing is not the same as hiding. Hiding an edge still shows the angle between the two faces separated by this edge while smoothing softens this angle and blends the two faces into one that gives the appearance of one continuously curved surface.
Just ideas.
Jean, if you try it you'll see that the second line needs to be hidden not smoothed like the first line. You would think they'd both be smoothed. What it has to do with is there is not circle any longer on the bottom. It is two curves. You can put a circle back in.
To break the diameter at the center, draw the radii separately from the center.
Peter
Hello! It looks like you're interested in this conversation, but you don't have an account yet.
Getting fed up of having to scroll through the same posts each visit? When you register for an account, you'll always come back to exactly where you were before, and choose to be notified of new replies (either via email, or push notification). You'll also be able to save bookmarks and upvote posts to show your appreciation to other community members.
With your input, this post could be even better 💗
Register Login


Advertisement