Hayrake Dining Table
-
Thank you, Bently and Bryan.
Bryan, I described how I did those chamfers here. the description takes longer to read than it took to make them in SketchUp.
-
-
I decided to bang out a quick and dirty render in Kerkythea. I didn't spend much time on it and the background isn't anything to write home about but here it is.

-
VERY nice.
-
Dave
This has a decidedly shaker simplicity to it.
Is this a design you developed, or is it based on an historic piece?
I really like it, and you've done a great job on it. -
Thank you Bryan and Dale.
Dale, I wish I could claim credit for the design but that belongs to Michael Pekovich at Fine Woodworking. He was used a hayrake table designed by Sidney Barnsley
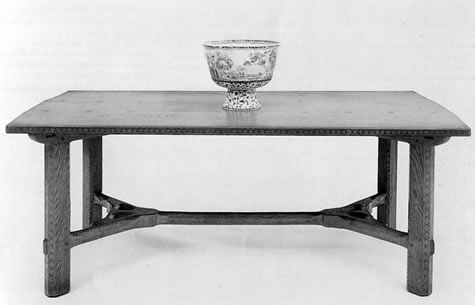
It's considered part of the Arts and Crafts movement.
-
Thanks Dave.
Interesting fellow Barnsley.
What is it about Cotswald that spawns so much creativity? -
Dale, you're welcome. He is an interesting fellow for sure. I don't know enough about the Cotswolds but I wonder if it has traditionally been a place for the artists and craftspeople.
MH, thanks. You could build it with no glue. The tenons are wedge or draw bored. The original was built with the planks joined with butterflies and no glue would be needed for them. The butterflies look like two dovetails put together in an hourglass shape. The way they were done for the original table, they pulled the planks together as they were driven home.
-
So this morning I was experimenting with Photoshop Elements (it was free with my Wacom Intuous4) and I managed to get this:

I'm sure the way I did it was probably the hard way. I wonder if anyone would be kind enough to give me some pointers about the right way to get this sort of result. Solo suggested I look at a freeware app called Squirlz which I tried but I didn't like the results I got. I do appreciate the suggestion very much, though and I bet I can do some other interesting stuff with it.
If someone would be interested in giving me some tips, I would be grateful. It could be done in a separate post or by PM if desired.
Thank you.
-
http://articles.sitepoint.com/article/photoshop-fade-layer-mask shows how to 'fade' an image with a layer mask
You can make two scene tabs one with full rendered color and the other in white + lines and no shadows etc.
Import them both with the line as an overlay [erase all of the white so you see the colored version below].
Add the fade layer mask to 'vignette' the colored part as you have done... -
Thanks, TIG. I'll check out that link.
-
I LIKE that effect.
-
The Dave_R Method

-
Thank you Bryan.
Rich, here's the "Dave_R Method" tutorial. Open both images. Poke at this button. Try that slider. Make a new layer. Delete that layer. Make a new layer. Try this tool. Merge layers. Hit Ctrl+Z many times. Save.

-
WARNING: Genius at Work

Do you use PhotoShop?
-
Well, I have Photoshop Express because it came with the Intuous4. and "use" is not quite the right word.
 I ought to take a class or something.
-
You'd take to it like fish to water. Give the trial a go. Or even GIMP or this
-
Thanks, I'll check that out. I've got Paint.NET that I muddle through with, too.
-
Hi Dave,
This idea to make this rectangular face at the and of the path and extrude it with pushpull tool is excellent


This complete tutorial ( Stopped Curved Chamfers ) can greatly simplify the process of carving a panel!!
-> link of your tut added to my
Subject: PlayTime_02: Gothic Panel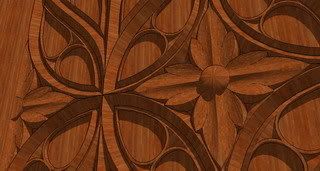 simon
simon -
Thank you Simon. I wish I could take credit for inventing it.
Hello! It looks like you're interested in this conversation, but you don't have an account yet.
Getting fed up of having to scroll through the same posts each visit? When you register for an account, you'll always come back to exactly where you were before, and choose to be notified of new replies (either via email, or push notification). You'll also be able to save bookmarks and upvote posts to show your appreciation to other community members.
With your input, this post could be even better 💗
Register Login


Advertisement