Edge color by layer
-
Beginning of 2nd century up to the second half of the 4th (AD of course). "Phase 8" (with the potato-shaped pits) is already end of / right after the Roman rule in the 5th century.
-
That seems like a lot of reconstruction in not so many years.
-
Don't forget wars... This is one of the most significant military provinces of Rome (actually, just a 40 km wide but couple of hundred km long frontier zone) which was under the biggest and most frequent pressure by barbarian raidings. Most of these buildings were completely destroyed and burnt to the ashes instead of just rebuilt due to some city planning reasons.
-
Interesting stuff. I would love to see it in person one day.
-
Here are some pics of the excavation (not too hi-res however). I have more (hi-res) but alas I cannot share as it was not my excavation.

-
Uh....Where's "here"?

-
Oops, sorry. Here:
http://www.pecskep.hu/logic/pages/showdoc.php?id=299
And some more/somewhat bigger (with my humble models/renders)

http://www.pecskep.hu/logic/pages/showdoc.php?id=729 -
@gaieus said:
Also, if you colour everything (not just edges but faces as well) by layer and set your edge styles "by material", SU will apply the layer colour to the edges, too.
Thank you, sir. I'm sure this isn't the first time you've shared this tip.
-
-
I dunno guys. I just tried when the question arose...

-
Gaieus
Could you please point me to where I can learn to create an animation as depicted above?

I will need to do one early next year on my Silver Dart model for an aviation museum both here in Toronto and Hamilton. It needs to be an AVI/MOV/MPG file to be put on a DVD for a continuous show. I want to show how the craft was constructed while doing a walk-around, then place the camera at the pilots eye for a look around through the twigs and wires.
thanks.
-
I actually exported the animation in image sequences then made smaller animations which I used to put together into a bigger one together with stills and added transition between the animations.
I can send you the whole animation project folder and you can see how it is put together in Windows Movie Maker
 (so it is rather low resolution, too)
 -
I have, in the past, done a scenes export animation and was appalled at the crappy resolution it produced.

In this case I will need some decent resolution as it will be used as a museum video display alongside the actual replica of the Silver Dart, from which the SU model is being developed, along with historic drawings and photos. I've seen some good quality animations on YT and wondered how.
-
You can set the export resolution to something higher if you want. Click on Options in the Export box.
-
@dave r said:
You can set the export resolution to something higher if you want. Click on Options in the Export box.
No "Export Options" in SU-6 Free.
 I do intend on going to V8 soon.
 -
Gotta keep up with the times.

I don't remember on the free version of 6 but can you even export AVI or MOV from it?
-
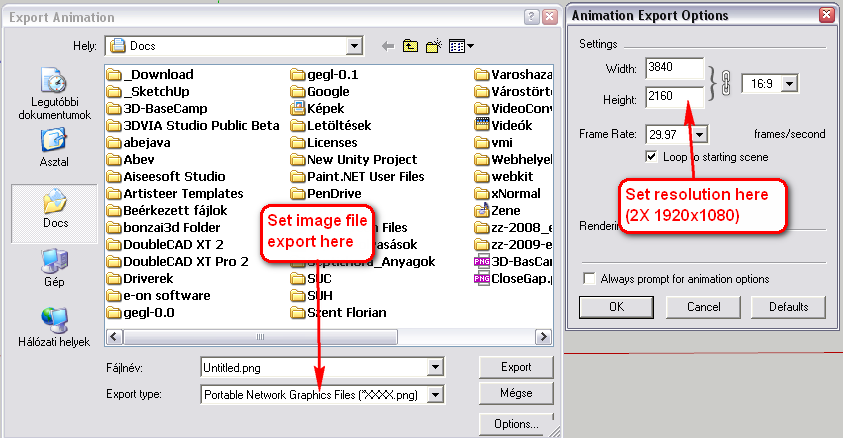
Export > Animation > And there should be the options:

Note to export your image files into a separate folder otherwise you will go nuts until you clean up your desktop.

Then downsample your images with a batch processing app like FastStone Photo Resizer (note that free for non-commercial use only ) to 1/2 of the export. This will make better antialiasing and nice, thin, crips lines (as well as this way you minimize edges bleeding through faces).
Then put it together in a video editor.
-
@dave r said:
Not that I can find. You could apply a colored material to the edges and set line color to By Material. Would that help?
Set Edge Style to Colour by Material, then enable Colour by Layer.
-
thanks Thomthom. I think that's the same thing Csaba came up with awhile back.

-
@dave r said:
thanks Thomthom. I think that's the same thing Csaba came up with awhile back.

Well of course he did...
 ...being connected directly to the Matrix and all...
Advertisement


