sketchucation logo sketchucation
    • Login
    1. Home
    2. The Pixel Artist
    ℹ️ Licensed Extensions | FredoBatch, ElevationProfile, FredoSketch, LayOps, MatSim and Pic2Shape will require license from Sept 1st More Info
    T
    Offline
    • Profile
    • Following 0
    • Followers 0
    • Topics 0
    • Posts 4
    • Groups 1

    The Pixel Artist

    @The Pixel Artist

    10
    Reputation
    1
    Profile views
    4
    Posts
    0
    Followers
    0
    Following
    Joined
    Last Online

    The Pixel Artist Unfollow Follow
    registered-users

    Latest posts made by The Pixel Artist

    • RE: [Plugin][$] FredoScale - v3.6a - 01 Apr 24

      Dear Fredo,

      FYI, I updated to 2.2a today and found that the radial bending tool seems to break the ability to use ThomThom's UV Toolkit remember/restore feature. It works fine with 2.1a and I've gone back to that version for now. Just thought I'd make you aware of it.

      Here's the link to my post in the UV Toolkit thread that explains the problem better. The combination of Fredoscale and the UV Toolkit to do things like curved brick arches is terrific!!

      LINK: http://forums.sketchucation.com/viewtopic.php?p=346983#p346983

      BTW, thanks for all of your hard work over the years! I've never had to chance to thank you. (I haven't posted here in a couple of years!)

      posted in Plugins
      T
      The Pixel Artist
    • RE: [Plugin] UV Toolkit

      Hey SU'ers,

      First off, Thomas, thank you so much for all the amazing plugins you've made and all the hard work you've done for the SU community! It's been quite a long time since I've been active on these forums, so I haven't had a chance to tell you. Big thanks! πŸ‘

      Anyhow, I just started using this plugin the other day on a new project that has lots of curved brick headers and details and your plugins has worked amazing well!! I normally have to build a custom texture for each arch in photoshop. So this was really a time saver! Was also able to use it to speed up the roof texturing.

      Here's a couple images from this project...
      http://www.thepixelartist.com/c2005007/p2011011/20110807/p2011011-20110805-img08.jpg
      http://www.thepixelartist.com/c2005007/p2011011/20110807/p2011011-20110805-img07.jpg

      Unfortunately, today I'm having a big problem getting your plugin to work. I updated a bunch of my plugins yesterday, including all of your plugins of which I use and the TT_Lib2. The remember and restore function seem to be completely broken for me now! Not sure what the heck I did, but here's an image of what's happening. It either doesn't work at all or only a few faces gets restored.
      http://www.thepixelartist.com/c2005007/p2011011/20110807/p2011011-20110807-img01.jpg

      Anyone having the same problem or have any ideas? Thanks in advance.

      Edit1: I don't know if this will help, but I noticed that when I try to reset the texture position for any area that didn't update it made a new, cropped version of the brick texture (screen shot below). Also, the areas that didn't restore don't have the option to copy/paste UV either (icons are inactive).
      http://www.thepixelartist.com/c2005007/p2011011/20110807/screen1.jpg

      Edit2: OK, found the problem... turns out it's an issue with the new Fredoscale 2.2a and not UV Toolkit. The radial bending seems to break the ability to restore the UV now. I went back to Fredoscale 2.1a and it works just fine again. I'll post this to the Fredoscale thread.
      http://www.thepixelartist.com/c2005007/p2011011/20110807/screen2.jpg

      posted in Plugins
      T
      The Pixel Artist
    • RE: Photo-match problem

      Hey Didec, no problem. Just hoping to help.

      Yeah, that watermark technique works pretty well and generally use it more than I do PM (unless I need the photo for texturing). I actually had to used it about a week ago when a client sent me a camera photo that I needed to integrate a rendering into. (Here's that image: http://www.thepixelartist.com/c2006008/p2010011/20100709/p2010011-20100709-view1-1600.jpg )

      But, it's a bit of an inaccurate and tedious process to get right. Which is a shame, because that's the whole point of having PM. Plus you lose the option to use the photo as a texture. What's strange is that PM seemed to work better back in V6 when it first came out and has seemed more glitchy since V7. For example, here's an animation I did back in V6 where I used PM to model a very complicated existing building. Used a lot of photos, wide angles and mixed orientations. I haven't had nearly as much success with PM since then (LINK: http://www.thepixelartist.com/c2006001/p2007011/20070525/test1.html )

      V8 has made things worse by adding the front image option, but then removing the ability to use display controls, forcing you to go into the style manager to change the opacity settings. It's really pain in the ass now! All they had to do was add those controls to the PM dialog box (opacity sliders for both front and back image, plus keeping the display controls). Frankly, PM was just very poorly implemented in the first place and just needs a major overhaul with a far more accurate/precise tools... and could be made far more intuitive at the same time (like most of SU really... but don't get me started! πŸ˜‰ )

      Anyhow, to offer a bit of advice on how I usually handle a photo integration project (if it needs to be fairly accurate), I usually start off with an aerial print of the site (obviously off google or bing), pre planning my photo location as best possible, then accurately mark the actual photo location out on the site (along with tripod height per photo). If needed, I'll even measure to the center of the tripod location with a 100' tape to the two nearest objects most visible in the aerial. Also note your focal length/aperture (or just get it from the image EXIF data). If possible, I try to set my camera perfectly level so I don't have to worry about pitch and roll later (I actually use a bubble level attachment on my cameras hotshoe mount).

      From there I'll bring the aerial data into SU (or ACAD). This is one area that V8 will certainly be helpful since we can now bring in much higher res, color aerial data. Before I would have to export the lower res, B&W aerial texture from SU into photoshop and update the texture with highres color data manually.

      Using the "Film & Stage" plugin (which I think is just built in now) I will make a camera object and manually place it on the aerial at the correct location and height. I'll use the "Edit Camera" option later to change the cameras focal length and aspect ratio (typically 1.5, like your camera, or 1.3333).

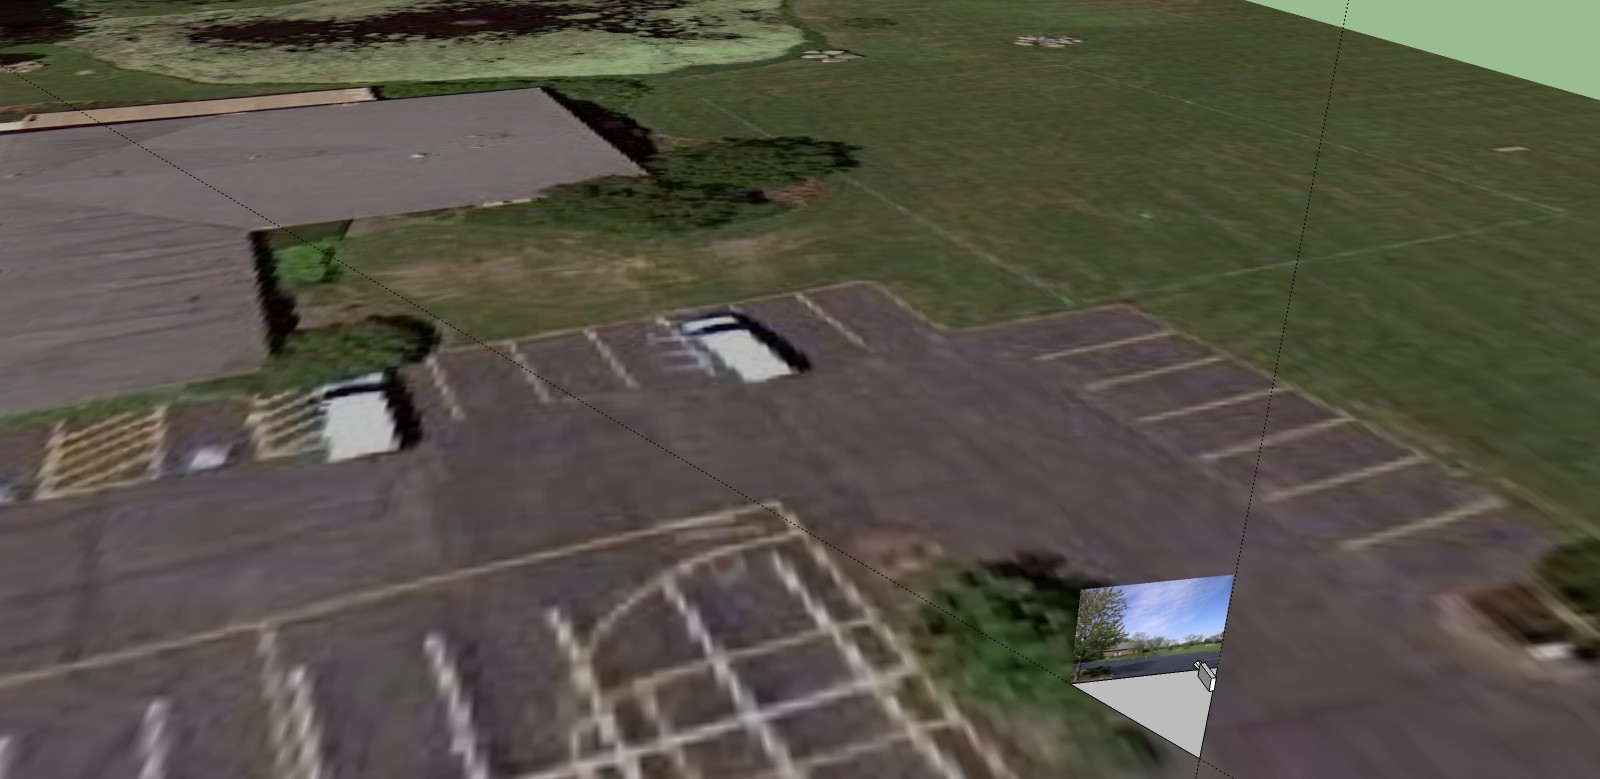
      Now, this part is a little hard to explain. I will build a triangle (around 10') from the center of the camera location, flat to the aerial, with its main angle to match the "horizontal field of view" of the photo. For example, a 28mm FL would have a horz. field of view of 65.5deg (Didec, your 17mm EOS 550D would be 67). Here's a great online calculator I use, use "Angular Field of View" link: http://www.tawbaware.com/maxlyons/calc.htm. I add construction lines to the main angle edges and rotate the camera to bisect the angle. You can make a group of the whole thing, then rotate it (around the location center) to match the view in the match photo (align to the objects at the edges of the photo). There's a couple more accurate ways to align the angle, but you can usually just eyeball it. I've attached an image to hopefully show this step a bit better.

      Add the photo as a background image (again, make sure your aspect ratio is correct) and it should be pretty close. You can tweak the camera location manually if needed. I usaully use the "Walk" tool to keep the camera location set.

      Here's a couple images I've done using this technique.
      Before: http://www.thepixelartist.com/c2007002/p2007013/20070625/p2007013_20070622_view1-1000-exst.jpg
      After: http://www.thepixelartist.com/c2007002/p2007013/20070625/p2007013_20070622_view1-1000wm.jpg
      Before: http://www.thepixelartist.com/c2007002/p2007013/20070625/p2007013_20070622_view2-1000-exst.jpg
      After: http://www.thepixelartist.com/c2007002/p2007013/20070625/p2007013_20070622_view2-1000wm.jpg

      Hope this helps. Best of luck!
      Adrian Alan Brown


      camera_setup_example1.jpg

      posted in Newbie Forum
      T
      The Pixel Artist
    • RE: Photo-match problem

      (I originally posted this on the Thearender forums, but thought I'd post this here too. Maybe it'll spur some good discussion)

      Hi Didec,

      Since it looks like nobody has been able to help you yet (saw that you posted on Sketchucation too), I thought I'd try to help.

      Yeah, for whatever reason these are tricky images (they shouldn't be!), probably due to the wide angle. I have this problem all the time too, so it's not just you πŸ˜‰ .

      Unfortunately, PM (Photo match) is just fundamentally flawed in design (and V8 has actually made it worse!). Using the PM tools as they were designed keeps getting the focal length wrong (finding something like 48mm). I personally wish it would just read the photos EXIF data and/or give us the options in the PM dialog to manually add focal length, aperture, and adjustments for things like barrel distortion. If it did, it would it find the equivalent FL should be 27.4mm to match the 17mm you used on your EOS camera.

      Anyhow (rant over) I was able to get an approximate match for the two images by fudging the heck out of the perspective controls and horizon adjustment nodes. They're pretty close... but not perfect. You can probably spend some more time tweaking what I've got and get it a bit closer. Sadly, if I need something more accurate, I usually have to use another app like 3ds Max (but then you need good height data too).

      Best of luck,
      Adrian Alan Brown

      LINK: http://www.megaupload.com/?d=9IYHRH3V

      posted in Newbie Forum
      T
      The Pixel Artist