sketchucation logo sketchucation
    • Login
    1. Home
    2. Oramac
    ℹ️ Licensed Extensions | FredoBatch, ElevationProfile, FredoSketch, LayOps, MatSim and Pic2Shape will require license from Sept 1st More Info
    O
    Offline
    • Profile
    • Following 0
    • Followers 0
    • Topics 3
    • Posts 13
    • Groups 1

    Oramac

    @Oramac

    10
    Reputation
    1
    Profile views
    13
    Posts
    0
    Followers
    0
    Following
    Joined
    Last Online

    Oramac Unfollow Follow
    registered-users

    Latest posts made by Oramac

    • RE: In over my head. Don't even know where to start.

      @dave r said:

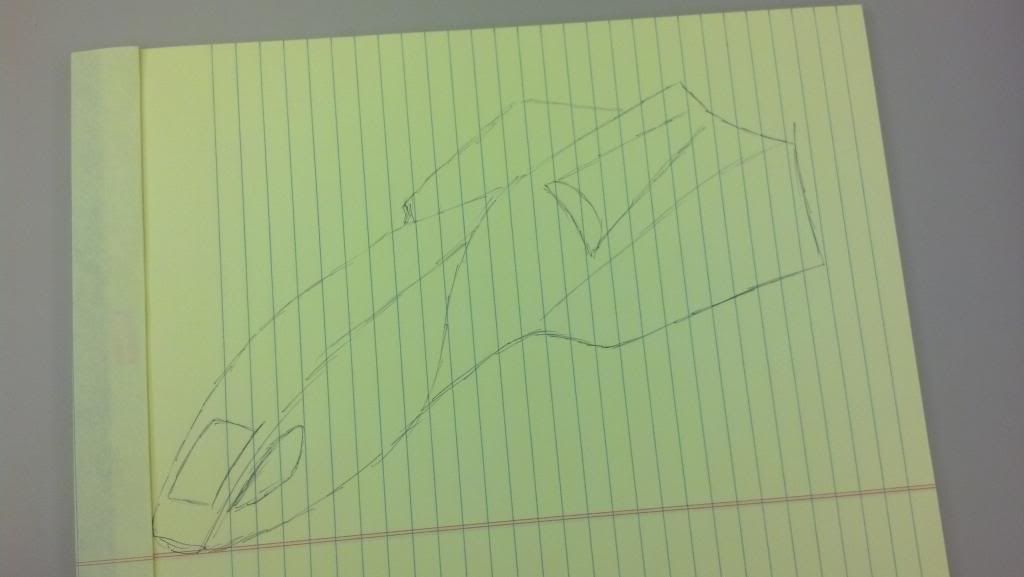
      I'd start by drawing a plan view as well as a couple of elevation views. If it is easiest, do that on your pad of paper. scan and import as an image into SketchUp. Then trace over the lines to create faces you can extrude and intersect.

      There are all sorts of tutorials out there for drawing vehicles. You should search YouTube. I bet you'll find a lot of help that way.

      Sadly, I'm at work right now so Youtube is out for a few hours, but I'll definitely check that out when I get home. I kinda got lucky on this sketch though. Never really was too good at drawing things. At least, not at keeping them all proportional and such.

      posted in Newbie Forum
      O
      Oramac
    • In over my head. Don't even know where to start.

      So I drew up the following sketch when I was bored at work and would like to make it in Sketchup, but honestly I haven't the foggiest idea how to even start building it. Can anyone shed some light for me? I'm especially concerned with the point where the triangular rear (right) joins the square/circular front (left).

      Thanks!

      http://i1068.photobucket.com/albums/u446/oramac1968/ShipSketch_zpse1ae5439.jpg

      posted in Newbie Forum sketchup
      O
      Oramac
    • RE: Splitting a compressed sphere?

      @dave r said:

      I was in the process of making a graphic example. I'll post it anyway.

      [attachment=1:3hulq9iz]<!-- ia1 -->Ovoid Perspective.png<!-- ia1 -->[/attachment:3hulq9iz]

      [attachment=0:3hulq9iz]<!-- ia0 -->Ovoid Parallel.png<!-- ia0 -->[/attachment:3hulq9iz]

      As you can see, it would be much easier to select all of the geometry for half of the shape or any other amount in the second view than in the first.

      Definitely. And I admit, that's part of what was originally giving me trouble when I initially tried this. Much appreciated.

      posted in Newbie Forum
      O
      Oramac
    • RE: Splitting a compressed sphere?

      @dave r said:

      Parallel Projection with a standard view (as I instructed) gives you a 2D view of your model. The reason I told you to set those things that way is that it makes it much easier to select half of the ovoid without getting geometry you don't want to select.

      Ahh! That it did. Good to know. Thanks again.

      posted in Newbie Forum
      O
      Oramac
    • RE: Splitting a compressed sphere?

      @dave r said:

      Since it is a component already, I would do the following.

      -Turn on hidden geometry (View menu).
      -Switch to Parallel Projection and choose Top view.
      -Open the ovoid component for editing and delete the half toward the rest of the ship. I assume that's the bit you want to get rid of.
      -Close the component (click out in space with the Select tool).
      -Use Move/Copy to copy the half-ovoid component to the other side of the ship and flip it along the green axis.

      Thanks! That worked great! Unfortunately, it didn't end up giving me the look I was going for, but that's nobodies fault except my own. I'll get it sorted.

      Quick follow up: what does Parallel Projection do for me? I didn't really notice any major difference between it and Perspective.

      posted in Newbie Forum
      O
      Oramac
    • Splitting a compressed sphere?

      I've come to something of an impasse. Possibly, I've gotten ambitious outside my skill level. I'm still pretty new and learning the tools and such.

      So in the image below, I want to split the ovoid down the red axis and put right half of it on the right of the picture and leave the other half where it is. If that makes sense. It's currently its own component, and I've tried just selecting the right half, but that inevitably splits it in every way except along the red axis. Also tried push/pull, though it only pushed the individual sections (which I expected, but I had to try).

      Any idea how I can accomplish this?

      Thanks!

      http://i1068.photobucket.com/albums/u446/oramac1968/StarwindQuestion_zps856a3c4e.jpg

      posted in Newbie Forum sketchup
      O
      Oramac
    • RE: Hello! Newbie saying hi and maybe a little advice

      @unknownuser said:

      @unknownuser said:

      Would this Sandbox thing help with that?

      Better is use the Scale tool for make ovoïd form from a sphere 😉

      I'll experiment with that. Thanks!

      So a few updates. I scrapped my original chassis and started over. I think this one is marginally better. At least, I'm getting used to making components and cutting them to fit.

      Here it is. I've no idea why the closest corner pieces show the blue side. I reversed faces and all kinds of things trying to fix it. Overall, I'm shooting for maximum torsional rigidity through the red axis, while keeping weight down.

      http://i1068.photobucket.com/albums/u446/oramac1968/ChassisWIP-01_zps12c73d73.jpg

      Also, I said I'd post the one ship that I used the scale tool on. It seemed to work fairly well, though it's tough to get a good view of it without being able to orbit around a bit. I used it on the front "forks" on either side of the cockpit.

      http://i1068.photobucket.com/albums/u446/oramac1968/StarwindWIP-02_zps1b0630df.jpg

      posted in Newbie Forum
      O
      Oramac
    • RE: Hello! Newbie saying hi and maybe a little advice

      @pbacot said:

      @oramac said:

      @pbacot said:

      Use the scale tool. Make a selection as you have and choose the scale tool. click on the bottom or top middle dot, press alt and move the dot up. The top and bottom edges should move in towards the middle.

      Ya know, as much PC gaming as I do, you'd think I would have thought to look for shift/alt/ctrl modifier keys for everything. Unfortunately, it never dawned on me. Another simple, easy tip that makes an enormous difference.

      Much appreciated.

      Good. Looking at the model, I have to mention that this operation may have an less than predictable result on the upper and lower faces of that wing. Those faces have many edges and angles, so when they are deformed by simply moving one edge (you can just move an edge in blue direction for similar result--may need to press command key when you do), it's hard to know if you will like the result. What SU will do is add edges within that face to keep the outside edges intact. These can be softened if the end shape is OK. Just because some operations are possible, doesn't mean the modeling steps are the best for your model. Often an approach to this sort of model would be to define the outlines of irregular faces and use a skinning plugin (simplest of which is Sandbox) to make the deformed face.

      Thanks! It actually worked pretty acceptably this time, at least to my eye. I'll post a screen later this week, since my computer is currently down while I move (posting from work).

      I have been kinda wondering how to make ovoid-ish shapes, like a flattened sphere or oval. Would this Sandbox thing help with that?

      posted in Newbie Forum
      O
      Oramac
    • RE: Hello! Newbie saying hi and maybe a little advice

      @pbacot said:

      Use the scale tool. Make a selection as you have and choose the scale tool. click on the bottom or top middle dot, press alt and move the dot up. The top and bottom edges should move in towards the middle.

      Ya know, as much PC gaming as I do, you'd think I would have thought to look for shift/alt/ctrl modifier keys for everything. Unfortunately, it never dawned on me. Another simple, easy tip that makes an enormous difference.

      Much appreciated.

      posted in Newbie Forum
      O
      Oramac
    • RE: Hello! Newbie saying hi and maybe a little advice

      @box said:

      You describe drawing lines between the square at each end. If these squares are verticle rather than perpendicular to the lines you draw then the "Tube" won't be the correct thickness.
      See little sketch exaggeration.
      [attachment=0:2621jwyl]<!-- ia0 -->Measure.JPG<!-- ia0 -->[/attachment:2621jwyl]

      As to cutting to size, there are many answers to that depending on what you are doing.
      But in the simplest terms, push/pull your crossmember through the vertical section then draw a line on the face of the crossmember in the right place and push the excess off.

      Or you can use intersect faces to cut things, but that is another step.

      That totally makes sense! Thanks! How would I go about making the properly sized tube for the left side? Just matching edges, pulling through and then cutting it off, I assume?

      Also, on a slightly different note, in the following picture:

      http://i1068.photobucket.com/albums/u446/oramac1968/StarwindWIP-01_zps52c95e37.jpg

      How can I take the selected area (and its twin on the opposite side) and "squeeze" it down, so that the highlighted area is about half the height of the main body, but centered on it rather than at the top or bottom, if that makes sense?

      Thanks again for all the help! I'll stop asking and start experimenting more after this.

      posted in Newbie Forum
      O
      Oramac