sketchucation logo sketchucation
    • Login
    1. Home
    2. LA_RR_Architect
    3. Posts
    Oops, your profile's looking a bit empty! To help us tailor your experience, please fill in key details like your SketchUp version, skill level, operating system, and more. Update and save your info on your profile page today!
    ⚠️ Important | Libfredo 15.6b introduces important bugfixes for Fredo's Extensions Update
    Offline
    • Profile
    • Following 0
    • Followers 0
    • Topics 6
    • Posts 63
    • Groups 1

    Posts

    Recent Best Controversial
    • RE: Light at the end of the tunnel

      Hello Tuna... thanks for the comment. Been staring at the screen long enough... maybe I'll head to the beach.

      Here she is in color.

      These are generally the correct colors but not exactly what I want. The colors and textures assigned here will be used to set up renderings in a bit.

      ...still, looks pretty much like a locomotive...

      From Sketchup without textures.

      More once the renders begin to come in.

      Jim

      posted in WIP
      LA_RR_ArchitectL
      LA_RR_Architect
    • RE: Just Wishing - Added Pic

      Your fine image reminds me that I'm five miles from the beach and haven't been in months... maybe tomorrow! Looking at the image I can feel the breeze on my face already.

      Jim

      posted in WIP
      LA_RR_ArchitectL
      LA_RR_Architect
    • RE: Light at the end of the tunnel

      Fellow SU fans.

      It's my pleasure (or relief) to announce that the white phase of my locomotive is done.

      Perhaps more accurately, I've decided to stop embellishing the model as I can certainly find many additional features to add or refine.

      The craziness needs to end somewhere.

      Next will be a thin veneer of color and texture. Afterall, in the end, it's mostly black.

      Here's how she looks now...

      Fireman's side from the front...

      Engineer's (driver's) side from the front...

      Engineer's side from the rear...

      ...and again, fireman's side from beside the tender.

      Hope you all enjoy...

      Jim

      posted in WIP
      LA_RR_ArchitectL
      LA_RR_Architect
    • RE: Light at the end of the tunnel

      That's the thing about these machines... a huge part of the detail is hanging on the outside. The challenge is figuring out how to represent the important bits and what can be left out (there is a lot that's been simplified or omitted) and to still get a realistic model in the end.

      Yes, I'll render it in a bit. I have a couple location models where it will fit nicely.

      Thanks for the encouragement.

      Jim

      posted in WIP
      LA_RR_ArchitectL
      LA_RR_Architect
    • RE: Light at the end of the tunnel

      Hi,

      With luck, the final update before completion. I'm still missing the brake system and a fair amount of plumbing but otherwise, all major systems (external only) are represented.

      I've added a fair amount of detail, but as the grain gets smaller, it is a bit hard to see.

      With luck the modeling portion of the effort will be done this week.

      So again, without further ado, the pictures...

      Elevation of the engineer's side

      ...and a perspective of the same side.

      Perspective from the fireman's side

      ...and a final elevation.

      Enjoy, and as usual comments and suggestions are appreciated.

      Jim

      posted in WIP
      LA_RR_ArchitectL
      LA_RR_Architect
    • RE: Light at the end of the tunnel

      Hello Guys, thanks for the encouragement.

      Last couple days I've started adding the final few systems... I'm down to brakes and the power reverse gear, then it's piping, handrails and finishing up. With luck another week has the modeling phase done then I can look at a bit of rendering. I'll post more in a day or so when the progress is enough to see the difference.

      Jim

      posted in WIP
      LA_RR_ArchitectL
      LA_RR_Architect
    • RE: Light at the end of the tunnel

      I've made a bit more progress at the front and around the cab where the gap between cab and tender is gradually being filled. At the front we now have a bell and headlight to complement the whistle. Added a good sprinkling of bolts and rivets as well.

      From the front with illuminated number boards on the head lamp and a cast number under the bell.

      ...and a cab view.

      Hope you enjoy... the process is fun but I'm afraid a bit slow.

      Jim

      posted in WIP
      LA_RR_ArchitectL
      LA_RR_Architect
    • RE: Sikorsky S-64 Skycrane

      Really looks great, although to be perfect, the rotor blades should droop when not spinning. A tiny niggle on an otherwise as usual stunning image. Recently they have been keeping these birds quite busy out here in California on fire suppression.

      posted in Gallery
      LA_RR_ArchitectL
      LA_RR_Architect
    • RE: Chinese Yard

      Really wonderful. You guys are clearly master of mood and dirt (in a positive way!) Well done.

      posted in Gallery
      LA_RR_ArchitectL
      LA_RR_Architect
    • RE: Light at the end of the tunnel

      Hello,

      Thanks one and all for looking and for your comments.

      These things have become something of a hobby for me. Originally intended as simple entourage or background for models of historic railway buildings, these railroad pieces have grown into a project on their own.

      I certainly put a fair amount of research into them but don't think they quite rise to the level of museum pieces yet.

      This is definitely my most complicated locomotive to date. I suspect the project will take a couple weeks of on and off effort.

      ...but thanks for looking and for the encouragement.

      Jim

      posted in WIP
      LA_RR_ArchitectL
      LA_RR_Architect
    • RE: Light at the end of the tunnel

      Gradually working, largely from front to back adding various operational bits and a lot of plumbing...

      Still nothing behind the boiler, but getting there

      It's actually a bit addictive... but I need to take a break now.

      Jim

      posted in WIP
      LA_RR_ArchitectL
      LA_RR_Architect
    • RE: Light at the end of the tunnel

      Last couple days I've started to block out the boiler and several of the more curious lumps on top (from front to back they are: the feed water heater, the funnel, the sand dome and the steam dome). Lots more to come.

      Tuna, I'm working primarily from a set of quite detailed drawings summarizing the locomotive for model builders... about a dozen drawings, as well as many photographs and internet research on specific systems, e.g. the feed water heater.

      So without further ado progress...

      The huge boiler of a serious steamer...

      Beginning to have an interesting face as well...

      There are typically some interesting complex curvy bits to work out.

      ...and on we go...

      I'll post more as it develops.

      Thanks for looking

      Jim

      posted in WIP
      LA_RR_ArchitectL
      LA_RR_Architect
    • RE: Light at the end of the tunnel

      Thanks Mike...

      This one really was something of a eulogy. These late model "mountains" were very late in the steam era and didn't live out their useful life, being chased off the rails by the cheaper diesels.

      I love the challenge of modeling them because so much of the workings are hanging right out front and as a Sketchup skills challenge there's a lot (for me) of figuring out how to build the model.

      Regards

      Jim

      posted in WIP
      LA_RR_ArchitectL
      LA_RR_Architect
    • Light at the end of the tunnel

      About every two years I get the irrational urge to model another steam locomotive... I've now started my third.

      Each time the models (and locomotives) get a bit bigger and more complex. This is always a fairly long process resulting in a pretty huge model. The last one (a 2-10-0) was 200,000 faces and 250 components in a 23 meg file. The new project will be bigger in all respects.

      This one will be a Boston and Maine "Mountain" or for locomotive buffs a "4-8-2". Adding to the complexity of the project is a 14 wheel "centipede" style tender.

      The process in now pretty well underway but still miles to go. The following images indicate my process and the current state of the model.

      I started with the frame, wheels and suspension...

      ...added the cylinders and running gear...

      ...here's how the complete project looks today... still a long way to go.

      Currently I'm working on the air pumps for the brake system. This is the air system.

      Any thoughts or suggestions?

      Thanks for looking,

      Jim

      posted in WIP
      LA_RR_ArchitectL
      LA_RR_Architect
    • RE: Divider at entrance

      Well done! ...and you're certainly squeezing every possible bit of function out of each sq. centimeter.

      posted in Gallery
      LA_RR_ArchitectL
      LA_RR_Architect
    • RE: My first rendering attempt

      The results are nice indeed. Model is sparse but OK, I especially like the boots at the door.

      posted in Gallery
      LA_RR_ArchitectL
      LA_RR_Architect
    • RE: Brutalist Drainage Basin

      I think there's a place for you among those who design dystopic movie sets... Very convincing... and well done!

      posted in Gallery
      LA_RR_ArchitectL
      LA_RR_Architect
    • RE: Modeling Trains - learning Sketchup

      Good evening,
      Just finished another project, a model of a 70 ton 2 bay covered hopper.

      Basic SU model

      The model is based on a fairly schematic engineering drawing and a collection of photographs of the actual cars. This type of car carried various granulated or powdered industrial materials.

      Colored SU model

      This model of car was used by a number of railroads in the 1950s with minor variations. I picked the Norfolk Western version because I liked the inverted V cut in the side between the hoppers and like the pale gray color they used.

      3 view Max

      Here’s a three view composite from 3DMax. As you can see little additional color / texture work was needed moving it into Max, mostly adding more realistic metal surfaces.

      Max detail vies

      I really like hoppers because I can expose a fair amount of detail in the open ends. In this view in addition to a lot of piping, you can see the reserve air tank and below that the brake valve mechanism.
      On the other side of the car, you can see brake cylinder and the levers used to actuate the brakes.

      CH Train.jpg

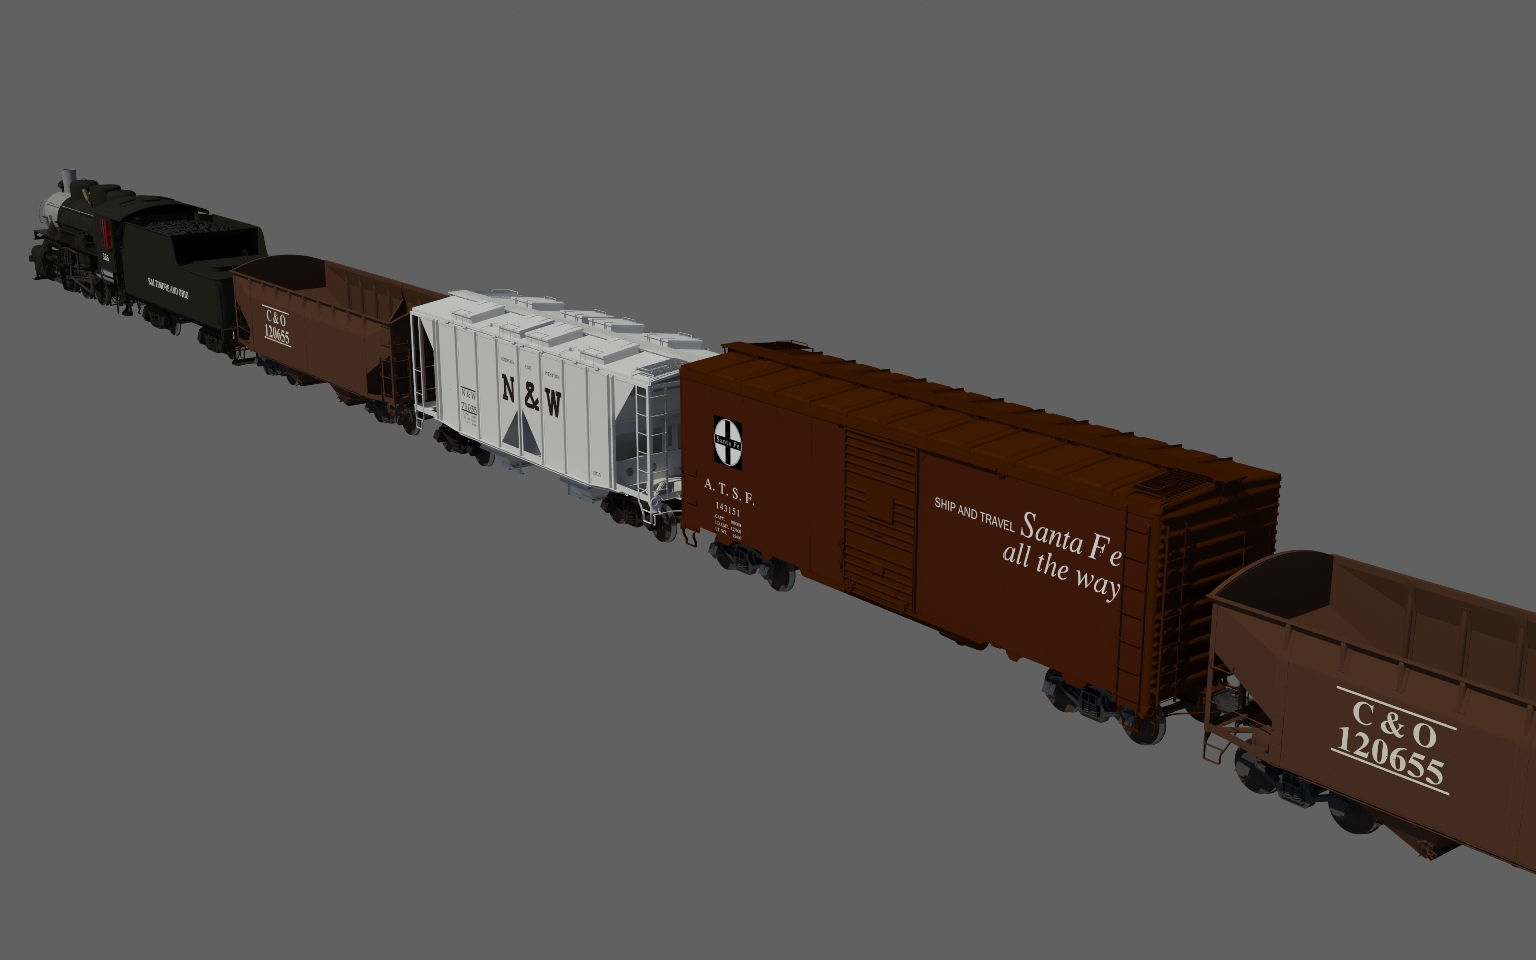
      Here’s the 70 ton hopper coupled into my switch train.

      CH  Draw Bridge .jpg

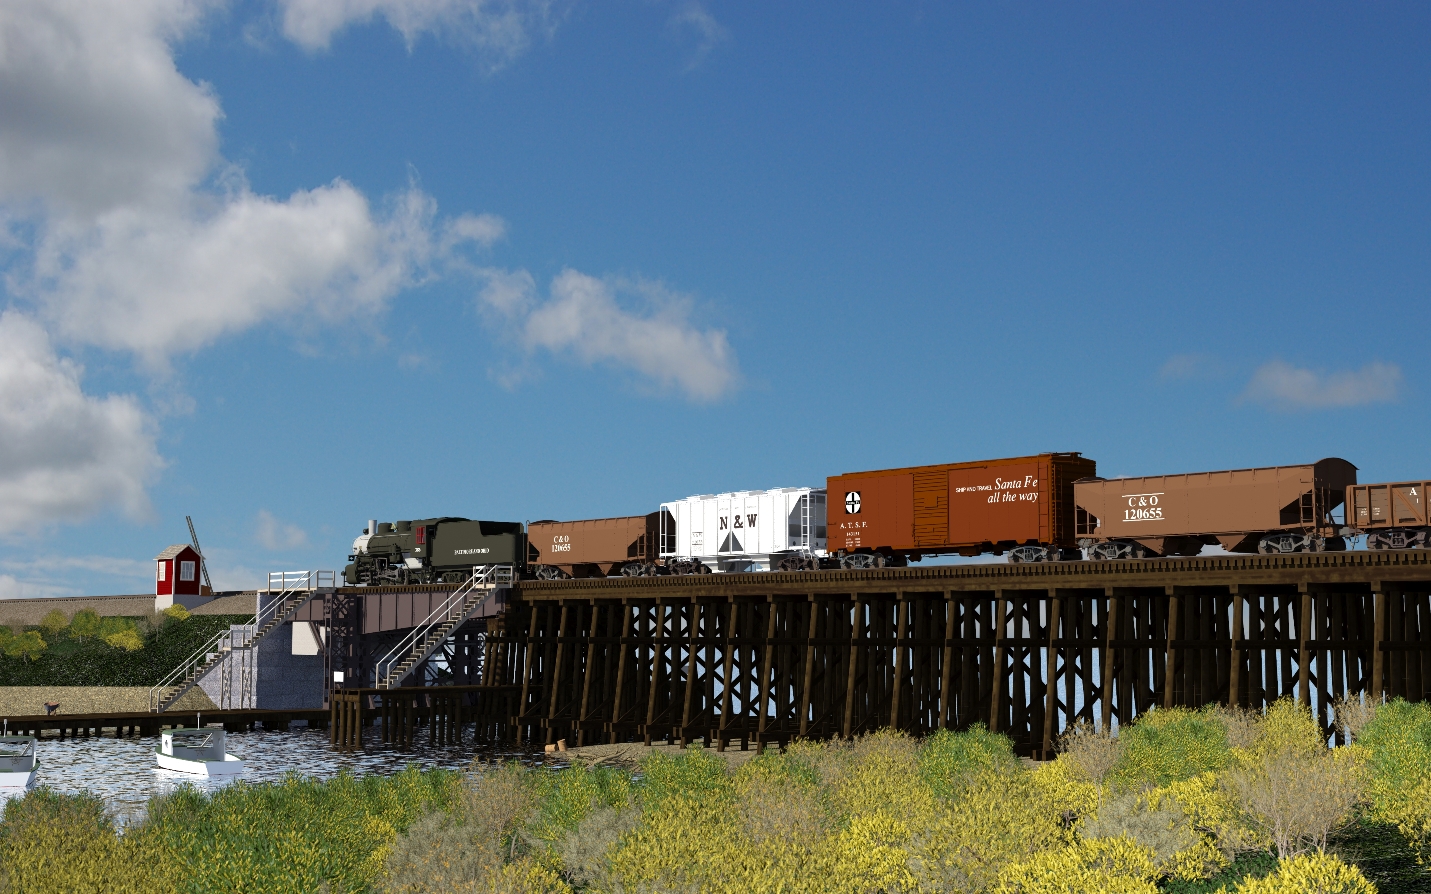
      And finally, the switch train crossing the Gloucester River draw bridge on a sunny summer afternoon.

      As usual, I had a lot of fun building this little car.
      Jim

      posted in Gallery
      LA_RR_ArchitectL
      LA_RR_Architect
    • RE: Modeling Trains - learning Sketchup

      It's been a while since I posted anything, partly from my need to earn a living, partly because I needed to work out the shingles on the station and partly due to inertia.

      In any case, I've finally completed a few renderings of the Point of Rocks, Baltimore and Ohio train station in Maryland. The model is geo-located on terrain extracted from Google.

      Switch train rolling through Point of Rocks

      An overall view... working out the curving track was one of the challenges.

      Closer view from the platform

      A bit of a detail. The paving, brickwork and stone bands are textures, the slate shingles have been modeled, painfully, one at a time with the coursing and patterns as close to the photos of the actual station as possible.

      Arriving home from work late in the evening.

      ...and of course we need one of my extra dark images, imagining what it would look like arriving late at night.

      I hope you enjoy.

      Jim

      posted in Gallery
      LA_RR_ArchitectL
      LA_RR_Architect
    • RE: Modeling Trains - learning Sketchup

      Hello pbacot,

      Thanks for the comments.

      Kelso is a bit of an odd depot, not really serving traditional depo functions. For example it has minimal ticketing and baggage support and no waiting room or platform. I gather that in the days before air conditioning waiting in the shade under the arcade was the best option.

      The depo served two customers: there was a dinner operated 24-7 for passengers on trains without dinning cars and recreational facilities and housing for the railway workers who ran the water / refuel stop and the helper engines that pushed trains over the hill to Los Vegas.

      I've started on the material tweaking and environment for renderings of the Point of Rocks depot, but it will be a while before I have much to post.

      posted in Gallery
      LA_RR_ArchitectL
      LA_RR_Architect
    • 1
    • 2
    • 3
    • 4
    • 2 / 4