sketchucation logo sketchucation
    • Login
    1. Home
    2. Fletch
    3. Posts
    Oops, your profile's looking a bit empty! To help us tailor your experience, please fill in key details like your SketchUp version, skill level, operating system, and more. Update and save your info on your profile page today!
    πŸ«› Lightbeans Update | Metallic and Roughness auto-applied in SketchUp 2025+ Download
    F
    Offline
    • Profile
    • Following 0
    • Followers 0
    • Topics 52
    • Posts 721
    • Groups 2

    Posts

    Recent Best Controversial
    • RE: Image from Google Earth cannot be exploded

      Edson,
      I don't understand the issue. If you have exploded it, it just renders like any other texture in SU.

      That said, if the face with the texture is a curving terrain, then it will likely render segmented, because each face (every teensy triangle) will now have its own unique little picture on it... and these will not be seen by the rendering program as having a single image, and therefore it will not know how to smooth it as if it were one smooth image... this depends on how the image is applied, the render program exporter, etc.

      posted in SketchUp Discussions
      F
      Fletch
    • RE: Bar

      lovely images!
      one tiny thing... the shader for the translucent light fixture looks like it's made of air or something... not glass or plastic.

      posted in Gallery
      F
      Fletch
    • RE: Hotel room

      @frederik said:

      I really like ...it much warmer...
      The image I posted was far too cold to my taste...

      +1 πŸ‘
      In real life photos, any light fixture produces some kind of color... incandescent or fluorescent, choosing the right color for the lighting in your render is extremely important and more realistic than plain white light... IMHO.

      Beautiful work as always, Fred. πŸ˜‰

      posted in Gallery
      F
      Fletch
    • RE: Settings for a rug (twilightrender)?

      Make sure your bump map is a good one, simply desaturating the image is not an official bump map.

      in a bump map, the white is going to bump farthest "up" from the face. black is going to bump farthest "down" into the face. 50% gray means no bump.

      So if you make a good bump map, it will look 100% better.

      Then it's a matter of lighting, and choosing the right material template. Lighting should be natural, or put it in a light studio. If the lighting for your test scene is too bright or too 'flat', it will not let you know how good the model/render is.

      I like the design for the rug, by the way. πŸ‘

      posted in SketchUp Discussions
      F
      Fletch
    • Kerkythea Gallery added over 100 images!!!

      😍 Kerkythea's Gallery just added over 100 images... please come visit and enjoy β˜€

      Easily more than half of the images were created by talented SketchUp users/lovers πŸ€“ , this is why we extend the invitation to you.

      Some examples of the quality images you can enjoy...

      Exteriors: (by Camara)

      http://www.kerkythea.net/gallery2/d/2190-2/eduardo_camara_exterior_web_126.jpg

      Interiors: (by Calvin Clawson)

      http://www.kerkythea.net/gallery2/d/2481-2/Kitchen-CalvinClawson.jpg

      Fantasy: (by Mocki010)

      http://www.kerkythea.net/gallery2/d/2354-2/SteampunkCoffeemaker-Mocki010.jpg

      Transportation: (by MRYS)

      http://www.kerkythea.net/gallery2/d/2336-2/Happy-Little-Monster-MRYS.jpg

      Toys and Sculptures: (by Alvydas)

      http://www.kerkythea.net/gallery2/d/2413-2/Toys-Alvydas.jpg

      Technical: (by RangerRick)

      http://www.kerkythea.net/gallery2/d/2462-2/WineGlasses-Empty-RangerRick.jpg

      Nature: (by RangerRick)

      http://www.kerkythea.net/gallery2/d/2375-2/woolybearcaterpillar-rangerrick-rBrehm.jpg

      posted in Hardware
      F
      Fletch
    • RE: [Plugin] Set North in Free version

      Didier, your tool for setting custom north angle still works perfectly in SU8 free.
      😍

      posted in Plugins
      F
      Fletch
    • RE: The Art of SketchUp - part 2: Sci-Fi

      (using best Yoda voice) A master at SketchUp, you are.

      posted in Gallery
      F
      Fletch
    • RE: Public Beta for Obj, SolidWorks, STEP, and FBX importers

      @ashraf said:

      @notareal said:

      I just finished importing the OBJ file, here is an image of the dragon enjoying the SketchUp environment, I will try the FBX file later.

      Impressive. How long, exactly, did it take to import the dragon object? Can SU even handlethat dragon file in all it's high-poly glory?

      Jim Frolz also has an jf_obj_import.rb ruby that works quite well on Sculptris models.
      I've seen another company with an FBX importer somewhere as well... πŸ˜•

      posted in Plugins
      F
      Fletch
    • RE: High School Animation

      Stunning video - the way they should be done! I hate the fly-arounds many clients want that make me dizzy and a little sick to my stomach.. 2 months sounds about right... a lot of work to do this here. πŸ‘

      posted in Gallery
      F
      Fletch
    • RE: Day And Night :::

      Lovely renders, Freeagent, beautiful work!

      posted in Gallery
      F
      Fletch
    • RE: Twilight project

      great job, jo-ke,
      perhaps an emitting plane outside the skylight to boost the lighting there, or just increasing brightness of the sky would have worked.

      putting a render next to a real photo is always risky... but it's a great way to learn/hone your skills. πŸ‘

      posted in Gallery
      F
      Fletch
    • RE: New plugin for the facade

      oh... if only we could cut out the black areas of an image that we have pasted on a wall... 😲 😎

      posted in Plugins
      F
      Fletch
    • RE: [Plugin] Make Fur v.2.1.0(20140323)

      @massimo said:

      @unknownuser said:

      Fletch, your leaves are not overlaping! how did you achieve that?

      Perhaps he deleted some overlapping components later? πŸ˜‰

      Glad you like it... I do too! πŸ˜„

      No. I deleted nothing.
      There are 12 new leaves we made (free) for licensed users of Twilight... available here.... along with a video tutorial and the practice scene.

      Twilight Render also has no problems exporting these 2400 leaf instances in this image (took about 1sec. to process the file) and they render perfectly.

      The "secret" to not overlapping is that the leaf component is made to be at approx. 15 degree angle away from the face, the way they grow.

      But yes, the sizes and angle should perhaps be "jittered" or "changed" a bit more... it was just a quick test. πŸ˜‰

      posted in Plugins
      F
      Fletch
    • RE: [Plugin][$] Curviloft 2.0a - 31 Mar 24 (Loft & Skinning)

      Fredo, this is simply astounding work, you are absolutely incredible! β˜€

      posted in Plugins
      F
      Fletch
    • RE: [Plugin] Make Fur v.2.1.0(20140323)

      tak2hata,
      Thank you! πŸ‘
      Once I installed the latest version, it worked perfectly.

      Renders well with Twilight Render... 3mins. πŸ˜„
      (I used 3 different Ivy leaves each placed once with fur plugin 800 components at a time.)

      Controlling the axis for the component is the hard part.


      IvyExample.jpg

      posted in Plugins
      F
      Fletch
    • RE: [Plugin] Make Fur v.2.1.0(20140323)

      First, thanks so much for sharing this GREAT plugin! It is very cool. πŸ˜„

      @lapx
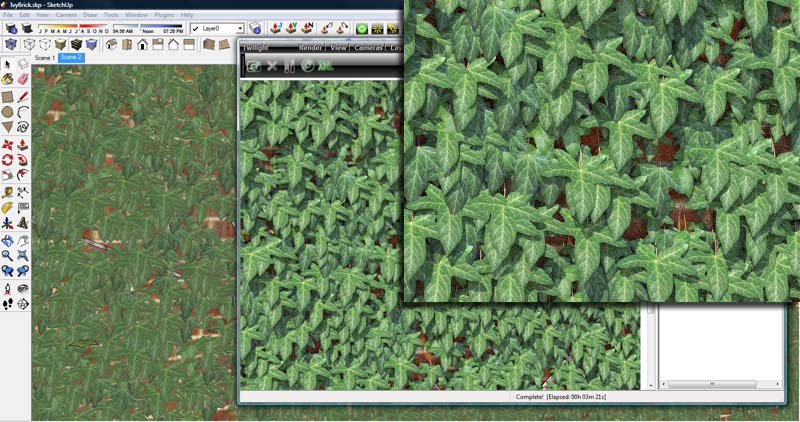
      Component spray gives you much control over many things in spraying components... unfortunately, I've just discovered a few minutes ago... you can NOT use Component Spray tool on Vertical surfaces (someone please correct me if I'm wrong!)
      But I can NOT get an Ivy leaf I created to scatter using Component Spray tool on a vertical wall. πŸ˜•

      So I turned to the fur plugin... but... I have some questions...
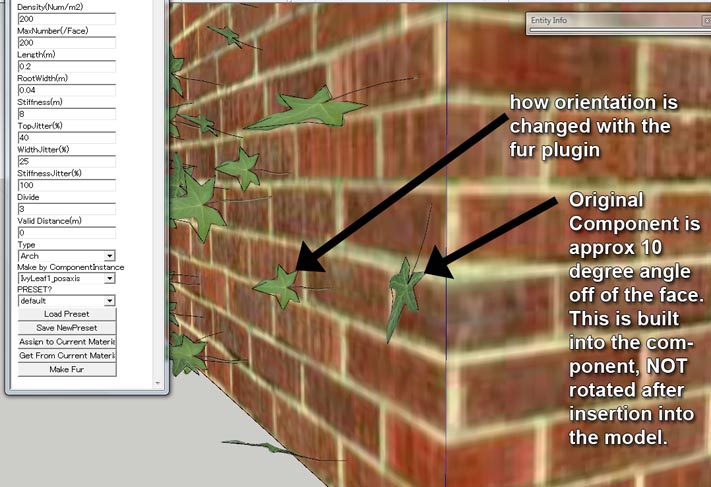
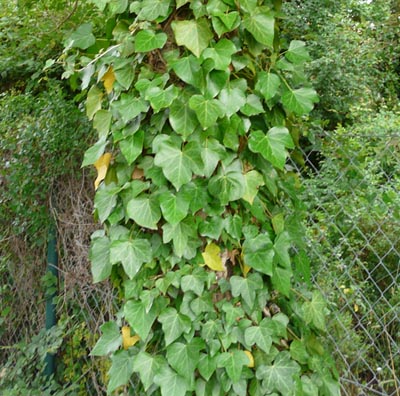
      How do I get it to place the Ivy Leaf Components as shown in the image below "Ivy-Real" ❓

      There's no control that I can find to STOP the components from rotating randomly... can anyone correct me? I want all my Ivy leaves to basically be oriented the same way... only rotate slightly one direction or the other, like actual ivy leaves. I can not get Fur plugin to behave this way.

      Also, I can NOT get the components to be created with Fur Plugin so that they are oriented correctly... they "stand up" perpendicular to the surface, no matter what I seem to do in the fur settings. EDIT... modifying original component axis "fixes" this "stand up" issue. The Green and Red Positive axes are very important to the Fur Plugin.

      Also, I wish I could 'spray' like the Spray tool onto a vertical wall surface... I like the finite control and ability to add multiple leaf types into the Spray Tool... this functionality does not seem present yet in the Fur Plugin.

      Also, I wish I could define the physical distance of allowable 'overlap' between 2 similar components, sometimes you can end up with multiple instances basically on top of one another, while other areas of the canvas seem empty... I wish I could get the distribution more 'even'... one can spend hours deleting the overlapping components. πŸ˜•


      fur-ivy-question.jpg


      Ivy-Real.jpg

      posted in Plugins
      F
      Fletch
    • RE: OMG! fur plugin is AMAZING!

      @frederik said:

      However, if you're able to save the texture with a transparent background (I.e. as a .png file), it will automatically be made into an alpha-channel... πŸ˜‰

      simply "fix" the buffalo grass component to contain the .png file with the alpha mask already inside it πŸ˜’
      voila... then everything is automatic in Twilight. πŸ˜‰

      oops - thanks dozer, I see you "fixed" it for Twilight. β˜€

      posted in Gallery
      F
      Fletch
    • RE: Twilight Render - Regas Challenge

      Great images, Oli! πŸ‘
      Regarding people, as another person mentioned, clients need them. Really... in fact, if they don't see people no matter how good the render most of my clients say "where are the people!? fill it up with people!!!"

      I think the motion blur is very appropriate considering the exposure time on the cam needed for this shot.

      Wish there were a ladder, bucket, and some tools on the floor inside that made it look like he just bought the place and is coming to inspect the work progress before they come in the morning. πŸ˜†

      posted in Gallery
      F
      Fletch
    • RE: Model AND Render this: Lavalamp

      I responded to Rich on Twilight's forum, but thought I might share some insights here in case they may help others.

      Indeed, the model is more complicated than necessary... here's a render in under 2mins πŸ˜„

      Here's the model/scene ready for Twilight!

      1. deleted the water model completely. πŸ˜‰
      2. Then painted the front faces of the "inside of the glass" as "water"
      3. grouped them.
      4. opened the group and got them all oriented to point "out" (away from the centerline /centroid of the lamp)
      5. deleted some of the geometry in the upper base group to get out of the way of the light... deleted odd-shaped emitting light plane which was equal to about 50 lights. ❗
        (Each face is triangulated, so an odd-shaped face with many faceted sides = many triangles, each triangle = 1 light emitting plane)
      6. set a spot light in the bottom of the lamp (renders much more quickly than emitters and about 100x faster than the odd-shaped emitter plane.)
      7. used White as the color of the glass and Flint template 1% opacity
      8. used White as the color of the water and 0% opacity
      9. used the SSS>Wax template at default settings for the Lava.
      10. used Brushed Metal template no bump. 600 shininess.
      11. scaled the scene accurately ❗ (14" high... approx 35cm)
      12. scaled the lava by 1.08 to fill the lamp more and hide top and bottom of the lava model
      13. changed color of base to just be flat grey at 75% grey
      14. inserted the Bauhaus lamp scene and deleted the lamp and purged the file.
      15. used the studio for the lamp to light the scene
      16. created a camera view I liked.
      17. applied a fake emitter material to the reflection screens in the background to get something interesting in the metal reflections. I hid a fake-emit screen or two.
      18. adjusted the power of my spot light and hot spot and falloff until I was happy (about 2mins of work)
      19. rendered prelim at 300x600 on low.
      20. rendered final at 300x600 on Medium+.

      1m47s-Med+.jpg

      posted in Gallery
      F
      Fletch
    • RE: [Plugin] Camera Stats

      Sorry Martin, haven't tried it yet, but can you, in your initial post, please explain the "send data" "get data" buttons?

      posted in Plugins
      F
      Fletch
    • 1
    • 2
    • 5
    • 6
    • 7
    • 8
    • 9
    • 36
    • 37
    • 7 / 37