Stinkie,
The library is still available here - http://forums.luxology.com/discussion/topic.aspx?id=16238
Stinkie,
The library is still available here - http://forums.luxology.com/discussion/topic.aspx?id=16238
@unknownuser said:
At least I was not the only one thinking that the kid was doing the one finger wave
Scott
I guess that's a good thing. It's the little things of a billboard that will get a drivers attention. How many people will drive by and say, "Did that kids just flip me the bird?" LOL The kid in the pic is my youngest son. After at least a hundred attempts to get a good picture, this was the best we could get.....him pointing at the camera. We thought about photoshopping out the finger, but concluded it may be an effective attention getter.
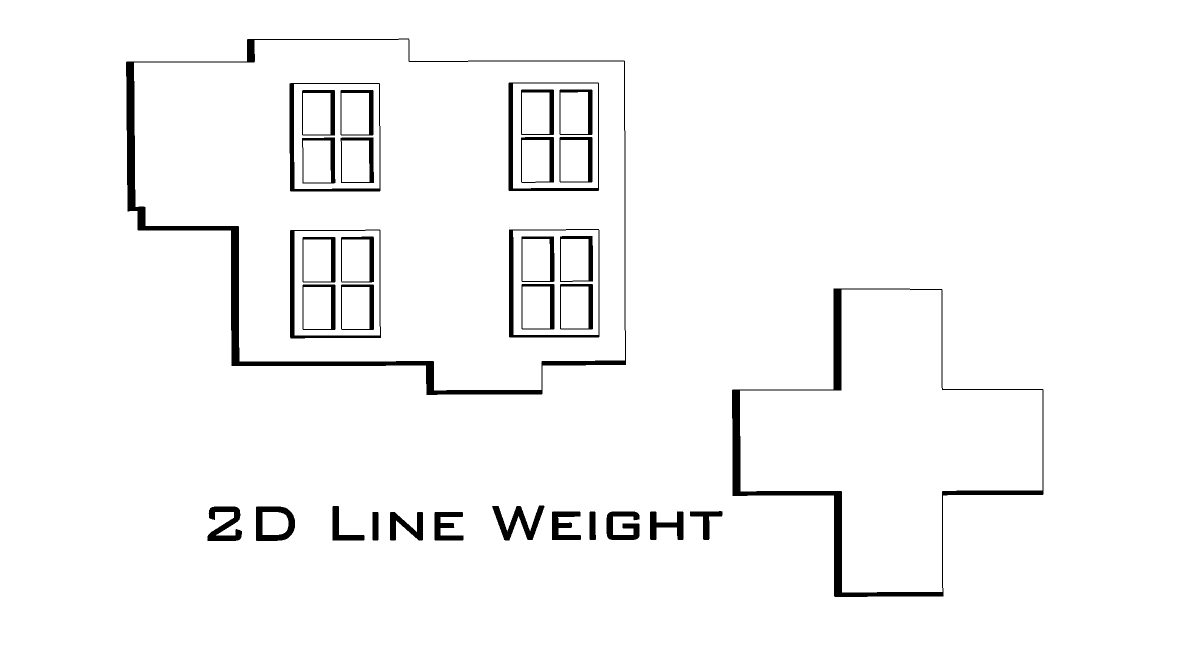
I was thinking about this today. Currently, the only available way to give a line thickness by turning it into a face and painting it black. I often use the extrude line ruby for this when I need a thick line in 2D.
Can someone modify this script so that it will automatically widen a 2D line by a certain distance and automatically paint in the thickness?
Ideally you would be able to set the "line weight" and axis and then just click on a line and have the line extrude on the set axis by the distance of the line weight, then automatically paint in the face created by the extrusion.
I may also be beneficial to include the ability to select to which side of the line the "weight" is added.
The best scenario would be a dialog box where you could set the various options, then just click away. Again, this would ideally be of most benefit when presenting 2D drawing.
I usually draw out all my build plans in 2D first, which I save separately from the actual model. I always present a 2D plan along with my models, which usually needs a bit of dressing up outside of sketchup. It would be nice to see some tools that specifically addressed the presentability of 2D plans out of sketchup.
Al,
Just tried out the newest version and it's a lot better. I'm really happy with the results. A couple things though.
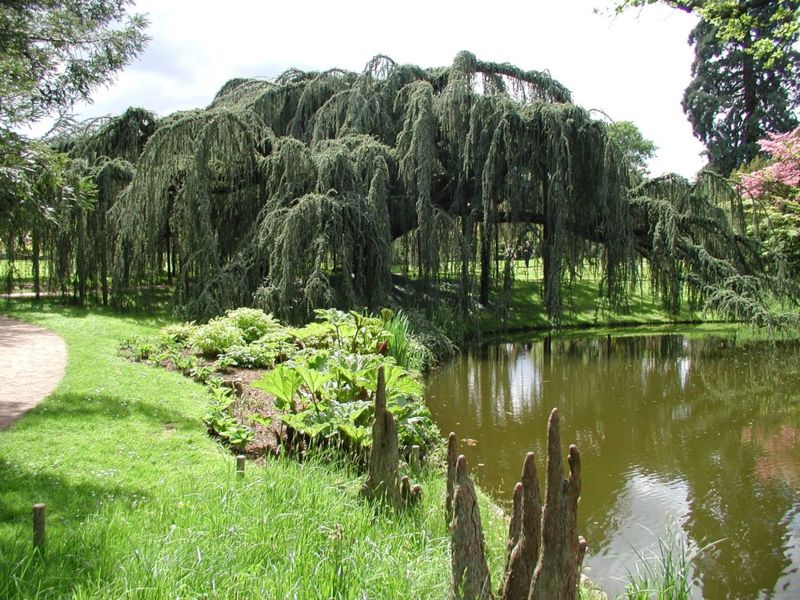
It would be nice to have some control over the secondary branching. Even at Max fullness, the secondary branching remains disproportionate to what occurs in nature. The off shoot branching should be fuller and vary in direction depending on the type of specimen. Control of secondary branching would help to achieve a higher level of realism.
Control over the central leader. Most deciduous trees don't have the same central leader structure as a conifer, where the main trunk extends to the top. The central leader will generally split into branching off shoots at the crotch, long before the top of the tree. This is true especially as deciduous trees mature. In the editor however, for standard trees, the central leader is always extending to the top of the tree. It works for some trees, like Oak for instance, but for others, I have a hard time creating the proper branching structure. Take this Zelcova Serrata for instance. Notice the central leader vs. branching structure -

Lastly, I was wondering if it were possible to allow an option to create an NPR version of the tree? Something that will be read in a B&W sketchy line style. I tried playing around with unhiding the lines that are around the shadow mask, and this works okay, but it would be great if some of the branching was also translated into line work. I know this may be pushing it, but it's worth a shot.
I was helping my wife put together a billboard ad for a client yesterday and we needed an image of a wrench to make the idea work. I spent about 20 minutes looking through clipart, when it dawned on me that I could've just modeled and rendered a wrench in the same amount of time I spent looking for one. So, 20 minutes later, I whipped up a quick wrench in Sketchup and rendered it in hypershot. We finished the ad and our client sold the billboard. Just another example of Sketchup to the Rescue!

")


Pete, have you tried to export the mesh into a program like Zbrush for further sculpting? I wonder how it would hold up because it's triangulated and not quad poly. I've tried to take SU mesh into Modo and use the sculpt tools, but it tore apart at the seems. Probably due to the vertices not welding properly. I think Max handles triangulated mesh better than any other software. Perhaps you could try to take one of your sketchup characters into max and try playing with the trial version of Joe Alters Lip Service and L brush? http://www.lbrush.com/test/features.htm
Yes Pete. Hypershot, with just a default HDRI and standard materials. Texturing took less than a minute and rendering was almost instant as I just saved a screen shot right after texturing. Hypershot really shines on this type of thing.
That's wild! I think even Solo would be proud of that one! Maybe add some small circles with TOS for the whisker dots and it's a dead ringer for the photo.
I actually kicked that around at first. Earth Mover....Earth Moving Design...something like that. I just didn't think it rolled off the tongue quite right.
I went ahead and purchased blueatlasdesign.com just in case.
Jeff, how is your design business endeavor coming along?
No not a definite choice, but I'm 90% committed. It's named after my favorite tree, the Blue Atlas Cedar.
Thanks for the idea Jeff. The more I thought about it, the more I felt I needed to keep the logo pretty broad. We are doing a lot of general graphic design and visualization work, and although we are catering mostly to the landscape industry, I don't want the logo to limit our future marketing base to that field alone. I currently have a landscape design and build company that I have been funneling all my design work through. In the past 6 months I have done more and more work for other contractors and landscape architects. I'm hoping to continue growing that end of things, but I want to separate it from my installation company, so as not to create the wrong perception for potential clients. I also believe it's wise to diversify heading into a recession. I'm toying with the idea of broadening my design horizons past that of the landscape field.
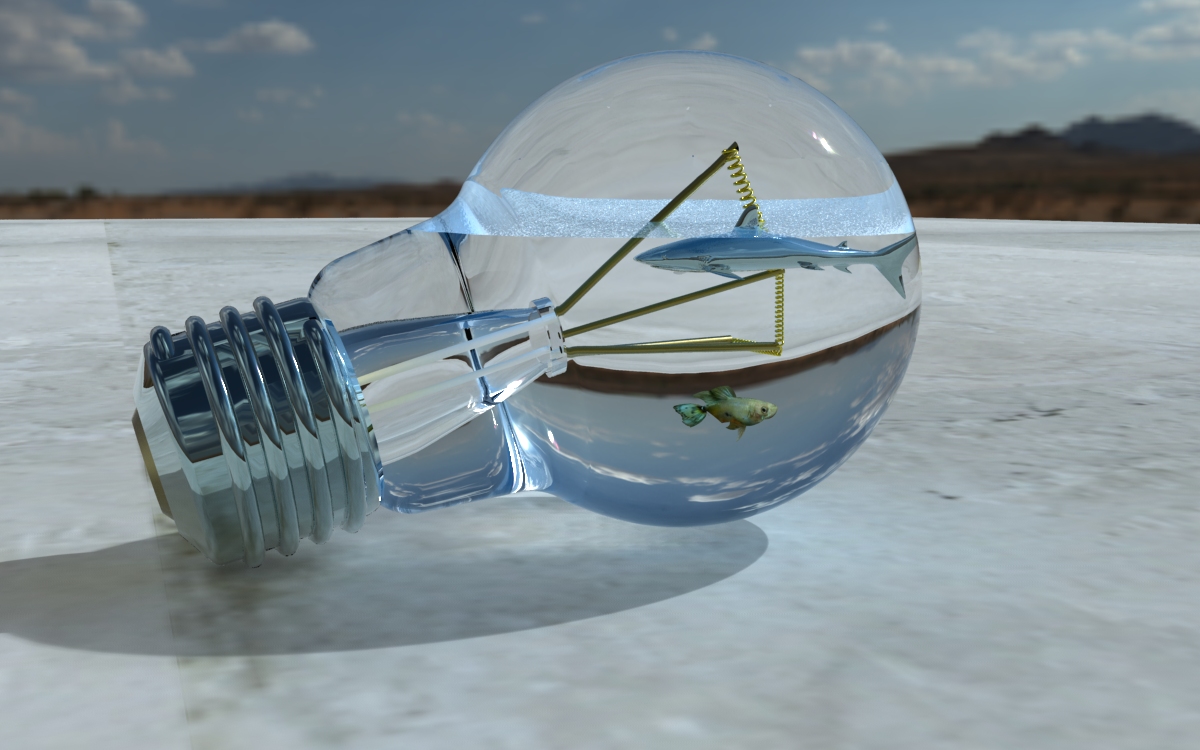
Pete, that's great!! The caustics make a world of difference. Did they add a lot of render time?
Peter, the extra polygons on the edges are the result of using Fredo's round edges by bezier plugin. I first extrude a 2D shape and double click on the front face to select the edges, then I run the script. I'll have to do about 5 minutes of corrections, but the results are very clean and accurate. I only round the edges that are going to be seen in the render, and it's just to pick up a slight amount of reflection and light bounce on the edge. After all there are not many true hard edges in real life.
Thanks Tom!
Decided to try again. This time I took the compass into 3ds Max and did all the layout and font's in there. I used slight beveling and added a bend modifier to the upper letters. Rendered in Vray for Max.

Hey prince
Thanks for sharing the model. I ran the bulb through SDS with 1 iteration and then gave it a go with hypershot. Render took about 3 min.

")


 That's just wrong!