sketchucation logo sketchucation
    • 登入
    🛣️ Road Profile Builder | Generate roads, curbs and pavements easily Download

    Medeek Floor

    已排程 已置頂 已鎖定 已移動 Plugins
    139 貼文 6 Posters 8.3k 瀏覽 5 Watching
    正在載入更多貼文
    • 從舊到新
    • 從新到舊
    • 最多點贊
    回覆
    • 在新貼文中回覆
    登入後回覆
    此主題已被刪除。只有擁有主題管理權限的使用者可以查看。
    • medeekM 離線
      medeek
      最後由 編輯

      Version 0.9.3b - 09.12.2024

      • Fixed a HTML/Javascript bug in the Draw Floor menu.

      Nathaniel P. Wilkerson PE
      Medeek Engineering Inc
      design.medeek.com

      1 條回覆 最後回覆 回覆 引用 0
      • medeekM 離線
        medeek
        最後由 編輯

        Version 0.9.4 - 09.16.2024

        • Added joist hangers to the Draw and Edit menus.
        • Added a built-in library of face mount and and top flange hangers.

        Nathaniel P. Wilkerson PE
        Medeek Engineering Inc
        design.medeek.com

        1 條回覆 最後回覆 回覆 引用 0
        • medeekM 離線
          medeek
          最後由 編輯

          Tutorial 2 - Joist Hangers (19:57 min.)

          Nathaniel P. Wilkerson PE
          Medeek Engineering Inc
          design.medeek.com

          1 條回覆 最後回覆 回覆 引用 1
          • medeekM 離線
            medeek
            最後由 編輯

            Version 0.9.5 - 09.18.2024

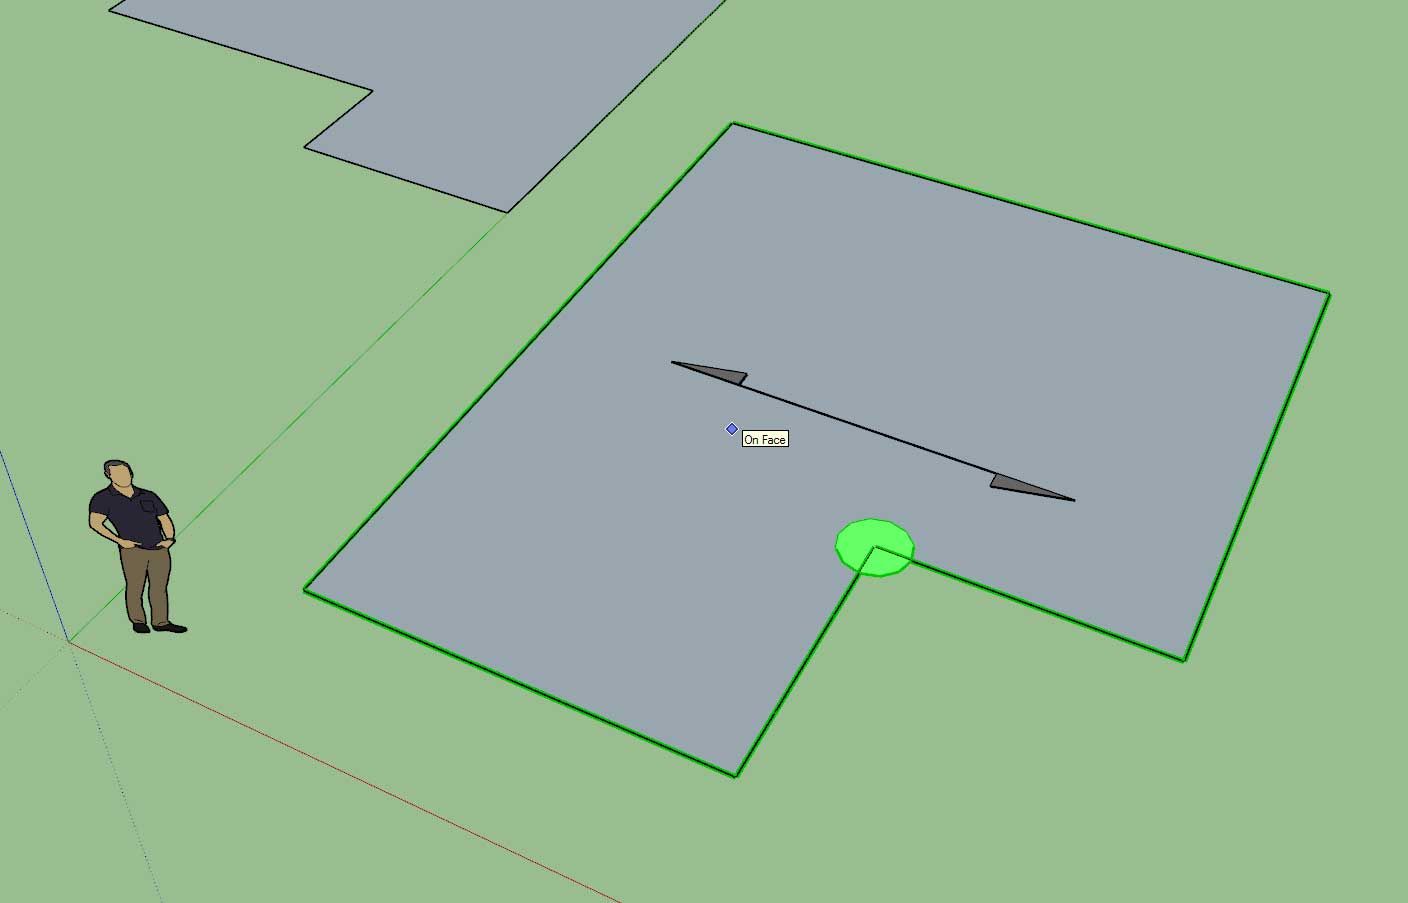
            • Added a joist direction arrow to the draw floor tool.
            • Added a "debug mode" parameter to the General tab of the Global Settings.
            • Fixed a bug with deck board placement.
            • Fixed a bug with the deck board offset parameter.

            floor_su054_800.jpg

            Nathaniel P. Wilkerson PE
            Medeek Engineering Inc
            design.medeek.com

            1 條回覆 最後回覆 回覆 引用 0
            • medeekM 離線
              medeek
              最後由 編輯

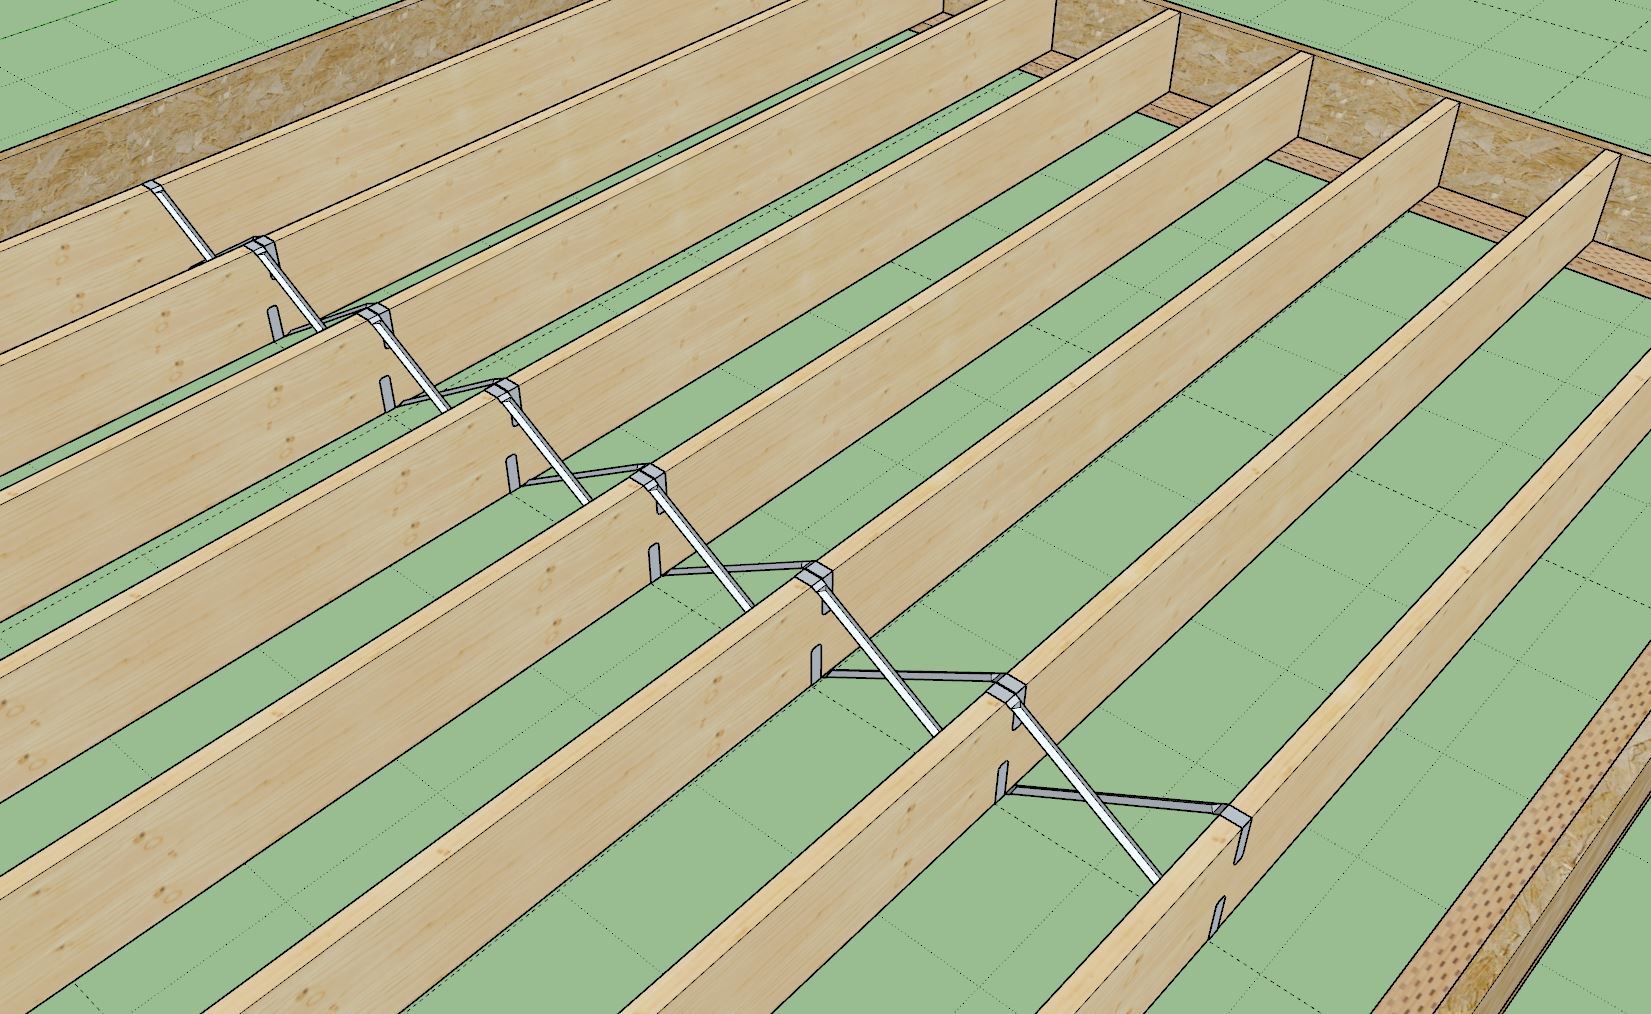
              I have had two requests now for metal bridging or bracing so I took about an hour and modeled up a Simpson TB27 between 2X10 joists @ 16" on center. It actually looks really nice:

              However some things immediately jumped out at me:

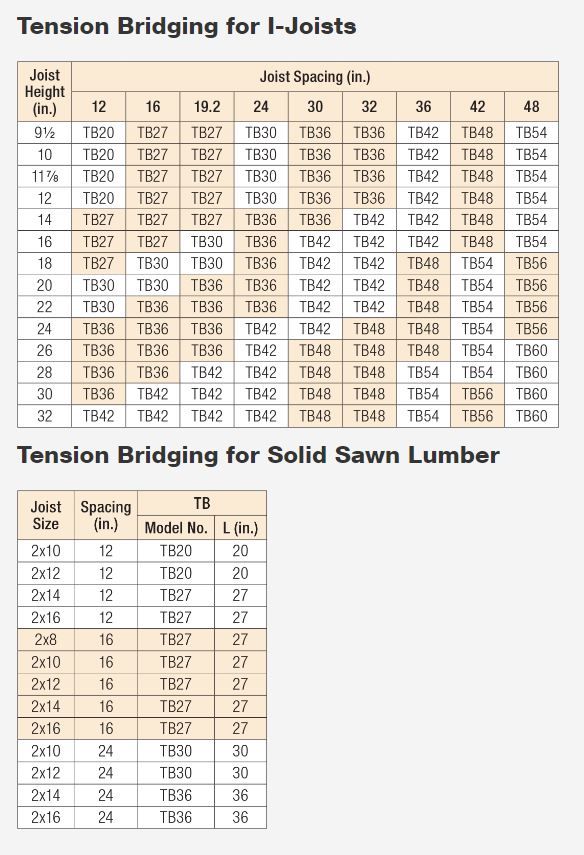
              1.) I based my TB27 off of the ICF file on Simpson's website so it is dimensionally accurate, however to do that takes quite a bit of time. Modeling like this is fun but very time consuming and one thing I never have enough of is time.

              2.) This is the TB27 configured for 2X10's on 16" centers, now think of all the other permutations (including I-Joists). To make this look right would require a preconfigured component for each case. The number of permutations is at least 130 or more.

              3.) If you also consider custom offsets of specific joists then it gets even more crazy.

              My thinking is that if I do want to enable something like this it will need to be less detailed geometrically (just a basic representation) and drawn on the fly using an algorithm that checks joist depth and spacing. Rather than specify the exact part number (ie. TB20, TB27, TB30 etc...), just specify that it is metal bridging.

              floor_su055_800.jpg

              floor_su056_800.jpg

              floor_su057_800.jpg

              Nathaniel P. Wilkerson PE
              Medeek Engineering Inc
              design.medeek.com

              gullfoG 1 條回覆 最後回覆 回覆 引用 1
              • gullfoG 離線
                gullfo @medeek
                最後由 編輯

                agreed - i'd say less detail on the components to improve speed and rendering, and just good descriptive text / names instead. one option might be in a "library" view showing a detailed version of a single component so selection purposes, but the generated structure uses the simpliest possible geometry.

                Glenn

                http://www.runnel.com

                1 條回覆 最後回覆 回覆 引用 0
                • medeekM 離線
                  medeek
                  最後由 編輯

                  Version 0.9.6 - 09.19.2024

                  • Fixed a bug with metric floor presets.
                  • Fixed a bug with the insulation module.

                  Nathaniel P. Wilkerson PE
                  Medeek Engineering Inc
                  design.medeek.com

                  1 條回覆 最後回覆 回覆 引用 0
                  • medeekM 離線
                    medeek
                    最後由 編輯

                    I am changing up the way in which I do subtractive geometry from the way I've done it with the other plugins in the past.

                    If you enable Subtractive Geometry in the global settings you can use the SUBTRACT keyword to cut holes through everything as per normal. However you will now also have two other options:

                    SUBTRACT_SHEATH: This keyword will only subtract through sheathing, flooring and deck boards.

                    SUBTRACT_GYPSUM: This keyword will only subtract through gypsum

                    I may add others as the need arises or additional requests are made.

                    Nathaniel P. Wilkerson PE
                    Medeek Engineering Inc
                    design.medeek.com

                    1 條回覆 最後回覆 回覆 引用 1
                    • medeekM 離線
                      medeek
                      最後由 編輯

                      Adding in the advanced floor options into the Global Settings:

                      floor_su0floor_su060_800.jpg 59_800.jpg

                      I am working on adding in metal bridging with some associated parameters:

                      floor_su060_800.jpg

                      P.S.
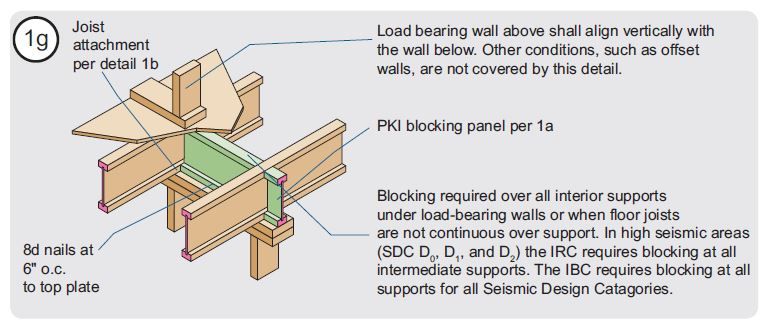
                      I was going to combine the metal bridging with the solid blocking however after some thought I realized there might be cases where you might combine both forms of bracing in one floor (solid blocking and metal bridging). Hence I need a separate module for blocking. Unlike the wall blocking floor blocking may be regular lumber or I-Joist blocking so that further complicates the matter slightly.

                      The parameters for the blocking module will probably be:

                      1.) Blocking Type: Lumber/I-Joist

                      If blocking type is Lumber:

                      Blocking Width: 1.5 in (default)

                      Blocking Material: Lumber / PT Lumber / LSL / PSL / LVL etc...

                      If blocking type is I-Joist

                      Blocking I-Joist Family:

                      Blocking I-Joist Type:

                      other general parameters are:

                      Row Spacing: 96 in. (default)

                      Stagger Blocking: Yes/No

                      Remove Row: empty by default

                      Quite a few more parameters (8) to add into a number of files, this will keep me busy for a couple of days at least.

                      floor_su061_800.jpg

                      Nathaniel P. Wilkerson PE
                      Medeek Engineering Inc
                      design.medeek.com

                      1 條回覆 最後回覆 回覆 引用 0
                      • medeekM 離線
                        medeek
                        最後由 編輯

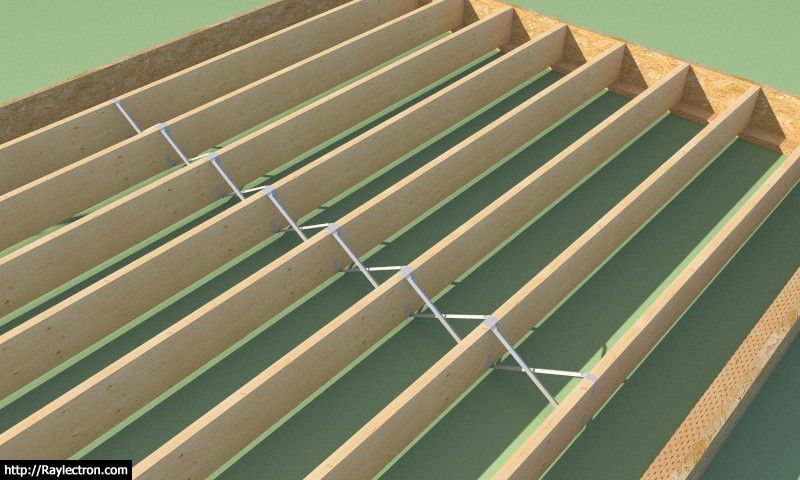
                        First look at metal bridging (I-joist and Lumber):

                        floor_su069_800.jpg

                        floor_su070_800.jpg

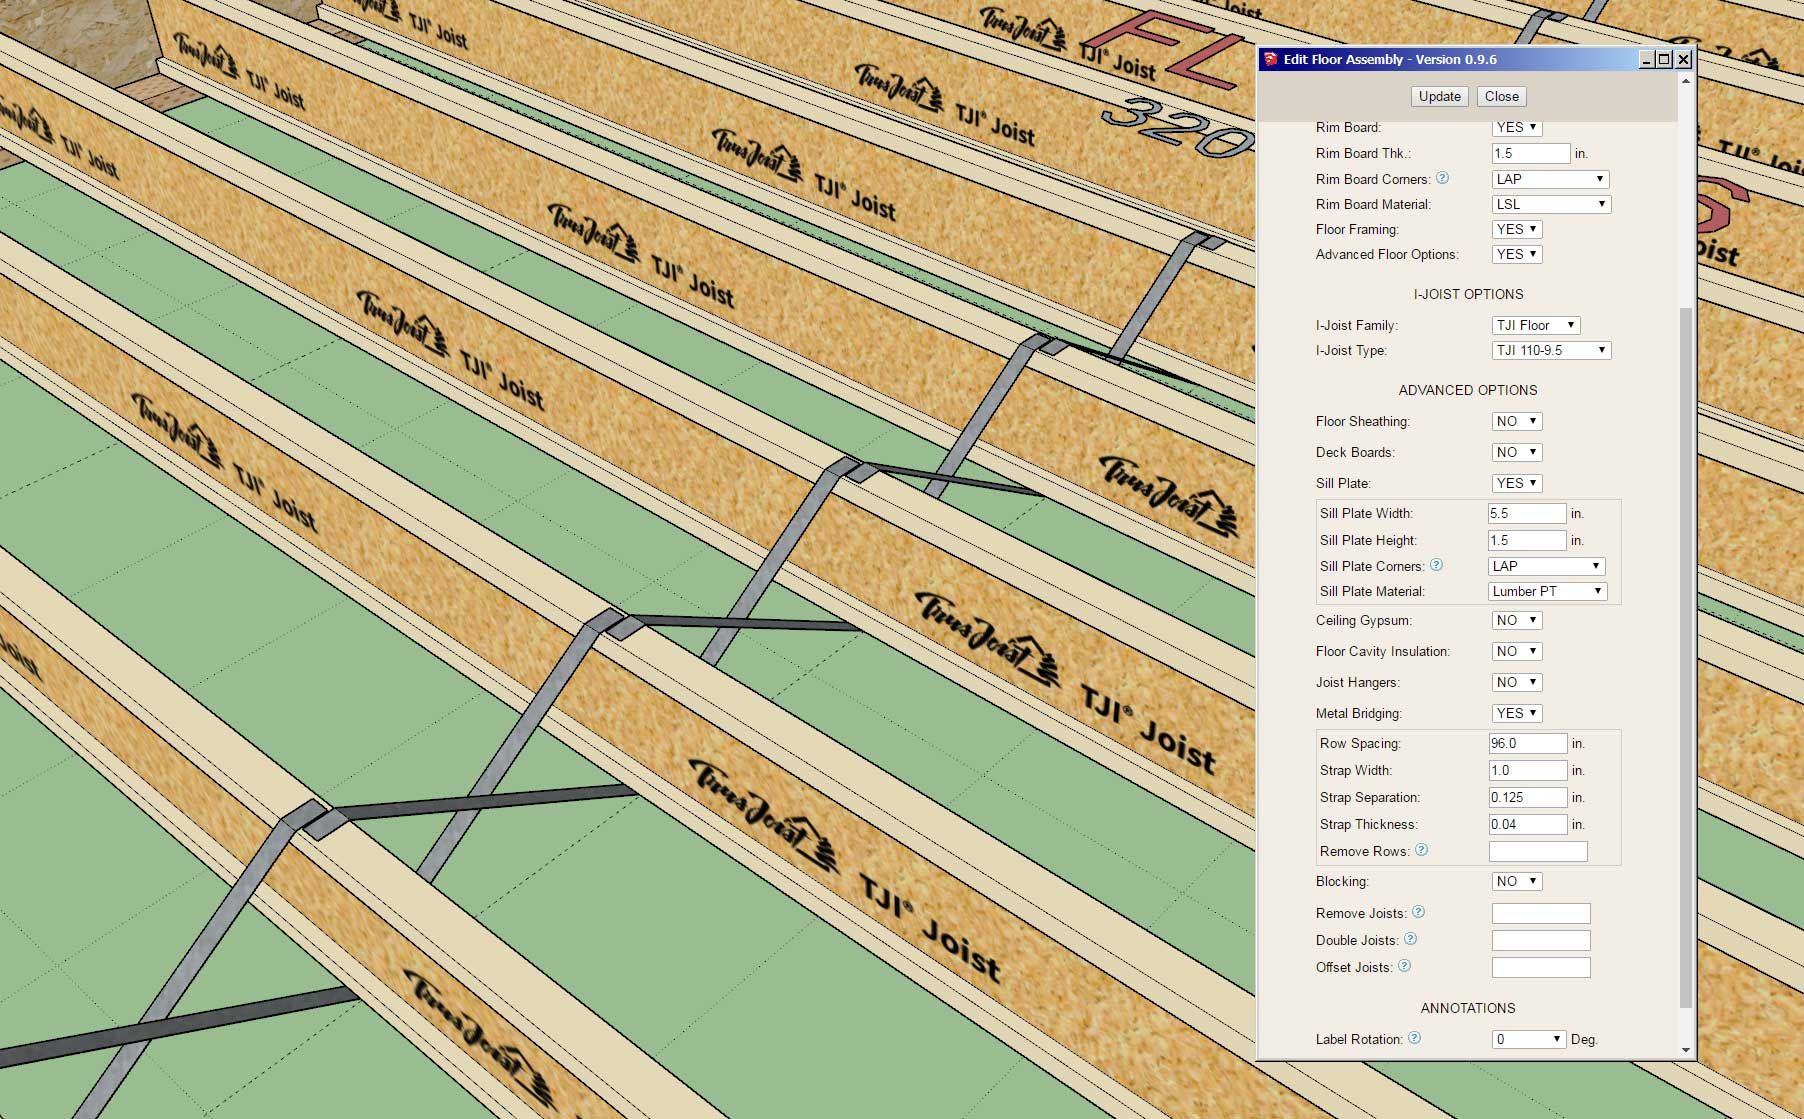
                        Geometrically a lot simpler and more lightweight than the preconfigured component that I made based off of the Simpson IFC model. I'm using my galvanized texture/material but I may change it slightly. There are quite a few parameters that one can adjust to customize the look and feel of these metal bridging straps, hopefully that should make things configurable enough for most power users.

                        As noted per the Simpson literature the crossing straps should not be in direct contact to avoid screeching noises when they move under load. Hence the default 1/8" gap, but this can be modified as can be seen in the menu.

                        I've also included a thickness parameter for the straps. The correct thickness for a 20 gauge strap is probably around 0.035" however I've rounded the default value to an even 0.04".

                        Nathaniel P. Wilkerson PE
                        Medeek Engineering Inc
                        design.medeek.com

                        1 條回覆 最後回覆 回覆 引用 0
                        • medeekM 離線
                          medeek
                          最後由 編輯

                          Version 0.9.7 - 09.23.2024

                          • Updated the SUBTRACT feature with three other options.
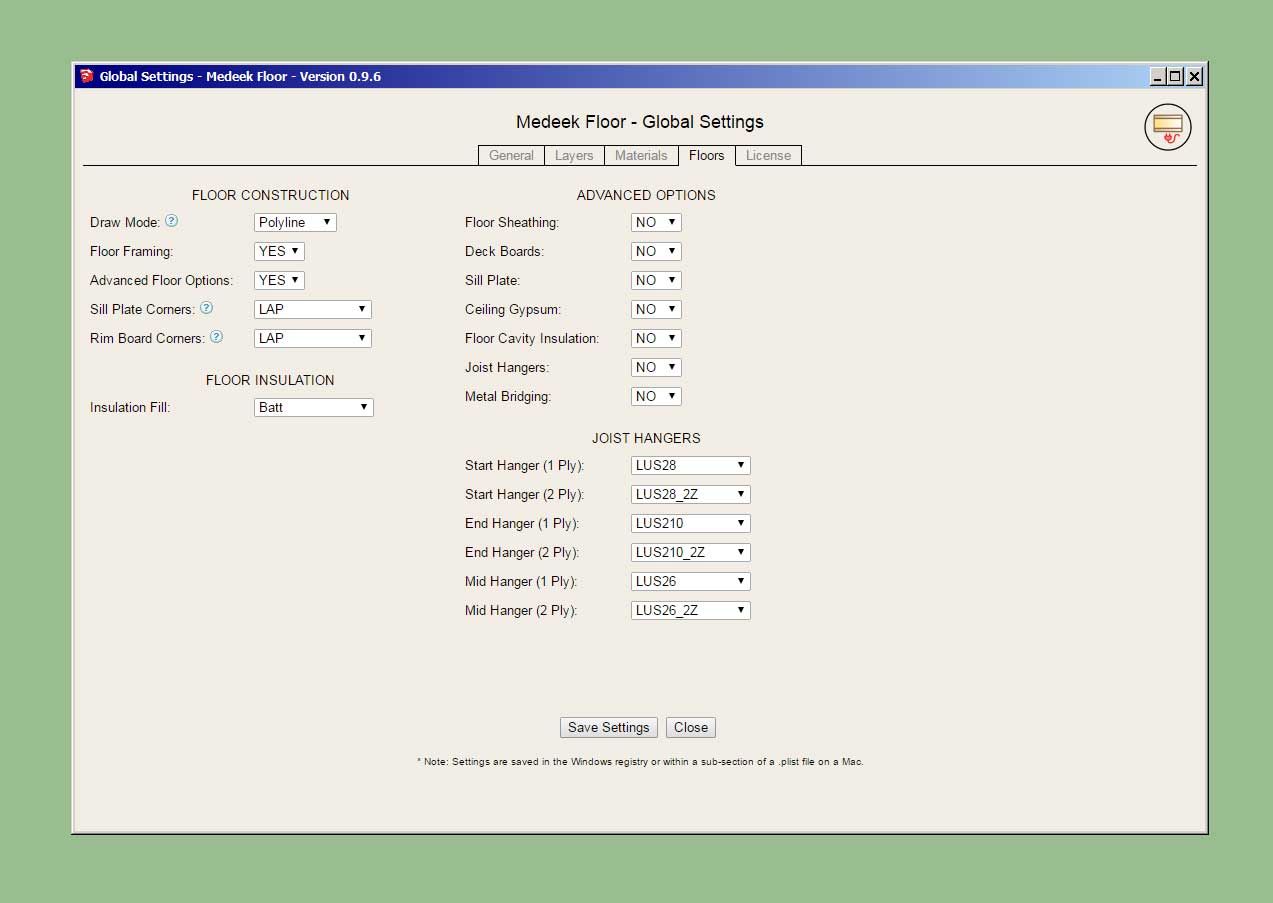
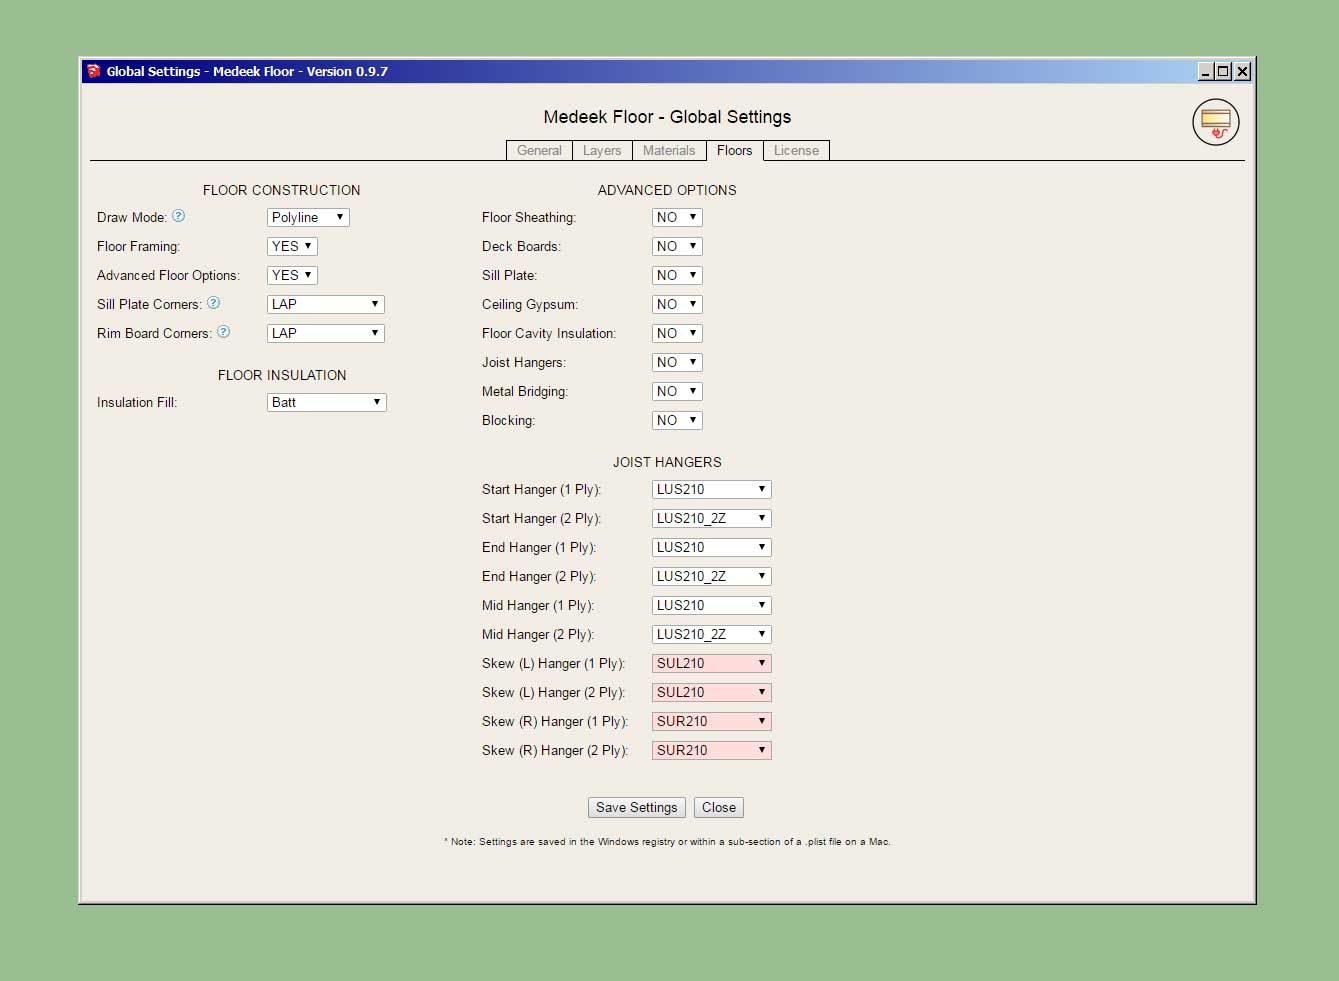
                          • Added seven advanced options in the Floor tab of the Global Settings.
                          • Added metal bridging to the Draw and Edit menus.
                          • Added solid blocking (Lumber and I-Joist) to the Draw and Edit menus.
                          • Fixed minor bugs in the HTML menus and preset system.

                          Nathaniel P. Wilkerson PE
                          Medeek Engineering Inc
                          design.medeek.com

                          1 條回覆 最後回覆 回覆 引用 0
                          • medeekM 離線
                            medeek
                            最後由 編輯

                            Tutorial 3 - Metal Bridging and Blocking (10:28 min.)

                            Nathaniel P. Wilkerson PE
                            Medeek Engineering Inc
                            design.medeek.com

                            1 條回覆 最後回覆 回覆 引用 0
                            • medeekM 離線
                              medeek
                              最後由 編輯

                              Version 0.9.8 - 09.27.2024

                              • Made the polyline/face icon (draw mode) in the draw menu clickable.
                              • Added a joist direction toggle button/icon to the draw and edit menus.
                              • Added a stagger joist option to the Draw and Edit menus.
                              • Updated the insulation, blocking, metal bridging and hanger modules to accommodate staggered joists.

                              Nathaniel P. Wilkerson PE
                              Medeek Engineering Inc
                              design.medeek.com

                              1 條回覆 最後回覆 回覆 引用 0
                              • medeekM 離線
                                medeek
                                最後由 編輯

                                So yes, staggered joist present a few issues. For example if the blocking doesn't land in the lapped region of the joist layout you end up with this:

                                floor_su081_800.jpg

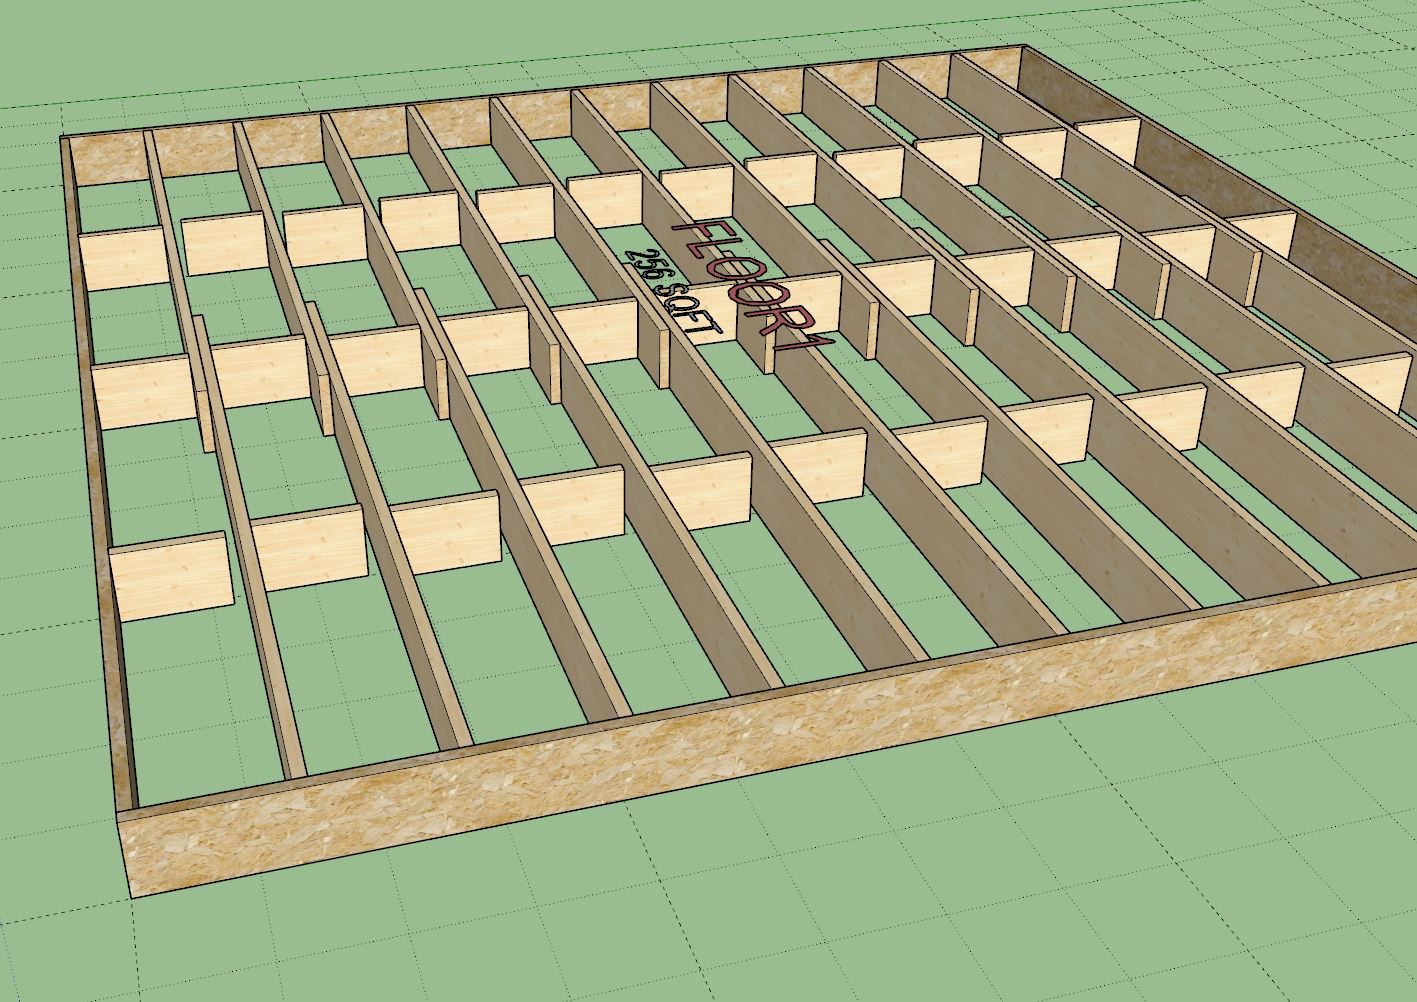
                                Right at the moment I'm not sure how to address this or actually determine when the blocking lands in the non-lapped sections of the layout. The easy way out would be to do a boolean subtraction using the joists themselves, but then I would need to separate the resulting (multi-body) group into a bunch of groups/solids, this one is a bit of headache.

                                Nathaniel P. Wilkerson PE
                                Medeek Engineering Inc
                                design.medeek.com

                                1 條回覆 最後回覆 回覆 引用 0
                                • medeekM 離線
                                  medeek
                                  最後由 編輯

                                  With staggered joists I am tracking how many rows of joists I need, the joist length and lapped length, so given that information (three variables) I can then run a quick check on each blocking row to see how it pencils out. This little block of code does the trick:

                                  if @Spanno < 2
                                  			stoffset = 'NEG'
                                  		else
                                  			lapcount = 1
                                  			for lapi in @Stjarray
                                  				if (distx > lapi[0]) && (distx < lapi[1])
                                  					stoffset = 'LAP'
                                  					break
                                  				elsif distx < lapi[0]
                                  					if lapcount.odd?
                                  						stoffset = 'NEG'
                                  					else
                                  						stoffset = 'POS'
                                  					end
                                  					break
                                  				elsif (distx > lapi[1]) && (lapcount == (@Spanno - 1))
                                  					if lapcount.odd?
                                  						stoffset = 'POS'
                                  					else
                                  						stoffset = 'NEG'
                                  					end
                                  					break
                                  				end
                                  
                                  				lapcount = lapcount + 1
                                  			end
                                  				
                                  		end
                                  

                                  As one can see there are really only three possibilities for the blocking: Lapped, Positive or Negative.

                                  The end result is this:

                                  floor_su082_800.jpg
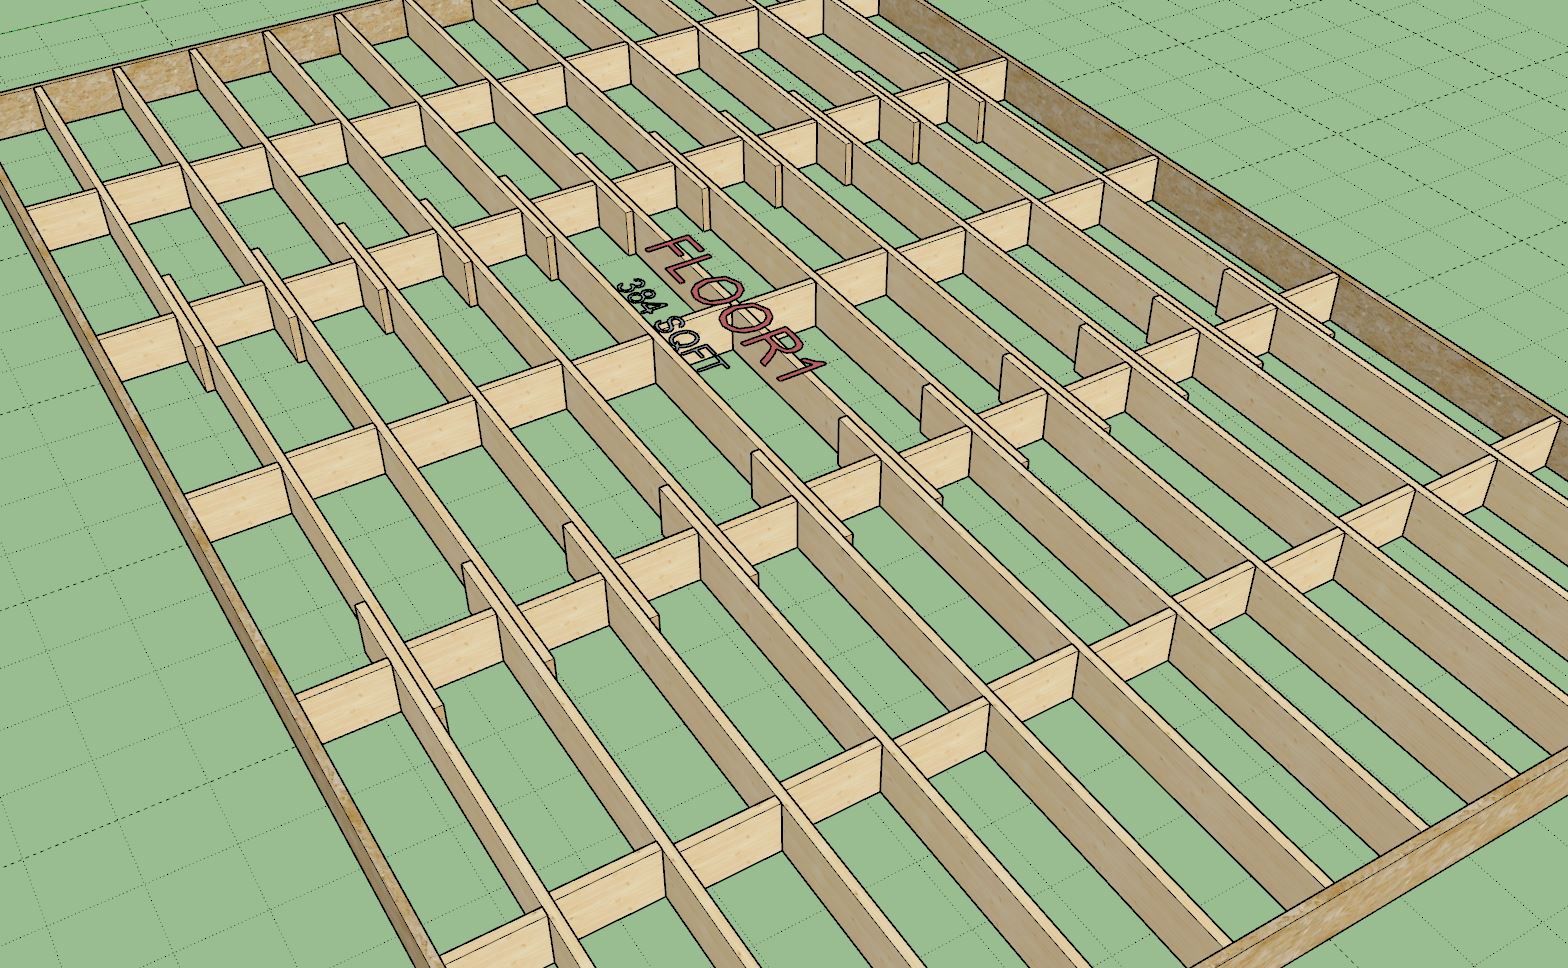
                                  Problem solved. Now I just need to apply this same logic to the metal bracing and implement it. Insulation is somewhat different so I still don’t have a good solution for that one just yet.

                                  Nathaniel P. Wilkerson PE
                                  Medeek Engineering Inc
                                  design.medeek.com

                                  1 條回覆 最後回覆 回覆 引用 0
                                  • medeekM 離線
                                    medeek
                                    最後由 編輯

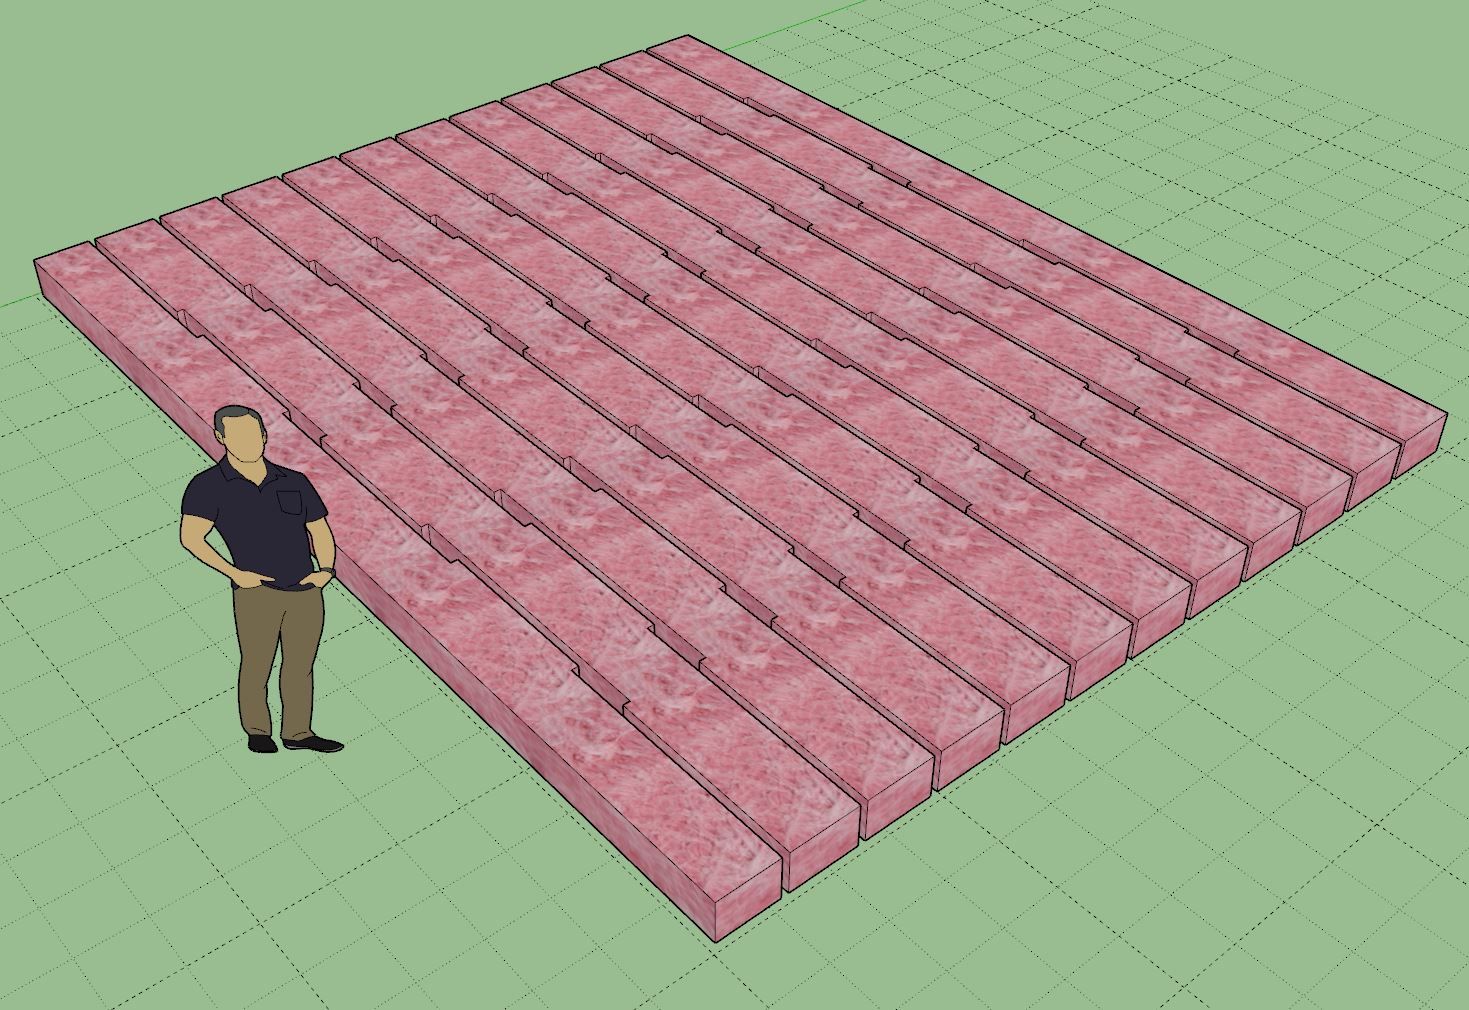
                                    After another three hours of some productive thought and hacking away at some rather large blocks of code (and a few choice words) I managed to pull together a fairly efficient and robust algorithm for the cavity insulation between those irregular joists.

                                    Ladies and Gentlemen, I give you “Batt Insulation with Staggered Joists”:

                                    floor_su086_800.jpg

                                    floor_su087_800.jpg

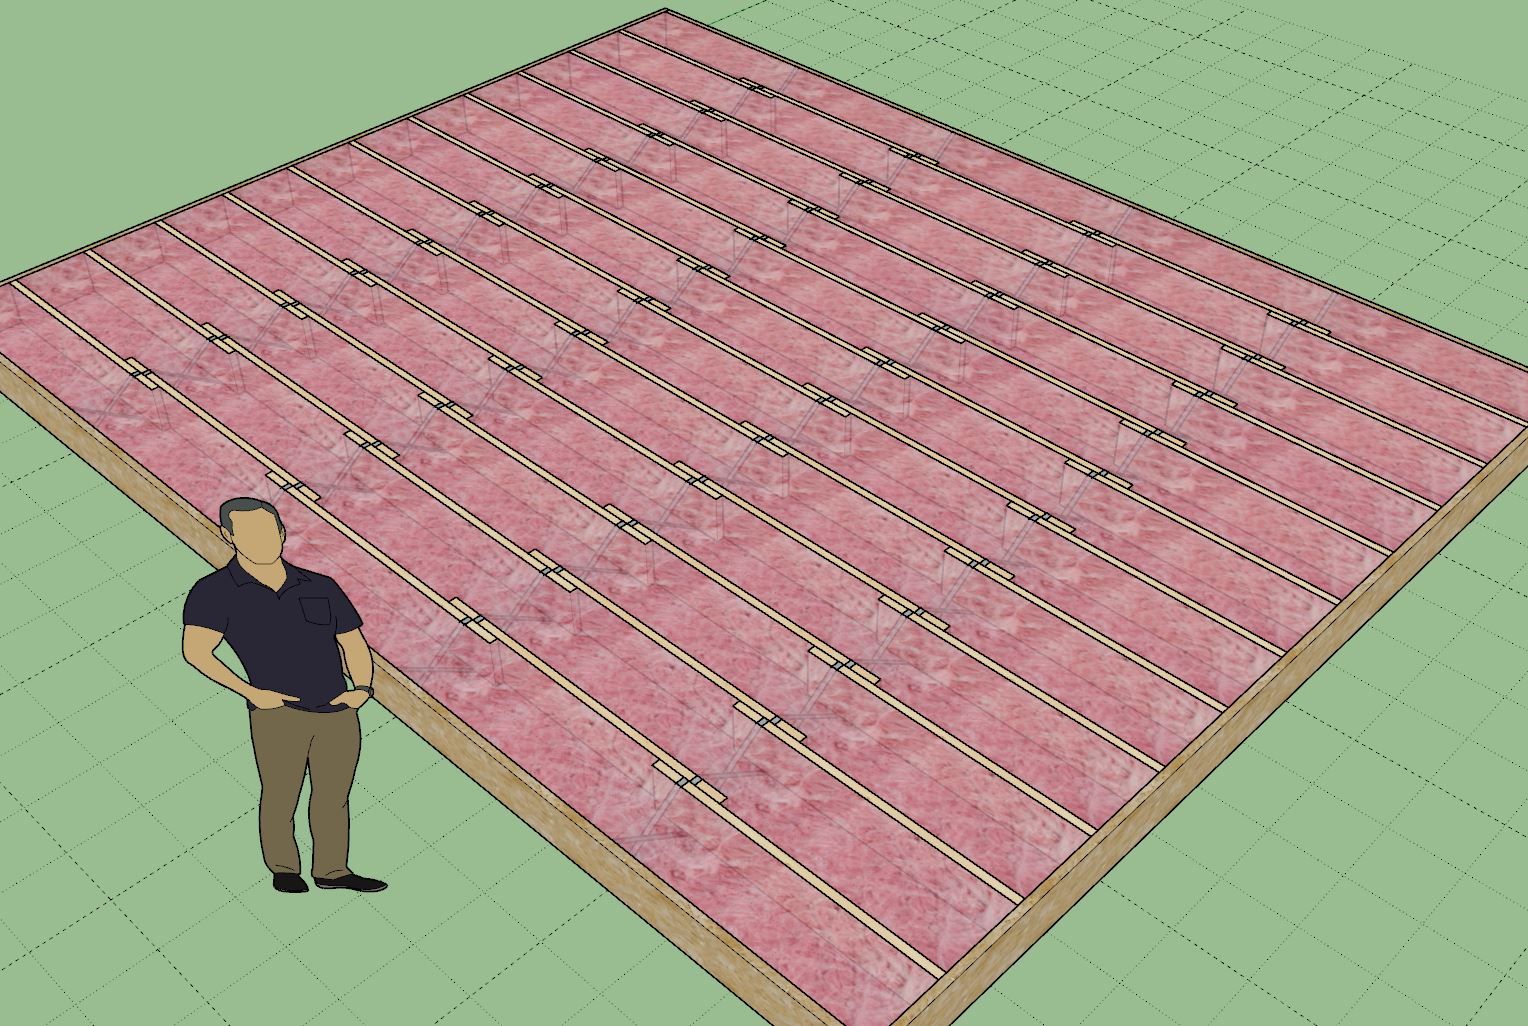
                                    I’m exhausted, tomorrow I might take a small break.

                                    Nathaniel P. Wilkerson PE
                                    Medeek Engineering Inc
                                    design.medeek.com

                                    gullfoG 1 條回覆 最後回覆 回覆 引用 1
                                    • gullfoG 離線
                                      gullfo @medeek
                                      最後由 編輯

                                      what if i want them staggered the other way? LOL J.K. nicely done!

                                      Glenn

                                      http://www.runnel.com

                                      1 條回覆 最後回覆 回覆 引用 0
                                      • medeekM 離線
                                        medeek
                                        最後由 編輯

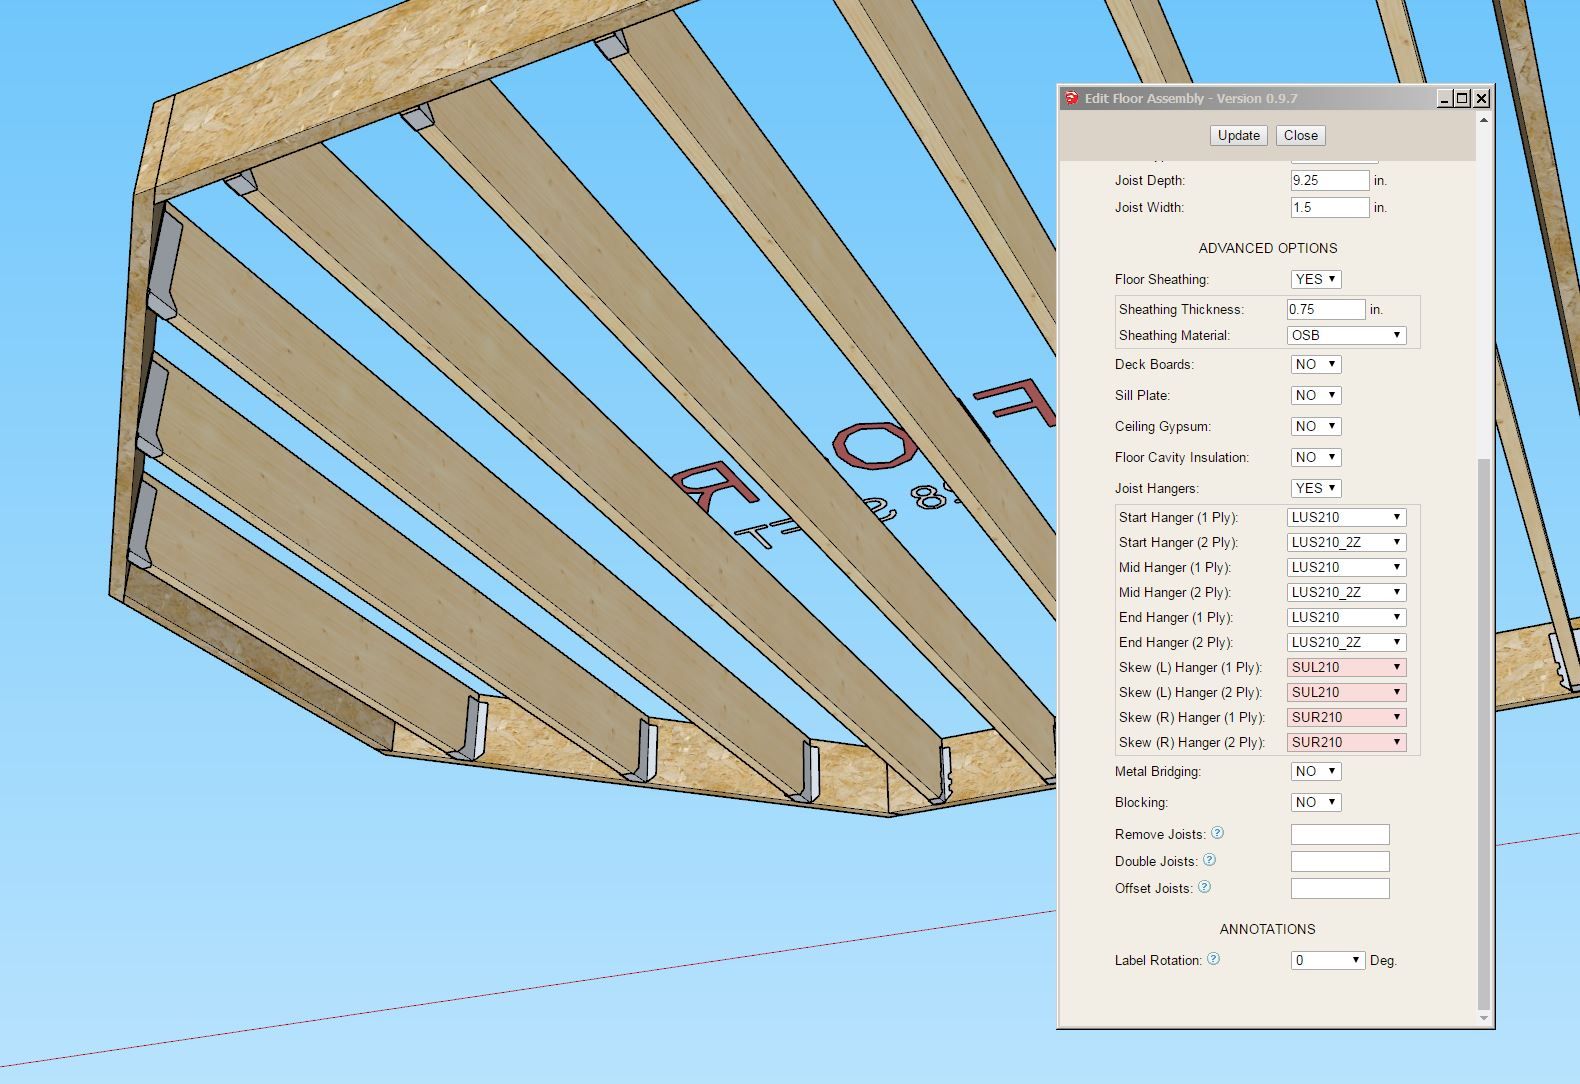
                                        First look at skewed hangers with staggered joists:

                                        floor_su096_800.jpg

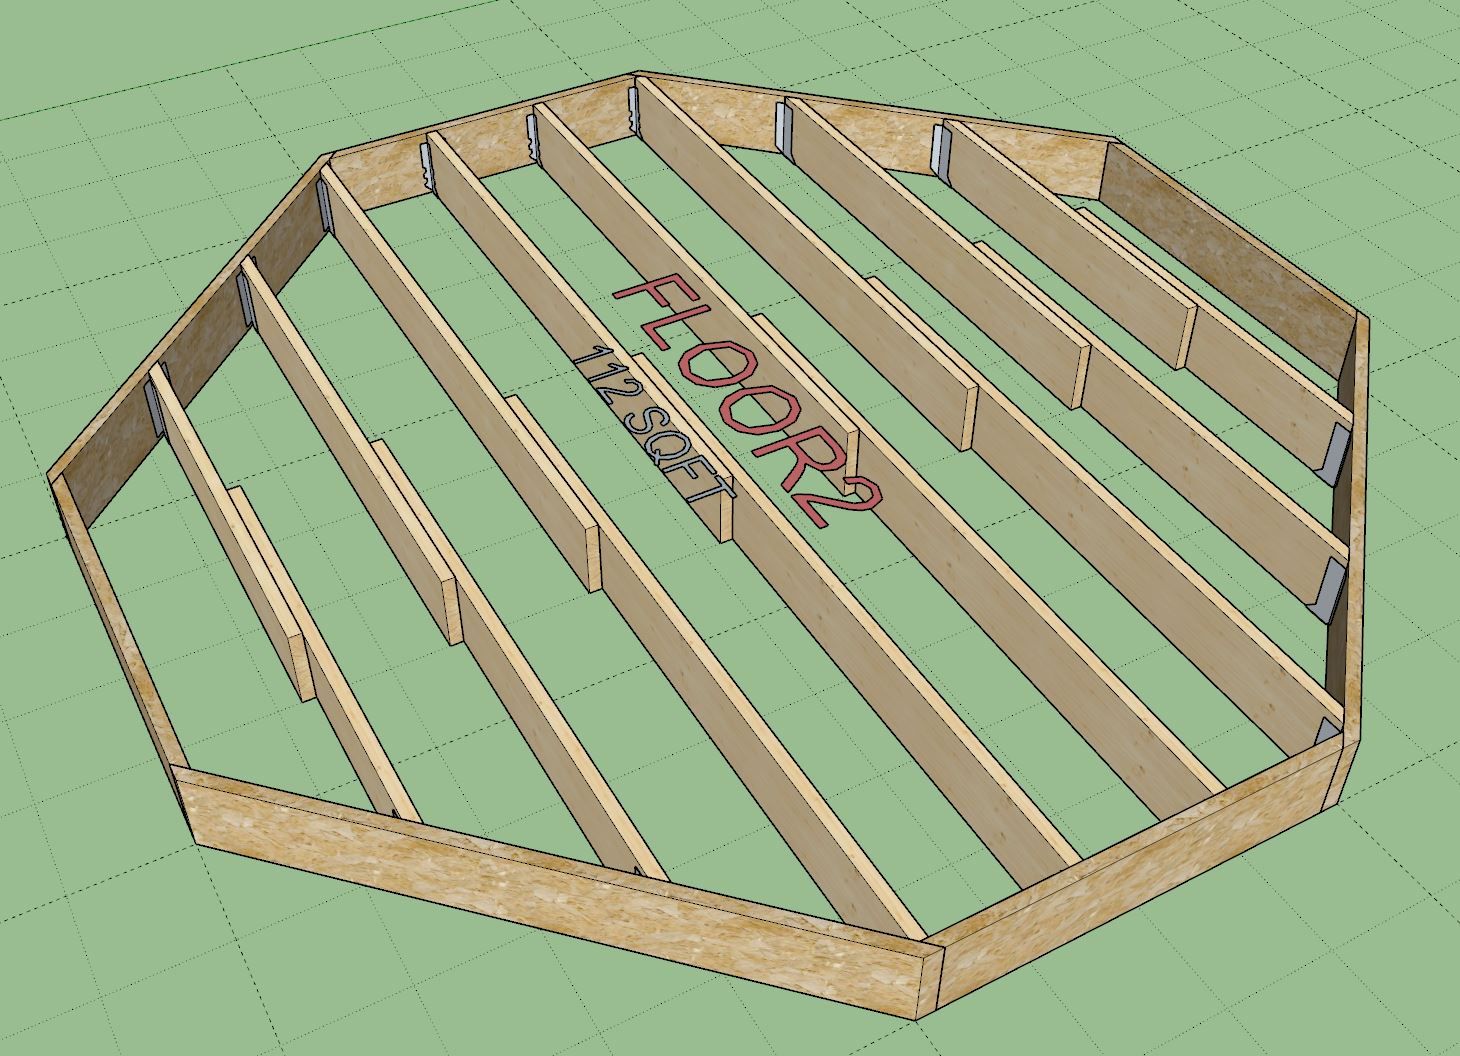
                                        A little bit more complicated than regular joists due to the offsets but overall its pretty much the same routine. Pretty excited that I actually can get this to work, at first I wasn't really sure if it was even feasible.

                                        Nathaniel P. Wilkerson PE
                                        Medeek Engineering Inc
                                        design.medeek.com

                                        1 條回覆 最後回覆 回覆 引用 0
                                        • medeekM 離線
                                          medeek
                                          最後由 編輯

                                          Version 0.9.9 - 10.01.2024

                                          • Further updated the insulation, blocking, metal bridging and hanger modules to accommodate staggered joists.
                                          • Added skewed hanger options into the Floor tab of the Global Settings.
                                          • Added skewed hangers to the Draw and Edit menus.
                                          • Added the following skewed (45 degree) Simpson hangers into the built-in library: SUL24, SUL26, SUL210, SUL214, SUL1819, SUL18111, SUL18114, SUL2069, SUL20611, SUL20614, SUR24, SUR26, SUR210, SUR214, SUR1819, SUR18111, SUR18114, SUR2069, SUR20611, SUR20614
                                          • Updated and added a new subtraction mode to the SUBTRACT feature: SUBTRACT_JOIST
                                          • Added Subtractive Geometry (Joist) in the General tab of the Global Settings.

                                          floor_su097_800.jpg

                                          floor_su098_800.jpg

                                          Nathaniel P. Wilkerson PE
                                          Medeek Engineering Inc
                                          design.medeek.com

                                          1 條回覆 最後回覆 回覆 引用 0
                                          • medeekM 離線
                                            medeek
                                            最後由 編輯

                                            Version 0.9.9b - 10.01.2024

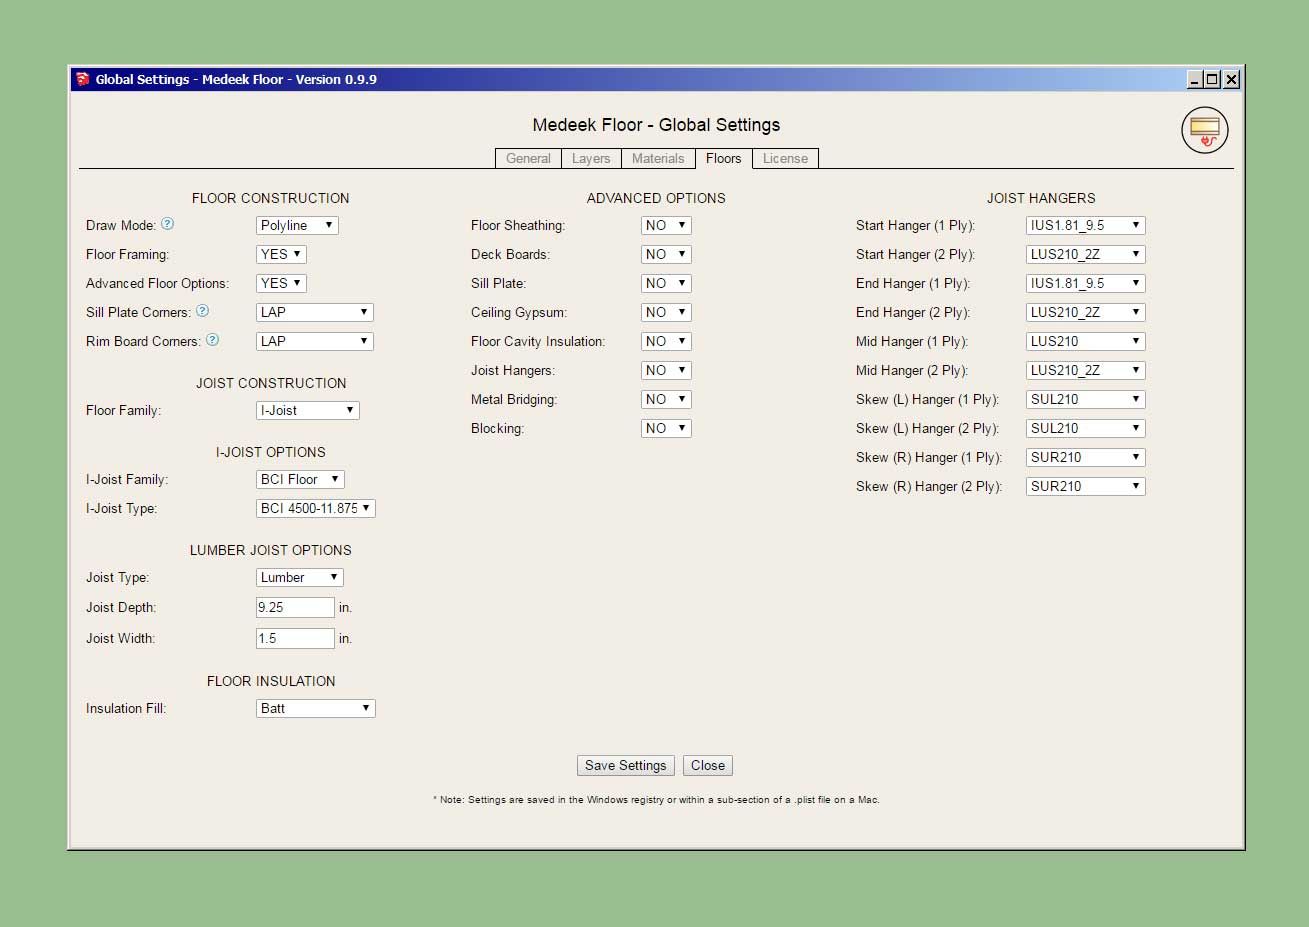
                                            • Updated the Floor tab of the Global Settings with additional parameters for joist construction.
                                            • Fixed a minor bug with the hanger module for double ply staggered studs.
                                            • Fixed a bug in the Draw and Edit menus so that all hangers in the library are properly displayed.
                                            • Added the following skewed (45 degree) Simpson hangers into the built-in library (skew_hangers): SUL410, SUL414, SUL214_2, SUL210_2, SUL26_2, SUR410, SUR414, SUR214_2, SUR210_2, SUR26_2

                                            floor_su099_800.jpg

                                            Nathaniel P. Wilkerson PE
                                            Medeek Engineering Inc
                                            design.medeek.com

                                            1 條回覆 最後回覆 回覆 引用 1
                                            • 1
                                            • 2
                                            • 3
                                            • 4
                                            • 5
                                            • 6
                                            • 7
                                            • 3 / 7
                                            • 第一個貼文
                                              最後的貼文
                                            Buy SketchPlus
                                            Buy SUbD
                                            Buy WrapR
                                            Buy eBook
                                            Buy Modelur
                                            Buy Vertex Tools
                                            Buy SketchCuisine
                                            Buy FormFonts

                                            Advertisement