Medeek Wall Plugin
-
It looks very promising...!

-
@frederik said:
It looks very promising...!
Thank-you for the vote of confidence. I'm sure the initial release will have its list of limitations and bugs but it certainly is a start in the right direction. Just remember it is just me programming this thing, I don't have a whole team of professional programmers working behind the scenes, creating the magic.
-
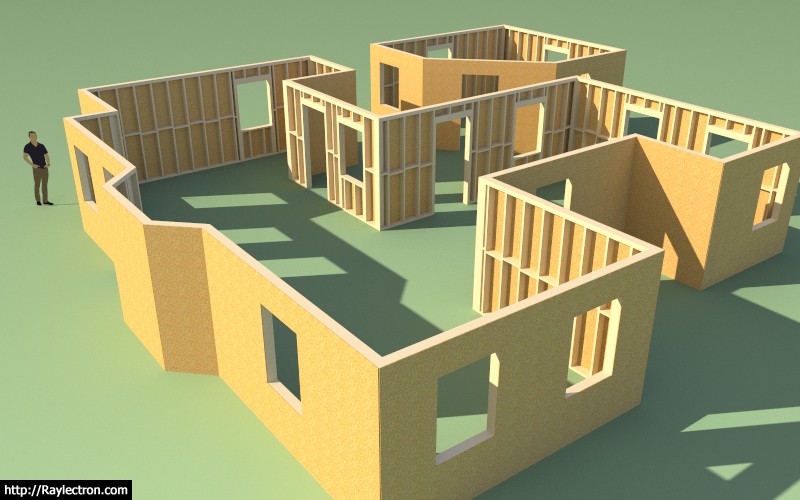
One of many wall move permutations that must be considered:

I also still need to fully vett the non-orthogonal wall possibilities, this is exhausting work.
-
Orthogonal walls are now pretty solid, onto non-orthogonals.
As I'm testing this feature out it occurred to me that it might be useful to have the ability to move just one corner of a wall, this would allow for the changing of angles between walls. I have added this feature to the "todo" list for future consideration.
Along with the split wall function it would also be useful to have a fuse or join wall function, where two wall panel that are inline with each other and butting up can be joined into a single wall panel.
-
@medeek said:
Just remember it is just me programming this thing, I don't have a whole team of professional programmers working behind the scenes, creating the magic.
Yes, I'm fully aware which makes this even more impressive...
-
A preview of the Wall Move Tool:
View Model here:

3D Warehouse
3D Warehouse is a website of searchable, pre-made 3D models that works seamlessly with SketchUp.
(3dwarehouse.sketchup.com)
The primary items left to do before the release are:
- Interior Walls
- Global Settings (update)
- Web Page (update)
I will start on interior walls tomorrow.
I also have some additional testing to do with the no framing option to make sure it is working seamlessly with the other modes (2D and 3D).
-
Nathaniel,
Looking Good!
Will the door tool handle double doors (i.e. a house entry composed of two separate doors.)?
And closet sliding doors?
-
@bob james said:
Nathaniel,
Looking Good!
Will the door tool handle double doors (i.e. a house entry composed of two separate doors.)?
And closet sliding doors?
Right now the door types are limited but yes I plan on adding all the various door types:
- sliding
- bifold
etc...
In that regard I am also very interested in working with other plugin authors to somehow integrate other door and window plugins so that they can work seamlessly with the wall plugin. In order for this to work correctly I will need to setup a simple system that sends a signal to the third party window/door plugin letting it know if the opening size or location has changed that way the windows and doors will stay synchronized with the wall model and automatically move with it.
-
As I'm working on interior walls today it occurred to me that just as I've provided for a trim option with exterior walls I also need to provide an interior trim option for both interior (int-int) walls and exterior walls (int-ext).
I've added in one extra option in the advanced wall options to toggle interior trim. I will probably not full flesh this out until after the plugin release but interior trim will probably deal with the following key elements/options:
- Baseboard
- Crown Molding
- Chair Rail
- Wainscot

-
Nathaniel, I don't know if you should be putting those finishing trims in the plugin. So many variables and options, probably better if those were left to the designer to dictate / complete as per their design wishes?
-
@juju said:
Nathaniel, I don't know if you should be putting those finishing trims in the plugin. So many variables and options, probably better if those were left to the designer to dictate / complete as per their design wishes?
You can always turn the option off and in the global settings you can always make it default to off so the preference of the designer is respected.
However, for those who just want a simple representation for the interior trim the option will exist at some point.
-
This is looking like a good solutions in a few ways. While you may keep adding alternate details and flexibility, this at least bring SU up to a lot of residential modeling for quick representation of basic contemporary homes, for example for remodels. I might not find it has enough options to work on most jobs I work on, but I might find it good for a quick model that will satisfy less sophisticated jobs and give that instant feel people now are half expecting due to the home remodel shows on TV (for better or worse). On the other hand the overall work is more important to builders to get to the framing and other take-offs, something I don't get involved in fortunately.
I like the work with the 2d plan, which updates the model. Refreshing!
-
@pbacot said:
This is looking like a good solutions in a few ways. While you may keep adding alternate details and flexibility, this at least bring SU up to a lot of residential modeling for quick representation of basic contemporary homes, for example for remodels. I might not find it has enough options to work on most jobs I work on, but I might find it good for a quick model that will satisfy less sophisticated jobs and give that instant feel people now are half expecting due to the home remodel shows on TV (for better or worse). On the other hand the overall work is more important to builders to get to the framing and other take-offs, something I don't get involved in fortunately.
I like the work with the 2d plan, which updates the model. Refreshing!
You are just going to have to try it out and see if it works for you.
My intent is to make it well suited for most typical conventional homes (residential work) being built today in the US and Canada. I am also providing metric on everything so it should work as well for the Europeans and Aussies and other international designers.
Adding more flexibility and options also adds to the complexity, I am trying to strike some sort of balance there but as you can probably already tell I do like to dive into the details with just about everything.
In addition to the 2D mode, after speaking with a couple of other designers, I think I'm also going to add an additional global setting called: "2D Layout in 3D"
If the user toggles this to "ON" then the 2D representations for the windows and doors will be drawn on the top surface of the wall plate, the door swing(s) will be shown at the wall bottom and the text callouts will also be drawn at the wall bottom. The idea being that you can view the 3D model from the top down and still see the plan layout.
-
Interior Walls:
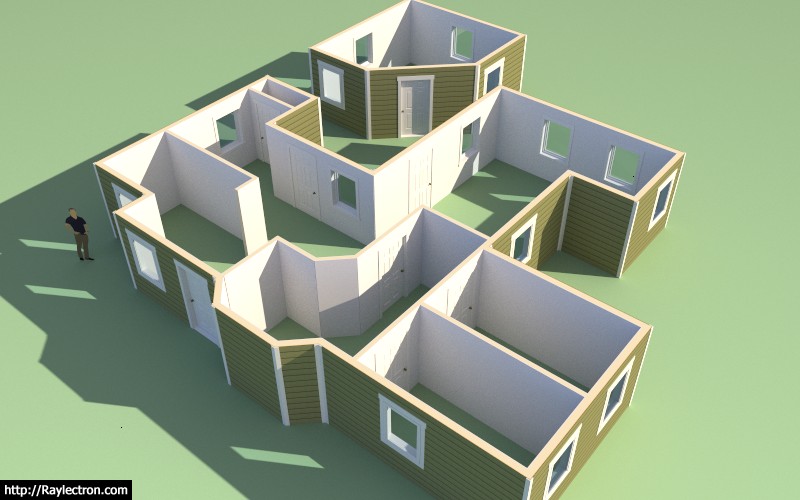
A couple of items on today's todo list with regards to interior walls:
- The wall move tool decouples interior wall corners from exterior wall corners, this is intended.
- I still need to add in an algorithm which can sense when an interior wall is Teeing into an ext. or int. wall. This is important primarily for the move tool and wall creation tool.
- Update interior door casing
- Interior windows (windows that are embedded in an interior wall) are not very common, not sure exactly what to do in this case. Perhaps just treat as regular window installed in an exterior wall.
- Interior framed openings (without installation of door or window): These need to be wrapped in gypsum to properly finish them out.
- Added interior trim (baseboard, crown molding, chair rail, wainscoting) to the long term todo list.
That should be it for now. I may be able to get all this done today if I really hustle and then on to the global settings tomorrow.
-
Window and Door callouts with the "2D Layout in 3D" option turned on.
Notice that I have parallel projection turned on in SketchUp.
I apologize for the strange coloration and quality of the image, I'm trying out some new software for taking screen grabs and turning them into animated GIFs.
-
Nathaniel,
Been following your progress with great interest, your plug-in is really looking good now!
Anxious to try it out, when ready of course. (No pressure)Best regards,
Charlie -
@charlie__v said:
Nathaniel,
Been following your progress with great interest, your plug-in is really looking good now!
Anxious to try it out, when ready of course. (No pressure)Best regards,
CharlieMe too, looks like a very robust plugin. My question is will there be some kind of library that we could add our own window/door and trim styles to ? Would make it a much more useful tool to me as I have tons of Pella and Anderson speced windows already with quite a bit of modeling time invested.
-
@alpro said:
Me too, looks like a very robust plugin. My question is will there be some kind of library that we could add our own window/door and trim styles to ? Would make it a much more useful tool to me as I have tons of Pella and Anderson speced windows already with quite a bit of modeling time invested.
I've been giving this some more thought and I like the idea of designers being able to bring in their own pre-built components (dynamic or not) into the model via the plugin.
Do you have an example window/door that I can examine and figure out the best way to create the ability to bring in such a pre-configured component.
The plugin allows one to set the size and location of an opening and to adjust this at any time. The user would then need to select from their library of pre-configured windows/doors to select the correctly sized component and then it would be inserted automatically into the model at a specific insertion point.
I guess the big question for me is where should this insertion point be located for a window or a door? Top center, bottom center and also how should it be centered within the wall depth?
-
@medeek said:
I guess the big question for me is where should this insertion point be located for a window or a door? Top center, bottom center and also how should it be centered within the wall depth?
SU normally uses the the origin of the model that is being brought in as the reference, now this may differ depending on how the external model was made and positioned.
Personally, I prefer bringing windows in at the centre (left / right) of the head (top), doors at the centre (left / right) of the threshold (bottom).
Some kind of picker may be advisable, ie. top: left / centre / right (and the same for middle and bottom). I'm not sure what kind of gymnastics this may cause in coding though...
-
For what it's worth, I use the top/left
Hello! It looks like you're interested in this conversation, but you don't have an account yet.
Getting fed up of having to scroll through the same posts each visit? When you register for an account, you'll always come back to exactly where you were before, and choose to be notified of new replies (either via email, or push notification). You'll also be able to save bookmarks and upvote posts to show your appreciation to other community members.
With your input, this post could be even better 💗
Register Login


Advertisement