Medeek Wall Plugin
-
Nathaniel,
Been following your progress with great interest, your plug-in is really looking good now!
Anxious to try it out, when ready of course. (No pressure)Best regards,
Charlie -
@charlie__v said:
Nathaniel,
Been following your progress with great interest, your plug-in is really looking good now!
Anxious to try it out, when ready of course. (No pressure)Best regards,
CharlieMe too, looks like a very robust plugin. My question is will there be some kind of library that we could add our own window/door and trim styles to ? Would make it a much more useful tool to me as I have tons of Pella and Anderson speced windows already with quite a bit of modeling time invested.
-
@alpro said:
Me too, looks like a very robust plugin. My question is will there be some kind of library that we could add our own window/door and trim styles to ? Would make it a much more useful tool to me as I have tons of Pella and Anderson speced windows already with quite a bit of modeling time invested.
I've been giving this some more thought and I like the idea of designers being able to bring in their own pre-built components (dynamic or not) into the model via the plugin.
Do you have an example window/door that I can examine and figure out the best way to create the ability to bring in such a pre-configured component.
The plugin allows one to set the size and location of an opening and to adjust this at any time. The user would then need to select from their library of pre-configured windows/doors to select the correctly sized component and then it would be inserted automatically into the model at a specific insertion point.
I guess the big question for me is where should this insertion point be located for a window or a door? Top center, bottom center and also how should it be centered within the wall depth?
-
@medeek said:
I guess the big question for me is where should this insertion point be located for a window or a door? Top center, bottom center and also how should it be centered within the wall depth?
SU normally uses the the origin of the model that is being brought in as the reference, now this may differ depending on how the external model was made and positioned.
Personally, I prefer bringing windows in at the centre (left / right) of the head (top), doors at the centre (left / right) of the threshold (bottom).
Some kind of picker may be advisable, ie. top: left / centre / right (and the same for middle and bottom). I'm not sure what kind of gymnastics this may cause in coding though...
-
For what it's worth, I use the top/left
-
I use top centre, though bottom centre works fine for doors. If you want more flexibility you could do it like Profile Builder with a selectable set point.
Ideally there would be an offset variable for the setback from the exterior sheathing. (For flanged windows the default value would then be '0'). In our case (Passivhaus) we centre the window in the middle of the insulating thickness, so the setback from the exterior can be as much as 8".
A saved variable with a default allows any scenario to be covered.
-
Per input from various designers I am steering towards top center for windows and bottom center for doors. The insertion point of the window/door component (at origin of SKP file) will be inline with the outside framing by default but then can be adjusted by an inset variable (neg. or pos.) I will create a sub-folder within the plugin called "library" where the designer can place all of their pre-configured SKP files, so the plugin can access them. The plugin will then allow one to select any one of these files to place into an opening.
If there are additional requests I can also make the insertion point fully customizable within the global settings:
- Top Center
- Top Left
- Top Right
- Middle Center
- Middle Left
- Middle Right
- Bottom Center
- Bottom Left
- Bottom Right
-
I would vote for entering a given head height for the windows, so every window goes in at this height automatically unless the designer opted for another for special windows.
-
I agree with pbacot. I use Chuck Vali's excellent Instant Architecture plug-in but cannot get used to first adding a line across the wall(s) for the head height before I start the plug-in to insert the windows/doors. To Chuck it makes sense, but for me it's an extra step (or two, or three, or ...) that I don't want to do.
-
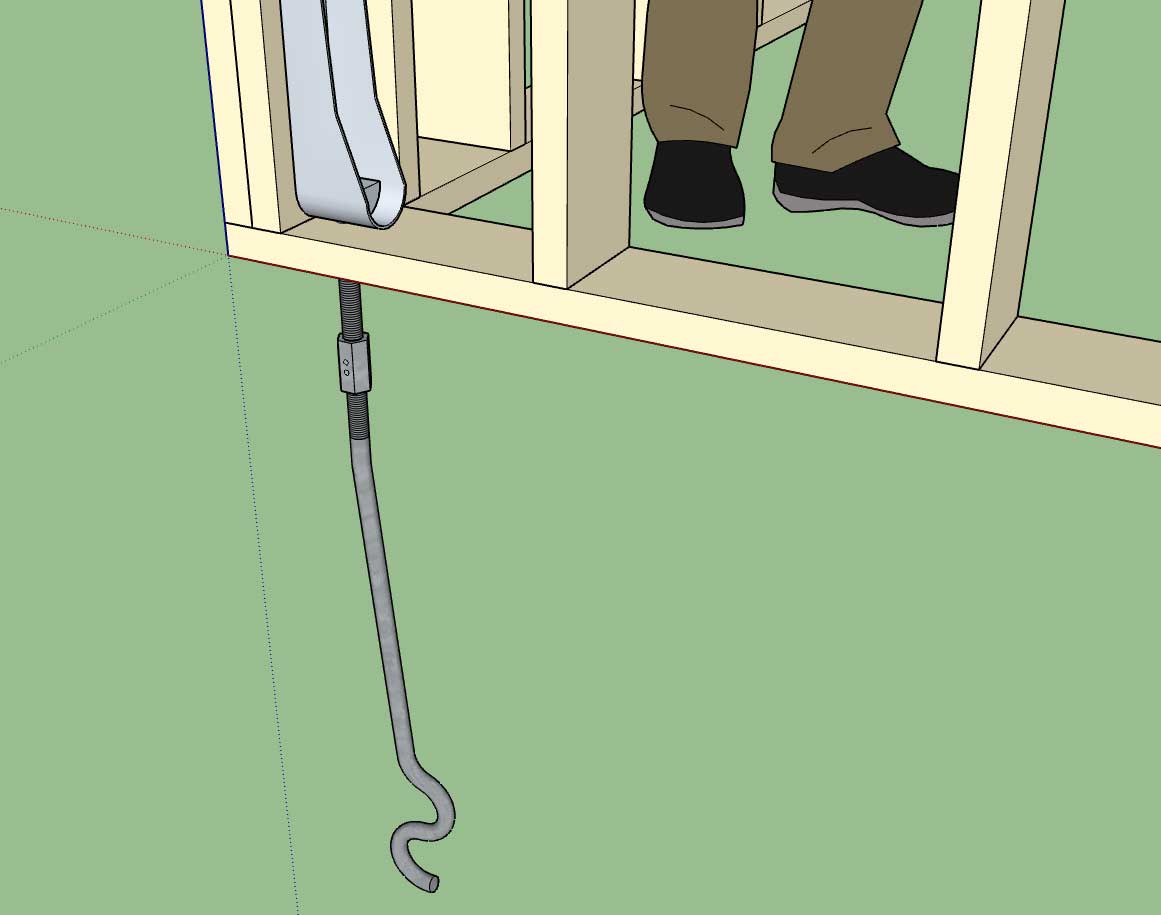
Straps, holdowns, anchor bolts, threaded rod and couple nuts are now part of the plugin. More details on that later. At some point the engineering module will be able to do the entire lateral calcs on a structure with the click of a button and input of a few site criteria parameters. The idea is to fully automate the engineering of a residential structure, engineers shouldn't have to work this hard.
Tomorrow I will wrap up the global settings and we will release the plugin for beta testing.
I still have quite a bit more stability testing to make sure I have missed any glaring errors but I'm sure the beta testers will help sniff out a lot of those issues.
-
@unknownuser said:
I would vote for entering a given head height for the window
Agree
@unknownuser said:
I will create a sub-folder within the plugin called "library" where the designer can place all of their pre-configured SKP files, so the plugin can access them. The plugin will then allow one to select any one of these files to place into an opening.
Super!
-
@mtnarch said:
I agree with pbacot. I use Chuck Vali's excellent Instant Architecture plug-in but cannot get used to first adding a line across the wall(s) for the head height before I start the plug-in to insert the windows/doors. To Chuck it makes sense, but for me it's an extra step (or two, or three, or ...) that I don't want to do.
I don't know how the application would work--when you set this height. It could be that when you begin using the tool it remembers last time you worked,it was 8', or this must be set in each model, each drawing session, or what. But the outcome would be a constraint, so if you insert a window in 2d or 3d, it knows how high it is.
If you are allowing custom components to be used, I suppose that means the axis / insertion point location is significant, and needs to be at the head for windows, at the base for doors.
-
I've now enabled the "Install Mode" parameter which allows the user to use the "Builtin" window generator/plugin or use one of their own pre-configured windows stored within the "library" sub-folder of the plugin:
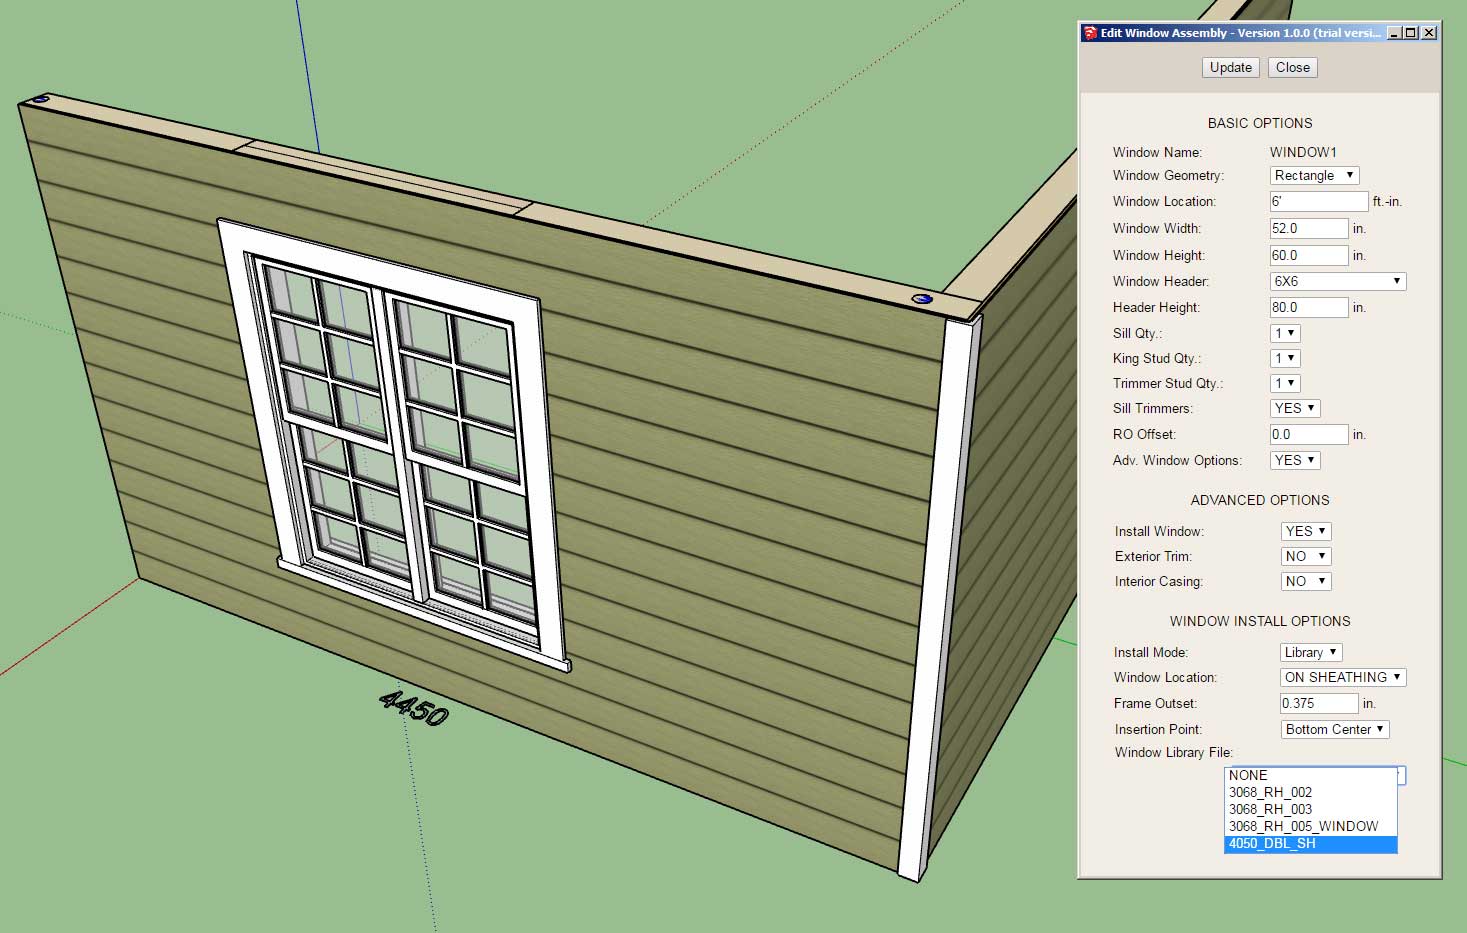
Notice that the insertion point can be specified as well as locating within the wall depth by two parameters:
1.) Window Location: ON SHEATHING or ON FRAMING, this parameter will offset the location of the window within the wall by the sheathing thickness automatically or place it inline with the wall framing.
2.) The window location within the wall can be further modified/customized by adjusting the outset with either a positive or negative value.
One thing to note is that the framed opening has no idea what the dimensions of the window or door are, the user must provided the correct width and height for the installed window. Also note that callout at the base of the wall does not include any specifics on the window installed when in library mode since it does not know whether the window is a picture, single hung, casement etc...
Since this particular library file already has the proper trim and casing as part of the component I have turned off these advanced features for this opening. If it did not I could alternatively enable both the trim and/or casing within the plugin even though the plugin is not actually drawing the window itself (it is bringing in a third party component instead).
The plugin will automatically populate the library dropdown with any valid SketchUp files found within the sub-folder "library/windows/".
I am now working on the door modules to extend this functionality for doors.
I am also interested in working with other plugin authors so that I can establish an API which will allow the wall plugin to talk to their window/door plugin and automatically pass parameters back and forth so that opening location and size can properly sync with a third party plugin.
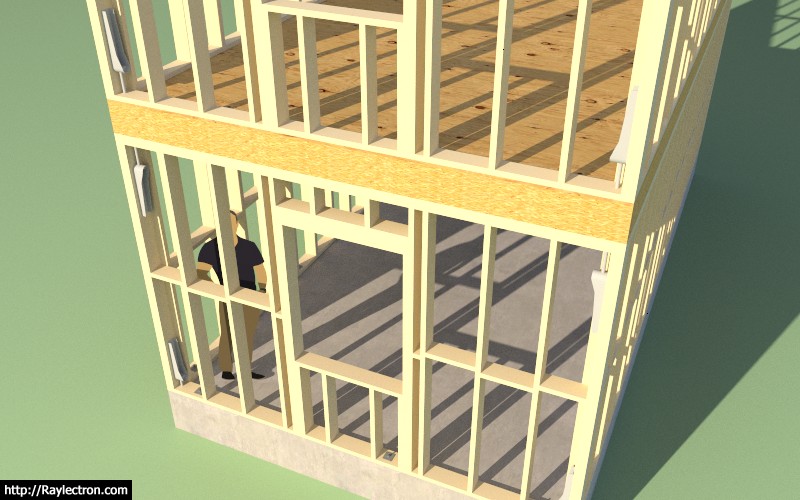
You might also notice that there are two dots shown on the top plate at each end of the wall in this model. This gives the user indication that holdowns are installed in this wall panel at these locations. In 2D mode these indicators will also be shown even though no hardware is drawn.
-
Working on updating the global settings to reflect the myriad of settings added to the plugin in the last month.
This is what you will see when you pull up the license tab with a fully licensed plugin:

Notice that there are twelve tabs:
- General (complete)
- Layers (complete)
- Materials
- Sheathing
- Walls
- Doors
- Windows
- Wall Corners (complete)
- Trim
- Insulation
- Holdowns (complete)
- License (complete)
The window and door tabs will have the largest amount of options. Updating all of these html pages is rather tedious work but it is necessary.
-
After a few mind numbing hours of parameters the global settings are now up-to-date. See a screenshot of the door tab below:
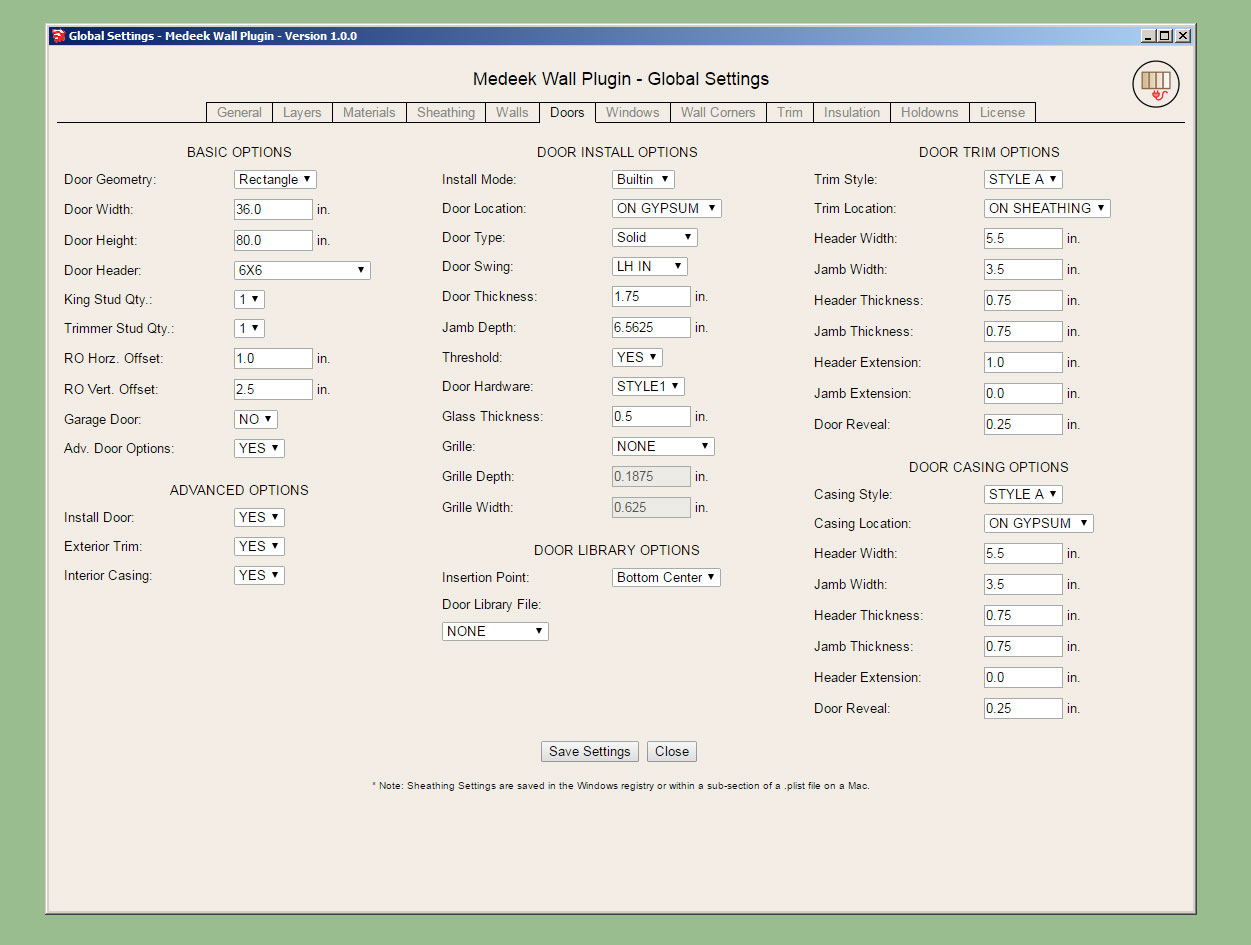
There are probably a few more additions that can be made to some of the tabs but I think we are good enough now for the initial release.
I still have one major item that needs some attention:
Updating of the interior wall algorithm so that it properly detects "Tee" intersections.
I also need to update the door casing for interior walls and add the gypsum wrap for interior walls with framed openings that do not have a window or door installed (ie. plain opening), however these are minor items and can probably be attended to after the initial release.
I have some known issues with the "no frame" option that need to be addressed but should only require a few minutes to remedy.
I will start working on the "Tee" intersection algorithm tonight and hopefully wrap this up tomorrow.
-
One thing to note in the 2D to 3D function:
Within the global settings you can set the default wall framing parameter to YES, NO, or 2D. If the parameter is set to NO then the 2D to 3D function will bring the model from 2D to the no frame condition, however if this parameter is set to YES then bringing the model into 3D will fully frame it out.
Of course within the Wall Edit Menu you can selectively choose between any of the three modes.
P.S. I've decided to change the notation to the following context menus with the right click of the wall assembly:
- Edit Wall Assembly
- 2D
- 3D (No Framing)
- 3D (Full Framing)
Now you can quickly go between any of the three modes without having to make adjustments to the global settings.
-
The tee intersection algorithm seems to be working fairly well (click on image to view animation):
-
Moving a wall with corner and tee intersections:
-
The current todo list in no particular order:
-
Interior Trim (Crown Molding, Baseboards, Chair Rail, Wainscot)
-
Garage Doors
-
Update door casing for interior walls
-
Gypsum wrap for interior wall openings and end walls
-
Exterior Cladding Corner Option (Lap and Miter)
-
Wall Split Tool
-
Wall Join Tool
-
Gable / Shed Wall Tool
-
Add Glulam Beams to Window and Door Header Options
-
Implement Wall Groups (currently you can assign a group letter or number but it is not active)
-
-
Congratulations! Though this is not the end of your work, obviously, it's a huge milestone. You should be very pleased! Thank you!
Hello! It looks like you're interested in this conversation, but you don't have an account yet.
Getting fed up of having to scroll through the same posts each visit? When you register for an account, you'll always come back to exactly where you were before, and choose to be notified of new replies (either via email, or push notification). You'll also be able to save bookmarks and upvote posts to show your appreciation to other community members.
With your input, this post could be even better 💗
Register Login


Advertisement