sketchucation logo sketchucation
    • Login
    ℹ️ Licensed Extensions | FredoBatch, ElevationProfile, FredoSketch, LayOps, MatSim and Pic2Shape will require license from Sept 1st More Info

    Learning to render with Twilight Hobby

    Scheduled Pinned Locked Moved SketchUp Discussions
    sketchup
    49 Posts 11 Posters 7.0k Views 11 Watching
    Loading More Posts
    • Oldest to Newest
    • Newest to Oldest
    • Most Votes
    Reply
    • Reply as topic
    Log in to reply
    This topic has been deleted. Only users with topic management privileges can see it.
    • pilouP Offline
      pilou
      last edited by

      @ NDave : You will be surprised, I never made renderings, it's not my cup of thea, i just make translations of Render manuals or sites of render's engine, or UI!
      Like these ones for TwillightRender, Visualizer, Podium, LightUp, SimLab etc... ! πŸ˜‰

      For the render above I just read what has said Box and voilΓ ! πŸ˜„
      (the only difference is the apply of a standard Wall/Floor material)
      So you can make the same in Twillight!

      All renders today make quasi all the same things, just difference is the ergonomy!

      @unknownuser said:

      I have been using Twilight because it is free.

      Twillight is perfect! 😎

      @unknownuser said:

      3 click process is not going well for me

      You right if you are hobbyist prefer the "one Click"! Alas this one is pricey (see KeyShot)

      Frenchy Pilou
      Is beautiful that please without concept!
      My Little site :)

      1 Reply Last reply Reply Quote 0
      • Dave RD Offline
        Dave R
        last edited by

        @pbacot said:

        Dave,

        Did you use a edge overlay in the render? Nice job. I think the metal as he says is nice, because the other metal looks too perfectly reflective to be realistic.

        Peter

        Peter, yes. I did use an overlay. Actually, I pasted a Hidden Line exported onto a separate layer set to Multiply. I made the Hidden Line export at 4k or 5k wide and resized it down to the size of the rendered image so that the lines would be very thin. I also adjusted the opacity of that layer so the lines would be fairly light. All very quick and easy to do.

        @ntxDave, I could have also made the floor reflective but as I said, I was just trying to make a quick example and didn't bother setting up all of the materials.

        Etaoin Shrdlu

        %

        (THERE'S NO PLACE LIKE)

        G28 X0.0 Y0.0 Z0.0

        M30

        %

        1 Reply Last reply Reply Quote 0
        • ntxdaveN Offline
          ntxdave
          last edited by

          @box said:

          @ntxdave said:

          What is the sketchucation studion pack?

          Thanks - got it. I am experimenting with each of the backgrounds.....

          1 Reply Last reply Reply Quote 0
          • soloS Offline
            solo
            last edited by

            Ugh! I just missed a 'render this' challenge. πŸ’š

            http://www.solos-art.com

            If you see a toilet in your dreams do not use it.

            1 Reply Last reply Reply Quote 0
            • ntxdaveN Offline
              ntxdave
              last edited by

              @solo said:

              Ugh! I just missed a 'render this' challenge. πŸ’š

              Welcome aboard but the real challenge is me learning how to use a rendering engine. ❗

              1 Reply Last reply Reply Quote 0
              • D Offline
                db11
                last edited by

                @dave r said:

                Peter, yes. I did use an overlay. Actually, I pasted a Hidden Line exported onto a separate layer set to Multiply. I made the Hidden Line export at 4k or 5k wide and resized it down to the size of the rendered image so that the lines would be very thin. I also adjusted the opacity of that layer so the lines would be fairly light. All very quick and easy to do.

                Dave --

                Love this look, with the thin line overlay. It's just slightly diagrammatic, which really suits technical / mechanical subjects. And thanks for the mini-tut on how to achieve it!

                Doug

                1 Reply Last reply Reply Quote 0
                • Dave RD Offline
                  Dave R
                  last edited by

                  Doug, I'm happy it helped someone. πŸ˜‰

                  Etaoin Shrdlu

                  %

                  (THERE'S NO PLACE LIKE)

                  G28 X0.0 Y0.0 Z0.0

                  M30

                  %

                  1 Reply Last reply Reply Quote 0
                  • ntxdaveN Offline
                    ntxdave
                    last edited by

                    @dave r said:

                    @pbacot said:

                    Dave,

                    Did you use a edge overlay in the render? Nice job. I think the metal as he says is nice, because the other metal looks too perfectly reflective to be realistic.

                    Peter

                    Peter, yes. I did use an overlay. Actually, I pasted a Hidden Line exported onto a separate layer set to Multiply. I made the Hidden Line export at 4k or 5k wide and resized it down to the size of the rendered image so that the lines would be very thin. I also adjusted the opacity of that layer so the lines would be fairly light. All very quick and easy to do.

                    What the heck does all of this mean?

                    @Box, I tried all 10 of the backgrounds. Now I am going to try to learn how to use the lights. When I select certain light types (Projector or IES), it asks for an image file (projector) or IES (ies). Is there a source for the light types?

                    1 Reply Last reply Reply Quote 0
                    • Dave RD Offline
                      Dave R
                      last edited by

                      Dave, most rendering applications render the faces and not the lines that border the faces. To get the lines dividing the pipe into sections or the blue thing to show as it does, you would need to either create 3D geometry to get small gaps and shadows are you could do what I described.

                      Here's an example of a render I did with no materials. If I hadn't made the hidden line image to overlay, there'd be no separation between the case sides and the legs or the drawer front and draw sides.
                      [url=https://flic.kr/p/Bccrw3]
                      https://farm1.staticflickr.com/727/23099200410_ce3df302ac.jpg

                      You can create that separation with material changes but when the material is the same on either side of the seam, you need to do something different.

                      Etaoin Shrdlu

                      %

                      (THERE'S NO PLACE LIKE)

                      G28 X0.0 Y0.0 Z0.0

                      M30

                      %

                      1 Reply Last reply Reply Quote 0
                      • ntxdaveN Offline
                        ntxdave
                        last edited by

                        Makes sense. I just need to figure out how to do that with Twilight Hobby.

                        1 Reply Last reply Reply Quote 0
                        • Dave RD Offline
                          Dave R
                          last edited by

                          This has to be done outside of SketchUp. Export a hidden line image from SU and combine it with the rendered image in an image editor.

                          Etaoin Shrdlu

                          %

                          (THERE'S NO PLACE LIKE)

                          G28 X0.0 Y0.0 Z0.0

                          M30

                          %

                          1 Reply Last reply Reply Quote 0
                          • Dave RD Offline
                            Dave R
                            last edited by

                            Twilight renders in the SketchUp window, correct? It does look like you are getting better with it.

                            Etaoin Shrdlu

                            %

                            (THERE'S NO PLACE LIKE)

                            G28 X0.0 Y0.0 Z0.0

                            M30

                            %

                            1 Reply Last reply Reply Quote 0
                            • ntxdaveN Offline
                              ntxdave
                              last edited by

                              After doing some more "playing around" in Twilight Hobby, I tried some more settings and I think this image has come a long wary from where I started. Dave, you will notice that there are some lines showing the jointed pieces of piping along the right side.
                              IP Stripper-HDRI.jpg
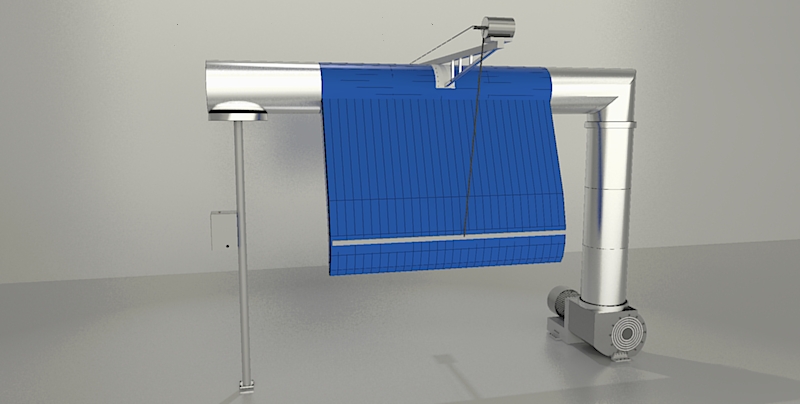
                              Not perfect by any stretch of the imagination but progress...........this one was done at only medium resolution. Might look even better at high resolution.

                              Still another angle with same settings
                              IP Stripper-HDRI-1a.jpg

                              1 Reply Last reply Reply Quote 0
                              • ntxdaveN Offline
                                ntxdave
                                last edited by

                                @dave r said:

                                Twilight renders in the SketchUp window, correct? It does look like you are getting better with it.

                                Yes, it has a series of popup windows that allow you to set everything up and render while still in SketchUp.

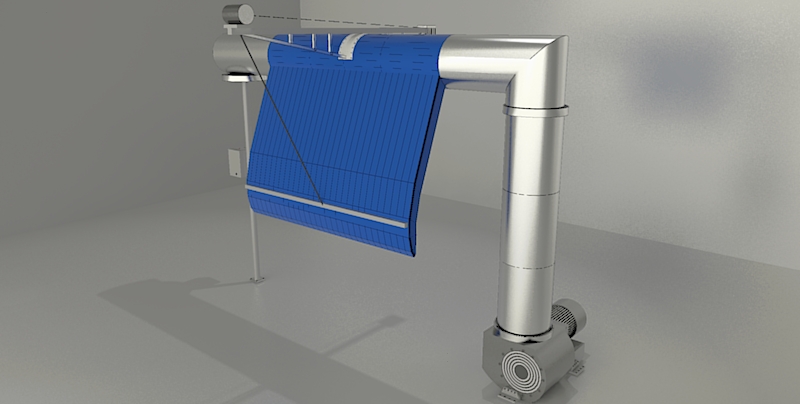
                                BTW: I did an edit and showed the equipment from another angle with the same settings.

                                1 Reply Last reply Reply Quote 0
                                • ntxdaveN Offline
                                  ntxdave
                                  last edited by

                                  Latest attempts.....making more progress in understanding how the product works and how to control various parts........
                                  Medium Resolution
                                  Higher Resolution + some changes in walls & floor

                                  1 Reply Last reply Reply Quote 0
                                  • ntxdaveN Offline
                                    ntxdave
                                    last edited by

                                    Continuing to learn and experiment. Here are 2 more renders of the office and part of the support equipment room for a car wash.
                                    Support Equipment Room
                                    Lobby
                                    These are both section cuts and as you can see, I still have more learning to do. In particular, in the lobby, the chairs are not supposed to be shinny at all and the glass is too dark. In fact the whole office is too dark and yes, I need to have the lamp turned on. But I think I am seeing some progress so it is just a matter of continuing to learn. Good thing these are just for my own fun and I am not using them for any commercial purposes (yes I would then upgrade to the full/pro version}.

                                    In particular, the glass is getting to me. That is why I issued the challenge in this thread http://sketchucation.com/forums/viewtopic.php?f=80%26amp;t=64364

                                    1 Reply Last reply Reply Quote 0
                                    • Dave RD Offline
                                      Dave R
                                      last edited by

                                      It's coming along. I think you should use Perspective instead of Parallel Projection for the camera setting in your renders. They look strange as they are at least for someone who has binocular vision and sees parallel lines running off to vanishing points.

                                      Etaoin Shrdlu

                                      %

                                      (THERE'S NO PLACE LIKE)

                                      G28 X0.0 Y0.0 Z0.0

                                      M30

                                      %

                                      1 Reply Last reply Reply Quote 0
                                      • ntxdaveN Offline
                                        ntxdave
                                        last edited by

                                        Switched the view and here are some newer renders using perspective.....
                                        Lobby
                                        Office - still a problem with the one chair
                                        Support Equipment
                                        Notice that I also made a big improvement in the glass thanks to Box in another thread (my challenge thread).

                                        Now I need to understand how to save the settings I used so that if I go back into the model all of my rendering settings are saved. Need to do some more reading......but I do think I am making progress.

                                        1 Reply Last reply Reply Quote 0
                                        • ntxdaveN Offline
                                          ntxdave
                                          last edited by

                                          @dave r said:

                                          It's coming along. I think you should use Perspective instead of Parallel Projection for the camera setting in your renders. They look strange as they are at least for someone who has binocular vision and sees parallel lines running off to vanishing points.

                                          I agree. I forgot to switch the view.

                                          1 Reply Last reply Reply Quote 0
                                          • pbacotP Offline
                                            pbacot
                                            last edited by

                                            You're doing really well!

                                            MacOSX MojaveSketchUp Pro v19 Twilight v2 Thea v3 PowerCADD

                                            1 Reply Last reply Reply Quote 0
                                            • 1
                                            • 2
                                            • 3
                                            • 2 / 3
                                            • First post
                                              Last post
                                            Buy SketchPlus
                                            Buy SUbD
                                            Buy WrapR
                                            Buy eBook
                                            Buy Modelur
                                            Buy Vertex Tools
                                            Buy SketchCuisine
                                            Buy FormFonts

                                            Advertisement