3D Truss Models
-
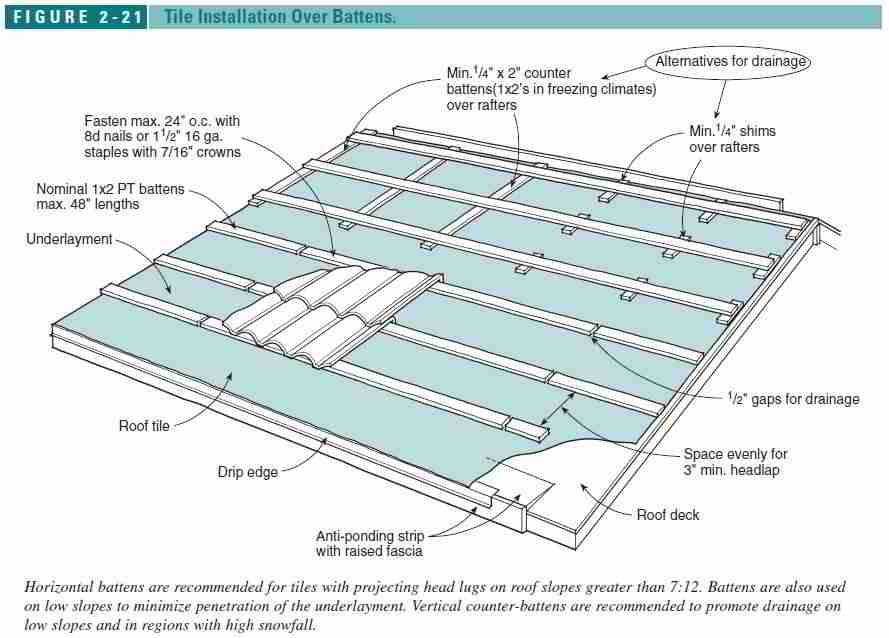
In some cases vertical counter-battens are used when sheathing is applied under the battens. It appears that the counter battens usually line up with the truss or rafters. I will need to include three more options in the batten menu:
Counter Battens: YES/NO
Counter Batten Height:
Counter Batten Width:.jpg)
-
Version 1.6.7 - 07.21.2016
- Added a counter battens option within the battens menu for common, scissor and vaulted trusses.
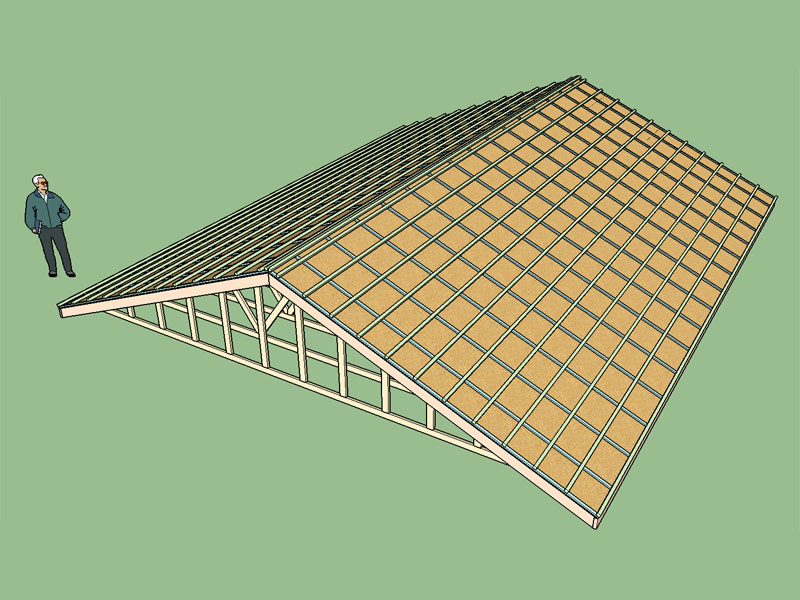
View model here:
3D Warehouse
3D Warehouse is a website of searchable, pre-made 3D models that works seamlessly with SketchUp.
(3dwarehouse.sketchup.com)
Counter battens can be applied with our without sheathing. The counter battens are centered on the trusses below therefore their spacing is not independently controlled.
Based on my research it appears that counter battens are usually only applied when battens are laid on top of a sheathed roof. However I have left the option open to apply them without the sheathing in case one wanted to apply them directly to the truss top chords over a vapor barrier.
-
@medeek said:
This latest update was per your request. You will have to tell me if I got it right or not. If you offset from the fascia this moves all the battens up the roof. I don't know if this is the correct behavior that you want or intended.
The battens at the peak are butted together. Looking at the different details I see that a gap between the peak battens might be more typical.
I run the battens from the outside of the rake to the outside of the rake, is this correct?
I've never seen battens placed under the sheathing but I suppose I could also make that an option.
Currently the battens are placed on top of the sheathing if the sheathing option is "YES".I can provide options/input for more user control over some of these details, I just need further feedback or corrections.
Hi Nathan,
I only had time now to test the battens / purlins for the first time. It works like a charm, thank you.
I would still like to be able to offset the topmost purlin / batten from the apex, as one can with the lowest one at the fascia. Also I wouldn't mind having an option to equally space the battens / purlins between these two points.
-
Version 1.6.7 - 07.21.2016
- Added a counter battens option within the battens menu for common, scissor and vaulted trusses.
- Battens (at peak) can be offset from peak.
- Peak-to-Eave spacing option available when "battens at peak" option is selected.
This was a very small update so I just tucked it into the latest revision.
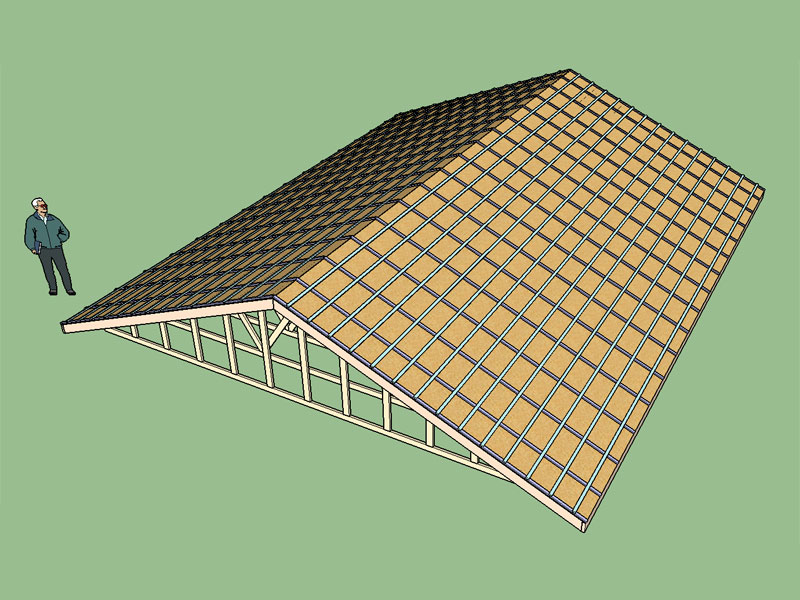
View model here:
3D Warehouse
3D Warehouse is a website of searchable, pre-made 3D models that works seamlessly with SketchUp.
(3dwarehouse.sketchup.com)
-
I can add another input field into the menu which will allow the offset from the peak:
Offset from Peak (mm):
I can also put in another option that will allow for the equal spacing between peak and eave battens with the spacing input serving as the max. batten spacing if this option is enabled:
Spacing Peak-to-Eave: YES/NO
I think this will then give you the flexibility you need to make this feature actually useful in real world applications.
Another thing to note is that the battens will work with the roof returns option but I currently have no logic in place to deal with the extension at the eave. I may need to give this some more thought:
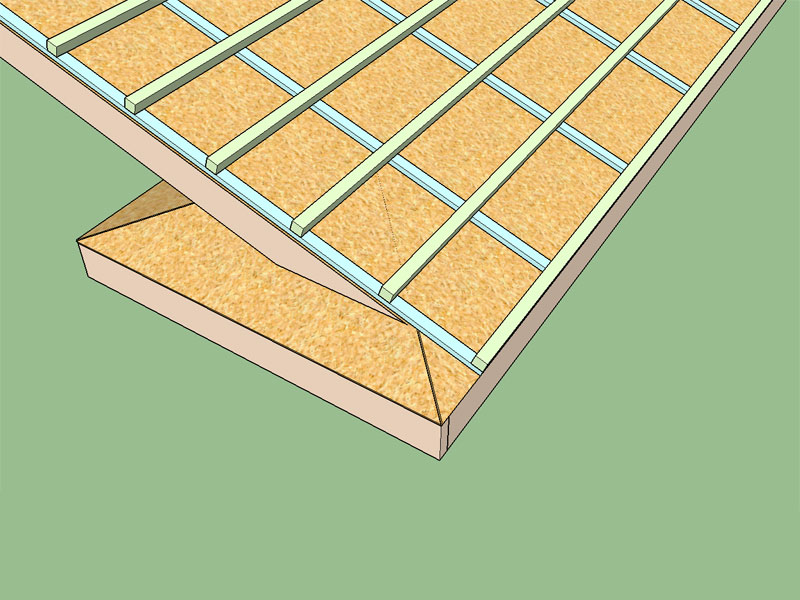
As I add more advanced options and features it is sometimes tricky to make sure they all play well together.
-
I've been working on a Trim and Extend tool that will allow one to trim or extend a member (ie. rafter) to a face of another member (the face will define the plane). Since I don't yet have advanced roofs figured out this feature would come in very handy where roof primitives are initially used to generate the roof geometry and then some manual intervention is necessary.
I'm still not quite there yet and there may be some insurmountable problems ahead but the goal is to have the tool recognize the cutting plane and then the selected (solid) group and automatically trim the group to the plane inserting new vertices and faces as required to close the solid back up and also delete the appropriate geometry.
If I delete the vertices of the group that are on the "clicked" side of the plane that will also eliminate any of the unwanted faces. The algorithm will involve some tricky applications with vectors and line/plane intersections to try and sort it all out. I am quite impressed with the API and its geometry functions.
-
@medeek said:
Version 1.6.7 - 07.21.2016
- Battens (at peak) can be offset from peak.
- Peak-to-Eave spacing option available when "battens at peak" option is selected.
I tested this, works as expected, thanks!
@medeek said:
This was a very small update so I just tucked it into the latest revision.
naughty naughty, revision history "paper trail", still thanks none-the-less
-
If a fix or correction is fairly minor and it is within the same 24 hour period as a new revision I like to bundle it into that revision otherwise it appears I am making leaps and strides with the development when I am not.
-
Sorry Nathaniel,
I'm with Julu on this.
In my 34 years of programming - this type of short circuiting general accepted practice more often than not gets programmers into trouble.
I know I've done it myself - and sometimes I've gotten away with it - and sometimes I've created problems for users. Even alienating a single user due to frustration is simply not worth it !!!
So naughty naughty it is !!!
-
Nathaniel,
I support the other posts but would not go as far as saying "naughty".Within a 24 hr period a lot of downloads could have occurred.
Now you will have a group of users that may be out of step.
Not Good!Best to keep to the rule of:
ANY CHANGE THAT IS ISSUED REQUIRES A NEW NUMBER DESIGNATION.Having said that "Keep Going" you are on a roll.
I look forward to your "Manual" which could be released as a "Beta"
so you get feedback on how it is received. -
Okay, you all have a point I will avoid this practice in the future. However I will note that the change log lists every modification to the plugin since I started.
On a different note I just started a new job and I'm living out of a suitcase right now so I probably won't be able to work on anything for at least a week or two. I would really like to test the trim function I've created but it will have to wait. Once i get my workstation back I will hit it full force.
-
Congratulations on the new job! Uprooting/moving is always uncomfortable, so wishing you as little discomfort as possible.
Looking forward to the future development of both the truss and slab/foundation plugins.
-
I haven't had any time this week or even this weekend to dive back into it yet but the icons for the Medeek Tools Menu (trim and extend for now) will look like this:
-
The trim function is a work in progress. I had some help with a developer on the other board but it has a ways to go yet.
-
How's the new job going? Have you settled in already?
-
Starting to get my bearings with the new job. Still haven't found a place to live yet, Airbnb has been interesting.
-
Version 1.6.8 - 08.20.2016
- Added the Medeek Tools toolbar with Trim and Extend icons.
- Added the trim function for (solid) groups and components.
Only the trim function currently works with this latest release. I'm also not completely satisfied with the trim function as it tends to break down when dealing with components that have tranformed instances. I am still working on this one. The main reason I've released it is for a few of my SketchUp mentors to have the ability to test the trim function and hopefully help me work the bugs out of it.
-
I've created a SketchUp model tonight using the truss and foundation plugins to further examine a structural design I am working on.
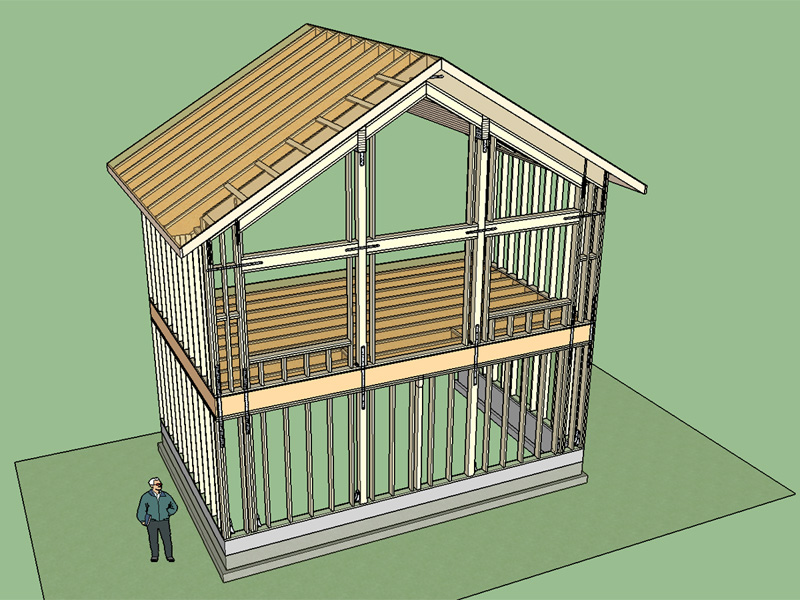
View and download model here:
3D Warehouse
3D Warehouse is a website of searchable, pre-made 3D models that works seamlessly with SketchUp.
(3dwarehouse.sketchup.com)
I think I will probably add a TJI roof that allows one to use two glulam beams with cantilevered rafters as shown in this model, this configuration seems to be fairly popular.
-
Medeek,
What function do the Bracket - Fixings shown in attached jpeg serve?
I assume they are Simpson Strong-Tie HDU2-SDS2.5 (as noted in your Skp model - entity info)
but why so far from the bottom plate - bolts to be added later or in situ?Good work, keep them coming

-
The HDU5 at the corner is primarily for the lower shearwall, the HDU4 about 24" inboard is for the the portal frame load path in the wall above, notice the straps between floors that complete the load path. I have not shown the SB5/8X24 anchor bolts that will be placed in the forms before the concrete is poured. I showed the holdowns about 1-1/2" above the sill plate, actual height will be dictated by the extension of the anchor bolts above the sill plate and is not really critical. The holdowns could just as well sit directly on the bottom plate.
What I've shown in this window wall is a site built wood moment frame, what I have not shown is the required nailing patterns. I also forgot to add in the pad footings for the PSL posts, and possibly a few more A35 clips and straps, but overall it is mostly complete. I am still working on the lateral analysis of the total structure which may change the sizing of the straps and holdowns slightly. This is the typical work I do during my day job but its fun to throw together a 3D model to really look at how it all goes together.
Advertisement


