3D Truss Models
-
Medeek,
..."take an entire roof configuration and store it as a preset roof assembly."I think this will be very popular, looking forward to this function!

-
Version 2.1.7 - 03.06.2018
- Enabled the "Edit Truss Assembly" function for all common roof trusses (imperial units only).
To edit a roof truss assembly just right click on the assembly and select the "Edit Truss Assembly" option.
Note, that this function is only available for common trusses with imperial units (template). Metric will be next.
It seems to be working fairly robustly but I'm sure there will be some minor bugs that pop up considering the complexity of the code and the sheer numbers of variables that I am working with.
Please report any errors by using the ruby console to record the error and email it to me.
Once this feature has been out for a while and I know it is running fairly stable I will then work on updating all rafter and truss assemblies so that the user can edit them. I can already see that this will be a very useful upgrade to the plugin.
-
Realize that the entire roof assembly is being redrawn from scratch so any manual customization will disappear. It is actually quite a bit faster than I thought it might be so I’m fairly happy with that.
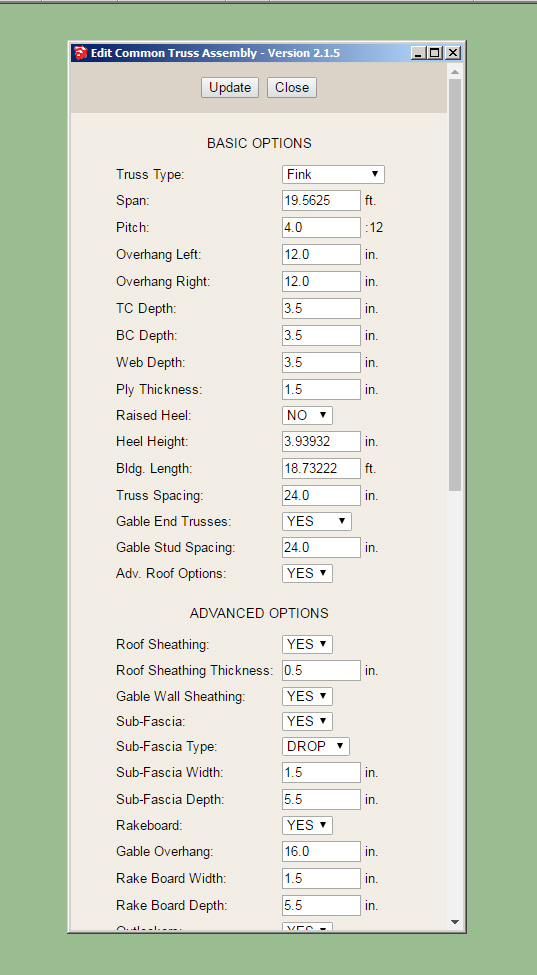
I did notice that when you initially create a truss assembly without any advanced options and then enable advanced options in the edit panel it does not auto populate the various advanced option fields, I think this could use some attention.
Below is a screenshot of the edit panel:
-
Version 2.1.7b - 03.10.2018
- Enabled the "Edit Truss Assembly" function for all common roof trusses (metric units).
-
Tutorial 7, Edit Function and some changes to the global settings:
-
Version 2.1.7c - 03.11.2018
- Added ceiling gypsum and ceiling battens to cathedral trusses.
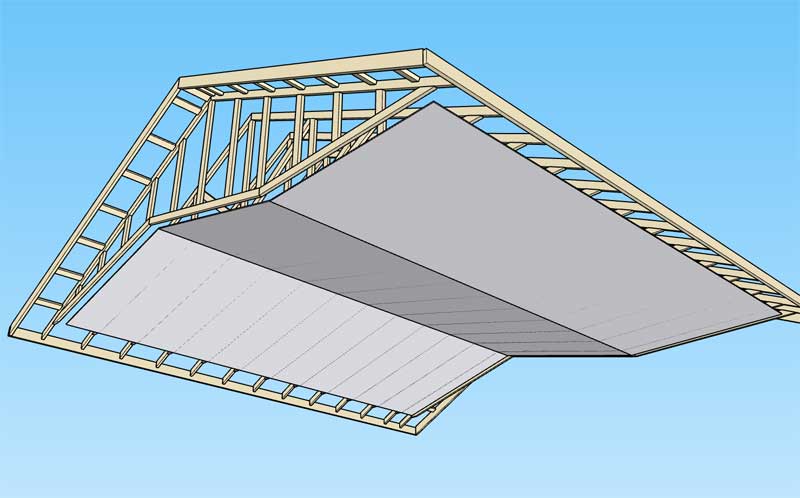
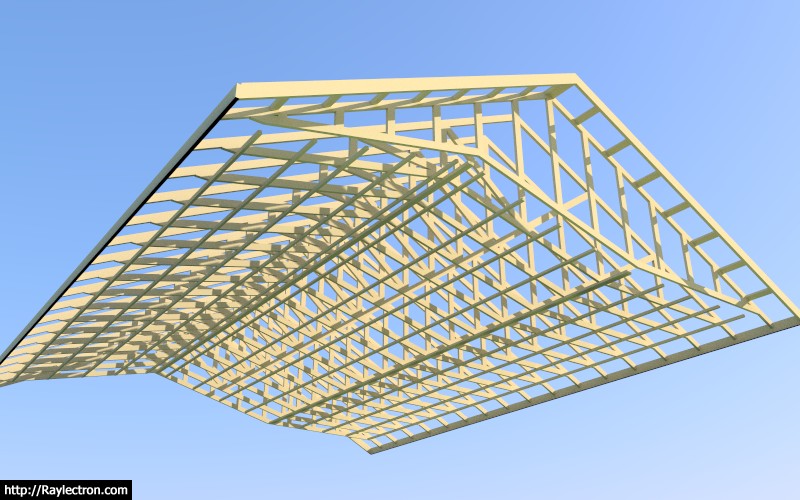
View model here:
-
-
Should be up now.
-
I've been giving some thought to framed openings in floors, see image below:
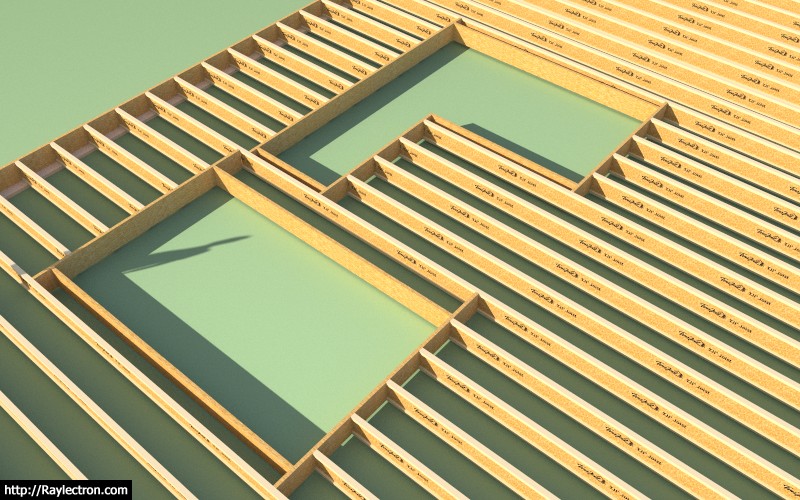
Generally, at least from what I've seen most holes in floors are either rectangular, L-shaped or U-shaped, but I guess any outline is possible.
What I've shown in the image above is LSL or LVL framing out the opening however the actual framing might be significantly different depending on what is supporting the floor below.
In some cases the rectangular opening might not be supported by bearing walls from below, in that case the two LSL boards running parallel to the joists would probably be larger beams and the headers would be hangered from these beams and would also probably be more substantial.
The point is how to make this feature flexible enough to accommodate most framed openings but at the same time keeping it as simple as possible so the user is not overwhelmed with parameters.
View model here:
https://3dwarehouse.sketchup.com/model/a879f0c7-0900-47f5-9caf-acc1c3a53f25/Framed-Opening-TJI-Floor
Any ideas would be greatly appreciated.
P.S. I am also going to make this feature editable so that the actual hole can be altered after the fact. This should be an interesting programming challenge.
-
Alternatively that same opening could be framed as below:
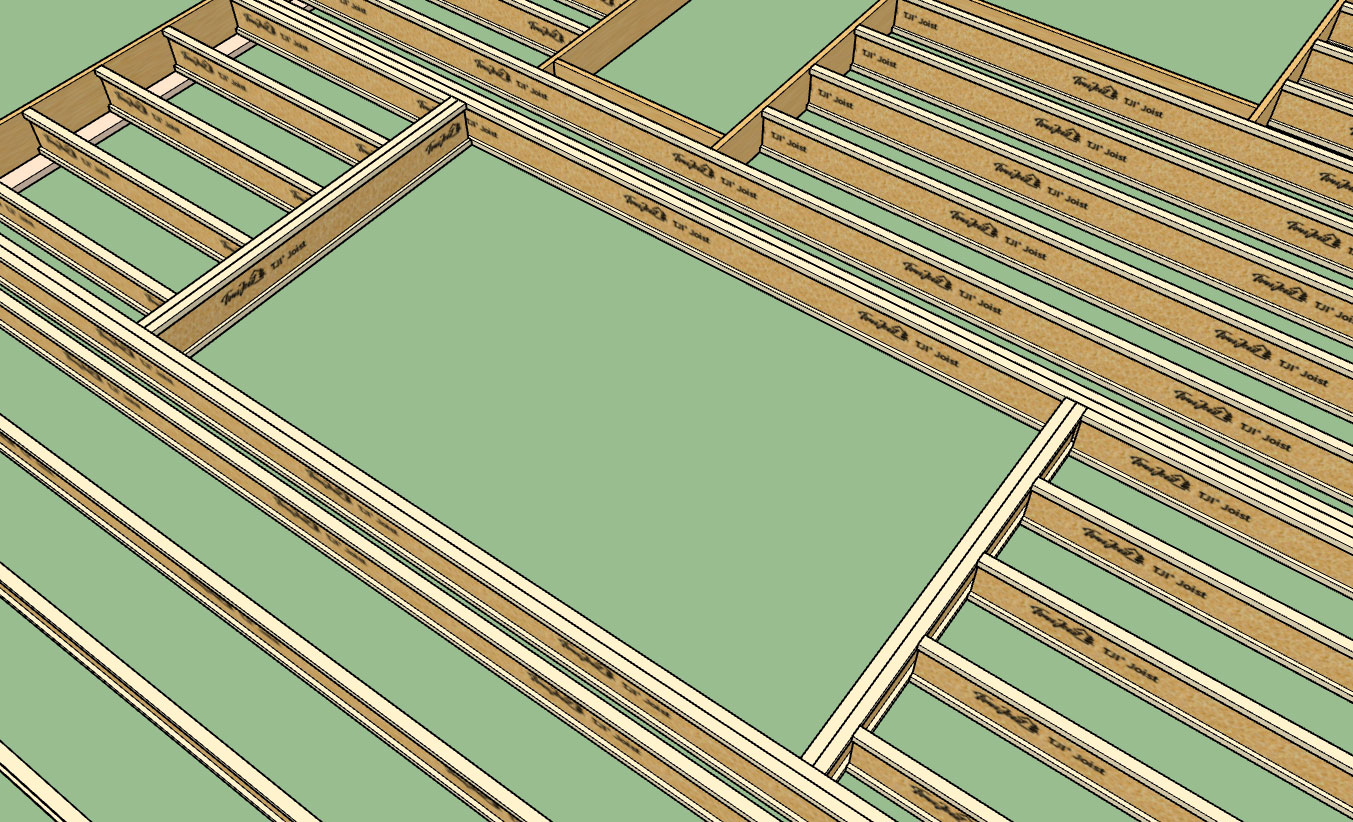
For the size of the opening one would probably use some PSL Beams rather than a couple of I-Joists but the concept is the same, compare with the previous example where the opening would probably be supported from below by bearing walls.
-
Here is an example of a L-shaped opening in a floor to allow for a stairway.

Probably not the best example but I think it helps get the idea across.
Note the bearing walls supporting perimeter of the opening.
-
Version 3.1.7d - 03.14.2017
- Addresses a minor bug with the UI menu for common trusses. The overhang of the truss could be rounded to an integer value upon recreation of another truss set.
I wonder why no one else has noticed the overhang rounding issue. I just realized it is an artifact from when I had it setup to use a integer value for the overhang, which I eventually changed but I must have forgot to update the rounding function (or remove it) so that non integer values could be input.
It appears this bug only affected common trusses but I will need to go through and check each truss type to make sure the same issue was not replicated elsewhere.
-
I am trying to get my hands on some shop drawings for a dutch gable truss set. I would like to work on adding this truss set into the plugin this weekend if possible.
-
Two different ways to truss out a dutch gable roof:
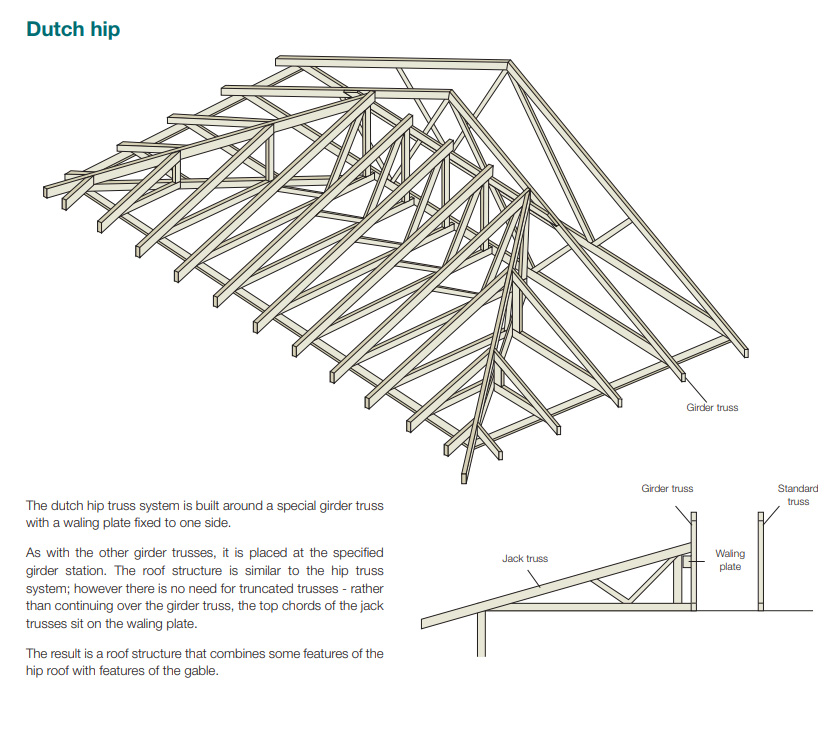
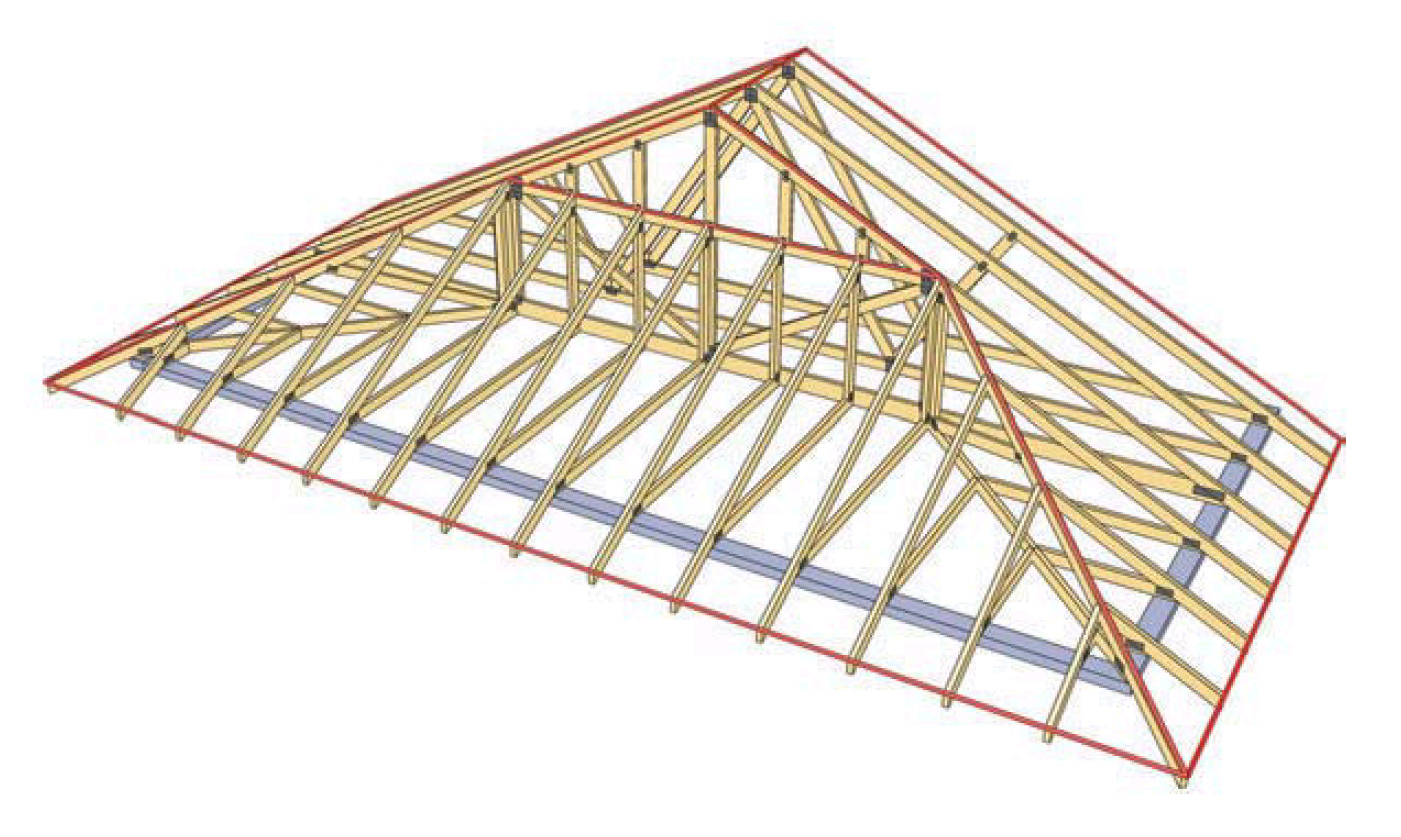
The first method involves a wailing plate attached to the side of the girder truss. This appears to be the preferred method of construction in Australia.
The second method employs vertical studs on the gable end portion (upper half) of the girder truss. What is not entirely clear to me is how the joint comes together at the top chord where the horizontal member (at the top of the jacks) meets the vertical and diagonal web of the girder truss.
I could really use a shop drawing (2D) of this particular configuration.
-
Version 2.1.8 - 03.18.2018
- Enabled the "Edit Floor Assembly" function for all I-Joist floors (imperial and metric units): TJI, BCI, LPI, Red-I, PKI.
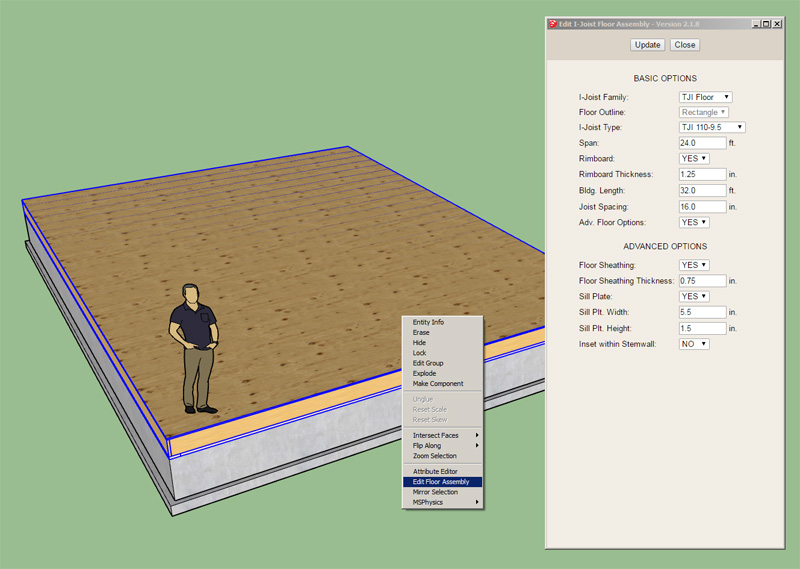
Now I just need to get the floor framed opening feature working and then this module might actually be useful.
Realize that any manual edits made to the floor assembly are blown away when you use the edit function. It is essentially re-drawing the entire floor assembly, the same goes for the roof truss assembly edit feature.
-
Spending some time the last couple of days thinking about the floor module (floor trusses, I-joists, solid sawn joists).
The obvious 800 lbs gorilla is the ability to easily add openings into these floors. The other missing element is the ability to create a polygon shaped floor (something beyond a rectangle outline).
With regards to polygon shaped geometry I've already done the heavy lifting when I programmed the foundation plugin to generate polygon shaped layouts (slab and stemwall). The details in trimming the joists is also mostly figured out since my rebar and mesh routine for slabs utilizes a function that will form the basis for this function. It is really just a matter of finding the time and then digging into the code deep for a solid 12+ hour period (uninterrupted).
These two issues are my main focus the next week or two. If I can address both as well have the edit function work seamlessly with both then I will have created an actual functional floor module.
-
I have a lot of people recently asking me about features that are or are not included in the plugin. Granted my documentation is still in disarray, especially the manual, but I would strongly suggest doing a search in the Changelog if you are interested in a particular feature and would like to check if it has been implemented yet:
-
I've been looking at adding in the ability to handle dual pitch hip roofs:
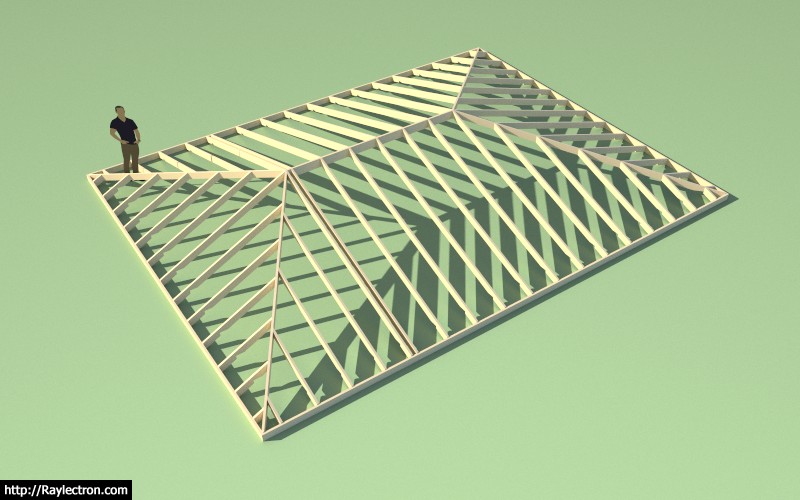
View model here:
https://3dwarehouse.sketchup.com/model/745938a9-71cf-4fef-8db1-e9ebc305f839/Hip-Roof-Dual-Pitch
The first thing that jumps out at me is the jack rafters do not line up when the pitches are different. Also if the overhang is the same and the fascia is the same height then the top plate will be a different height for the different pitches.
-
Yeah irregular pitch roofs are kind of tricky. They occur nevertheless.
-
@medeek said:
I've been looking at adding in the ability to handle dual pitch hip roofs
That'll be neat! Just a quick question (or two), are all existing options/functions (as relevant) ready and implemented across all truss types? Manual?
Advertisement


