Sketchup and Blender
-
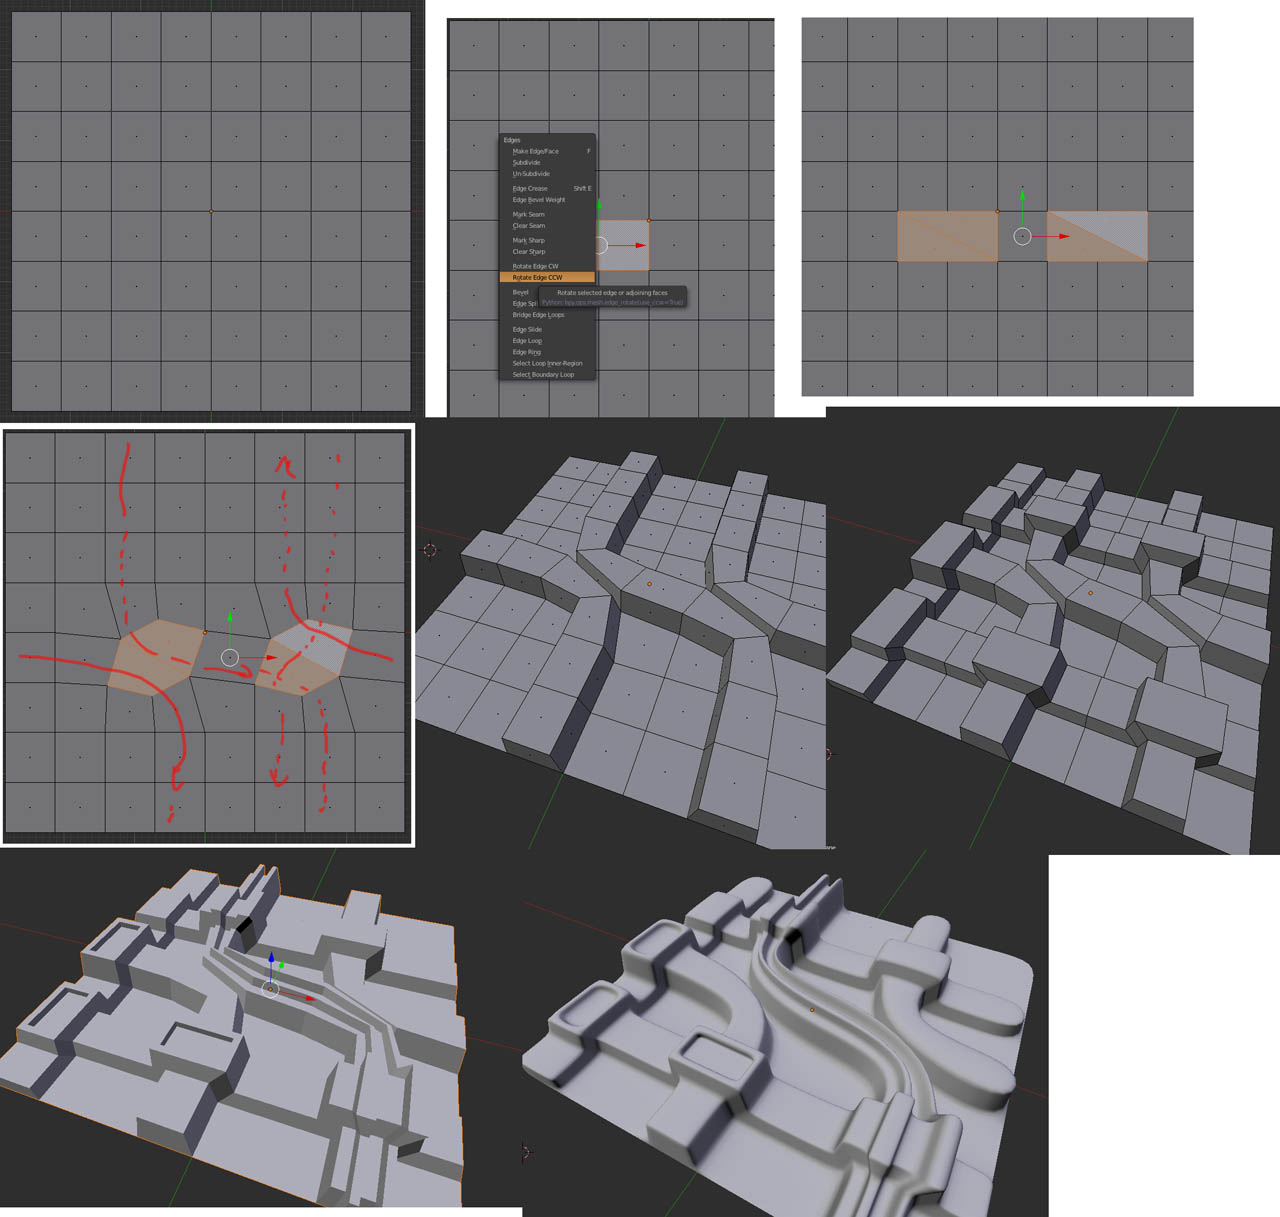
Simple ideas, working on a grid
Loops, extrudes (insets) and subdivisions.Alternatively, if these loops can follow a geometrical displacement panel-map, I mean, if the selected face loop can be unwrapped as an aliened quad row on a geometrical pattern…. such a displacement will follow the topology.
This is the basic idea. Too much work? Blender UV editor can do it automatically with 1-2 clicks.

-
@unknownuser said:
Is there a walk through some place or a video tutorial, I'd really like to learn this and another thing, say I have a shape created in meta modeling and convert it to regular mesh will this process work with it?
A video tut?
Oliver Villar did a tutorial based on this. It explains only the basics though. There is much more potential on this method.
http://www.youtube.com/watch?v=3wyzvsmfia0&feature=youtu.be -
I must admit i did not really go for tutorials when i first started learning blender.
Even if this modelling time lapse isn't what you want to model in Blender i think it says more about modelling, approaches to modelling and retopology (after the z brush bit) than quite a few of the tutorials i have subsequently watched.
If in doubt just start modelling a hand in mid air and end up with the right number of edges to join to the arm! Using the sculpt brushes to shape the low poly mesh e.t.c.
it was definitely, mind blowing.
Regards
-
Had some fun with Pete's model...


Properly meshed and rigged this will make for some fun loony tune time

-
Funny : a French Blender Guru is named CoyHot!

Site in English

-
we should still keep in mind how rapidly Cycles renderer is developing, right?
I noticed this artwork today, byn blender artist Spelle. -
That is an incredibly impressive image!
-

Sneak Peek: Blender Toolbar Tabs
https://www.youtube.com/watch?v=h1ik0rlJuK4 Campbell Barton demonstrates an early version of tabs for the Blender user interface. Remember this is still very much work in progress! I like what I'm seeing so far:…
BlenderNation (www.blendernation.com)
New UI coming
-
About bloody time! This is the only thing that holds me back from being competent with blender.
-
@rich o brien said:

Sneak Peek: Blender Toolbar Tabs
https://www.youtube.com/watch?v=h1ik0rlJuK4 Campbell Barton demonstrates an early version of tabs for the Blender user interface. Remember this is still very much work in progress! I like what I'm seeing so far:…
BlenderNation (www.blendernation.com)
New UI coming
Looks like a nice evolution. Not sure Oli that it'll necessarily make Blender easier to learn. From what I could tell it doesn't fundamentally change anything about the UI, just makes it a bit easier to navigate.
-
It's a pity that was not make from the beginning!

-
The level of commits for the next Blender is growing...
Render time remaining now added
Themeable UV editor
Cycles speed improvement
OSL improvements.
-
Christmas coming.
A nice blender tutorial from Andrew Price
I found it interesting, a good presentation of Sapling Tree blender editor.
Some particles system
Color indexing and some PPros (compositor)
https://www.youtube.com/watch?v=5Yd7ad08e54 -
Happy new year!

This guy is very good in Blender and speeching!
A real entertainer!
-
-
A wonderful Blender presentation.
Have fun, it is a 2:20 hours video. -
Happy 20th Birthday to Blender.
I had version 1.6 at one point but wasn't until 2.4 that I started to get my head around it.
-
Active Morphing by François Grassard aka CoyHot with Blender!
Morphing result:
Screencast :
PS
in the past was existing WinMorph by Debugmode in 2D! (free)
 -
Not yet the same than Sketchup but...that is the beginning!

ArchiMesh -

Many ways to skin a cat Pilou.
I would try a different and simpler way for the job.I wonder, what we could do for a cornice on the ceiling.
Extrude following a path somehow?
It can be done.
But not quite creative.
What about using the inset tool of blender?What I'm trying to say. Different apps, different workarounds.
Hello! It looks like you're interested in this conversation, but you don't have an account yet.
Getting fed up of having to scroll through the same posts each visit? When you register for an account, you'll always come back to exactly where you were before, and choose to be notified of new replies (either via email, or push notification). You'll also be able to save bookmarks and upvote posts to show your appreciation to other community members.
With your input, this post could be even better 💗
Register LoginAdvertisement


