Flipping Crazy
-
Folks,
Using the 'replace selected' feature found in component window results in the source component being flipped upside down before replacing the target component. As shown in the screen shots, i guessed that the problem was that the z-axis of the target component (a bolt in a block) is different in orientation to that of the source z-axis.
I tried using 'change axis' in an attempt to flip the z-axis of the source component, but alas, no joy.

Surely there must be a way to do this.
Any help is gratefully accepted.
P.S.
I attached a SU2013 file to play with
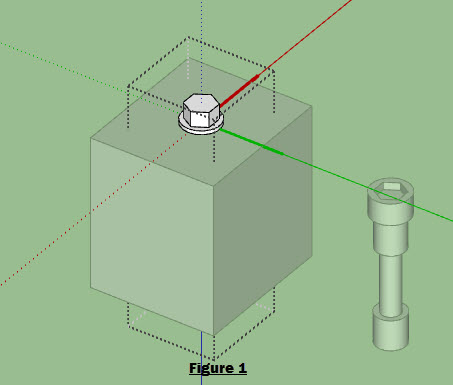
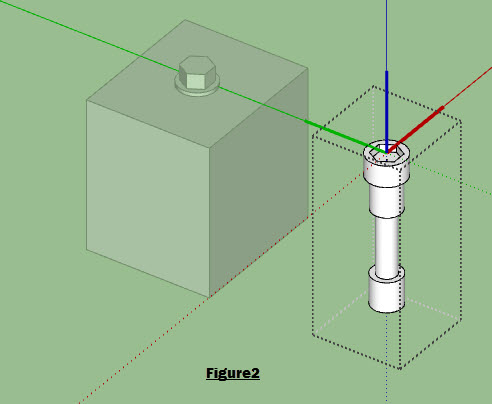
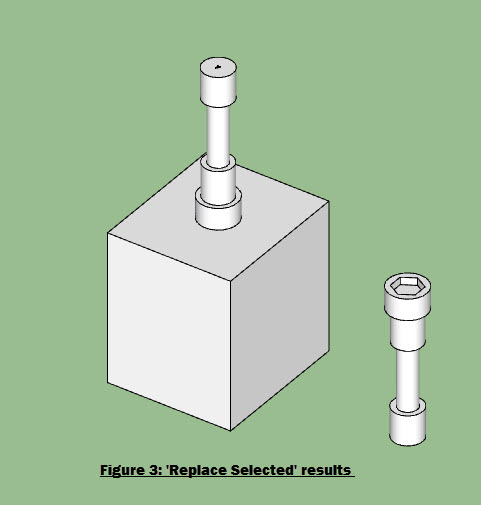
-
If you are planning on swapping components then you need to make all of them with a common axis arrangement. Then they'll replace kept 'in place'...
For bolts I'd have thought that it'd be a good idea to make them 'gluing' [perhaps even 'cutting' too?] that way they automatically align to the face you put them on, this means they need to have their insertion point centered on the underside of their heads and the blur axis 'up' through the head, and away from the 'shaft'.
With this arrangement all bolts will glue onto the face you put them onto, with the head protruding above the insertion point, but the rest of the 'shaft' behind the face... you can select > context-menu unglue to allow you to manipulate the location e.g. you want the head recessed, or the head off face to allow for washers ? Swapped bolts using the same origin/axis rules will then change over seamlessly...
-
-
Thanks to all for your responses.
Setting the gluing / cutting attributes is new to me so I looked it up. According to what I've read here:
http://support.google.com/sketchup/bin/answer.py?hl=en&answer=114533
The 'set glue pane' option on the component dialogue box is only available to Mac users. I'm on a PC.
From what I can determine, the end result of 'gluing' would be the same as a 'change axis' operation. Regardless, I have found it impossible to get the source component z-axis to point downwards. It snaps to every orientation except down.
If you have a moment, please open the attached file and try for yourself. If you are successful in getting the source component z-axis to point downward, please attach the file with the change so I can attempt to duplicate your effort.
Man, I love a good challenge

warm regards
Bob
-
I'm not sure how you got that gluing is only available on Mac. It is available on the PC. If you looked at my links, the screen shots showing the glued component was done on the PC.
I'll look at your SKP file in a moment.
-
@tig said:
you can select > context-menu unglue to allow you to manipulate the location..
DOH!!! Thanks TIG wish I'd spotted that yesterday
-
Here is where you find the edit component options on a PC after yopu go to the In model library and select one of the components:
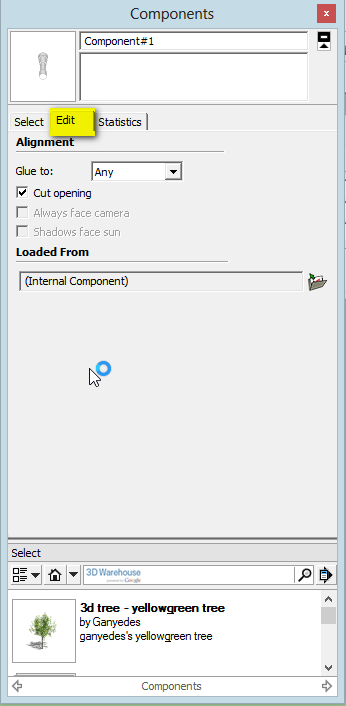
and changing the axes is in the context menu: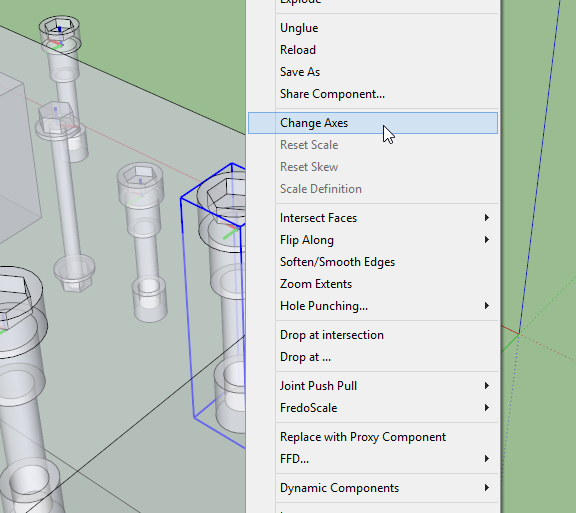
-
Is this what you want?
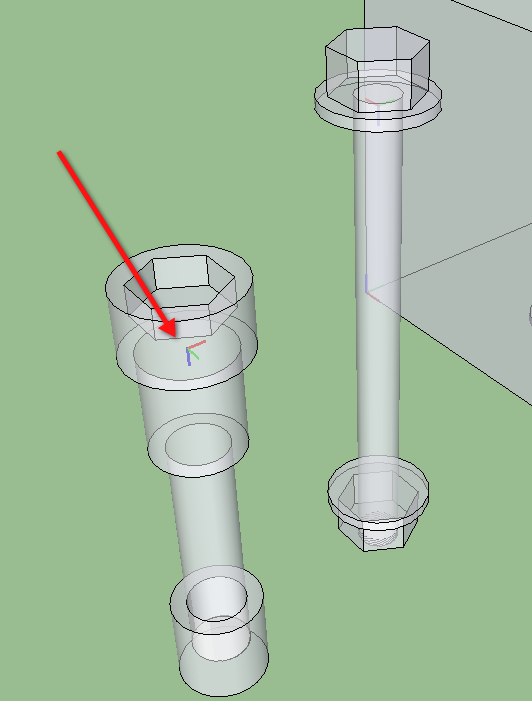
Personally I think making the blue axis point downward is the wrong way to go about it. If you bring in the component to place it (not use it to replace), it'll be inserted inverted from the way it is shown. Instead, determine the most common orientation and set the axes so the bolt will insert with that alignment. The component will insert with its axes aligned to the model axes.
If you looked at my links you'll see I was using drawer pulls for the examples. They always wind up on the front of the piece of furniture and the front is always parallel to the red axis so I set the component axes for the pulls to match.
In the case of your example I would change the orientation of the hex bolt so the blue axis points up and set the socket head screw's axes to match.
As I tried to indicate before, If you have inserted one bolt and then rotated it to a different orientation, when you replace that component, the new one will come in with the same orientation if the axes match.
-
-
Blue axis should be UP, otherwise if you do glue it then it'll attached to the wrong side of the face

-
This may help to match up components
-
@techdave02 said:
This may help to match up components
He already found that and had the axes shown in his model.
-
Dave,
Yes that is 'precisely' what I was trying to do. The bolt shown in the block was created using BoltMaker XII and I found it's axis orientation odd from the beginning. That is why I've had to resort to finding a way to change the source component axis to match it.
Also, I stand corrected regarding the 'glue' button. Thanks for catching that
Tig:
I agree wholeheartedly that the 'blue' axis should be up. However, I was unable to do so with the bolt in the block. That bolt was created with BoltMaker XII. Why it's down, I don't know. All I know is that I can't change it to go up. I therefore tried to change the orientation of (my) source bolt to match that of the BoltMaker XII component.
You wrote "you can select > context-menu unglue to allow you to manipulate the location". Are you referring to the 'Glue To: None' option in the Component window? I searched all over but couldn't find anything with the word 'Unglue' in it.
Thanks to all for jumping in
-
Is the bolt maker plugin locating the axes incorrectly or did you just rotate the component after creating it? As I said, if you aren't going to set the component to glue, adjust the axes so it'll insert in the most common orientation.
-
Right click on the component and a context menu item is unglue.
You can always explode the component in the correct location and remake it as a component which will give you the opportunity to set the axis, glue, cut etc
-
Dave,
Thinking that I might have...I went back and created a new bolt with BoltMaker XII. I was correct in that the z-axis always points down when using this plugin.
Box:
I tried your suggestion. I can see the 'unglue' option in the context window, but it's greyed out. I also tried putting the bolt component ( seen in the block) in edit mode, but it made no difference. Using the file I attached, are you able to see it black and not grey?
-
I have used BoltMaker and it has always produced the fastener with the axes in this configuration and my solution was always to match the specialty fastener to it. Or to go into the component delete it and redraw/copy past new one if I want all the instances to be the same
-
Lousy plugin, then.

If anyone takes up your challenge to rewrite/improve the plugin, maybe they can fix this problem, too.
If Unglue is greyed out, there's no gluing established. If a component has three distinct axes as in your example and the screen shot I posted, there is no gluing.
-
That isn't what he is talking about.
-
@unknownuser said:
in edit mode, but it made no difference. Using the file I attached, are you able to see it black and not grey?
Bob
I am not sure if you are saying that it is hard to see??
If so adjust as follows.
Advertisement


