sketchucation logo sketchucation
    • Login
    ℹ️ Licensed Extensions | FredoBatch, ElevationProfile, FredoSketch, LayOps, MatSim and Pic2Shape will require license from Sept 1st More Info

    Flipping Crazy

    Scheduled Pinned Locked Moved Newbie Forum
    sketchup
    59 Posts 8 Posters 1.4k Views 8 Watching
    Loading More Posts
    • Oldest to Newest
    • Newest to Oldest
    • Most Votes
    Reply
    • Reply as topic
    Log in to reply
    This topic has been deleted. Only users with topic management privileges can see it.
    • T Offline
      TECHDAVE02
      last edited by

      Dave R

      I understood that but if you are using BoltMaker over and over in the same model that is the result.
      The points that you make are all valid and I agree wholeheartedly with you and tig on all counts but if at this point BoltMaker is used then the workaround must consider this.

      1 Reply Last reply Reply Quote 0
      • bsintzelB Offline
        bsintzel
        last edited by

        Techdave02

        Sorry for the fuzzy answer: I was referring to a library of components I keep for all of my models πŸ˜‰

        I've taken obfuscating to a whole new level!

        1 Reply Last reply Reply Quote 0
        • pilouP Offline
          pilou
          last edited by

          A little image before / after for explain the problem ?

          This plugin by SDmitch don't resolve your trouble ?

          Frenchy Pilou
          Is beautiful that please without concept!
          My Little site :)

          1 Reply Last reply Reply Quote 0
          • bsintzelB Offline
            bsintzel
            last edited by

            Pilou,

            I love this plugin from SDmitch, but it does unconventional things to the axis of the bolts it produces, causing a lot of axis alignment issues for me. I posted my issues in the Newbie Forum, see subject 'Flipping Crazy' for all of the screenshots.

            Bob

            I've taken obfuscating to a whole new level!

            1 Reply Last reply Reply Quote 0
            • pilouP Offline
              pilou
              last edited by

              I always don't understand all that! πŸ˜„
              As said previous in another thread
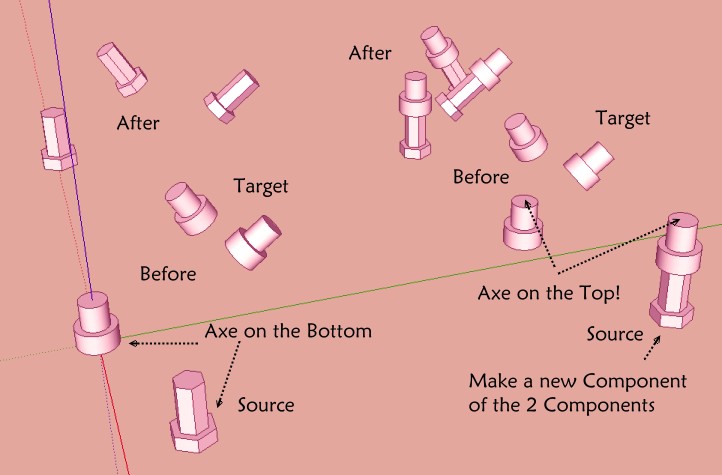
              Seems the axe tools by Thomthom who give an axe to any objet
              Then the replace component by Sdmitch Source / Target
              makes that you want!
              With that you have nothing to do! πŸ˜„
              No click for give orientation πŸ˜„
              What do you want more simple ?
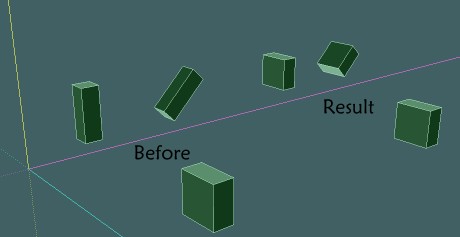
              bef_after.jpg

              Frenchy Pilou
              Is beautiful that please without concept!
              My Little site :)

              1 Reply Last reply Reply Quote 0
              • bsintzelB Offline
                bsintzel
                last edited by

                Pilou,

                It's ok...I'm going to put this problem to bed. Thanks to all for your input

                Bob

                I've taken obfuscating to a whole new level!

                1 Reply Last reply Reply Quote 0
                • pilouP Offline
                  pilou
                  last edited by

                  Only with Axes tool by Thomthom + Replace random component by Sdmitch! πŸ˜‰
                  (with only one component as source)
                  At the end just select all the ("component of 2 components" very easy with the Outliner)

                  and explode them if you want refind the 2 original separated components!

                  And if you want a "resize on the Target"
                  use the special Replace random component file linked always by Sdmitch ! πŸ˜‰
                  Very easy, very speedy and nothing to do! πŸ’š

                  Bollets.jpg


                  PilouComponentReplacement.zip

                  Frenchy Pilou
                  Is beautiful that please without concept!
                  My Little site :)

                  1 Reply Last reply Reply Quote 0
                  • bsintzelB Offline
                    bsintzel
                    last edited by

                    Pilou,

                    Very cool πŸ‘

                    It's also very kind of you to share this. Thank you πŸ˜„

                    Bob

                    I've taken obfuscating to a whole new level!

                    1 Reply Last reply Reply Quote 0
                    • pilouP Offline
                      pilou
                      last edited by

                      Just a little thing that I have forgotten to write! 😳
                      Between each call of the random replace component you must erase inside the Info Box all the Words Source and Target! (use again the Outliner for an easy selection)
                      If not the plug will not work in some cases! πŸ€“

                      Frenchy Pilou
                      Is beautiful that please without concept!
                      My Little site :)

                      1 Reply Last reply Reply Quote 0
                      • bsintzelB Offline
                        bsintzel
                        last edited by

                        Pilou,

                        Since you put a lot of extra effort into this problem, I'm going to as well. First however, I have to be certain nothing is getting misunderstood by either of us.

                        I'll begin by asking you to use the BoltMaker XII plugin and (using the model I provided), try the following steps:

                        1 - open the file I've attached. It contains: a component (a block) with a bolt in it created using BoltMaker XII and a 'Source' component made by me.

                        2 - From the Window/Entity Info dialog box, confirm that the 'Source' bolt I created is a component. Double-click on the 'Source' component, you'll see that it's z-axis is pointing up (standard convention).

                        3 - From the Window/Entity Info dialog box, confirm that the bolt created by BoltMaker XII is a component. Double-click it and examine its axis. You'll find that the z-axis is pointing down. This is not standard practice as a new component should have the z-axis pointing up.

                        4 - Now run SDMitch's ComponentReplacement plugin against the 'Source' and 'Target' components.

                        What you should see is that the 'Source' component replaces the 'Target' component at a location and orientation you wouldn't expect.

                        Try this and let me know what you find. If you have a procedure I can follow that results in a properly oriented target replacement ( using the model I provided) ...I'll be ecstatic 😍 .

                        Warm regards

                        Bob

                        Bob


                        SU8 format


                        SU2013 format

                        I've taken obfuscating to a whole new level!

                        1 Reply Last reply Reply Quote 0
                        • bsintzelB Offline
                          bsintzel
                          last edited by

                          Guys,

                          FINALLY...after listening to all of your ideas, I derived a solution based largely on your comments and it worked perfectly. When it happened, it was one of those cathartic moments.

                          The solution was mainly to forget all about trying to 'replace' a BoltMaker XII bolt with mine and instead, figure out how to 'insert' my custom bolt exactly where I wanted it in another component.

                          Steps followed:
                          1 - Selected my custom bolt component (the source).
                          2 - Using ThomThom's Axis tool, set the insertion point of the custom bolt x-y-z axis to 'center'
                          3 - Selected the Box component (the Target).
                          4 - Using ThomThoms Guide Tools plugin, set the Target's bounding box's cPoint at bound center.
                          5 - Click on the 'Source' component then CTRL-click on the 'Target' component.
                          6 - Using ThomThom's Guide Tools plugin, select Insert Component at cPoints.

                          voila, the custom bolt is inserted in the block at the precise location I want. 😍

                          THANK YOU ALL for your input


                          Figure 1: Set the custom bolt x-y-z axis to 'center'


                          Figure 2: Set cPoint of 'target'


                          Figure 3: Insert 'source' component at cPoint of 'Target' component

                          I've taken obfuscating to a whole new level!

                          1 Reply Last reply Reply Quote 0
                          • Dave RD Offline
                            Dave R
                            last edited by

                            It appears you've got a process you're happy with. That's cool. πŸ‘

                            Etaoin Shrdlu

                            %

                            (THERE'S NO PLACE LIKE)

                            G28 X0.0 Y0.0 Z0.0

                            M30

                            %

                            1 Reply Last reply Reply Quote 0
                            • pilouP Offline
                              pilou
                              last edited by

                              So you don't use a replacement mehod πŸ˜„
                              Yes ...but how do you make when you have a little hundred of bolts in any orientation to change ? πŸ˜„

                              PS For me its' save as V6 or V7 for read the files πŸ˜‰

                              Frenchy Pilou
                              Is beautiful that please without concept!
                              My Little site :)

                              1 Reply Last reply Reply Quote 0
                              • bsintzelB Offline
                                bsintzel
                                last edited by

                                Hi Dave...

                                Forgive me if I already asked you, but could you remind me of the 'fewer' steps you use πŸ˜„ .

                                I've had so much correspondence around this topic with so many people on different forums, I've lost track 😳

                                Bob

                                I've taken obfuscating to a whole new level!

                                1 Reply Last reply Reply Quote 0
                                • bsintzelB Offline
                                  bsintzel
                                  last edited by

                                  Piloe,

                                  Re "So you don't use a replacement method". Sorry to say, but I was going about this all wrong. I was using BoltMaker as a way to automatically create a bolt that would resize itself according to the dimensions of the target. I thought that by simply replacing the BoltMaker bolt with mine that it would be very easy to do. Sadly, I was wrong.

                                  I do thank you for your efforts.

                                  Bob

                                  I've taken obfuscating to a whole new level!

                                  1 Reply Last reply Reply Quote 0
                                  • Dave RD Offline
                                    Dave R
                                    last edited by

                                    Bob, there are links on the first page of this thread. No plugins required the way I do it.

                                    I'm curious about your procedure. You are locating the bolt so its center is aligned with the center of the block component. Why do you put a fastener in a single piece? Wouldn't that fastener be used to hold two parts together? And if that's the case, you don't want the center of the bolt located at the center of a single part, do you? What happens when you have a pair of bolts to locate on the part. Both of them can't be at the center in the part.

                                    I would locate the insertion point for the screw in your example centered at the top of the head and place the screws at points on the surface of the part. These would be the points you'd identify in reality instead of points inside the part.

                                    And with gluing, the bolts drop in easily in any orientation desired.

                                    The only plugin used in the creation of the model in the video was to drill and counterbore the holes for the bolts. Everything else was done with native tools. It would be trivial to adjust the lengths of the bolts as needed so I didn't show that.

                                    Etaoin Shrdlu

                                    %

                                    (THERE'S NO PLACE LIKE)

                                    G28 X0.0 Y0.0 Z0.0

                                    M30

                                    %

                                    1 Reply Last reply Reply Quote 0
                                    • pilouP Offline
                                      pilou
                                      last edited by

                                      Maybe you can also look at Component Dropper by ThomThom πŸ˜‰

                                      Droppthom.jpg

                                      Frenchy Pilou
                                      Is beautiful that please without concept!
                                      My Little site :)

                                      1 Reply Last reply Reply Quote 0
                                      • bsintzelB Offline
                                        bsintzel
                                        last edited by

                                        Hi Dave...

                                        This is an excellent video tutorial. Thank you so much πŸ‘ πŸ‘ . I would prefer your solution to mine if I can get it to work on BoltMaker XII output. You see, BoltMaker automaticaaly sizes the bolt to match its target.

                                        Just one question: was the bolt you used created with BoltMaker XII and if so, did you manipulate it's axis in any prior to gluing them?

                                        To answer your question "Why do you put a fastener in a single piece?".

                                        Answer: To illustrate the 'flipping' issue I was experiencing when using BoltMaker XII. I totally agree that a single bolt in just one piece would serve no purpose πŸ€“ .

                                        I've taken obfuscating to a whole new level!

                                        1 Reply Last reply Reply Quote 0
                                        • Dave RD Offline
                                          Dave R
                                          last edited by

                                          @bsintzel said:

                                          Hi Dave...

                                          This is an excellent video tutorial. Thank you so much πŸ‘ πŸ‘ .

                                          Ah. Thank you. I'm glad that was helpful.

                                          @bsintzel said:

                                          I would prefer your solution to mine if I can get it to work on BoltMaker XII output. You see, BoltMaker automaticaaly sizes the bolt to match its target.

                                          Just one question: was the bolt you used created with BoltMaker XII and if so, did you manipulate it's axis in any prior to gluing them?

                                          No. I didn't use any plugins to create the bolt. I just drew it manually. In this example I made the screw, washers and nut as separate components and made a nested component of them. When I made the nested component I set Gluing to 'Any' and clicked on the button to set the axes. I then placed the axes at the top of and centered on the head. It took little time to do the whole thing. I think I spent more time looking up the real dimensions for the head and socket than drawing the components. BUT I don't ever have to look that info up again.

                                          Since the screw, washers and nut are separate components, I can easily get a parts list from the model if I want it.

                                          @bsintzel said:

                                          To answer your question "Why do you put a fastener in a single piece?".

                                          Answer: To illustrate the 'flipping' issue I was experiencing when using BoltMaker XII. I totally agree that a single bolt in just one piece would serve no purpose πŸ€“ .

                                          That makes sense. It seems to me that the boltmaker plugin currently creates more problems than it solves and forces you to be inefficient as you are working.

                                          I now have a 1/4 in. socket head cap screw that is designed to sit with the top of the head flush to the surface of the part. It would be easy enough to edit its length or modify the location of the insertion point so I can have it insert with the washer on the surface. I could eliminate the washers or change the nut to a locking nut or whatever and do it all with only the native tools.

                                          Etaoin Shrdlu

                                          %

                                          (THERE'S NO PLACE LIKE)

                                          G28 X0.0 Y0.0 Z0.0

                                          M30

                                          %

                                          1 Reply Last reply Reply Quote 0
                                          • bsintzelB Offline
                                            bsintzel
                                            last edited by

                                            Dave R,

                                            I 'really' liked the plugin you used to counter-bore. I design folding furniture that I ultimately make for myself so the counter-bore plugin you used would be a real time saver.

                                            I found a suite of woodworking plugins https://sites.google.com/site/wudworx/plugins-and-tools/wwxboardmaker) and purchased the Wudworx Library Version 2(includes BoardMaker Pro, Dovetails, M&T, and Drill plugins).

                                            I'm not sure if it's the same plugins you use. If so, you should get a kickback for semi-advertising their plugin πŸ’š

                                            I can't thank you enough for the amazing support you've provided.

                                            Warm regards

                                            Bob

                                            I've taken obfuscating to a whole new level!

                                            1 Reply Last reply Reply Quote 0
                                            • 1
                                            • 2
                                            • 3
                                            • 1 / 3
                                            • First post
                                              Last post
                                            Buy SketchPlus
                                            Buy SUbD
                                            Buy WrapR
                                            Buy eBook
                                            Buy Modelur
                                            Buy Vertex Tools
                                            Buy SketchCuisine
                                            Buy FormFonts

                                            Advertisement