How to trace a Logo
-
Hi,
i want to print a 3D Version of a football club's logo. As i can't find a vector version that fits my needs i'd like to trace a bitmap version.
I guess you guys did that already hundred times and i have no clue how to start. Is something like that possible with sketchup itself or do i have to vectoriize it in another programm and import it to sketchup later? I'm on a mac so if there's anything platform related...

Thanks for helping,
Frank

-
It depends a lot on the logo, and what level of detail you want to include.
If you intend to 3D print the logo you probably would need a lot of detail and colors?A good start would be to import a bitmap of the logo as image.
Make a copy of it and explode it.
Start drawing contours on the exploded copy, using lines, arcs, curves, contours etc as needed. Pull out parts as you go, and add more detail/relief as wanted.
If your 3D printer can print colours you may save/skip a lot of details? -
thanks for your input. I'm not printing in multiple colors only one. I'm trying to keep the detail level intermediate.
-
What does the logo look like?
-
I just found a vector version of the logo in svg but no chance to import it. Converted it to dxf using illustrator but freeDXF doesn't import it well - don't know if the export or the import is the problem.
Does anyone else know a way to import svg by easy converting?
-
I'm sure you would get a lot more help if you posted/uploaded something, like a bitmap of the logo, the svg/dxf version etc...
-
The free Inkspace can give some many formats to export!

Even vectorize your logo
-
I need to something similar on occasion. Here's an example.

The how I did it is already here
Or you could spring for the pro version of SketchUp and import the vector version. If you need to do this very often, if your time is worth anything, and the art is available in vector format, you would probably find it worth the investment.
-
If it's a relatively simple shape then Dave's method is the best and easy...
If the outline is more convoluted etc then there are other ways...
In Gimp/Photoshop...
Save the image as PNG.
Flatten it.
Add a transparency layer.
Select the background with the magic-wand and delete it.
Tidy up any required 'holes' too.
Auto-crop the image to minimize the size of unneeded 'empty space.
Save it.
Now import the PNG image-file into the SKP as an Image - see the options on the side of the import dialog...
You should be able to see through the deleted 'transparent' background areas...At this pint you can follow a manual method like Dave shows...
OR you can download and install my ImageTrimmer tool and process the SKP's Image so that the 'transparent' parts are auto-erased and a cut-out is made.
You can then Edit the resulting Component-instance and Select all and unhide the edges.Now PushPull the main face[s] to give the 3d-effect.
You might want to repaint the vertical edges differently ?
Note that the 'ImageTrimmer' tool needs my 'SKMtools' installing too, AND for these to work you must have Java enabled on your system [it is by default] AND the related '.jar' files must NOT be associated with any decompression apps, but 'execute' when opened [the default setting too] - this is sometimes compromised because some decompression apps 'hijack' the '.jar' file extension as they install and open the archive so you can see the contents, when what we want is for such files to 'execute' and do various image manipulations, not readily available within raw-Ruby... The decompression app settings will enable you to uncheck the .jar format as one of its associations... -
It could easily be a lot more complicated than just tracing a contour and extrude it.
As I understood the OP this is to be a mono coloured 3D print of a logo - and we don't know what type of logo that is.
It could be QPR for instance?
First of all - it isn't a one-piece logo.
It would require a lot of extra modeling to even resemble the original one.
Even simpler logos, like Tottenham, ManU etc would require some 'internal' modelling.BTW, FreeCAD is supposedly reading svg and exporting dxf.

-
Sorry for beeing so quiet whil you were so wonderful helpful - this community is just georgeous

Here's the Logo - some of you may have already seen this: http://de.wikipedia.org/wiki/Datei:FC_Bayern_M%C3%BCnchen_Logo.svg
I'm currently working on importing this as a vector and later play with extrusion a bit.
Problem is that illustrator seems to be messy with the dxf export - maybe that is due to multilevel combined paths in the svg file. I'm trying some other ways now. If anyone knows a good way or is able to get imported into sketchup and wants to provide the sketchup file and a short how-to... i'd be thankful but i continue trying myself, too.
-
@Bjornkin: You're right. It could be a lot more complicated.
It turns out it isn't.
This one seems like a relatively simple project using either the method TIG outlined (ha! pun) or the one I did.
-
@bjornkn said:
BTW, FreeCAD is supposedly reading svg and exporting dxf.
FreeCAD is a complete secret to me. I could get something ready with that tool so far
 I got it installed and managed to import the svg but can't directly export it - seems like i have to do something with it first but all i see is kind of a preview...
 -
It looks like the svg contains no vectors? At least FreeCad doesn't seem to find any, but only the image//bitmap?
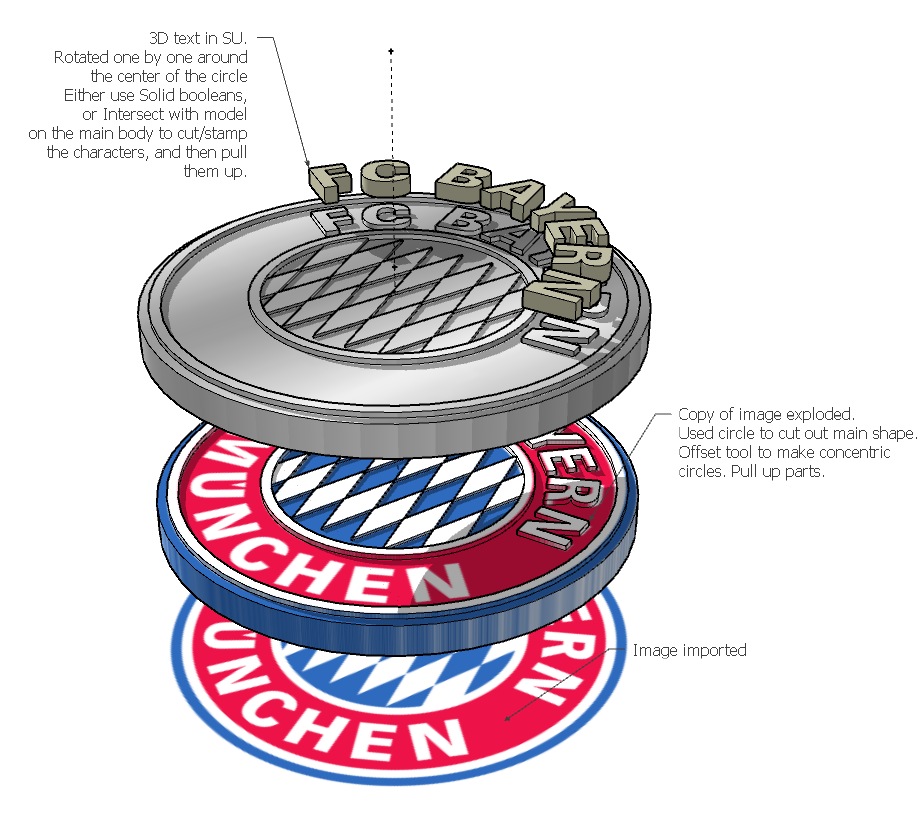
Anyway, you can easily make this directly in SU without any vector imports at all.
You only need to draw one circle to cut it out, and you could easily make the text and those blue/white diamonds directly in SU.

-
wow - thanks.
did you draw the lines of the font by hand on the middle layer to pull them up? I'm not that used to the arc tool so far and trying around a bit currently. Is there any other way to draw some kind of bezier lines or the arc only? haven't done that stuff so far.
-
The only drawing tool I used was Circle, to crop/enclose the circular shape of the logo.
Next I pulled up the circle, and now had a thickness.
Next I selected the top face and used the Offset tool to make circles where the colors changed - blue->white->red->white->blue.
Then I made a vertical construction line in the center of the circle.
Next was to pull up the two white rings.
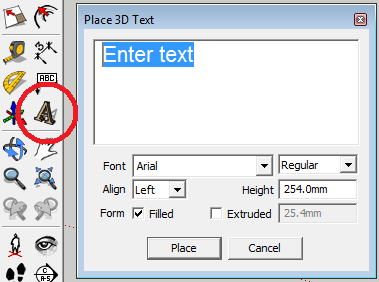
The text was made as 3D text on top of the red band, using a Helvetica/Swiss font.
FC BAYERN in one word, and MUNCHEN in the other (the triangle in the U was drawn with lines afterwards and extruded).
Inside each text group: Triple clicked each character and made it a group.
Moved all characters sideways so that they overlapped each other.
Explode the top text group.
Selected and rotated one character at a a time rotating around the center construction line/point.
When done, I just selected the red band and used the 'Intersect with model' command.
Hid the characters and extruded/pulled up the newly 'stamped' versions.
The central diamonds needs some special attention to pass the 'solid' test necessary for 3D printing. -
Hi Helmi
Have a look the SU 3DText Tool@unknownuser said:
by bjornkn - The text was made as 3D text on top of the red band, using a Helvetica/Swiss font.

Advertisement


