Engraved sign maker, technique, or plugin
-
Any one know of a technique, or plugin to make engraved signs?
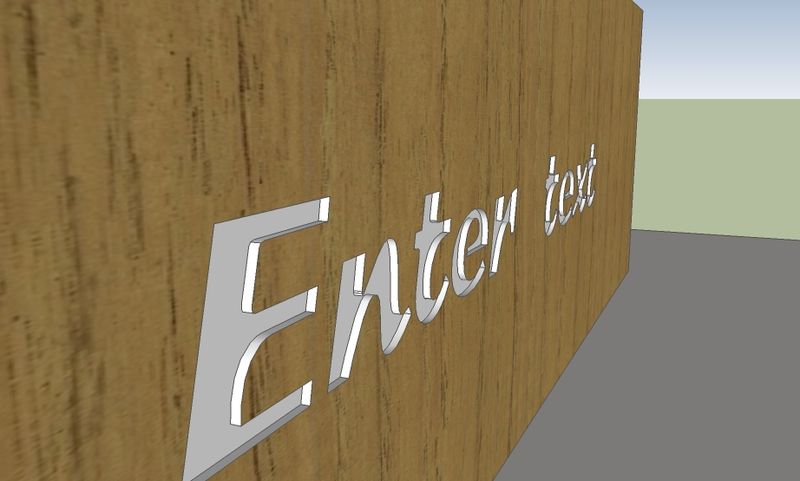
Here is what I have tried so far, make a rectangle of the proper size, and thickness then make a 3D text, on the un-grouped rectangle, move the text component to the proper depth into the rectangle, in my case the text was 1/8" and the rectangle was 1/4".
Explode the text component, and erase the front face of the text. Unfortunately the back face of the text also was erased, and easy fix, kind of, hide the back face of the rectangle, and re-draw one edge on each letter, the back face of the text will re-appear. Now paint the back face and side faces of the letters, then paint the rest of the rectangle's faces as desired. It works but is time consuming. Anybody have another approach? Here is a pic of a new one I just made, I didn't have to redraw the back faces of the text this time. Now you guys know what I am talking about.
-
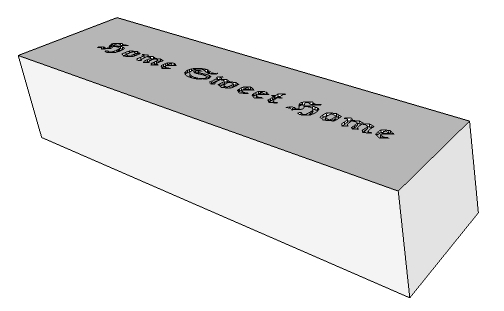
I quickly got an engraving using boolean subtract. I had to make the block a group first. Boolean ops are a Pro feature.
-
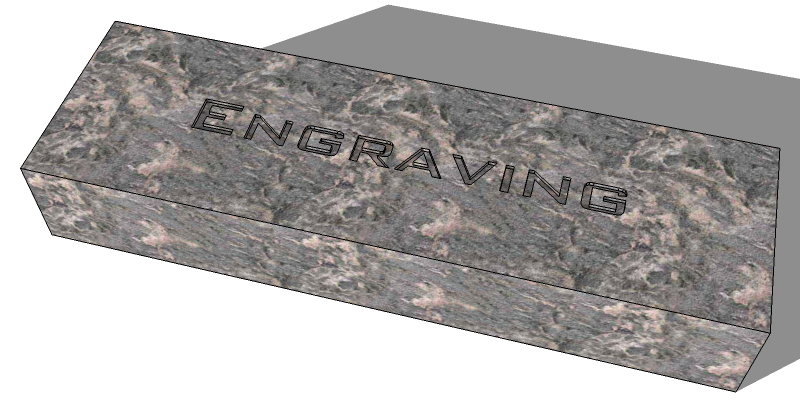
And here's one using just the pushpull tool.
I made a block: rectangle, then push pulled it up.
Grouped it, then double-clicked it to enter group edit context.Selected the 3D Text tool. Set font, etc. Unchecked filled (so it was just flat.)
And placed it on the face (within the group,) a near to center, by eye.
Exploded the text, selected it all, and push-pulled it down.I had to only manually fix the middle of the "A" and "R". (But with v8's prepick pushpull it's much easier, as you can use the intersections of other letters, so the depth is the same.)
-
First point, I don't have Pro, so I am pretty much stuck with the tools I have.
Prepick PushPull, what is that?. -
For the Free 8 Maybe the booleans by Oscarlok can work

-
Just a thought, if you have a lot of text, you might pull up on the surfaces that aren't letters. Set your 3D text to have no thickness.
-
Make the 3d text without any 'thickness' [no-extrusion].
Place it on the surface of your 3d premade 'block'.
Explode the text's container so that its geometry merges with the block's geometry.
PushPull the block's surface 'up' - which will have the effect of 'sinking' the text.
Any 'island-faces' within the text's characters - like inside ABDOPQR04689%&@#etc - can easily be pulled up by a doing double-click on each one to match it to the block's 'plane'.
Adjust the block by using Fenced_Selection+Move to set its final dimensions as desired... -
You say those things so much better than I do.
-
@tspco said:
Prepick PushPull, what is that?.
It was added in ver 8.
Previously, you selected the the PushPull tool, and then chose the surface using the PP tool's cursor. This also automatically registered a point (where you clicked,) on the face's plane, as the "base point of displacement."
But now, with pre-pick PushPull (which must NOT be disabled in Preferences > Drawing > Miscellaneous,) you can select a single face, (with the SelectionTool,) BEFORE chosing the PushPullTool,... and now you can choose ANY base point and ANY end point, for the displacement, ANYWHERE in the model. The points no longer need to be on the face's start and end planes, nor even within the face's bounds.
So, say that you already had a 3D shape, "shape1". And you drew a new profile for "shape2" that is somewhere else in the model outside the bounds of "shape1", but you wanted "shape2" to be the same height as "shape1."
You use pre-pick PushPull:
1) SelectionTool. Select the face of the "shape2" profile.
2) Choose the PushPull tool. (Note the difference in the statusbar help text.)
3) Choose a base point of displacement, at the bottom of "shape1."
4) Choose an end point of displacement, at the top of "shape1."Eureka! "shape2" is pulled up to the same height as "shape1."
In versions < 8, you either had to draw Clines, or measure the height of "shape1" first, and then manually enter that value into the VCB.
-
Tig you lost me at
@unknownuser said:Fenced_Selection+Move
. Otherwise it makes sense. -
I guess I have been pre picking pushpull all along, even in v7. I have a box "s" and box "z" in a model I want box "z" the same height as box "s", click on box "s" face and pull it even with "box "z".
Why "z" and "s" don't ask.. it has been a long day, and that's what I typed. :} -
@tspco said:
Tig <lost?> me at
@unknownuser said:Fenced_Selection+Move
. Otherwise it makes sense.
There are several ways of selecting objects - as well as simply clicking on an object to select it you can make a selection using a [dotted] fence, by click+dragging the cursor and then a 2nd-click - depending on whether it's left>right or right>left it'll select everything wholly inside the fence, or in the other direction anything that's inside the fence, even if just partially - this is a typical CAD-selection 'trick' which makes it easy to select what you want. Also remember that you can adjust any existing selection thus - use Select +Ctrl to add newly selected object[s] to the selection, +Shift to add newly selected [unselected] object to the selection OR if they are already selected to remove them from the selection, or +Shift+Ctrl to remove newly selected objects from the existing selection. Also remember that a click on a face selects it, a double-click selects it and its edges, and treble-click selects it and any other geometry connected to it...So to move the face[s] of an object like your plaque adjust your view so you see it 'side on', then use a left>right selection fence to select the required edges and faces, connected edges cut by the fence but not wholly within the fence are not included in the selection. Then you can use the Move tool [constrained with say an 'axial lock' to keep it moved in a desired direction...] to relocate the selection by a distance you type in, or by snapping to an existing object or guide so it lines up...
On your PushPull question you can type in an exact +ve/-ve dimension to use OR pick on any other object to align to, AND the next PushPull will remember the last used value... so if you have several faces to realign to the same plane then you only need to adjust one as described, then still in the tool [or even later in the session assuming you haven't made any more PushPulls!] you can simply double-click on the other faces to reuse that value and PushPull those to match 'automatically'.
-
Ok Tig I have been that all along also, I didn't know what it was called

-
I like Tig's approach, fast and easy, now if someone could come up with plugin to center text on a face automatically...Here is what I mean, you have a box, you make a text and place it on the face of your box. Right click context "center (object)" X,Y,Z select center "X", and/or center "Y", and/or center "Z".
Much like making a "fence selection" in a presentation program over all the items. Then select left, right, or center, vertically, or horizontally or both in multiple steps. Inkscape call this function "Align and distribute objects".
There is something to keep the RBGs (ruby script gurus)busy for a few minutes. -
Yea.. the actual point for "Center" aligned text is really bottom center.
You can use inferencing to place the bottom center of the text, at the center of the face, then move it half the text's height, in the correct direction.
A "Move Text by Center" tool would likely use the text object's
bounds.center, SU's inferencing can find the dual midpoint of 2 sides of your panel, if you hold down the SHIFT key after the first midpoint inference pops up. -
@tspco said:
I guess I have been pre picking pushpull all along, even in v7. I have a box "s" and box "z" in a model I want box "z" the same height as box "s", click on box "s" face and pull it even with "box "z".
No.. that is post-pick PushPull.
And yes TIG's tidbits are terrific.
-
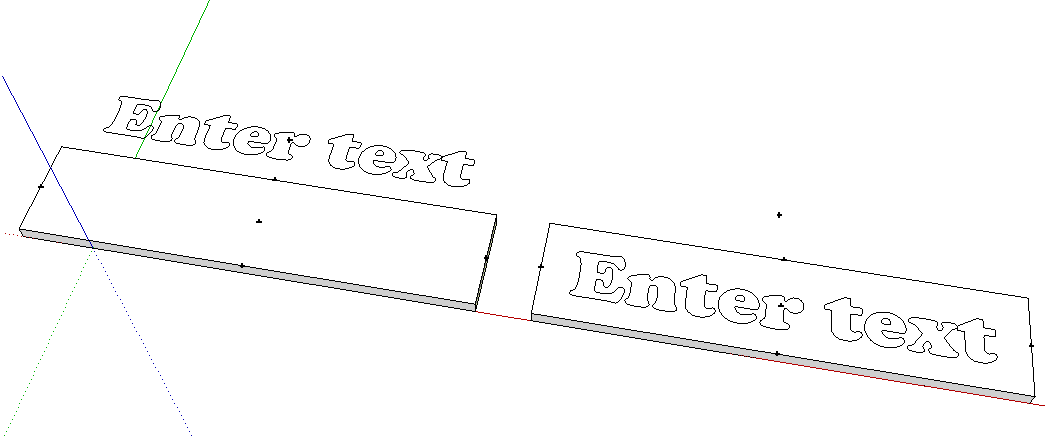
Ok Dan I tried this as I understand it, I used the pencil tool as a center finder.
The panel is no problem, the problem is the text object. I grabbed a random serif font, didn't change the text so it reads ENTER TEXT. I picked up component center inference dots. No dots on the "E" characters, and I picked up the center of the"T" characters two centers on the "N, R, and X" one on each "foot".
What I have done in the past to center a text component on a face, is place the component at "eyeball center". Then using the tape measure tool, move in from both sides from the edge of the panel to the widest part of the first, and last letter. Then subtract the smaller measurement from the larger, divide the result by two then move the text in the correct direction, that amount. Well, this technique doesn't work 100% of the time sometimes I need to repeat the procedure. That is an operator error thing. Not working for me right now. -
@tspco said:
Ok Dan I tried this as I understand it, I used the pencil tool as a center finder.
The panel is no problem, the problem is the text object. I grabbed a random serif font, didn't change the text so it reads ENTER TEXT. I picked up component center inference dots. No dots on the "E" characters, and I picked up the center of the"T" characters two centers on the "N, R, and X" one on each "foot".
What I have done in the past to center a text component on a face, is place the component at "eyeball center". Then using the tape measure tool, move in from both sides from the edge of the panel to the widest part of the first, and last letter. Then subtract the smaller measurement from the larger, divide the result by two then move the text in the correct direction, that amount. Well, this technique doesn't work 100% of the time sometimes I need to repeat the procedure. That is an operator error thing. Not working for me right now.A different thought that does not limit you to the SU 3d text. Using a candidate jgp and jpg photo editor like GIMP to edge detect then use WinTopo to convert to a vector file vs raster. You can then open this with SU( probably have to go through CAD first because WinTopo can not export to SU ) and use push pull etc to create the desired sign. Very complex graphics gets problematic.
-
Or use a PNG with a transparent background.
Add it as an Image.
Use my ImageTrimmer to make it a cutout.
Simplify the edges to avoid too much 'pixelation' steppiness.
Explode it to merge with the 'block' geometry... -
To center the text you could also use TIG's CenterPointAll on both the surface where the text will go as well as the text. Then just grab the center point on the text and move it to the center of the face. I would imagine the center of the text's bounding box might not always be the real center of the text, though.


Advertisement